shojtsy
-
Posts
194 -
Joined
-
Last visited
Everything posted by shojtsy
-
Add support for Mask to Below in Macros
shojtsy replied to shojtsy's topic in Older Feedback & Suggestion Posts
Is there maybe a workaround for this? -
Blend mode on layer group
shojtsy replied to shojtsy's topic in Pre-V2 Archive of Desktop Questions (macOS and Windows)
My experience is that clicking on the picker sets the brush color to what the picker memory stores. Picker memory is what you have last picked, and is application-wide, so it is transferred between documents, and is not saved inside your afphoto files. -
Blend mode on layer group
shojtsy replied to shojtsy's topic in Pre-V2 Archive of Desktop Questions (macOS and Windows)
Groups of adjustment layers only (no live filters) work like this for me as well. Live filters in a group do not blend like this because they are buggy. Live filters outside group do blend like this. Do you have examples where blending works differently for a group of adjustment layers only? -
Blend mode on layer group
shojtsy replied to shojtsy's topic in Pre-V2 Archive of Desktop Questions (macOS and Windows)
I had another one here https://forum.affinity.serif.com/index.php?/topic/48650-adding-pixel-layer-w-blend-mode-to-grouped-layers-messes-up-visibility/&do=findComment&comment=243403 I think it is a simplified description that a layer group ignores background for its own calculation when it contains a pixel layer. When your layer group contains adjustment layers below the pixel layer, those adjustments can only be applied on the background, because there is nothing else they can act on. Also if you have a pixel layer in a layer group and the pixel layer itself has a blend mode other than Normal, it needs the background first to calculate the image contributed by the layer group, and then uses the background again to blend the layer group with it using the blend mode of the layer group. You can experiment with this by having a layer group with Darker Color blend mode and put into it a pixel layer which itself has a Color mode for example. The resulting blend math can only be explained by the pixel layer inside the group also being blended onto the background before the layer group is blended again with the background. -
Blend mode on layer group
shojtsy replied to shojtsy's topic in Pre-V2 Archive of Desktop Questions (macOS and Windows)
Now that we have established this rendering bug, please go back to post #1 in this thread, where the same thing is happening. Do you now agree that the two layer setups are supposed to produce the same result? Because they do after adding the empty layer trick. -
Blend mode on layer group
shojtsy replied to shojtsy's topic in Pre-V2 Archive of Desktop Questions (macOS and Windows)
What I have meant is that the very bright image (rendering bug) is not immediately displayed after deleting the pixel layer. The reason for that I suppose is that the image area is not refreshed because there is probably some optimization in the application to avoid rendering when a change is done which is assumed to be irrelevant. And deleting a disabled layer should be an irrelevant change for the purpose of rendering. -
Blend mode on layer group
shojtsy replied to shojtsy's topic in Pre-V2 Archive of Desktop Questions (macOS and Windows)
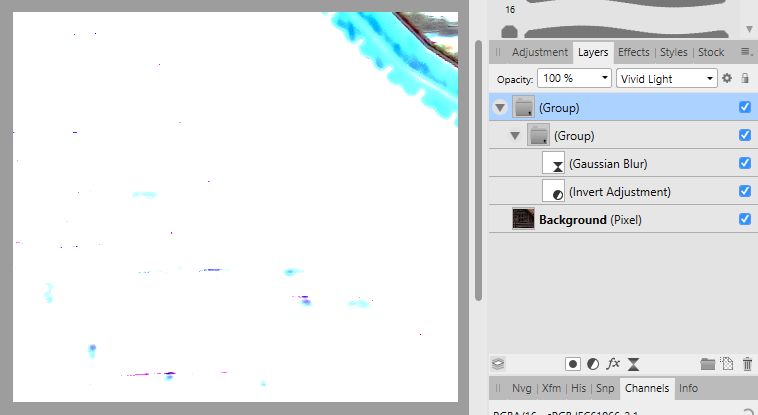
Some caching occurs, which might be reasonable feature given that deleting disabled layers should not change the result. Try to force a redraw after deleting the pixel layer, by disabling the layer group and then re-enabling it. See the screenshots here
-
Blend mode on layer group
shojtsy replied to shojtsy's topic in Pre-V2 Archive of Desktop Questions (macOS and Windows)
Please see affinity file attached. Experiment with deleting the empty and anyway disabled pixel layer. How do you explain the major change in the image resulting from deleting an empty and disabled pixel layer? layer_group_blending_workaround3.afphoto -
Blend mode on layer group
shojtsy replied to shojtsy's topic in Pre-V2 Archive of Desktop Questions (macOS and Windows)
I came to the same conclusion of this being a bug, and my original setup should just work. We have discussed another workaround on this thread of using the adjustment and live filter layers as not child layers of the layer group but clipping masks. This fixes the blending math, but hits another bug of grid pattern in the render output if any live filters are in the clipping mask position. However your workaround does produce the correct result, thank you very much! I was not yet able to file a bug report because it seems particularly difficult to explain the problem in a way that people understand it (see this thread). But your workaround will also serve as a good way to do that. Just delete the empty and disabled pixel layer. Nothing should change, right? Yet, it does change, revealing the bogus behavior. -
AP: Extreme denoising/sharpening
shojtsy replied to dmstraker's topic in Tutorials (Staff and Customer Created Tutorials)
As comparison here is the result with free Nik DFine And with Neat Image 7.6 Demo And Neat Image 8 Demo, with amazing quality
-
Reflect Blend Mode
shojtsy replied to Scott Williams's topic in Pre-V2 Archive of Desktop Questions (macOS and Windows)
For the photoshop ones yes. For example this is quite good http://photoblogstop.com/photoshop/photoshop-blend-modes-explained (but still not explain how Fill Opacity is used in the blending formula) However for the Serif - introduced blend modes, they won't be found in these sites. Edit: Your links lead me to this site which document the blend mode formulas of Pegtop, among them Reflect and Glow. http://www.pegtop.net/delphi/articles/blendmodes/quadratic.htm I have tested that they match the behavior of Affinity. -
Reflect Blend Mode
shojtsy replied to Scott Williams's topic in Pre-V2 Archive of Desktop Questions (macOS and Windows)
So Average and 50% Normal behaves differently in the presence of transparency. Good find. This seems to justify it's existence. I would go as far that the documentation for blend modes should include this information. Thanks, I have read this earlier. But it doesn't help much to me, it is confusing and I was thinking about something more concrete. "Darkens the image using values from composite layer" can be told about a half a dozen blend modes. How this differs from them? Also "in Negation ... pixel values are simply added together" sounds exactly like a description of the Add blend mode instead. "flips the layer order, so it brightens the image using values from the composite layer" is also confusing, why would layer order change automatically lead to brightening independent of layer content? Is the reason for Serif not publishing the actual blending formulas that these are some trade secrets? -
Reflect Blend Mode
shojtsy replied to Scott Williams's topic in Pre-V2 Archive of Desktop Questions (macOS and Windows)
I am also interested in a technical description of the formulas used in the blend modes, especially the ones introduced by Affinity. For example is Average same as Normal with 50% opacity? If yes, why would one need that blend mode? -
Selective opacity
shojtsy replied to shojtsy's topic in Pre-V2 Archive of Desktop Questions (macOS and Windows)
Layer blend ranges only take into account the absolute values of current layer or underlying layer. I don't want to make it transparent where it is dark, but where it is darker than the underlying. -
Hi, I am looking for a way to control the opacity of lightening and darkening effect of blending a layer separately. Such as 10% opacity for darkening and 65% opacity for lightening. What I am NOT looking for - duplication of the layer and have the two layers blend with different blend modes. The problem is that the top layer would then be applied on the result of blending the lower layer, changing the final result. Another problem is that changes to one instance of the layer would need to be manually propagated to the duplicate. - blending based on the absolute luminosity of the current layer, or absolute luminosity of the lower layer. It is their relative luminosity which is important instead. One of the things this would enable is selective control of the opacity of the dark and light halos you get with Unsharp mask live filter. Thanks
-
How can one group multiple layers in a Macro? I can record a Group operation, but what is the envisioned usage of that if I am unable to have more than one layer selected before it. Also doesn't seem possible to record moving a layer into a group.
-
Hi, In the right-click context menu on layers there is a Mask to Below which doesn't seem to be accessible from the main menu. Since the right-click menu is disabled while recording Macros, it means that this function can not be recorded in Macros, however It would be really useful. Please add a way to run this command during Macro recording and have it recorded. As a separate request please make it possible to assign a hotkey to the "Mask to Below" function.
-
I think the edges are too dark in the above examples. I got better results by Ctrl-I for Invert, then Filter->Colours->Erase White Paper, then Invert again. Gets the edges more transparent and less dark.
-
Dodge and Burn on Masks
shojtsy replied to Jim Hardiman's topic in Older Feedback & Suggestion Posts
You might be interested in a trick I have posted -
HSL Performance
shojtsy replied to Sullyman's topic in Pre-V2 Archive of Desktop Questions (macOS and Windows)
Unfortunately this means that the effect you can get in Photoshop with a dynamically applied filter, can only be achieved in Affinity with a baked-in mask, which does not dynamically respond to changes of the underlying layers colors. -
I would like to make adjustments on the selection, such as: 1) Make all partially selected pixels fully selected 2) Make all partially selected pixels not selected 3) "Unfeather" selection. For pixels more than 50% selected, make them fully selected, for pixels less than 50% selected, make them not selected. 4) Dim selection, for example everything that is X % selected, make it X/2 % selected All of this would be achievable if something like a Curves adjustment would be supported on the selection values themselves. I think the Edit Selection As Layer (also known as Quick Mask) mode would be a good place to add support for something like this. If you are editing the selection as a layer, it would be logical to be able to merge in adjustments into the selection layer. Something similar to 1) and 2) is achievable in Select -> Refine Edges -> Ramp. However the leftmost and rightmost position of the slider doesn't go far enough and still leave partially selected pixels. I understand that there is a workaround of creating a new pixel layer, filling the selected pixels, applying adjustments, select by luminosity and remove the temporary pixel layer. However this is pretty convoluted, which is the reason for Edit Selection as Layer to exist in the first place.
-
Inpaint selection from Current and Below
shojtsy replied to shojtsy's topic in Older Feedback & Suggestion Posts
Brushing works, however I build my complex selection based on luminocity of the dark wires, hence the request. This is what I was forced to do. However there are limitations of this workaround: 1) Convoluted. You need to save selection to spare channel, Deselect, Merge Visible, Load selection from Spare Channel, Inpaint, Mask, Merge Mask, Delete Spare Channel. 2) The process is not suitable for putting into a generic macro to automate it. This is caused by limited support for Spare Channel operations in macros. If you put all of the steps mentioned in 1) into a macro, you will notice that the Spare Channel Delete operation in the Macro targets incorrect Spare Channel. If you already have one or more Spare Channels before running the macro, your pre-existing Spare Channel will be deleted by the macro instead of the newly created, and the newly created is left over. 3) The process does not reproduce exactly what would happen with Inpaint on the new layer sampling from Current and Below. The difference occurs in the partially transparent pixels of the selection. When you inpaint on a merged layer the inpaint colors gets blended with the preexisting pixels on the partially selected pixels. If you make a masked copy of the inpainted area and add this above the original, the original colors get blended in twice into the pixels which were partially selected, as they are also already blended in into your new inpaint layer. I don't see a way to recover from a merged layer what should have been the inpaint layer to reproduce exactly the merged result. -
Inpaint selection from Current and Below
shojtsy posted a topic in Older Feedback & Suggestion Posts
Hi, I have a selection of electric wires which I would like to inpaint on a sky, ideally with inpainting being on a separate layer. However when I choose Edit/Inpaint or Edit/Fill/Inpaint it always samples from the current layer only, which is the empty layer I would like the inpainting to be on. I would like to do Inpaint of a selection with sampling from Current and Below. Adding an option to the Edit/Fill dialog would solve this issue. -
Add Cancel button for Brush Edit dialog
shojtsy replied to shojtsy's topic in Older Feedback & Suggestion Posts
Thanks, that helps. However I think that pair of Commit / Cancel buttons would be more intuitive, and avoid accidentally committing non-undoable changes to brushes. -
Hi, When one opens the brush edit dialog for an existing brush and touch some sliders for experimentation, the changes are auto-saved and there isn't a Cancel or even an Undo for them. How do you recover you original settings for the brush? Please add Cancel button to the Brush Edit dialog to throw away changes, and also make it possible to Undo it after committing the changes.