David Cantor
-
Posts
21 -
Joined
-
Last visited
Everything posted by David Cantor
-
Hmmm. I tried this in Affinity 2 but cannot check the Show AF Regions. Does this mean that DNG files behave differently to RAW files? My camera is a Leica CL Hope that this makes it through despite the age of the thread
-
Hi Dan, many thanks for your perseverance with my issue. I see where the problem arises because I assumed that because the document was created as CMYK, everything would be CMYK. I didn't notice the RGB box above the sliders when making most of the text 85% black and elsewhere 65%. Same applies to the images. I think that I have got my head around this Regards David
-
Thank you for your assistance, I’m going to follow your advice and see how it goes. In the meantime, the printers telephoned me to say that they have fixed the problem, at the moment I do not know how they did it. I need to avoid the problem in the future. I should have my print proof in two days. Thanks again and good luck with your own publication. David
-
Mr Jack, delighted that you solved your problem with the help of the good people on this forum, it sounds very similar to the one that I have. To be honest, I'm not that good at this tech stuff and I'm struggling, my brain and eyes are tired from looking at tutorials. Can you or anyone else give me an idiot's guide to creating and setting Global Colour? Thanks David
-
Dan I just re-uploaded the af file version 2 which is correct as far as methodology is concerned. I place a PDF in the earlier version rather than a JPG. David
-
Hi Dan I just uploaded two abbreviated files using the same process including Export parameters as my book project. In case it helps, the text page has been copied and pasted from Word. The image starts life as a JPG from Affinity Photo and imported into Publisher, I have then relied on the Export process to convert it to CMYK. My head is hurting! Your advice is very much appreciated. Part of the issue is that I do not think the print company is familiar with Publisher, I told them in advance the export parameters that I proposed using but that didn't help David
-
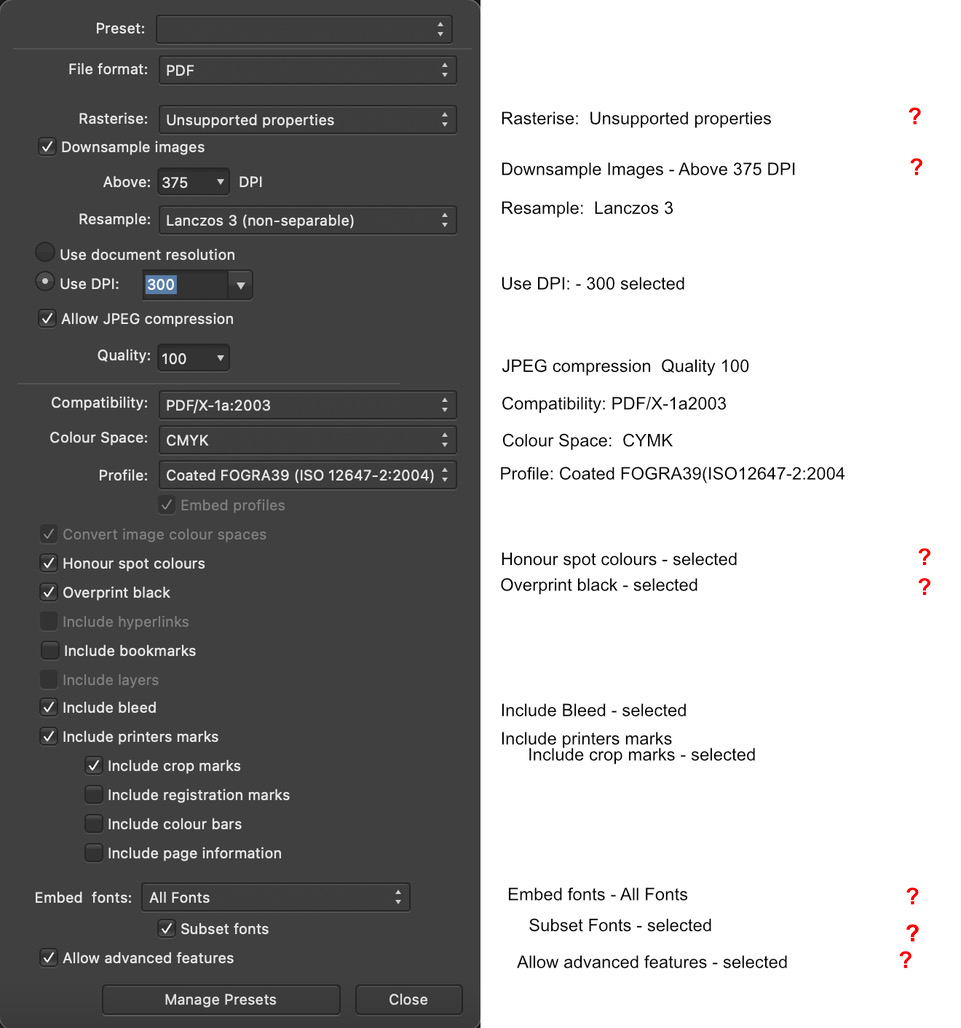
The files for my first attempt at self-publishing are with the printer for creating a printed proof of my photo book. Today, I received the following message. "At present it is Rich Black please can you convert to black and we are good to go!" I assume that that this is InDesign terminology and am unable to resolve today due to unavailability of staff at the printer. I'd like to prepare my files over the weekend ready for getting a print done on Monday. I assume that 'Overprint Black' option in Publisher Export options should be unchecked but am uncertain. Perhaps what I need to change is in Preferences? Before I export all the pages again (separately) according to the printer), I'd welcome advice. I have attached the Export parameter used, I'm in the UK Thanks David

-
I have two images open on my Mac. The Separated Mode is greyed out. Assistance required - Thanks
-
Affinity Photo for MacOS - 1.7.0
David Cantor replied to Patrick Connor's topic in News and Information
Is it just me? I upgraded yesterday to 1.7 and find that certain tasks such as Selection Refinement are taking significantly longer than previously. Difficult to judge accurately but I'd say three or four times slower. I run a 2-year old iMac with the latest OS. -
I found the previous thread here https://forum.affinity.serif.com/index.php?/topic/36846-profile-srgb-iec61966-21/?hl=srgb David
-
I know this has been covered before but I just cannot retrieve/find the thread. I am trying to enter a cub competition that requires images with the sRGBIEC61966-2.1 colour profile, so I convert the ICC profile in Affinity. On submitting my entries, they have a prefix as in enUSsRGBIEC61966-2. Is there a way to overcome this, I"m using a Mac. Thanks David
-
Hi MBd Many thanks. David
-
Hi Harry I have used Pro Am Imaging in Bradford for years. The prices are great, I pay about £1 for a 14" x 12" print. The quality is excellent, the packaging is robust (never had a problem) and if they think there is a problem with your work, they always telephone to check before printing. Basically, one has to resize the image and CONVERT the ICC profile to match their printer which is a Fuji. Download their profile Can recommend them without reservation. Thanks for getting in touch. David
-
HI MBd Sorry to hijack this thread but earlier this month I posted the following question. I've been using the same print lab for years, part of the image prep is to change the the image profile out of the camera to their printer colour profile, usually the last adjustment. Using Affinity Photo as compared to PS, there is a significant brightness gain and loss of vibrance. I'd rather rather not make adjustments to regain the look prior to changing the profile as what ever I do doesn't seem to recreate the original appearance. Any help/advice appreciated. Is the answer contained in your post on this subject dated 14 January? I have been using the Assign ICC Profile command and if I understand correctly, Convert ICC profile would be the better option? Thanks in advance David
-
Bump! Anyone out there who may know the answer to this? Thanks David
-
I've been using the same print lab for years, part of the image prep is to convert the image to their printer colour profile, usually the last adjustment. Using Affinity Photo as compared to PS, there is a significant brightness gain and loss of vibrance. I'd rather rather not make adjustments to regain the look prior to changing the profile as what ever I do doesn't seem to recreate the original appearance. Any help/advice appreciated. Thanks David
-
Thank you. That works David
-
Hi MEB Thanks for the reply. I didn't even get my question correct. The pixel size is 4640 x 3472 not as stated. So, 13.257" x 350 = 4640. However, I shoot in Raw on my Olympus - ORF format. If I resize and Save as xxxx.afphoto, the revised copy adjusts to the required size. So far so good. Then if I export the xxxx.afphoto file as a jpeg which is what the photo lab needs, the jpeg opens up with the dimensions of the original RAW file. How bizarre is that? I am confused by my confusion. I am working on a Mac since only a month ago and still adapting but would describe myself as a pretty competent Windows/Photoshop user. I am considering alcohol as a solution Regards David
-
I'm sure this has been covered before but try as I might, I am finding it difficult to resize image files - I think it's called being thick. Typically, the image out of the camera has: 1. DPI 350. Pixel size = 4,550 x 3,405 2. Measurement = 13.257 inches x 9.92 inches All I want to do is 1. Change the DPI to 402 (resolution required by the print lab I use (Pro Am Imaging in Bradford - ace outfit) 2. Change the measurement to 13.0 inches on the long side - my preferred print size. I understand that the short side will change automatically. I have been doing this for years in Photoshop without any problems. In AP however, I change the size of both the DPI and the measurement with various resample button options checked and unchecked. The file is saved, closed and reopened only to find the original size is present. Would some kind soul please give me an idiot's step by step guide with proper keyboard sequence to achieve want I need with the best quality for printing? Thanks in advance. David
-
Profiles
David Cantor replied to David Cantor's topic in Pre-V2 Archive of Affinity on Desktop Questions (macOS and Windows)
Thank you Lee -
Hi There I'm on the Affinity Trial Period and liking what I see. My question relates to Profiles In the File 'sub-list', we have Import ICC Profile In the Document 'sub list', we have Convert ICC Profile and assign ICC Profile Can anyone explain what the difference is in these three options or point me in the right direction? Thanks David