

Martigny
-
Posts
236 -
Joined
-
Last visited
Posts posted by Martigny
-
-
19 minutes ago, walt.farrell said:
But even with more visible icons, how would you distinguish between a Group and something else with child layers?
I think that's what the question is about.
That's exactly what I mean Walt. Thank you. I had a big file I was working on today. In the end I had to copy the groups etc and paste them into AD 1 again. Now I can work on them easily.
Affinity? What were you thinking of?
-
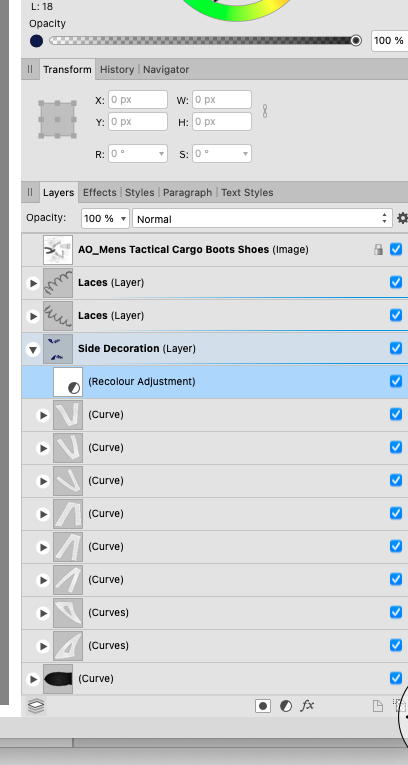
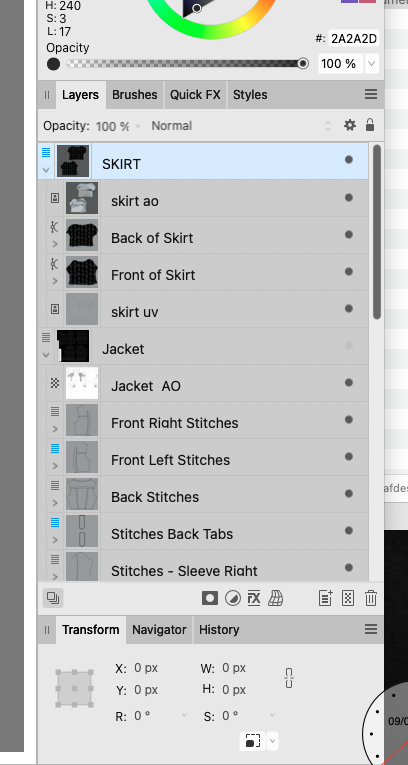
Recently updated to Affinity Designer 2 and I love it except for one thing. It's very difficult to identify groups now and groups within groups now (which I have a lot of). This was so clear in Affinity Design 1. Could groups not be made bolder making them easier to identify? Have pasted 2 images to show the difference between the two.

-
Okay thanks Garry. I got it now
")
-
2 minutes ago, GarryP said:
Are you able to give a link to the official documentation or attach an image to your post so people can see what you mean, rather than them having to follow a link to an external website they might not know/trust?
Sure .. edited and Image attached
-
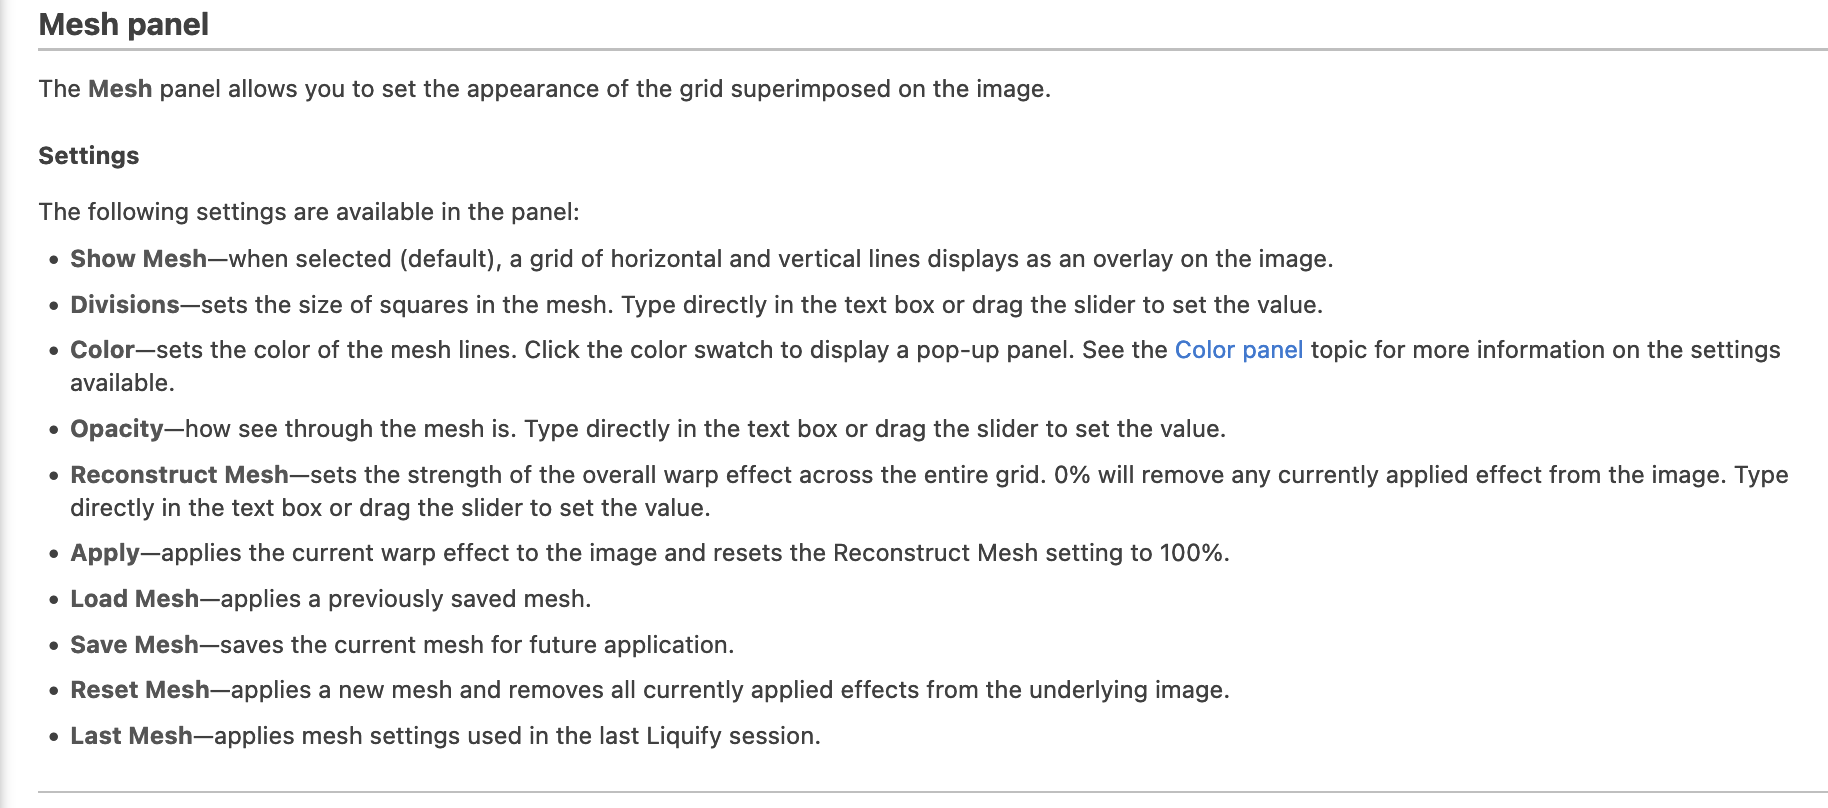
Confused here. Affinity help shows this.
Where is this mesh panel?
Anyone know?
Thank you

-
22 minutes ago, walt.farrell said:
You can do it by adjusting the height of your window, and your zoom level, so only one page at a time fits in the workspace. But other than that, no.
Thanks Walt. unfortunately that won't work for me at all. My documents are usually 17.25in x 8.75in and I'd lose most of the page. Perhaps this is something Affinity could add to Publisher. I'm sure I'm not the only one who would like to see one spread at a time.
-
12 minutes ago, A_B_C said:
Currently, the only way to achieve this is to export to PDF (or any other format) and use an external media viewer.
Thanks for your reply, but I was referring to when I'm working on the document.
-
After a few days of using Publisher beta I'm finding some things a little frustrating. One main thing is that I'm unable to view a single page without the previous and next pages showing above and below it - see attached file. Is there any way to do this?
-
2 hours ago, Jon P said:
If you want it to auto update you can enable "Automatically update linked resources when modified externally" in Preferences > General - If you don't enable this we will used the image as it was inserted, but the Resource Manager will show it as modified indicating the source no longer matches what we have in the document
Thank you Jon. That's a big help to me.
-
1 hour ago, Matthias said:
My guess:
Either Publisher beta ignores image linking and embedds them anyway (the size of your publisher document would be a tell) or the pictures are somehow twice on your hard drive.
Thanks for your response. The images are only on my hard drive in one place.
I have since discovered that I can update the images through the resource manager - however, I would have expected this to be an automatic process when a file is linked.
I would still like to know why there is a cache of images that are no longer in my files.
-
Point 1. I decided to try to put a pdf together in AP Beta. I successfully created a pdf. The following day I accidentally deleted it, which was not really a big deal as I needed to update many of the images (.jpg). I was surprised that when I created a brand new pdf with the updated images, Publisher placed the old images! How is this possible?
Point 2. Also, I can see no way to 'refresh' images.
Point 3. All my images are linked, but do not update.
-
On 1/5/2020 at 8:25 AM, carl123 said:
You probably need something like the Mesh Warp tool in APhoto to do that (see attached quickie example)
But it's probably doable in Designer if you painstakingly manipulate each letter (curve) one by one.
Unfortunately the APhoto method converts my vectors to pixels and I don't want that. My option is now to 'painstakingly manipulate each letter'
-
16 minutes ago, carl123 said:
You probably need something like the Mesh Warp tool in APhoto to do that (see attached quickie example)
But it's probably doable in Designer if you painstakingly manipulate each letter (curve) one by one.
That looks pretty cool. Thanks Carl ... I'll give it a go.
-
7 hours ago, v_kyr said:
You can for example also use instead of single positioned frametext letters here grafiktext and place it on a copy of the lower curve path, so it follows that path and move that onto your yellow shape. Further you can change font types and then adjust the whole "Dreamer" words character spacing and distance settings to your individual likes.
Thanks for your reply v_kyr. I did actually try that and although it looks better it's not quite the result I want. I would ideally like the text to 'mould to the shape', if you know what I mean.
-
Hi,
Does anyone have any idea how to fit text to a banner so that it looks nicer than the example I've attached? I need it to fit between the red lines.
-
-
Grrr ... just discovered this problem after thinking that the AD file would be saved with the changes I made in Publisher
-
17 hours ago, Patrick Connor said:
We have made fixes/improvements to this area (Cannot drag objects into Assets) of the program in the latest Windows customer beta of Affinity Photo and/or Affinity Designer. If you would like to try these changes the beta software is available in the forum posts listed below.
The 1.8.0.526 beta builds are in links at the top of these beta forum posts.
Once these programs have been through a full beta process the change will be released in a future free 1.8.0 update/patch to all customers.
Thanks for the information Patrick - this is good to know. Unfortunately, I don't have time to test this beta at the moment as I'm busy illustrating a book and can't risk losing anything. I look forward to 1.8.0 being released.
-
20 minutes ago, Gear maker said:
Martigny, likewise I do the same for tracing a lot of items and have never run into this. I don't see any cause for this in the drawing but I do see the transparency issue. I tried creating other shapes in your drawing using the same technique and they came out fine. I also found that doing a Paste Style from one of these layers caused the new layer to have the same issue. I did find that doing a Paste Style from a non-affected layer to the affected layer fixed the issue. Easier than redrawing maybe. Sorry maybe someone else will have better luck.
Thanks for looking at the problem Gear maker - and for your reply.
-
-
Hi all,
The attached file shows a recurring problem, which is:
I was tracing over an image and so set the opacity low so that I could see what I was tracing over. When I had finished, I removed the opacity on the slider so that it was 100%, but nothing happened, the opacity remained.
Copying and pasting to the same and a new document did not work, neither did opening it on another machine - both Windows and Mac.
There is no gradient or transparency set, all opacity sliders are set to 100% and no matter what colour I select, going from transparent to deepest black, the opacity remains.
The only solution was to retrace at 100%, which I did.
Any ideas?
-
-
-
1 hour ago, firstdefence said:
Personally it's a given that guides have the ability to be colour changed. The only other option for you at the moment would be to make a layer and draw thin 0.1pt - 0.2pt curves and lock it, the advantage for this is angled pseudo guides.
That's what I have to do. Silly to have to do so though


Difficult to Identify Groups in Layers in Affinity 2
in Affinity on Desktop Questions (macOS and Windows)
Posted
Thank you RCR ... This is more than my question was about. Thank you for your response though