Daniel Geiger
-
Posts
72 -
Joined
-
Last visited
Everything posted by Daniel Geiger
-
AP has always opened files in the merge all windows mode. For some reason, it switched default to separated mode. How can I make "merge all windows" the default opening condition again?
-
Same inpainting problem, same re-launch solution. AP 1.6.6 Maybe worth suggesting that first.
-
File Format Specification
Daniel Geiger replied to ptc's topic in Pre-V2 Archive of Desktop Questions (macOS and Windows)
Another vote for file format transparency. I also work in QuarkXPress, and now I have to maintain two versions of each image, a layered .afphoto, and a placable .tif. Really annoying if you try to fine tune images as they look in the context of a larger document. While speed improvements may be important for some large files, for many users the trade-off is rather tilted towards compatibility. Alternatively, have the option of saving AP files in .psd format by default. -
Sorry, did not see this reply. Z-stacking: you move the camera set-up but leave focus unchanged. This is the option of choice for macro, because you change magnification while changing focus. Focus stacking: leave camera in place, change focus setting on objective lens. This works better for long distance shots. UV-reflectance: instead of visible light, I use UV light and exclude all visible light with a visual opaque filter. If you look through the Baader U filter, you see nothing, it looks black. Bayer filter/mask: the sensor of a digital camera has color filters over each pixel. In most cases, in a 2x2 array, diagonal 2 are green filtered, one is red, one is blue. So each pixel only sees one color, the rest of the color information is interpolated. There are other options, and there is the Foveon 3 layer chip. But by and large, most digital cameras use a Bayer mask. I hope that helps. This is a bit more photo tech-geekery, and certainly an out-there method. I now follow the thread, do should reply quicker.
-
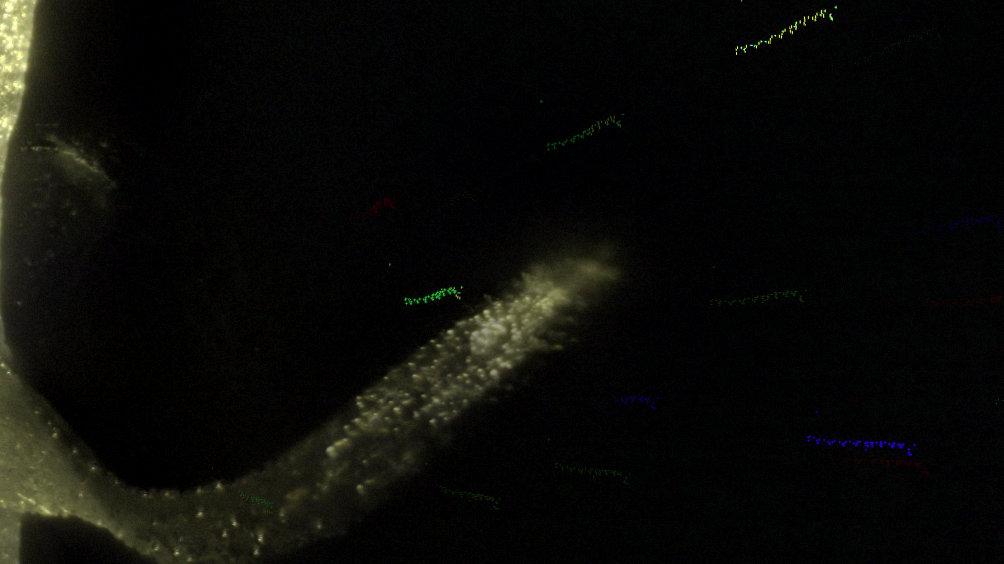
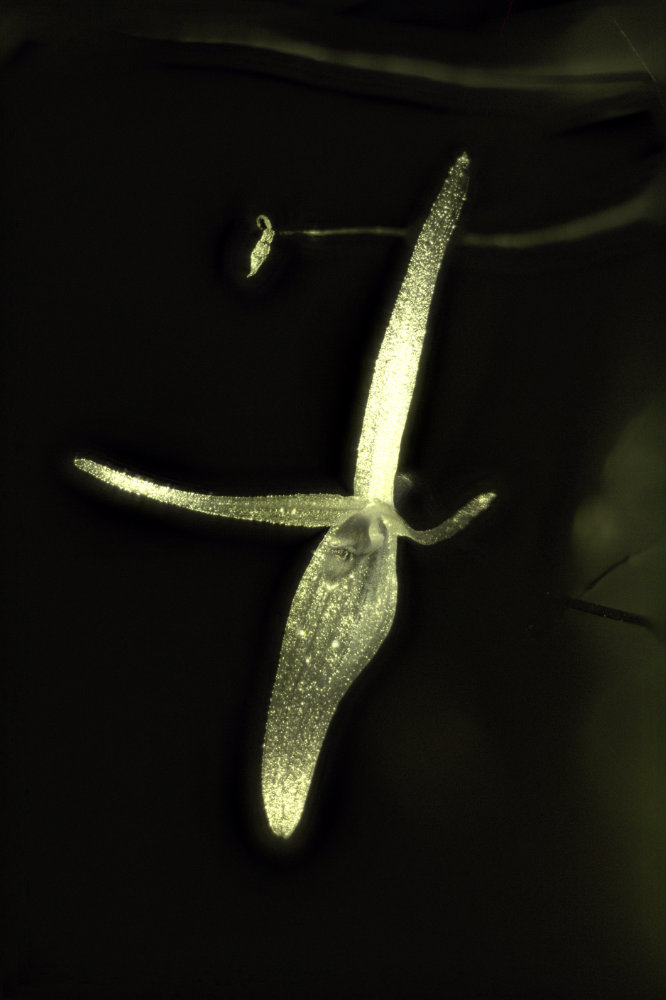
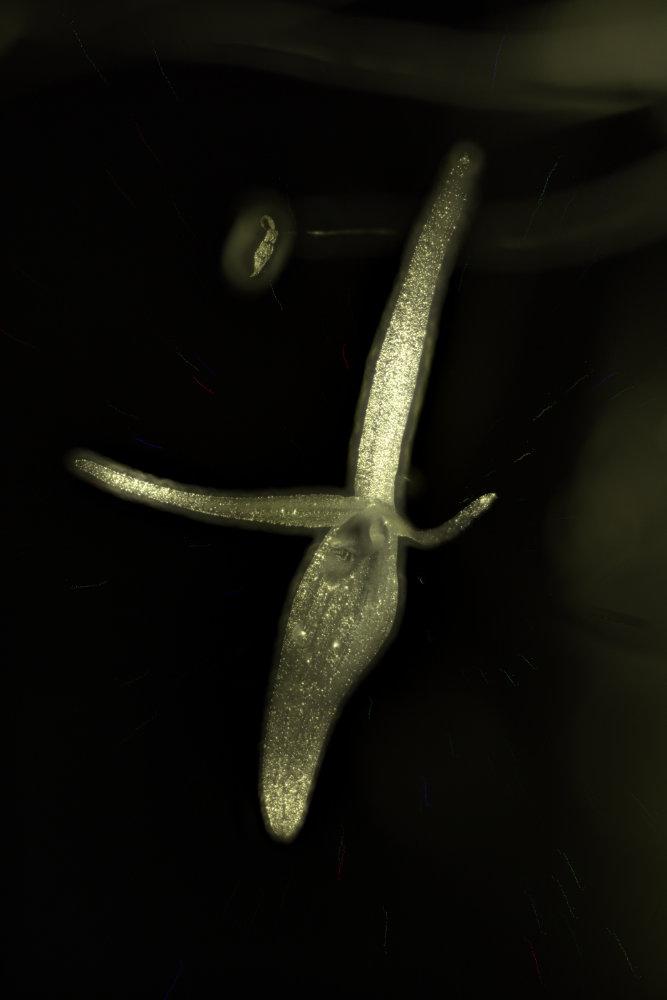
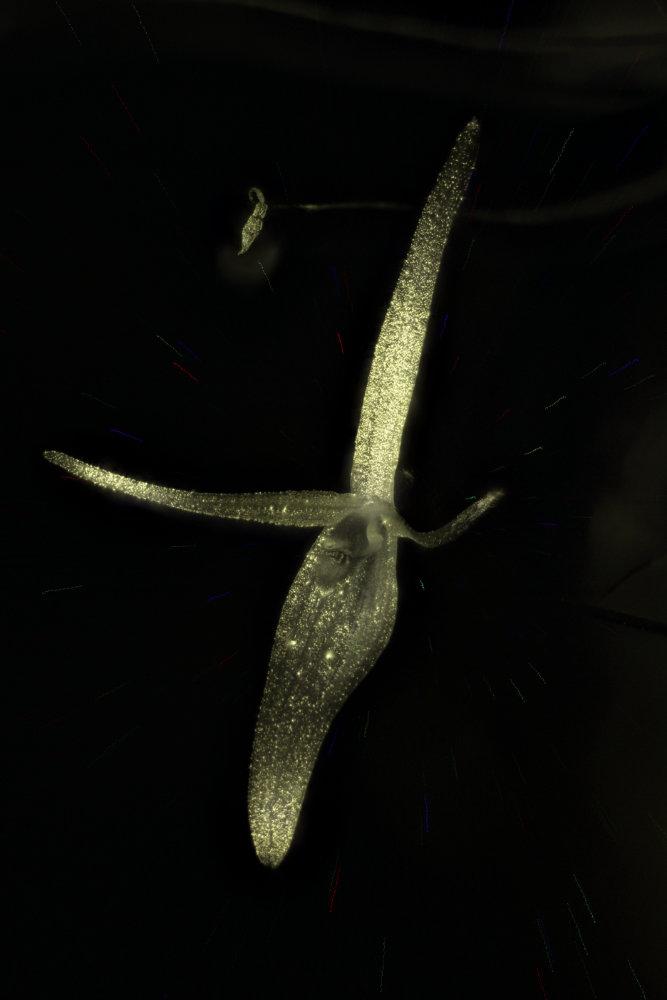
Not sure whether this is feedback or share your work, it's kind of both. I've been playing with UV reflectance z-stacking. Here I focus on the post-processing aspect. One problem is that during camera conversion, some of the Bayer filter elements most likely got damaged. This is no big deal for single captures, but if you stack 50 or more, one gets a lot of "creative" color streaks. Below blow up of those color streaks. That leads to a lot of post-processing after stacking. I thought of doing a dust delete data in the 5D2 body, but that does not work, because during conversion, the dust shaker hardware is removed, and without it, the dust delete data cannot be obtained. But because these color dots are in fixed positions, they can be screened out with a Gaussian blur mask. Do the following in Affinity Photo: - Open a dozen images in AP. - Add a Gaussian Blur live filter on top of the first image. - Add a mask to the Gaussian Blur live filter. Blur of about 2.5 pixels worked well for me, but that depends a lot on your camera and the type of Bayer damage you have. - Fill mask layer only with black. - Paint with a small white brush (4 pixels worked well for me) over any color spots in the mask layer. Do that at 150-300%. You'll spend some quality time at this. Don't bother fix those color spots right at the edge of the frame. The Gaussian Blur from the edge of the image is going to mess it up. - Once done with first image, copy-paste Gaussian blur filter with Mask into next source image. - Check for pesky color spots in second image and refine mask. - Copy-refine for the the rest of the images. Open one of the CR2 source images, develop it. Now start macro recording and paste the final version of the Gaussian Blur live filter with mask on top of the image layer. Stop macro recording and save it as something like "UV prep". The cool thing in AP is, that the live filter with mask is saved in the macro step. So the macro does not paste from computer memory, but the stored filter-mask. That means even if you quit the application, the Blur-Mask is still stored. Super cool. In Open-batch, select the Macro, select your output format (e.g., tif for Zerene), add files, and press OK [Another cool thing in AP, saving/export is not part of macros, but is in the batch dialog. No more infuriating confusions about save functions as in PS]. I am extremely impressed with AP batch processing. All 12 cores on my MacPro desktop go continuously full throttle (100%) for several minutes. I have not seen that with any other application. They really program the batch processing well. I also tried APs focus merge function, and am quite impressed, but Zerene still seems to have the edge. PS is worse than useless for serious macro stacking, so most people use either ZereneStacker or HeliconFocus. I have not found a way to touch up the final stack layer by layer, as you can in ZS or HF. If I stack with the color artifacts still in place, AP has trouble with proper alignment, while Zerene nails it. Last but not least, tone mapping is much better in Zerene than in AP. This could be fixed before feeding the files into AP. One problem with APs tif export is, that Zerene only reads them as B&W file (or single channel?). Feeding the same files into AP gives me a color image. Not sure yet what is going on there Attached four images. - Stacktrail Zerene. Notice the color streaks, but clean edges of flower and good tonality straight out of stacking. - Stacktrails AP. Notice color streaks, and edge of flower is blurry (alignment issue) and image is overexposed. - AP stack: stack of images after batch processing with Gaussian blur mask in AP. Flower edges are clean, but still a bit over exposed. It seems that AP-alignment is misled by color artifacts. - B&W Zerene: Cleaned tifs stacked in Zerene, resulting in B&W image (hmmm ....) The AP cleaned tif can be run back through DxO, and those secondary DxO tifs can be given to Zerene to stack in color. There is something funny going on how either AP encodes .tifs or Zerene reads them. It also seems easier to do RAW conversion in DxO (curves etc). and then feed DxO tifs to AP for color removal. It requires to run hundreds of images three times before stacking, but so be it. Below a vis - UV comparison of another species, with UV run through Zerene. Flowers are about 2 mm tall.

-
I'm blown away by the speed of batch processing! No comparison to PS. All 6 cores/12 kernels are used 100%, which I rarely see in any application. Cudos to a great implementation. But my coffee breaks are gone now. I am also pleased that macro lets me define line and text styles (though no actual lines or actual text), which is a HUGE time saver. That the save function is only available in the batch dialog is also a great plus. The PS action-batch command interactions was very confusing and irritating. Occasionally, less is objectively better.
-
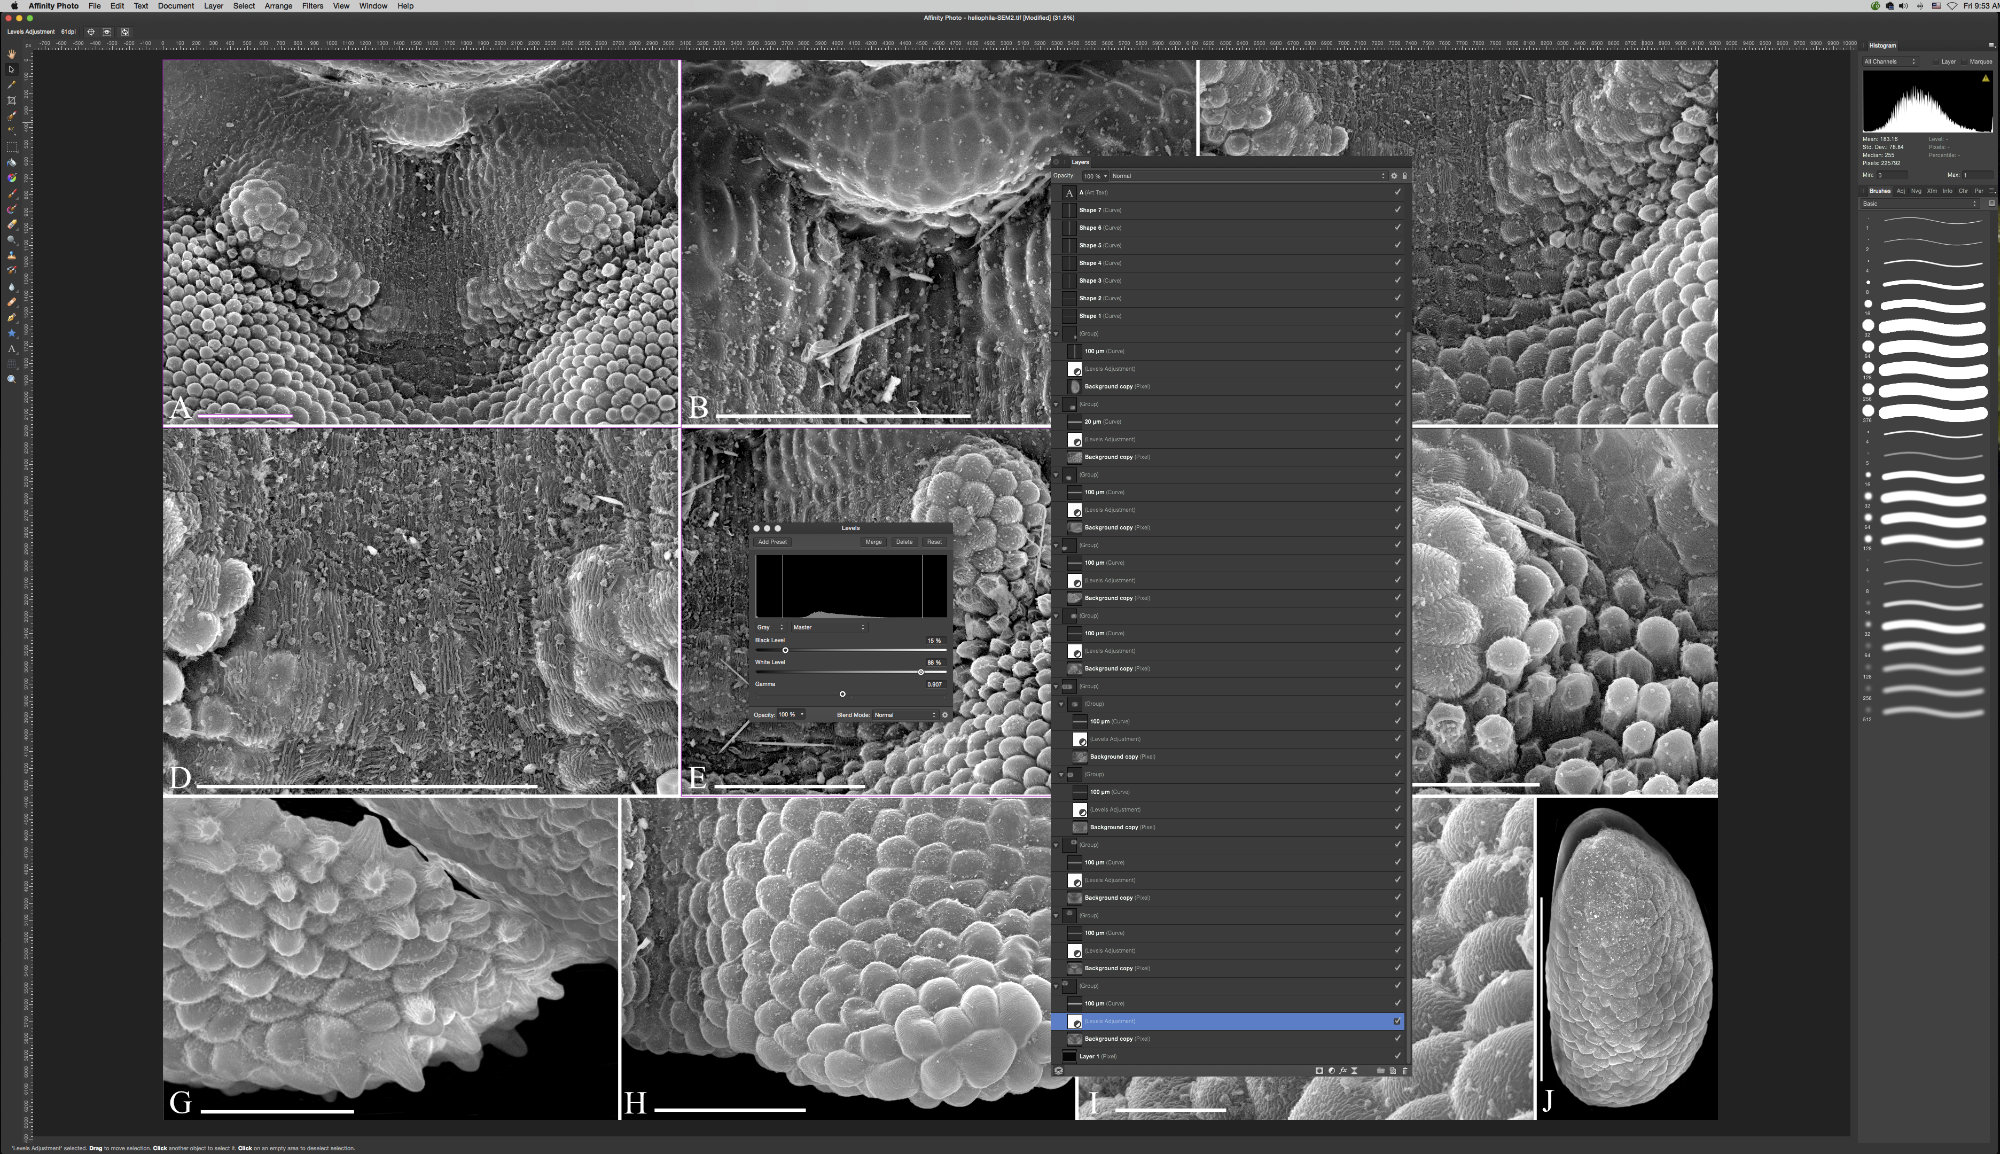
I use quite a few layers in my images. To adjust levels of individual portions, I have to group those (occasionally also in second level groups). The histogram in levels is a very poor representation of the brightness distribution (see image). How can I get that more meaningful? It seems that layer order matters, which is really weird. The lower layers have poorer (flatter) histograms than the upper ones. Not 100% sure that holds all the time. Second, AP retains all the information of each image part (which is actually good), even if it is outside the current canvass, or is hidden behind another layer. Is there a way to get histogram for just the visible part of each layer? The footer of each of these images is pure white, so when I try to adjust white point, it is difficult to know where the white of the image is, rather than the invisible footer of the files. Some sort of highlight/shadows clipping warning (with color overlay on affected area?) would be very helpful. If it exists, I have not found it yet. Gamut warning does not work for me. Thanks!
-
Just started playing with macros. I notice that AP will not permit me to move a layer to a different position. I like the insert new layer options (top, bottom, n-th layer from top/bottom), but the inability of moving layer requires me to execute the macro recording in a very specific sequence. I also notice that save/save-as/export is not available in the Macro menu. This is handled in the batch dialog. Might be nice to have a hint in the error message from the Macro panel when attempting to use save/export that save/export is handled in the batch dialog, rather than just saying "sorry cannot". Are there other commands/actions/procedures that are not permissible? Or is there a list of available commands/macro steps? For a 1.0 on macros, very impressive, but not quite prefect yet. In batch processing, it would be great if an entire directory (with/without subdirectories) could be specified as source for images to be batch-processed. With complex directory structures, adding files becomes very time consuming, while specifying the root directory (with all its subdirectories) would be a single click.
-
[APh] Version 1.6 - suggested additions
Daniel Geiger replied to smadell's topic in Feedback for Affinity Photo V1 on Desktop
By and large EXTREMELY happy with AP. - In image Size (option-command-I), enable Size adjustment with no resampling, so that AP adjusts dpi automatically to new value. Currently, if re-sample is turned off, Size cannot be adjusted. - When calling up feathering (Shift F6), have value highlighted so that I can immediately type in my desired value, rather than mousing over, double click on value, enter value then hit return. This is an efficiency request. - In Transform, provide length of diagonal lines, so a line that is going from 0/0 to 100/100 has Length 141, not only Width of 100 and Height of 100. Diagonal length should be then adjustable numerically in Transform (which works great for horizontal/vertical lines, but not diagonal ones). - Brush feathering: have an option for absolute feather border, not one relative to brush size. I want to define a brush with a 2 pixel feather, and if I set it at 5 pixel diameter and it has a 2 pixel feather and if I set it to 100 pixel diameter and it has a 2 pixel feather. Currently the 100 pixel brush would have a 40 pixel feather. I frequently use the option-control mouse left-right to adjust brush size, but I need a constant feather radius regardless of brush size. - Have a line stroke style, possibly like the brushes palette. If I use the Pen Tool, I would like to call up a line style with a single click, rather than first go to stroke color, select color, go to line style, select type of line, width of line, end-cap option, and that for every single document. Another efficiency request. I use that A LOT for scale bars in scientific illustrations. -
Thanks for the ultimate PS killer. Macro-batch and layered .tifs were the last holdovers for using CS5.5. I can lay that to rest now. Thanks for listening to what your customers want and need. Initial experiments with a short (10 file) z-stack were rather impressive. PS was useless for serious macro stacking, AP is on par with ZereneStacker on short stacks. Will have to run some larger stacks (50-150 files) through it, then we'll see for sure. Cudos!
-
Thanks for the pointers. That was already very helpful. Started reading AF help sections. I run into trouble with Layer clippingI read through that several times, and for the life of it, I cannot figure out what the grey red and pink layers are doing, and why the grey layer is on top, and not the nested one. The example is WAY too complicated. The PS tutorial with different greyed circles is far better. I also wonder why you would use a mask as opposed to using the curve adjustments for transparency (layer above, layer below). I have been using AP for a while now (year or so), and have 20 years with PS. Never saw the need for mask for scientific illustrations. Recently got into false color IR, and need more refined adjustment options.
-
I am having a hell of a time trying to figure out masks. Watched all the vimeo videos, but not helping much because the basics are missing. Is there a good write-up on the very elementary masking? I very much need something written out. The request for a written manual is very much supported. Question such as: - Difference between layer mask, quick mask, vector mask, clipping mask, .... including why one works and one does not, or why one is better than the other. Relationship between alpha channel and mask? - What is implied by position of mask in layers palette: layer itself, besides layer, below layer, indented below layer? What is the meaning of the little logos inside the mask layer? - What happens when you paint with black, what when white, red, what if transparent? Utterly confused by that and can never predict what is happening and why. - Terminology hierarchy. Is a luminosity (or fill in what ever mask type there is) mask a quick layer mask (or fill in any mask type there is), vector mask, clipping mask, all, or none, or only partial intersection? I need a Venn Diagram or hierarchical tree of mask terminology. Is a clipping mask a type of a vector mask or not? And is a Vector mask a type of a clipping mask or not? If synonyms, why the two terms? (Part-whole relationships). - How to consistently turn selections into masks. I think I have a <5% success rate and still don't have the foggiest why it works, when it works, and why not when not. Utterly infuriating. If there is a book for PS on masking that is also (or even mostly) applicable to AP, that would also work. But must be methodical and logical, not an assemblage of pretty examples that do not show principles. Maybe with exercises to drive home the principles? If AP is fundamentally different from PS, that would also help, so that I do not even try to understand AP based on PS info. Thanks, I take any help I can get.
-
Added feature request. Just wanted to make sure first, that there is no other option. Thanks!
-
In Image size, permit physical dimensions to be specified without resampling. When un-checking "resample" in Resize Document, the top physical dimension boxes are greyed out. I can calculate pixel dimension/inches = DPI and enter that DPI value with resample unchecked. A bit clunky, though. Reason: I want to have consistent lettering on multiple figures, but want to keep images as hires masterfiles. Consistent lettering is best done by specifying font size in mm/points, which is tied to physical size.
-
It would be great, if the tools would remember the last settings. For every file and every session, I have to specify for my standard lines: - stroke color - Style: line. - line width - cap type - Mode: line. It would be great if AP would remember at least within a session, or even better also after quitting/restarting, those settings/parameters. Then I can just select the tool, and apply the saved settings immediately in the next image. Similar with background fill, it always defaults to white.
-
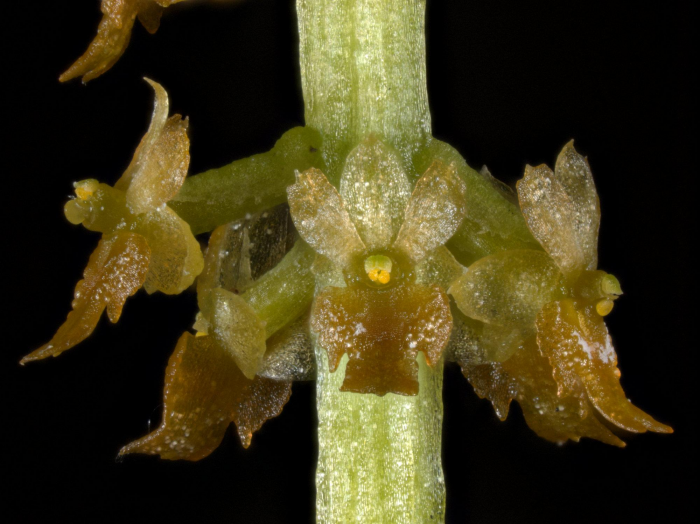
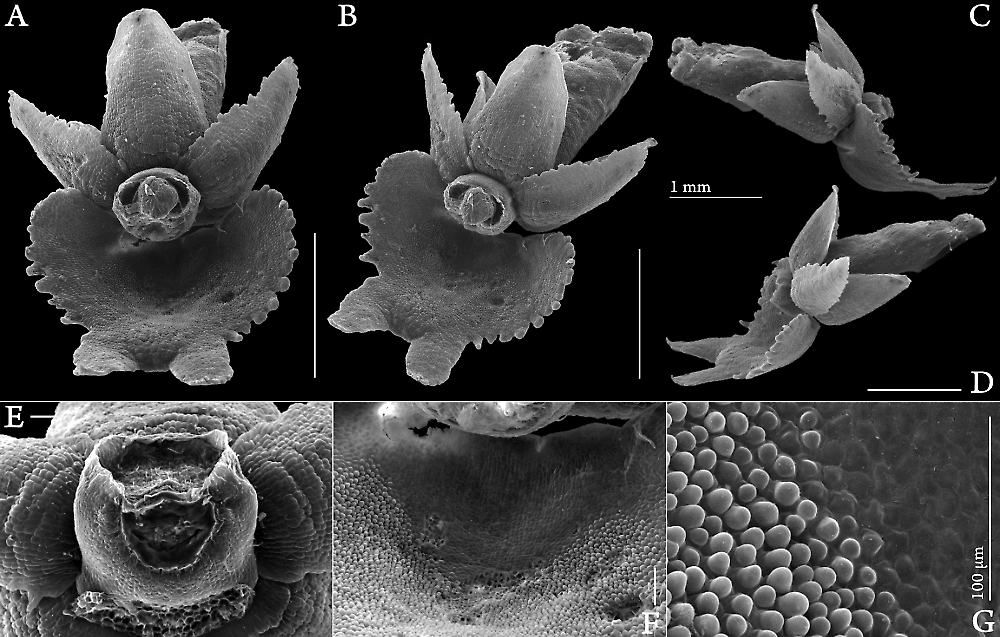
Very simple task, just cutting out and combining seven images, some lettering and scale bars. From my research on morphology of some orchid flowers. Images done by critical point drying and variable pressure scanning electron microscopy. Masterfile is just shy of 10,000 pixels wide. Target for this work is a peer reviewed science journal. Noticeable is the much better edge finder in AP, which cuts way down on manual eraser work. Access to brush palette is also much easier. The hovering preview with eraser is also excellent. The absence of rotate-scale: commit step is great. File size is smaller as well (63 vs. 83 MB for .psd). Things to improve: - When entering Select - feather, automatically highlight the value, so that I can immediately enter numerical value (no mouse double click on value field then enter value), then I can hit double enter to apply. Small thing, but in mass production every speed improvement helps. - Histogram in Levels should be scaled so that highest peak is at 100%. It seems that levels frequently looks at layer and all the empty space surrounding it, producing very flat histogram. - Text tool: should remember last fill/stroke settings. Had to reselect with every new letter/box. Eventually just duplicated text layer, then changed letter, which works OK. May also make master letter file, so that I just drag the required letters into the current document. - Separate view does not have the context options in the top area of each window. Find myself switching separate views on/off regularly, and have not figured out how to predictably get the right window on top when switching off. - Default value on brushes is 25% spacing, which leaves irregular edges (was the same in PS), 5% gives much smoother edges and brush does not jump upon moving it. - Enable keyboard page up, page down, home and end keys. This speeds up cleaning up/spotting of images immensely. - Not sure about autoselect layer. I'm used to select layer in layers palette, then click anywhere and move. I think I may like it in the end, but currently I'm still in old habits. - Layered .tif files are not recognized as layered. Had do batch process a few hundred files from layered .tif to psd using PS. Most of this is just teething problems on my end. Once I get the work flow sorted out, AP will be a very nice production tool. Looking forward to the macro editor.
-
Is it possible to resize document to a specific physical dimensions, but leave pixel dimensions unchanged? When un-checking "resample" in Resize Document, the top physical dimension boxes are greyed out. I can calculate pixel dimension/inches = DPI and enter that DPI value with resample unchecked. A bit clunky, though. Reason: I want to have consistent lettering on multiple figures, but want to keep images as hires masterfiles. Consistent lettering is best done by specifying font size in mm/points, which is tied to physical size.
-
Dear Hokusai (what an auspicious Ukio-e name!), you nailed it and then some! It's all there, just need to know where to look. Thanks!
-
OK, misunderstood the preset idea. I thought it would create a tab next to Export 1x ... Got it now. Thanks!
-
I try to define some export presets, but after going to File - Export - More - Manage Presets all three options are greyed out. Any ideas? Does not depend on intended file type or changed options. In the help file under Export Options panel (Export Persona only)at bottom of page, step 2, it says something about "click Panel Preferences and select Create preset from pop up menu". I guess that is something from a previous version and approach has been slightly modified (see above). Under help Exportat bottom of page, it gives the "more" pathway.
-
Multicore usage?
Daniel Geiger replied to Daniel Geiger's topic in Pre-V2 Archive of Desktop Questions (macOS and Windows)
Update: noticed that only with some functions it uses select cores only, most of them use all. Great!- 1 reply
-
- 1
-

-
How do I make a line with perfectly square ends? With line tool, the end is rounded with diameter = line thickness. I can use shape-rectangle with stroke = 0, but it is a bit more cumbersome, because line thickness cannot be pre-set.
-
Thanks Barninga. That's the same as command-zero = View - Zoom to fit.
-
Is there an easy (1 step, ideally one keystroke) command to fit window to image? Why? I am making composite images out of multiple source images. When figuring out how to arrange the various elements, I have each file (up to about 20) open as separate windows, then move them around for a rough selection/composition. I can easily make the images smaller with command-minus, but the window stays the same size. I can also manually reduce window by dragging mouse and then command-zero to make image fully visible. That leaves a lot of irregular background on the window. With larger number of images, even a 4K screen gets cramped. That's why I am looking for a quick adjustment. Thanks!
-
2photos si de by side
Daniel Geiger replied to Giovanni's topic in Pre-V2 Archive of Desktop Questions (macOS and Windows)
Was having the same question. Consider structure help in a way that user can find it. I tried searching for "windows", and "open files", but could not find anything in help. That may also be a nice addition for preferences: User interface options: Open files in separate windows. or something like that. As always, AP has everything, it is just a question of finding it. Still very happy with it. Just a few growing aches.