Truthseeker10
-
Posts
21 -
Joined
-
Last visited
Everything posted by Truthseeker10
-
Folks, when mentioning that you have the problem too please mention whether you your software is from the Mac App Store etc, or from Affinity direct. There's been mention elsewhere of a problem being identified with the Mac App Store version — but my copy isn't from there, but downloaded and bought direct from Affinity. I'm confident they'll track down the problem soon, and am happily using 2.4.2 (not 2.4.1 as I stated previously: sorry) again for now.
-
Nope, no SF Pro. Using: Apple Color Emoji, Bookman, Gill Sans, Helvetica, Lato, PT Sans and Symbol
-
Like others, I am experiencing problems with Publisher 2.5.0 making it unusable. This is on macOS Sonoma 14.5 using Affinity Publisher 2.5.0 which was reached by allowing 2.4.1 to self-update from the Affinity website. Licence purchased from Affinity (NOT from the Mac App Store). I'm working on a 300+ page book. Attempting to open the document with v2.5.0 results in it opening and, for a couple of seconds, I can sometimes double-click on text to select it. But after that I cna no longer select text or use other tools. I can, however, pan around the workspace between pages and xoom in or out. However, if I double-click, say, a Master Page it does not take me there. Attempting to close the document or Quit results in Publisher hanging, with the SPOD (Spinning Pizza of Death mouse pointer) appearing and spinning erratically. Richt-clicking Publisher in the Dock revealy "Application Not Responding" and I have to Force Quit it. I've tried downloading the Publisher 2.5.0 DMG file from the Affinity website and replacing the app in case the self-update was bad. However, it hasn't helped. I've now download the DMG file for Publisher 2.4.2 and my documet is opening and can be edited just fine. Definitely a problem with the Publisher 2.5.0 release, and not just related the Map App Store.
-
Any chance of having this bug looked at sometime? It's been around for a long time — I think I first encountered it, and figured out the workaround of using the Paragraph panel to edit the tab leader then updating the style — since V1 days, and on earlier releases of macOS. It's annoying! To reproduce: Define a paragraph style and apply it to a paragraph. Edit the style to create a tab stop. Still editing the style, click the "…" button next to the tab stop and select "(.)". The text box to the right becomes active, implying the leader character(s) can be changed. But the text there (likely a full-stop initially) can't be selected or edited. Workaround: (Without editing the style) Use the Paragraph panel to edit the tab stop's leader character. This time the leader character's text field is editable. Set it to what you want. Update the paragraph style from the amended paragraph (whilst hoping you didn't have any other stray local styling applied that might get picked up! 🙄). Application and System Information Affinity Publisher 2.2.0 (also present in earlier versions and, I seem to remember, V1) The problem is reproducible — see steps above. It happens for a new document as well as existing ones. Operating system is macOS Sonoma 14.0 on a MacBook Pro. Hardware acceleration in Affinity Publisher is ON (Metal). Has not worked previously. See also the second question/point in the "[Publisher 2.0.3] TOC Styles Problems" thread:
-
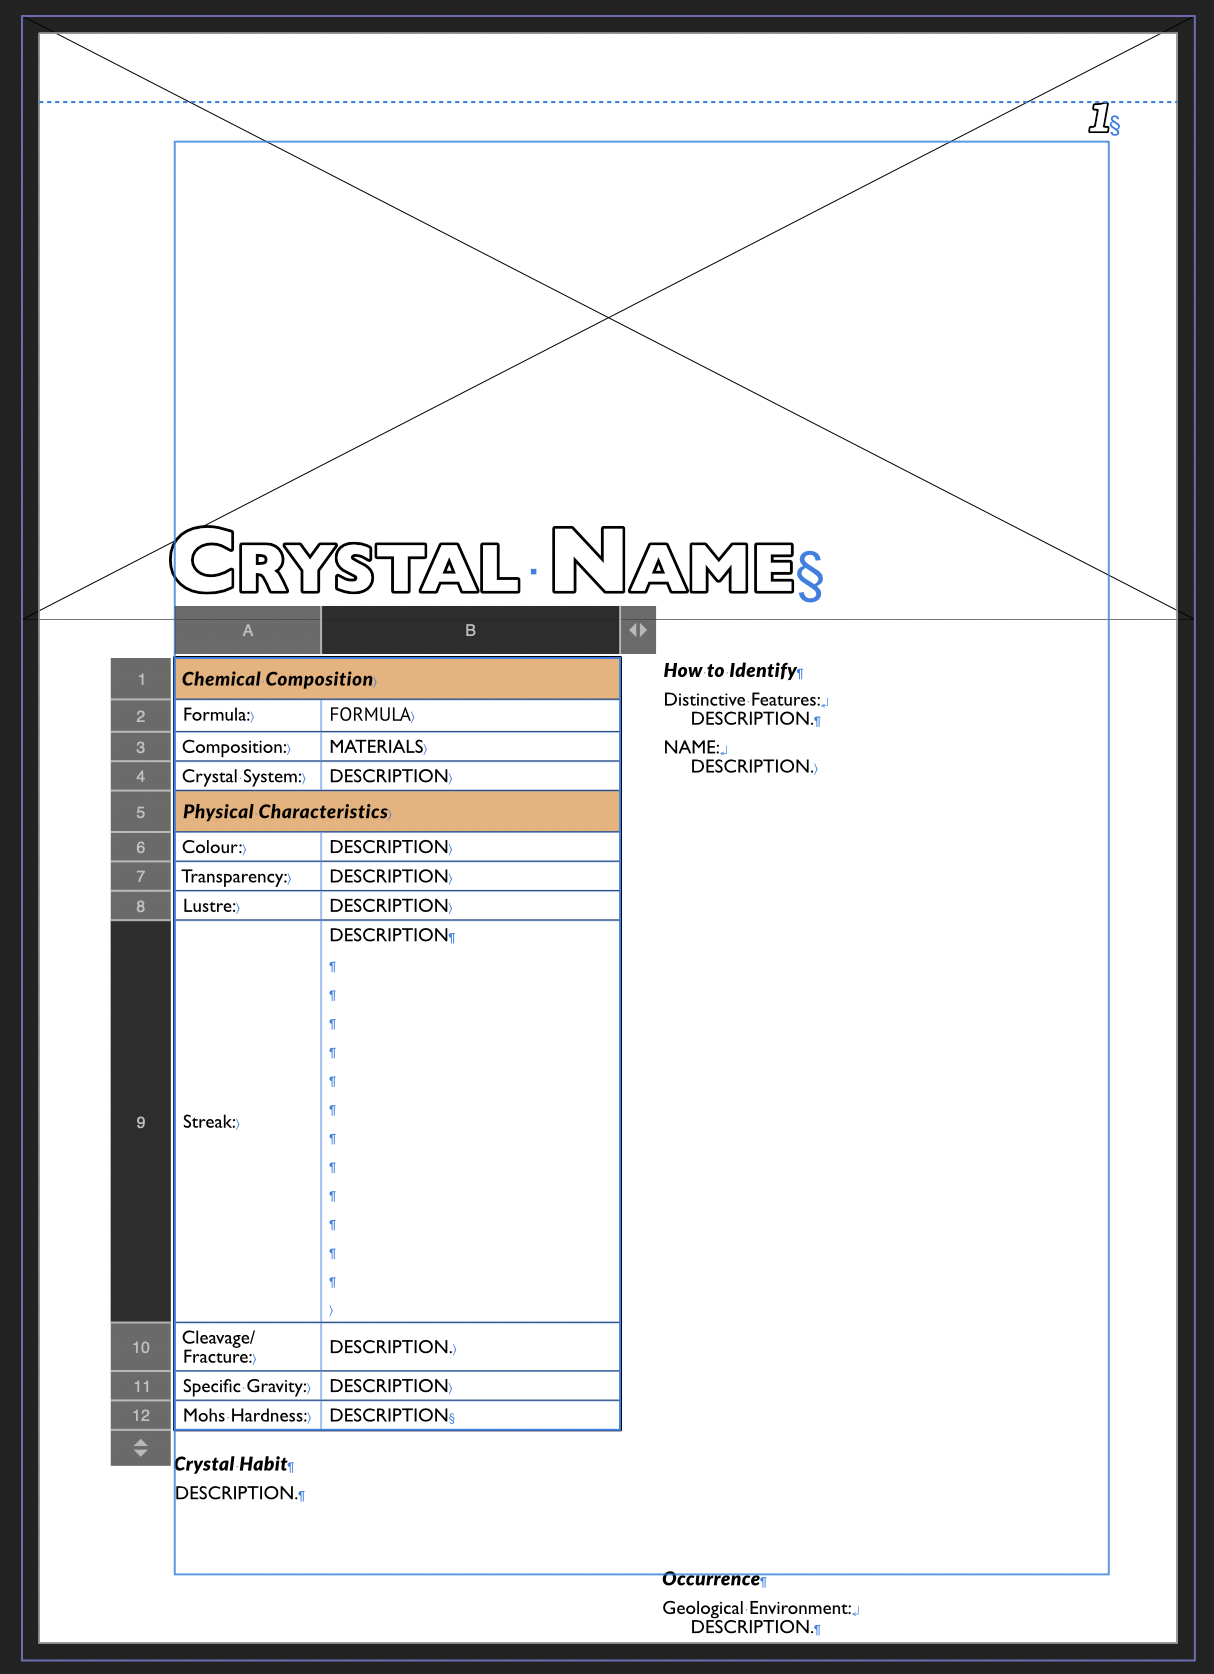
Sigh. I always seem to find weird/obscure problems! I'm preparing a reference document and want a master page containing: a placeholder for an image a two-column text box below the image a table for key facts set to have Jump text wrap positioned at the top of the left column I apply this master page to a regular page then type in its content. Doing this causes the rows in the table to grow, which should reflow the text in the column below it keeping it outside the bounds of the table. However, it doesn't and instead the table grows over and obscures the text. Even more strangely, add more text and grow the table's row sufficiently, the bottom-most lines of text from the left column are reflowed to the top of the right, but the preceding lines haven't moved and are still obscured by the table! Yes, that sounds complicated so I'm attaching a sample document to demonstrate the problem and the steps to reproduce it… The reference document I'm preparing in Affinity Publisher 2 that has information about a crystal on each page. The layout comprises an image at the top, and below that a text box set to two columns. At the top of the left column is a table of key facts. Below the table is text, which flows (via a column break) to the right column. The document has a three master pages set up: Master Right (sets the page area and a standard format page number) Crystals Right (has Master Right applied to it and the two-column text box applied along with placeholder text) Crystals Right 2 (has Master Right applied to it, the two-column text box and the key facts table placeholder) There are then two regular pages: Page 1 has the Crystals Right master page applied to it, and then the key facts table added locally to the page. This page demonstrates the behaviour I expect from Affinity Publisher (see below). Page 2 has the Crystals Right 2 master page applied to it, picking up its key facts table from the master page. This page demonstrates the incorrect text flow problem. Both key facts tables — whether locally added or on the master page — are set to have "jump" text wrap. This should push the text in the two-column text box to below the table. But… To Reproduce the Problem The Expected Behaviour On Page 1 (with the locally added table), click in the one of the cells of the key facts table (eg, after "DESCRIPTION" on the "Streak" row). [See screenshot Page 1 Expected - A] Press Return several times as if adding extra text. The row expands, the table grows and the text in the left column below moves down, keeping below the boundary of the table. [See screenshot Page 1 Expected - B] Keep pressing Return and eventually the bottom-most lines of text overflow from the left column into the right hand column. This is what I expect to happen. [See screenshot Page 1 Expected - C] The Incorrect/Unexpected Behaviour On Page 2 (with the table picked up from the master page), do the same test. [See screenshot Page 2 Unexpected - A] The row and table expand, but does not push the text in the column below downwards. Instead the table grows and overlays the text. This is not what I expect to happen. [See screenshot Page 2 Unexpected - B The red rectangle shows the unexpected behaviour.] Now keep pressing Return to add more blanks lines to the table's cell. Things get really weird — the lowest lines of the text in the left column correctly get pushed to the top of the right column but the upper lines of text in the left column haven't moved! They're still in their original place, with the table now overlaying them. This is definitely not right! [See screenshot Page 2 Unexpected - C The red rectangle shows the unexpected behaviour, and the green rectangle correct behaviour.] Application and System Information Affinity Publisher 2.2.0 The problem is reproducible — see steps above. It happens for a new document. See sample document attached. Operating system is macOS Sonoma 14.0 on a MacBook Pro. Hardware acceleration in Affinity Publisher is ON (Metal). Screenshots demonstrating expected and unexpected behaviour are also attached. Not known if this worked previously; it's the first time I've need to set this up. Table on Master Page problem.afpub

-
I've recently upgraded to macOS Sonoma and now find that searching the local Help for all three Affinity programs no longer returns correct results. I'm 98% confident it was working before the upgrade to Sonoma (I always start doubting myself at times like this! 🙂 The quick summary is that opening the Help window in any of the applications (Help menu > Affinity AppName 2 Help) then searching using its search box returns only one match in the application's local help, and that match is not correct for the search performed. The result is consistent each time for each application, although different between applications. What Application are you using? [Designer/Photo/Publisher] Affects all three applications: Designer, Photo and Publisher Are you using the latest release version? Yes: version 2.2.0 of each application Can you reproduce it? Yes. I can reproduce it within each application, and have tried quit/rerunning the application, restarting the Mac, and also reinstalling Publisher. Does it happen for a new document? If not can you upload a document that shows the problem? Yes, it happens for new and existing documents. It also happens when the application is open but without a document being open. If you cannot provide a sample document then please give an accurate description of the problem for example it should include most of the following: What is your operating system and version (Windows 11, OSX Ventura, iOS 16 etc)? macOS X Sonoma 14.0 Is hardware acceleration (in Preferences > Performance) ON or OFF ? (and have you tried the other setting?) Hardware acceleration is ON (Metal) for Publisher and Designer Hardware acceleration is OFF (OpenGL) for Photo because of an earlier bug discovered What happened for you (and what you expected to happen) Using the Help menu's "Affinity AppName 2 Help" item and searching for a keyword results in only one, not relevant, match being found in the application's local help. Provide a recipe for creating the problem (step-by-step what you did). Open the Help menu's "Affinity {Publisher, Designer, Photo} 2 Help" item. A window will open to the local help content and showing the application's logo in the centre. In the window's search box (at its top right) enter a word or phrase and press Return. Only one match will be found within the application's local help, followed below by general macOS help results. The item found appears to be consistent for each application, although different between them, and not relevant to the search. The following help item appears to be returned in each case: for Publisher it is always "Setting a cross-reference's text" for Designer it is always "Layers Panel (Export persona)" for Photo it is always "Edit selection as layer using Quick Mask" Did this same thing used to work and if so have you changed anything recently? (software or hardware) I'm as certain as I can be that this was working until recently under macOS Ventura, but since upgrading to Sonoma the problem has started. (I don't often need to use Help, but am pretty sure I used it in the week before Sonoma was released and was using the local help at the time instead of the online.) I upgraded all three applications to 2.2.0 when they were released, but can't remember if my last successful use of Help was before or after that upgrade, hence I'm not certain whether it's related to the installation of the v2.2.0 applications or of Sonoma.
-
I'm seeing the same problem running Affinity Photo 2.1.1 on my M2-based MacBook Pro with macOS 13.5.1. When Metal acceleration turned on, opening an existing image results in the content and surrounding work area to appear brighter than it should be. Leaving the most pointer still for a few seconds often reverts to a proper image, but moving the pointer immediately causes the problem again. It doesn't seem to just affect display either — exporting a copy of image then viewing it in Preview seems to show the different/wrong colours too. (This is reminiscent of a problem back with V1 some time ago, but then the image was getting strange blocky/black squares over it; that also affected exports and was caused by Metal acceleration.) Unfortunately I'm not sure when the problem started as I've not had to use Affinity Photo for a while, and have had upgrades installed for both it and macOS. I've currently turned Metal acceleration off within Affinity Photo, switching to OpenGL, which works around the problem.
-
Hmm… I wonder if this is similar to/the same problem I sometimes see when returning to a document. As I open the document Publisher 2 puts up an alert saying it has removed broken links to images. (But doesn't tell me how many or which ones!) Looking in the Resource Manager all seems well, with all images listed and links in place … as far as I can tell. I'll keep my fingers crossed for the next release, and hope that I've not broken too many of my documents in the meantime! 😏
-
Thank you, MikeTO! It's a relief in a way that it's a known bug opening V1 documents in v2 — I did search the forums but didn't spot anything that seemed similar to what I was seeing, although there posts about missing A2/A1/A0 sizes, which gave me the clue that the dimensions I was seeing might correlate to them. One thing I'd disagree with is that whilst on a new document the two presets for A3/A4/A5 etc show the same dimensions they don't when opening a v1 document; you get different sizes for each of the A3 pair etc. However, I guess that's to do with the bug. I'll keep my fingers crossed the Affinity fix the problem before I need to convert too many more v1 documents. 🤞 I'm guessing that once a v1 document has been opened and saved in the new v2 format (complete with wrong sizes for its paper presets) any future bug fix won't correct it, as it'll now be deemed to be a v2 format file? If so, I might have to re-create my newsletter files from scratch as v2 documents as I've already converted them. 😭 Cheers, Mike B-)
-
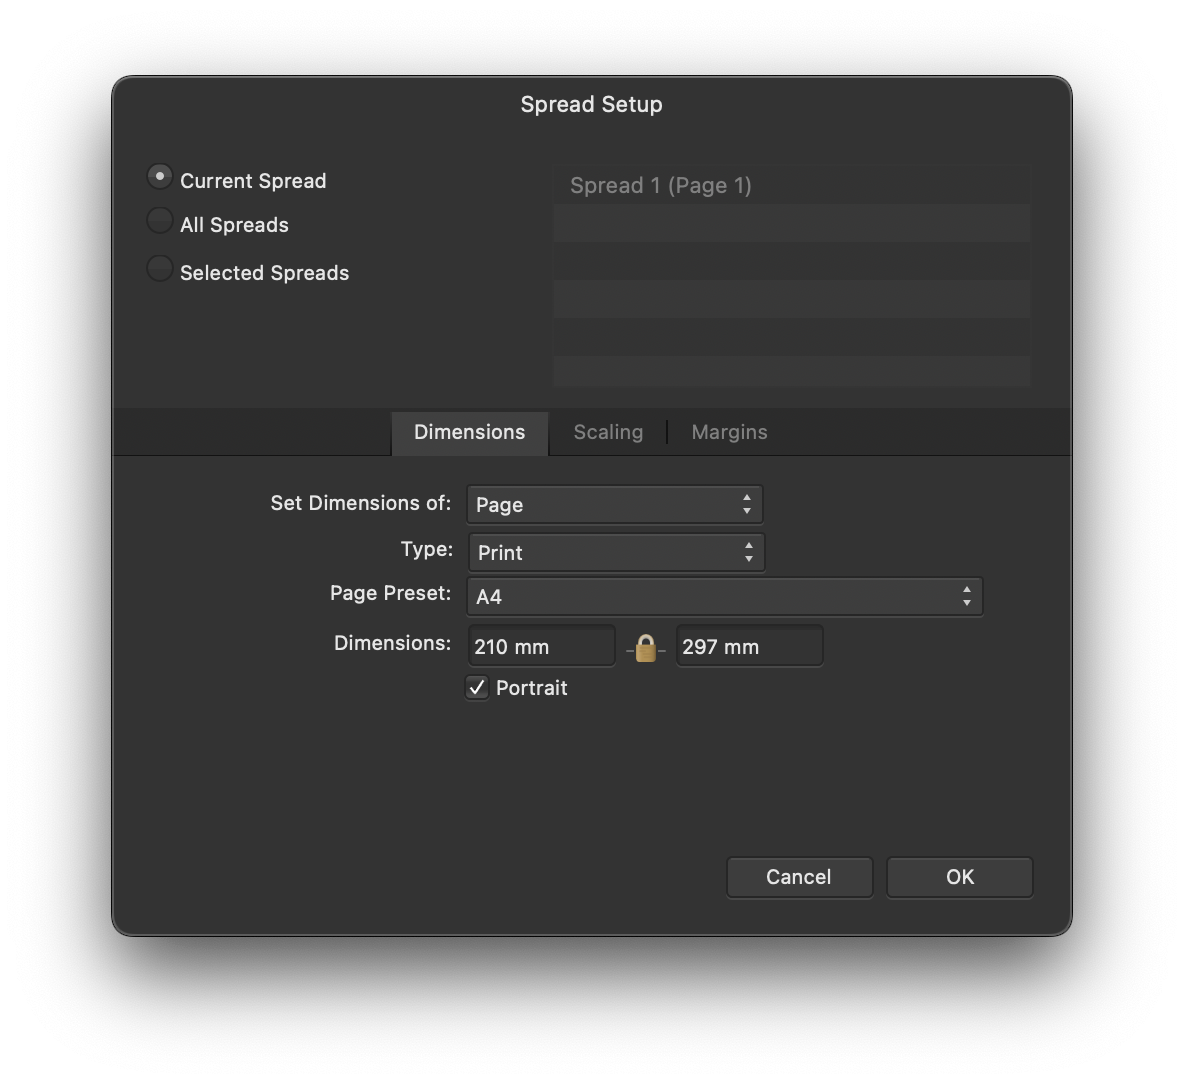
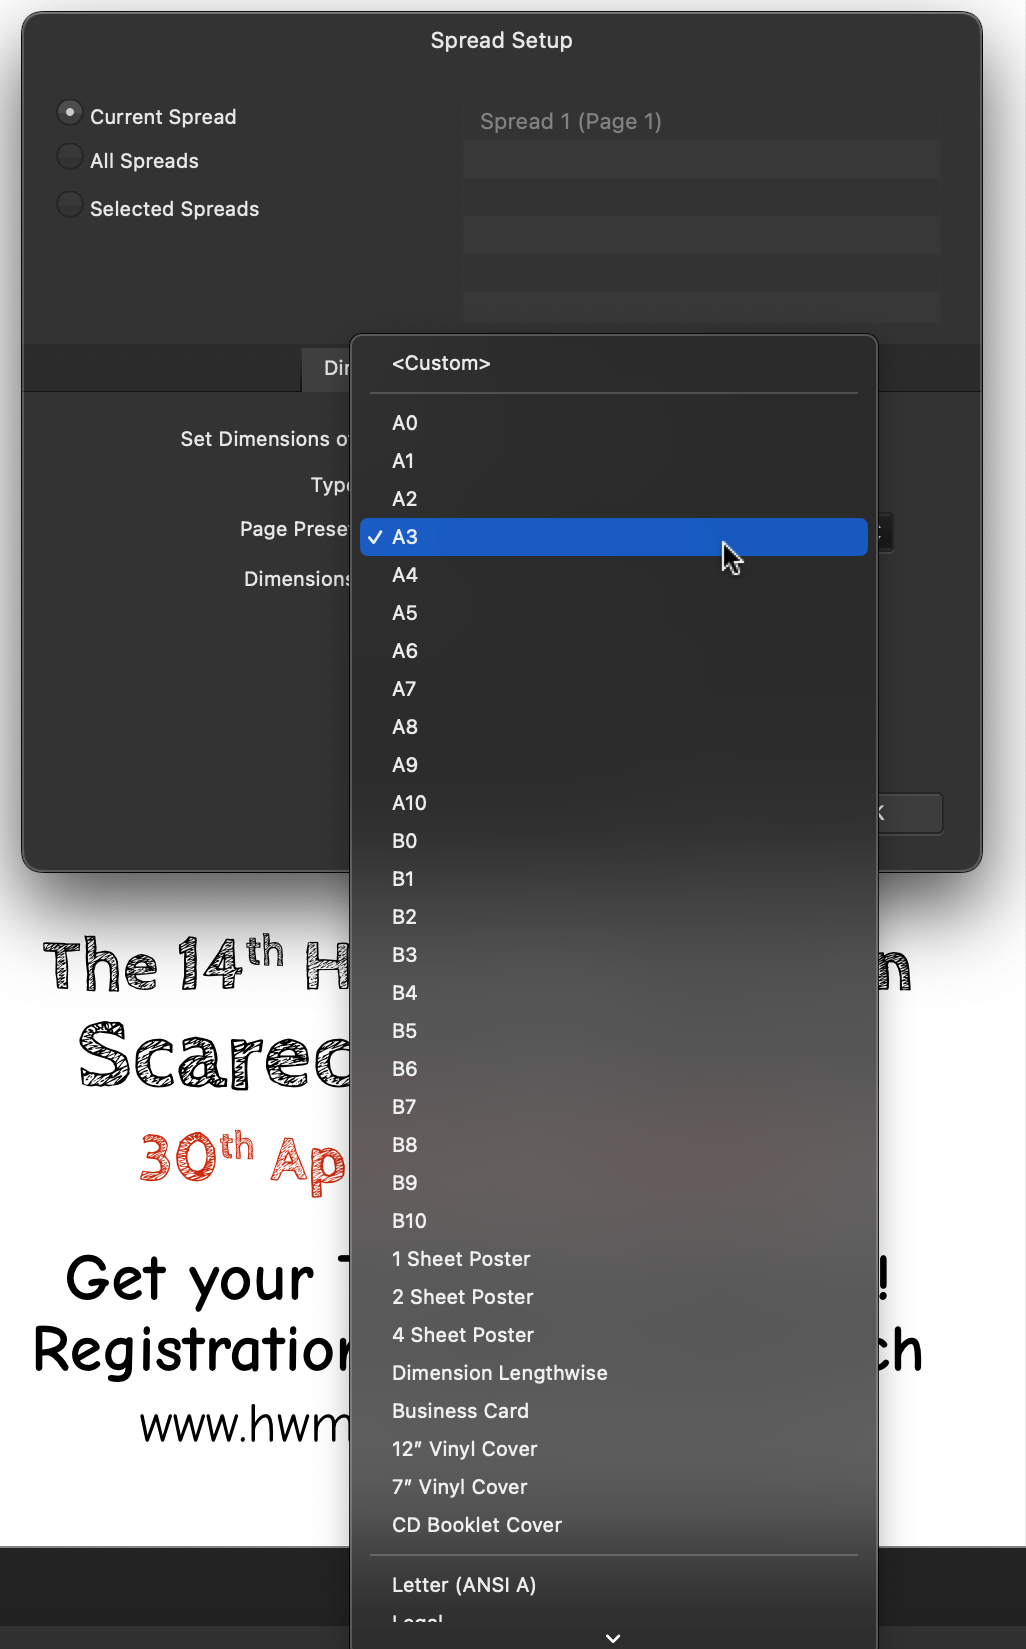
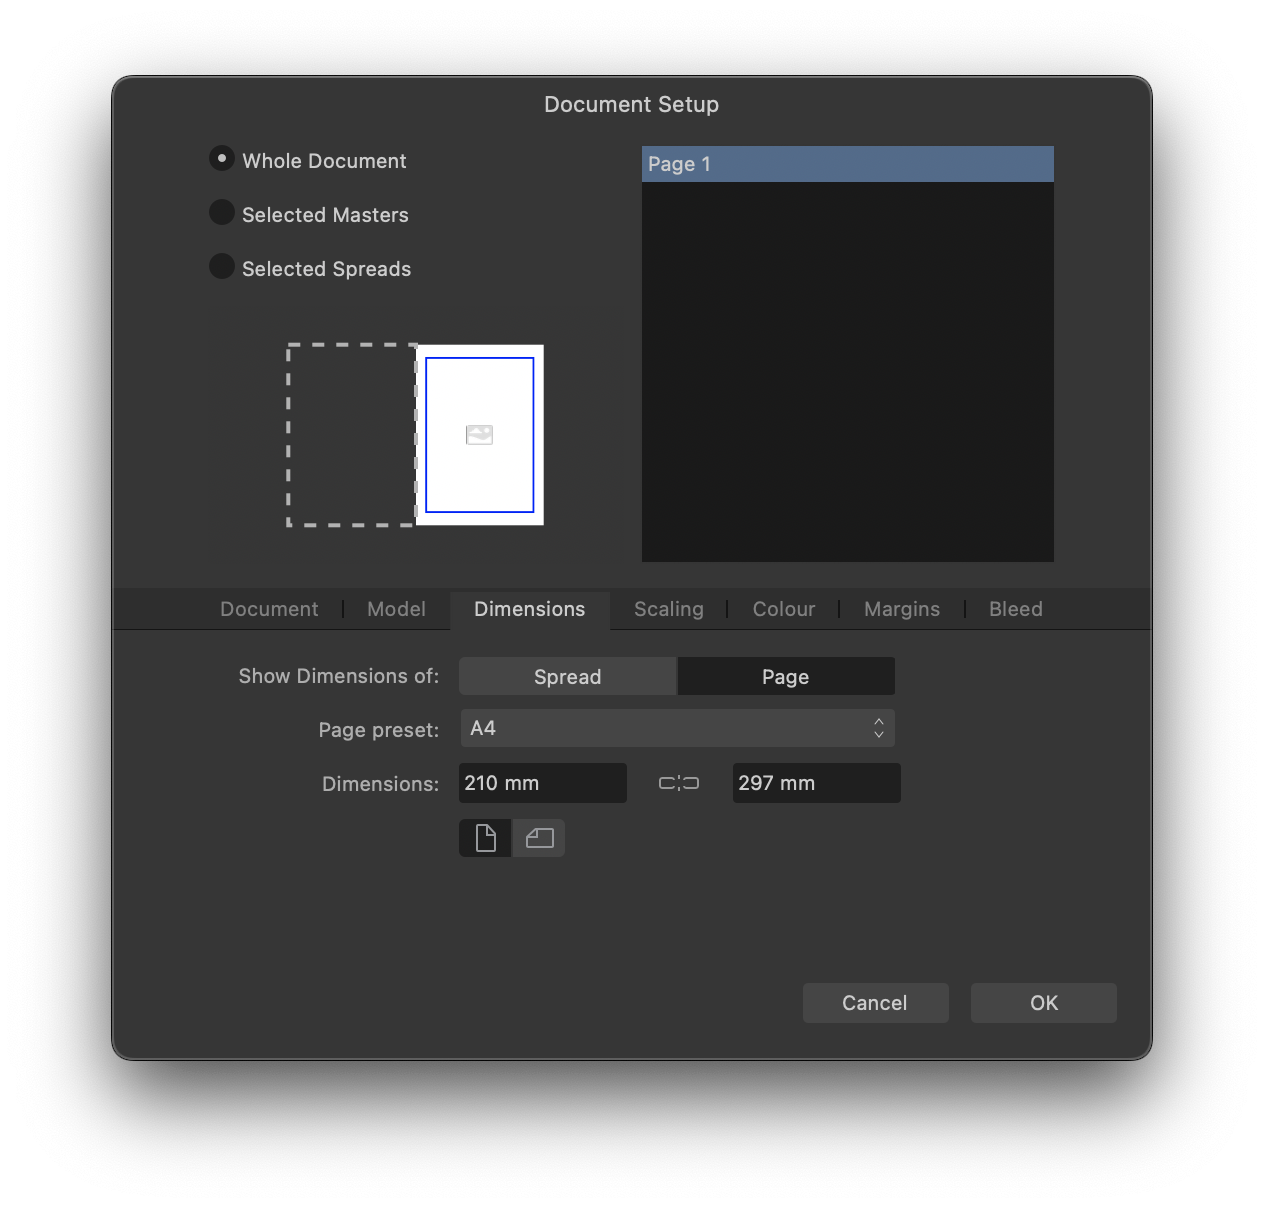
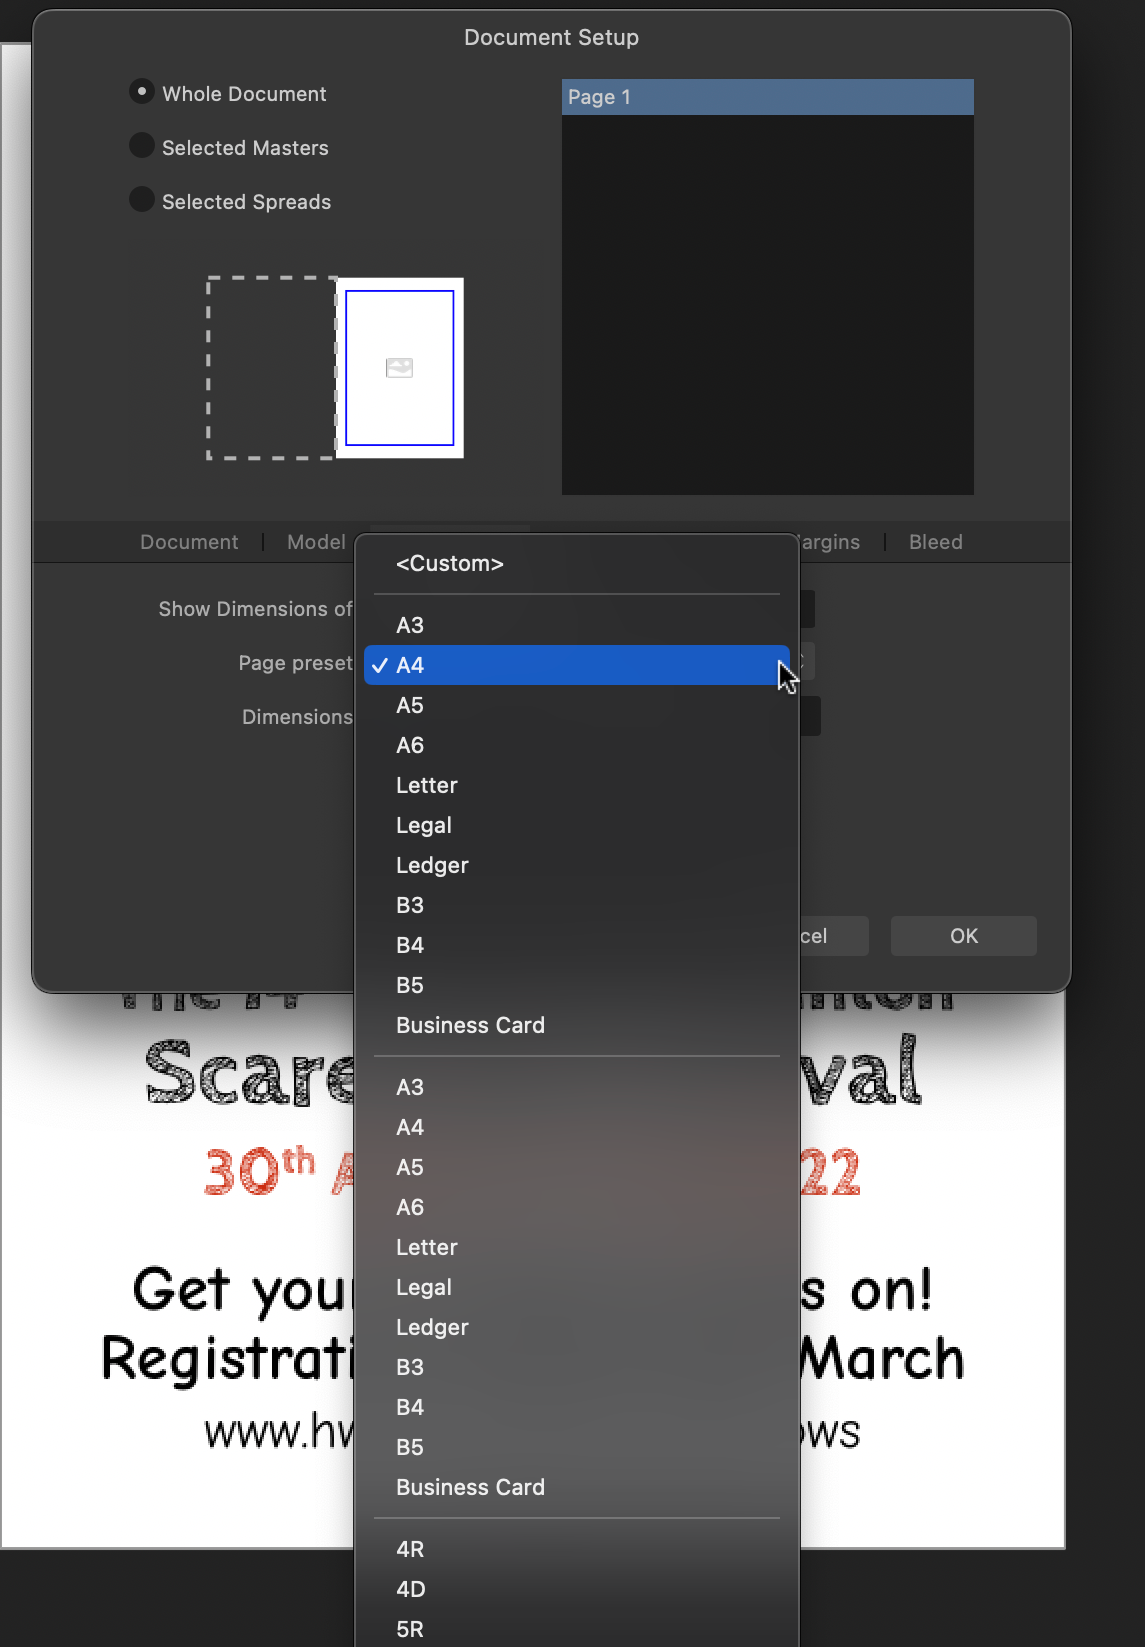
Why do I find the weird edge cases?! 😭 My MacBook Pro is running macOS Ventura 13.2 and has both v1.10.6 and v2.0.3 of Affinity Publisher installed on it. I have many Affinity Publisher 1 documents. When I open these v1 documents in v2 it gives me the expected warning about it being a legacy format etc. The bug I've discovered concerns resizing such documents. First the correct behaviour from Affinity Publisher v1… One of these documents (attached as "Scarecrow 2022 Poster 1.afpub") was set up as A4 dimensions (210x297mm). If I open this in Affinity Publisher v1 and go to Spread Setup I can see this paper size and dimensions as being selected. I can then use the pop-up menu to get a list of other sizes (A3, A5, etc), select one and its correct dimensions populate the size boxes. Screen shots of these are attached with filenames beginning "APub v1" and show the initial size, the 'popped up' list of sizes, and the (correct) result of selecting A3. Now for Affinity Publisher v2… I open there same document in v2 and use Document Setup to do the same process: resize the A4 document to A3. The dimensions initially show in the panel correctly as being A4 210x297. The first oddity is when I pop-up the list of paper sizes — I'm shown the list of A3 down to Business Card sizes TWICE in the menu instead of just once(?!). When I select the (first) A3 size in the list I expect to see dimensions 297x420mm but instead it is set to 841x1198mm. This is WRONG. Returning to pop-up menu to A4 also shows the wrong dimensions now. Working my way through some of them gets these dimensions entered into the size fields, all wrong: A3 841x1198mm (These dimensions are actually A0!) A4 594x841mm (These dimensions are actually A1!) A5 420x594mm (These dimensions are actually A2!) A6 297x420mm (These dimensions are actually A3!) Screen shots of these are attached with filenames beginning "APub v2" and show the initial size, the 'popped up' list of sizes, and the result of selecting A3 and then back to A4 (the dimensions selected by the pop-up menu are WRONG). If I select from the second set of A4 etc sizes in the pop-up list I get different dimensions again: all wrong for their stated papers. A3 215.9x279.4mm (Seems to be Letter (ANSI A) size) A4 215.9x355.6mm (Seems to be Legal size) A5 279.4x431.8mm (Seems to be Ledger (ANSI B) size) A6 431.8x558.8mm (Seems to be ANSI C size) If I proceed with the resize it's the numeric values that are honoured rather than the name of the paper size I selected. (eg, Selecting the first A3 from the list actually resizes my document to A0.) If I create a brand new document in Affinity Publisher 2 and try to use Document Setup to then resize it II: Still get a doubled-up list of paper sizes in the pop-up menu, but Selecting an A3/A4/A5/A6 paper size in either the first or second set of sizes sets the correct dimensions for that paper size in the boxes. So the problem with total wrong paper sizes only seems to affect v1 documents being opened in v2; new v2 documents get the correct paper size dimensions, although having the paper sizes listed twice is confusing. It's like the v1 documents include the list of paper names and dimensions, but v2 is interpreting these wrongly — possibly to do with the A0/A1/A2 paper sizes now removed from the pop-up list — showing the first dimensions (for A0 in the v1 document) against v2's "A3" label in the pop-up menu, etc? Technical info: Both Affinity Publisher 1.10.6 and Affinity Publisher 2.0.3 installed on the same MacBook Pro running macOS Ventura 13.2 The problem is reproducible when opening v1 documents in v2, and so far seems to affect each v1 document I've tried it on Sample document and screenshots illustrating expected behaviour in v1, and incorrect behaviour in v2 attached Hardware acceleration is set to ON and using Metal I can probably work around it for now be entering dimensions myself, but that's annoying and error prone. Cheers, Mike B-) Scarecrow 2022 Poster 1.afpub
-
Thank you, Dan! 👍 It's good to know this is the right place to send in bug reports. I've got another one lurking re tabs with custom leader characters but want to do a bit more checking before I report it.
-
I'm sad to see that this bug hasn't been addressed in the newly released Affinity Publisher 1.10.5 I thought this was the proper, official way of reporting bugs to Affinity? (I know it's worked before, but no-one from there has even acknowledged it here so far.) Is there a better way to report bugs as I'd like to get this one corrected to save my sanity! Cheers, Mike B-)
-
Thanks, PixelEngineer! Thank you for the tip about Shaft-Clicking the border of an image to restore its aspect ratio; I hadn't found that. I might well do that, although it's a bit of a pain as there are 93 images scattered through the 248 page book. But once it's done it's done. I did think about some form of technology to help the ageing relative read from a PDF, or even trying to copy the content into something that will generate an ebook. Sadly, she's at an age where technology totally defeats her and we need a physical print book. Thankfully I can scale-up the book from Affinity Publisher and use that to prepare an A4-sized book at the print-on-demand company we use; it's fine to order even just a single copy!
-
Hi, Wosven! Thanks ever so for confirming the results/problems exist on Windows as well; that's reassured me I've described it in sufficiently painful detail for the Affinity Team to reproduce the problem too! 😂 I try not to use Acrobat Reader as in the past it's annoyingly tried to take over handling various documents and viewer processes. But using the Mac's own Preview application to do the enlargement was going to be my fallback position if I'd not found a workaround. (Although the enlargement would have been approximately 100 x 297/210 = 141% rather than 200% to go from A5 to A4 — it's double the area, not double both linear dimensions.) However, Preview has its own way of being annoying: sometimes putting extra margin space around the thing you're printing. I think it's trying to be helpful and avoid non-printing margins. I also need to have an exact amount of bleed around the edges of the standard A4 content size, otherwise the printing company's validator software will get cross when I upload it. 🙄 As APub has already downsampled the images I've embedded in the book, I'd also prefer not to then upscale them and lose quality, but instead re-export the PDF direct from APub so they're downsampled correctly for the A4 job. (Yes, I know: I'm too much of a perfectionist, perhaps! 😄) To work around the border scaling problem I can do the enlargement and ignore the massive borders, but then select the heading paragraphs on the Master Pages and replace the wildly wrong border thickness with a correctly scaled value — 0.8pt x 297mm/210mm = 1.13pt. This fixes the problem, but sometimes doesn't cause the other pages to refresh in APub and show properly until you save and re-open the document. Hmm… Maybe I should have mentioned that refresh/redraw being omitted as a possible bug too! 🤔
-
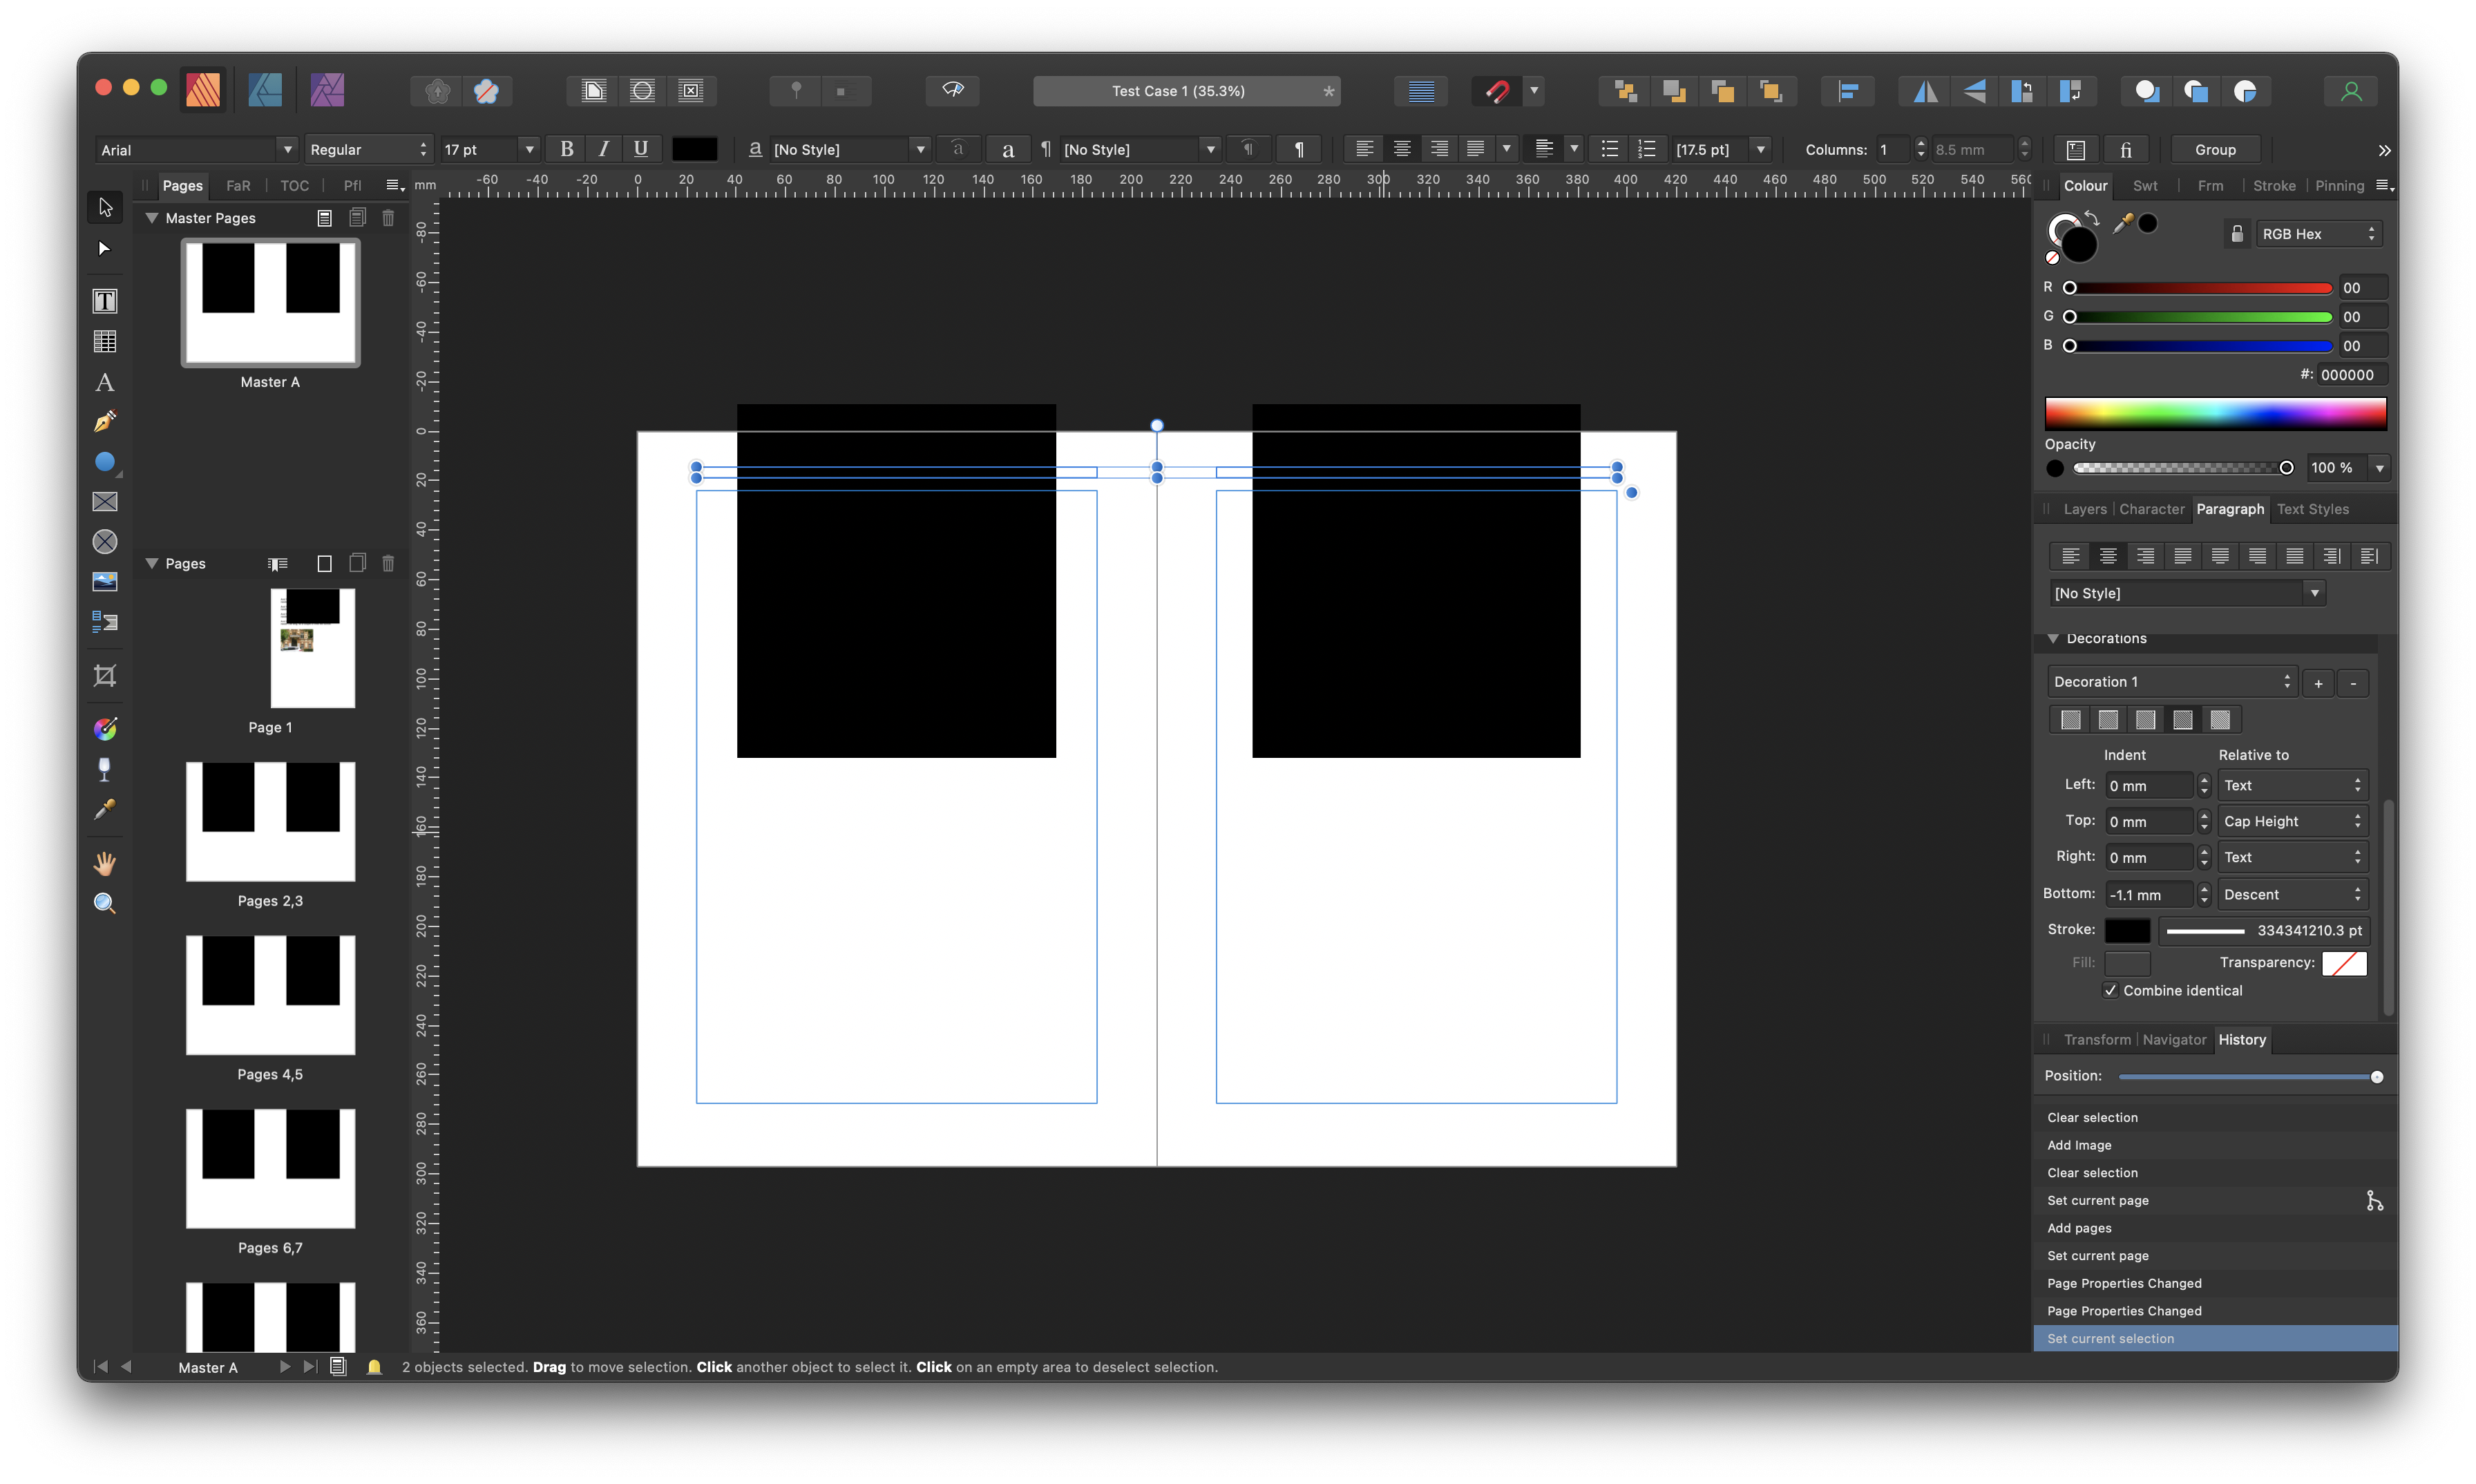
Hello! I'm using Affinity Publisher 1.10.4 on a Mac running macOS 12.2 (Monterey). AP's hardware acceleration is turned on. I've been creating a book with pages sized to A5 (which AP believes to measure 148mm x 210mm) and which I now need to resize up to A4 pages so I can generate a different PDF for a larger print copy for an ageing relative. I use two sets of Master Pages, each set being for facing pages. One Master Page or the other is applied to every page in the book. In particular, Master Page A is applied to every page after the introductory pages, to provide running titles and page numbers throughout the book. To do this I have two text frames on Master Page A: one for the odd (right) pages and one for the even (left). The text in these two frames has a Decorative paragraph attribute applied to it to add a horizontal rule the width of the page's column, of thickness 0.8pt. After I resize the Master Pages from A5 up to A4 with scaling applied, the thickness of the horizontal rule goes insane! I was expecting the thickness either to be left at 0.8pt (if left unscaled), or increased to 0.8 x 297/210 = 1.13pt (if scaled in line with the overall document). Instead it increases in thickness to 3009451852967572480pt! 😳 (Yes really: that number is copied from the border thickness in the Paragraph attributes' Decorative settings.) This results in huge black boxes being applied over the content of pages throughout the book. I've tried replicating this in a new document and it also occurs there. However, in my first tests the border thickness does not increase so drastically, but still increases more than it should. Instead how bad it is appears to relate to the number of pages in the document — my test document has only 10 pages, whilst the book has 248. See below to confirm this… Sample Document and Steps to Reproduce the Bug I'm attaching my newly created test document: Test Sample 1.afpub. In it you will find one set of Master Pages with some text for the odd and even pages, each with a 0.8pt border applied below its paragraph. There are ten regular pages in the document, each with the Master Page applied. The first page has some dummy content: some text, along with a picture to illustrate a different issue that occurs. To reproduce the problem: Open the test document in Affinity Publisher. Select the Move Tool and go to the Master Page by double clicking it in the list of pages on the left. Click outside the master pages so you see the Document Setup and Spread Setup buttons at the top. Click the Spread Setup button. In the dialog box that appears, select the Dimensions tab. Select the All Spreads radio button at the top of the dialog box to apply what follows to all Master Pages (probably not necessary here, but is in my book document). Change the Page Preset size from A5 to A4. Click the Scaling tab. Choose the Rescale option. Click OK and, when prompted whether to also apply the rescaling to the target pages, choose Yes. I would expect the thickness of the border below the paragraph in the header area of the Master Pages to either email at 0.8pt (if left unscaled), or to be adjusted to approximately 1.1 (if their thickness is scaled in line with the adjustment in page size). Instead the thickness of the border is increased to 9.2pt — you can check this by selecting one of the header paragraphs on the Master Page, going to the Paragraphs panel and looking at the Decorations section. The stroke thickness for the border below the paragraph has been set to 9.2pt. Now Blow Your Mind… Revert to my original test document. Add 100 pages after its final page, applying the Master Page to them as you do so. Repeat the above test. This time the border thickness is set to 334341210.3pt instead of 9.2pt! 😳 I'm also attaching a screenshot of the result of this test, showing the border thickness that's been calculated and set for this 110 page version of the test document in the Paragraphs panel on the right. So the thickness of the border you get is related to the number of pages in the document you are rescaling(!). In passing… Non-Proportional Scaling Problems After you have done either test, go to the Preflight check panel. There'll you'll now find a warning that non-proportional scaling has been applied to the image — you'll probably see something like 19.0% x 18.9% which isn't really visible to the human eye, but is to the Preflight Checker. (Sigh! 🙄) I think this may be because A4 is exactly 210mm x 297mm, and A5 is 148.5mm x 210mm. However AP, like printing companies, uses 148mm x 210mm as the dimensions of A5 — a very slightly different aspect ratio. This means that when scaling from one to the other you end up with AP applying non-proportional scaling, and thus triggering the wrath of the Preflight checker. I wish this could be fixed too, but don't see how it can without causing problems for people preparing work to go to printing companies, who want A5 dimensions of 148mm x 210mm. Sadly, that deviation from A5's actual measurements means you can't apply proportional scaling without risks, I guess? But maybe the wonderful AP team can figure out a way to Magically Make Image Scaling Work Properly too, to pacify the Preflight checker?! 😇 Cheers, Mike B-) Test Case 1.afpub
-
I've been creating a book in Affinity Publisher 1.10.4 on a Mac for a friend with its pages set to A5, laid out in spreads of facing pages with Master pages applied. They then asked me if I could do a larger print version with the pages sized to A4 and content scaled up to help their ageing relative read it. Like this thread, I learned that if you do the instinctive thing and resize the actual spreads of the book the content of the body pages is resized but that of the masters isn't. I also discovered the trick of resizing the Master pages instead and then saying yes to apply the resizing to their child pages. However… As well as a bug I found to do with paragraph rules (which I'll start a separate thread for), I found that resizing from A5 up to A4 is not great: it leaves placed images very, very slightly distorted, which then annoys the preflight checker: warning me that non-proportional scaling has been applied to the images. For example, 113.8% x 113.4% I assume this is because Affinity Publisher believes the size of A5 to be 148mm x 210mm, which technically is not correct (but is as far as printing companies are concerned!) — it should be 148.5mm x 210mm. So instead of upscaling from 148.5mm x 210mm to 210mm x 297mm Affinity Publisher upscales non-proportionally from 148mm x 210mm to 210mm x 297. This leaves your images distorted by a tiny fraction unnoticeable to the eye, but incurring the wrath of the pre-flight checker. If this could be looked into too when improving resizing as discussed above it would be great. (Although I'm not too sure what the correct procedure would be. As I say, A5 is technically 148.5mm x 210mm, but if you're preparing A5 material to go to a printing company they want 148mm x 210mm. Sigh.)
-
I have been seeing display (and image data) corruption similar to what Ozzoo describes, and which I reported here in another thread (link included below). A workaround is to go into Affinity Photo's Preferences, then the Performance panel, and turn off the Metal acceleration: untick a checkbox at the bottom of the panel. For me and others this makes 1.10.3 usable, albeit without the performance improvements from hardware acceleration. (These instructions are for Mac users, but I think are similar for Windows users where I think it also works around the problem.) Another alternative is to revert to version 1.10.1: either from a Time Machine backup (just restore the application in your /Applications folder) or, if you bought the software direct from Serif, by downloading the older installer from the Affinity website.
-
Preview for blur brush is transparency
Truthseeker10 replied to dmstraker's topic in V1 Bugs found on Windows
I’ve been seeing this, too, but on the Mac version. (In Affinity Photo version 1.10.1) it’s a pain. -
I'm attaching a screen recording as requested. (Sorry it's a huge 285MB!) It demonstrates the corruption I see, which looks to be a bit different from that seen by fatfreemedia. In my recording I: Open my test image from the Finder. Wait for ages for Affinity Photo to launch and the image to open. (Affinity Photo 1.10.3 feels slower to launch and to open documents than 1.10.1 was, but let's not get side-tracked!) Open the Preferences panel to show that Metal acceleration is ON. Add a Clarity Live Filter (after getting sidetracked into the wrong menu first!). Adjust its control slider several times. After a handful of such alterations the corruption starts. (For me it has so far been contained solely within the image view in the editing window.) Close the image, NOT saving the changes. Re-open the test image. Corruption is shown immediately: the loaded image is missing a part. Add a Clarity Live Filter. The corruption happens immediately on changing the slider. (After launching Affinity Photo it seems to take several adjustments before it starts. However, re-opening the image within an already running Affinity Photo causes the corruption to continue happening right from the first alteration to the Clarity settings slider.) This is on a MacBook Pro (15-inch, 2018) now running macOS 12.0.1 Monterey. (When I wrote my initial report I was still on macOS 11.6 Big Sur.) MacBook Pro (15-inch, 2018) Processor 2.6 GHz 6-Core Intel Core i7 Memory 32 GB 2400 MHz DDR4 Graphics Intel UHD Graphics 630 1536 MB No external hardware connected; just using the MacBook Pro and its native keyboard and trackpad. 1138871048_ScreenRecording2021-10-26at16_52_29.mov
-
In case it helps… Whilst browsing posts for Affinity Photo in Windows I learned its Preferences > Performance settings. I've been into these on my MacBook Pro in 1.10.3 and turned off (unticked) the "Hardware Acceleration: Enable Metal compute acceleration". Repeating the test using my test images no longer causes the corruption as long (as long as this is turned off). I'm bemused why this should affect more than just the displayed image: why the saved image also got corrupted. But perhaps the acceleration is used not just for the display but also applying filters and edits to the actual image data itself? It seems to be a workaround for this particular problem, but I'm going to hang fire on using the 1.10.3 applications in general for now. PS. I've now upgraded from macOS 11.6 Big Sur to 12.0.1 Monterey and the problem with Affinity Photo 1.10.3 with Metal acceleration remains (and the workaround works).
-
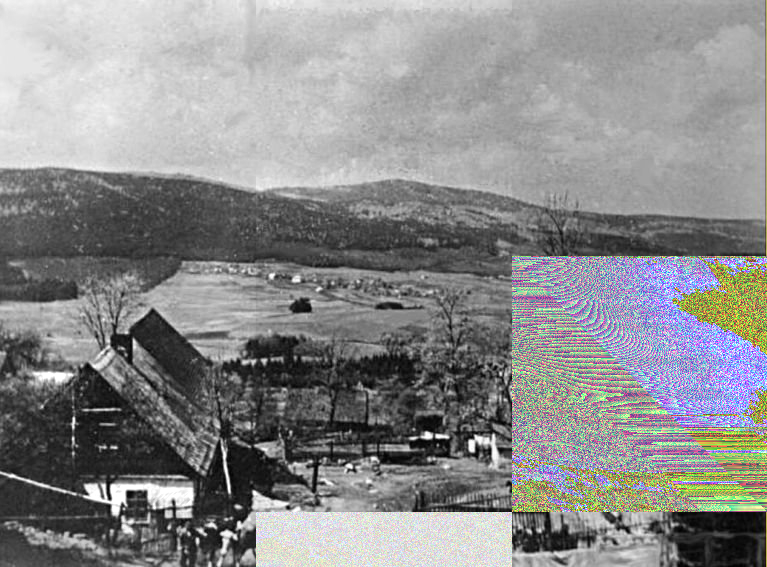
The Problem I'm using Affinity Photo on an Apple MacBook Pro running macOS 11.6 (Big Sur). Today I updated from Affinity Photo 1.10.1 to 1.10.3 and promptly hit a problem with one of the images I'm editing. The problem manifests when I add a Clarity live filter to the image then adjust the filter's slider several times. After a few (6 to 10) alterations to the slider the image displayed on screen starts getting corrupted. This is NOT just a display problem. If work is saved, the resulting file contains a corrupted image too, although in a different way to that shown on the editing screen. This suggests the actual memory copy of the image data is being corrupted, and so if saved can lead to data loss. The problem does not appear to affect all images so I'm attaching two test files, named "1 - Test 1.jpeg" and "2 - Test 2.jpeg". These are two distinct copies of the image downloaded from different sources at different times, and indeed are slight different (eg, aspect ratio, content). Steps to Reproduce the Problem Open one of the two test files above in Affinity Photo 1.10.3 (I'm using it on an Apple Mac). Add a new Live Filter > Sharpen > Clarity layer. In the filter's adjustment panel, adjust the slider up and down several times. (Eg, move it between a positive and negative value in quick succession.) Within a small number (typically 10 or so) "jiggles" of the slide control the image being edited starts showing corruption, appearing as large square blocks containing either a different part of the image, or random coloured "static". You might need to let go of the mouse/trackpad after each alteration; keeping it pressed and simply sliding the control doesn't seem to cause the problem (as quickly?). Sometimes the corruption effects are transitory and shown only when the control is being slid. Other times they remaining in situ. See the attached screenshot "3 - Screenshot of Corrupted Test Image 2 in Affinity Photo.png" to see an example. Here, the corruption has replicated part of the cottage at the lower right into the top centre of the image. Other parts of the image are misplaced below it and elsewhere. The problem does NOT happen when the test is performed in Affinity Photo 1.10.1 (see below). Observations Closing the image without quitting Affinity Photo then opening the test image again and repeating the test seems to make the issue occur immediately rather than after several wiggles of the Clarity Live Filter's settings slider. This might indicate memory corruption happening within Affinity Photo that is not reset until the entire application is quit and re-run: that closing and re-opening the image file is not sufficient. See the attached screenshot "4 - Screenshot of Corrupted Test Image 2 in Affinity Photo.png" to see the result of closing (without saving) then re-opening the image file without quitting Affinity Photo then re-opening the image file; adding the Clarity filter and adjusting it immediately caused this spectacular corruption. Exporting this corrupted image as a PNG gives rise to a corrupted image saved to disk. See the attached file "5 - Corrupted Test Image Saved.png". Likewise, saving as a native Affinity Photo file also stores a corrupted image. This can cause data loss when editing such a file, causing the corruption, then hitting Save before realising: it overwrites the original file with the corrupted image. I have not had this problem before, so restored Affinity Photo 1.10.1 from a backup and repeated the tests. Version 1.10.1 had not problems with my repeatedly altering the Clarity Live Filter's setting; no corruption occurred. (I see in other posts people mentioning crashes caused by memory allocation issues, and this corruption gives me the feeling it is the same sort of issue.) Trying the Test Images in Other Formats In case there was an issue with the JPEG data in the two test files I used Affinity Photo 1.10.1 to open "2 - Test 2.jpeg" then export fresh copies as JPEG and PNG. I then repeated the tests using these exported images in Affinity Photo 1.10.3. The problem continues to affect both images, suggesting it is not related to an issue with the original JPEG file's data. The fault in 1.10.3 does not affect all images. I repeated the tests with some other image files and could repeatedly alter the Clarity Live Filter's settings without problem. In Conclusion For now, I have both 1.10.1 and 1.10.3 installed on my Mac so I can do any testing Serif might need, but plan to only use Affinity Photo 1.10.1 to work with for now. I don't trust 1.10.3! Cheers, Mike B-)