User_783649
-
Posts
228 -
Joined
Everything posted by User_783649
-
10-bit /30-bit colour support please
User_783649 replied to Mujabad's topic in Feedback for Affinity Photo V1 on Desktop
In no way my previous message was addressed to you, dear @NotMyFault. I know you long enough on this forum as very smart, clever and highly educated person knowing probably way more advanced and highly technical stuff than myself. Your curiousity and constant desire to learn more simply admire and inspires me every time I found your posts here. I fully agree with you that for a proper 30bit workflow it might be better to switch to RGB/16 mode and just let the hardware do the rest. I mean, that longer we keep higher bit depth till final export, the better all our intermediate editing results will be. You wrote, that you get 10 bit colour resolution if you create gradients in RGB/16 mode. Does this mean that you don't notice any color banding in Affinity apps canvas on your system? The very simple test would be creating 1024px wide canvas and filling it with a simple black-to-white gradient. In RGB/8 there will be 4px (1024/4) wide steps visible. And in theory, in RGB/16 mode they should disappear. Regarding your display: Well this may be a bit different for M1. There's another test that can quickly show us, if you have 30bit enabled system-wide. Try looking at this image: https://raw.githubusercontent.com/jursonovicst/gradient/master/test_sequences/1920x1080/gradient_1920-1080_25-50.png -
10-bit /30-bit colour support please
User_783649 replied to Mujabad's topic in Feedback for Affinity Photo V1 on Desktop
I believe we shouldn't mix those things. 8bit/10bit is viewing bit depth (between your GPU and display). It tells how smooth gradients will be as there will be more colors in 10bit mode because there are no longer 256 gradation steps but 1024. Another thing is archiving bit depth (document mode). It may be RGB/8, RGB/16, RGB32, etc. It determines how color data will be stored in file when saved. So we may find ourselves working with RGB/8 document on a 30bit display and we also may work with RGB/16 image on a cheap 6bit+FRC display which is barely reaches 24bit with frame rate control. As far as I know, Photoshop does support 30bit viewing mode. At least it does on my Mac system. Gradients are much smoother in this mode. In case of macOS everyone can check if they're currently in 30bit mode system-wide or not. Run the following command in Terminal: /System/Library/Extensions/AppleGraphicsControl.kext/Contents/MacOS/AGDCDiagnose -a > AGDCDiagnose.txt 2>&1 Then go to your home folder and open text file AGDCDiagnose.txt, go to the end of file and try to find following strings: Pixel Encoding 1 (RGB444) Bits Per Color Component 4 (10 bpc) That will tell you that system is currently using 10bits per channel. To double check that you can go to About This Mac -> System Report -> Graphics/Displays. You need to look for this line: Framebuffer Depth: 30-Bit Color (ARGB2101010) -
@NotMyFault I confirm, this doesn't affect exports as they run through resampling pass (Bilinear, Bicubic or whatever we choose in settings). But that's another story. However I should notice that this even visible-in-app-only thing could potentially affect our workflow or some decisions we're making when working on an image. For me, it just feels "wrong" or broken. I wish they consider adding a single Bilinear pass for such odd zoom levels just like they do it currently when going below 100%. I think you agree with me, that it is always better to have as much accurate representation of canvas as it is possible during the work on the image. But, probably, it's always better to work at 100% zoom level and sometimes go precisely to 200% or 400% if needed.
-
@NotMyFault Finally! Thank you very much! Do you see how uneven the whole canvas is on two last screenshots you posted? It doesn't look like Bilinear it's even worse, way worse I must say. That's what I'm talking about. The problem persists for non-retina displays between 100% and 200%.
-
@NotMyFault Of course, they will be perfect since they are 100% zoom level! Now please try setting zoom level to 134% as you did previoulsy while maintaining your Dell as a main display. Sorry, if confused you with unclear instructions.
-
@NotMyFault Thank you for the screenshot provided. What seems strange to me is that 1920x1080 document fully fits into your 1920x1200 display at 134% and there's even more space available for side panels. I suppose you opened AP on your main screen and then dragged the window to the second display. In this scenario AP will still think it runs on high-res display and pressing Cmd+1 or setting zoom level to 100% will actually give us image shown just in half of its original size. If you press Tab (to hide all the panels) you'll see that document canvas is exactly half the width of your screen. Can you please try setting your second display as main temporarily in Preferences. In this way AP will start running on that display first and probably you'll be able to get an idea what I'm trying to catch here.
-
Hopefully someone from the team will open a ticket or assign a bug tag to this thread as well as to other threads mentioned in my previous message. If this whole concept will go straight to 2.0 without any changes or improvements, that would be actually very sad and disappointing.
-
@Renate RS I'm also on macOS 12.5 right now. Before that I was on 10.15.7, 11.6.7, 12.4. The problem you're experiencing is actually a well known. Check similar threads below. They are all about the same software design flaw in AP and raster personas in AD and APub: However, let's try "one more thing". Could you please try disconnecting your external display and relaunch Photo? Or another way — try closing the laptop's lid and relaunch Photo. Now try opening the same file and view it at 170% zoom level just like you did before. Does text appears crisp and clean now? By doing this we may try to rule out any possible issues with multiple screens resolutions conflicting with each other. I've seen such issues before. When app was initially launched on another screen and was moved to another one later.
-
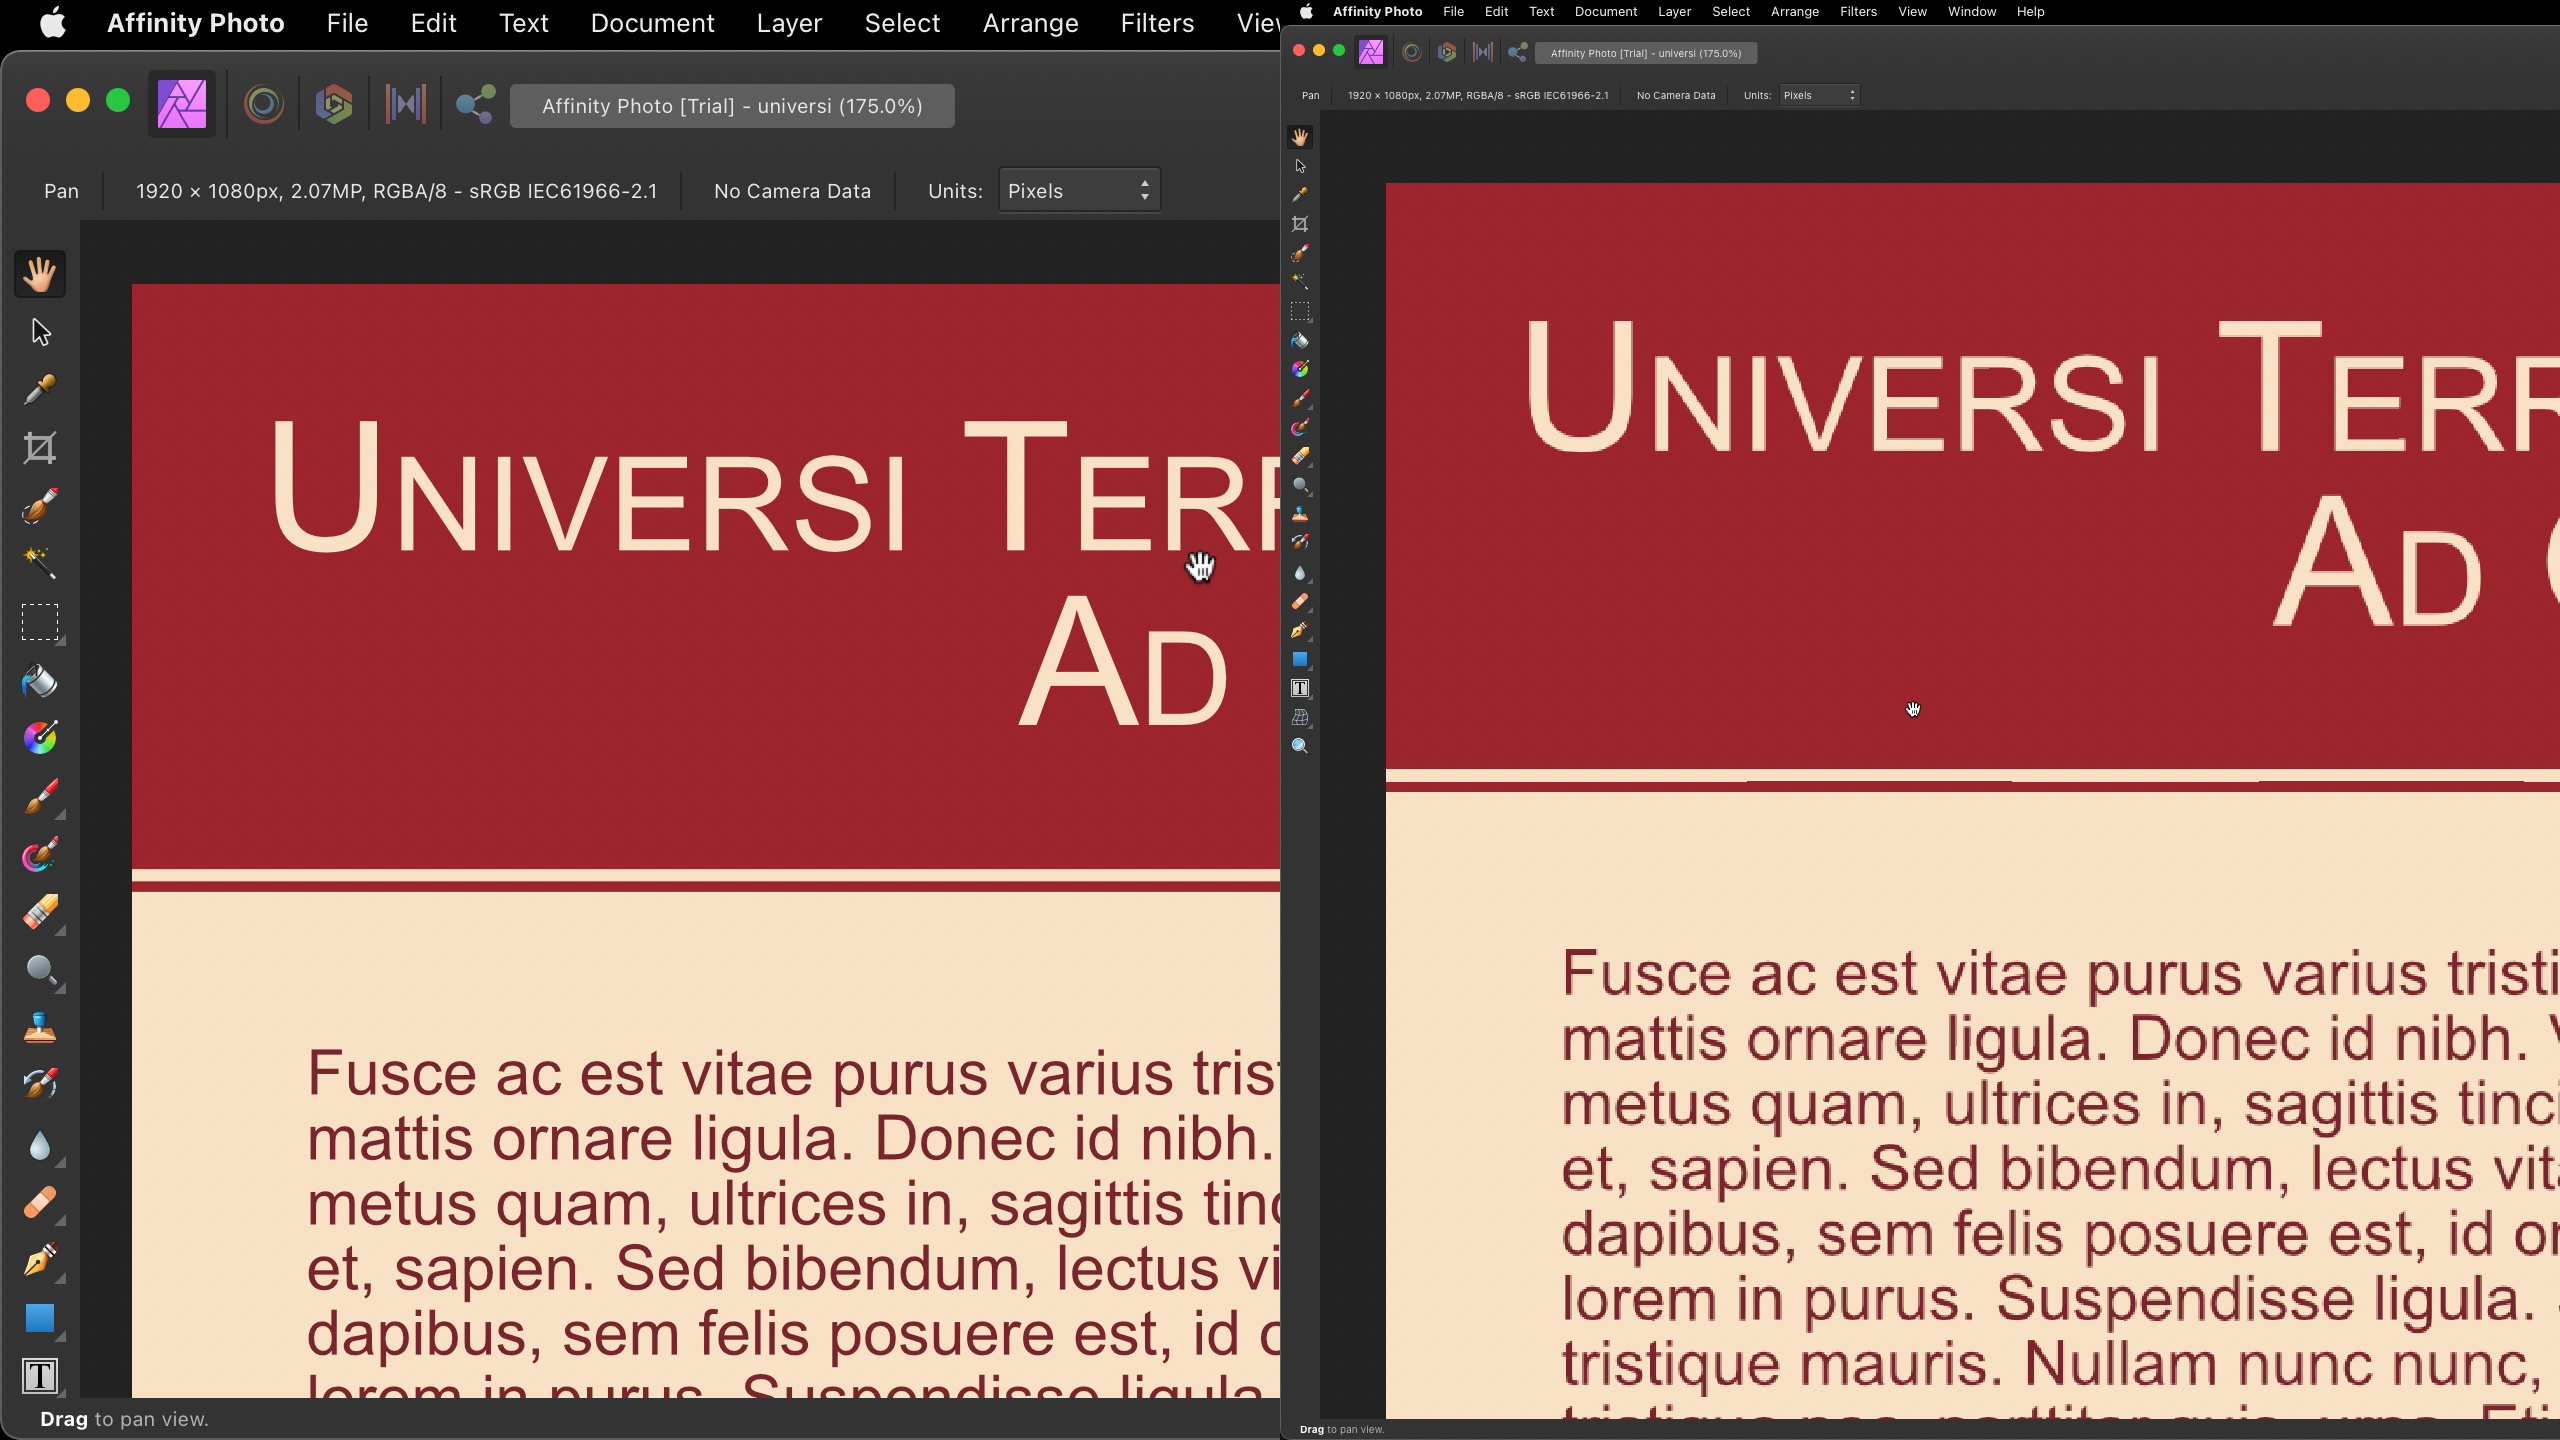
Interesting fact: if I switch my display resolution from default 2560x1440 to HiDPI mode 1280x720 than AP nicely resamples the canvas between 100% and 200% zoom levels providing clean and sharp image. That doesn't happen when working in non HiDPI mode. Here's a comparison I made at 175% zoom level (so everything is matched in size). Left — 2560x1440 @ 1280x720 (HiDPI). Right — 2560x1440 (native resolution).

-
@Renate RS Thank you for the screenshot. May we know what zoom level is used there? The difference you're showing is actually expected. Because APub is able to render text layers as vector objects thus they will remain sharp and crisp no matter which zoom level you've set. AP threats everything on a canvas as raster, pixel data even if it is the same text layer or a shape it will be all rendered as pixels accordingly to document pixel resolution.
-
@NotMyFault Thank you for the screenshots provided. It's clear to me that iPad version of AP doesn't have this issue. I suppose resampling routines working a bit differently here, considering the Retina display and that everything is rendered at 2x. So it's more of an issue of regular density screens with PPI ~110. I'm wondering if you're by the chance running your LG34WK95 at any HiDPI mode or at its full native resolution? Could you please post a couple of screenshots of the same document from your Mac mini system with an external dislay? Would be very interesting to see if there's any relation between screen resolution (HiDPI mode on/off) and how AP resamples the canvas. @Renate RS That's actually very interesting case. Because in Publisher its Publisher persona is vector view mode and its Photo persona should behave the same way as AP does. Could you please try opening the sample document from my post above universi.afphoto and post some screenshots? Also — are you running all these apps on your Macbook screen or have any external screens attached?
-
@Renate RS Designer and Publisher render text perfectly at any zoom levels because they are vector editors. Photo is a raster editor and can't do it the same way as vector editors. In your last screenshot with Performance Settings window I can clearly see that letters behind have better rendering than in your initial posting. So could you please set your zoom level once again to 100% (Cmd+1) and let us know if image quality is all good for you now?
-
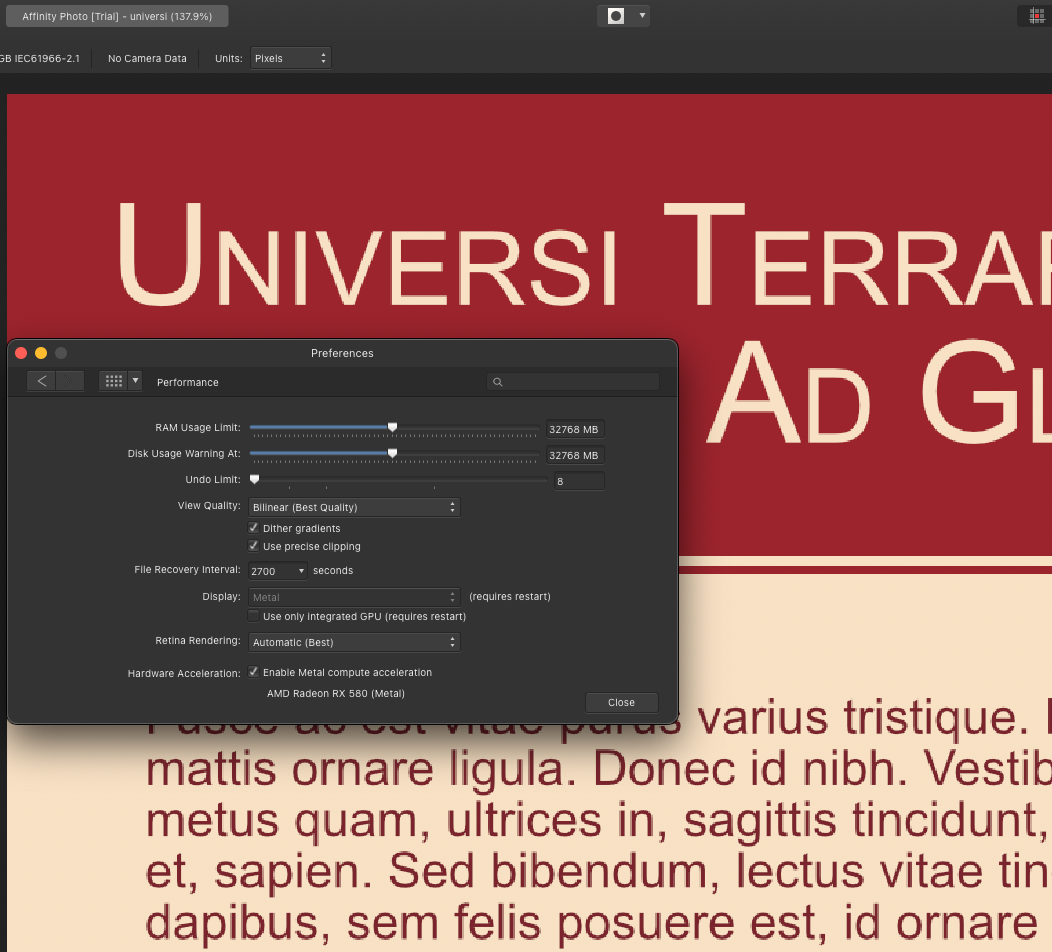
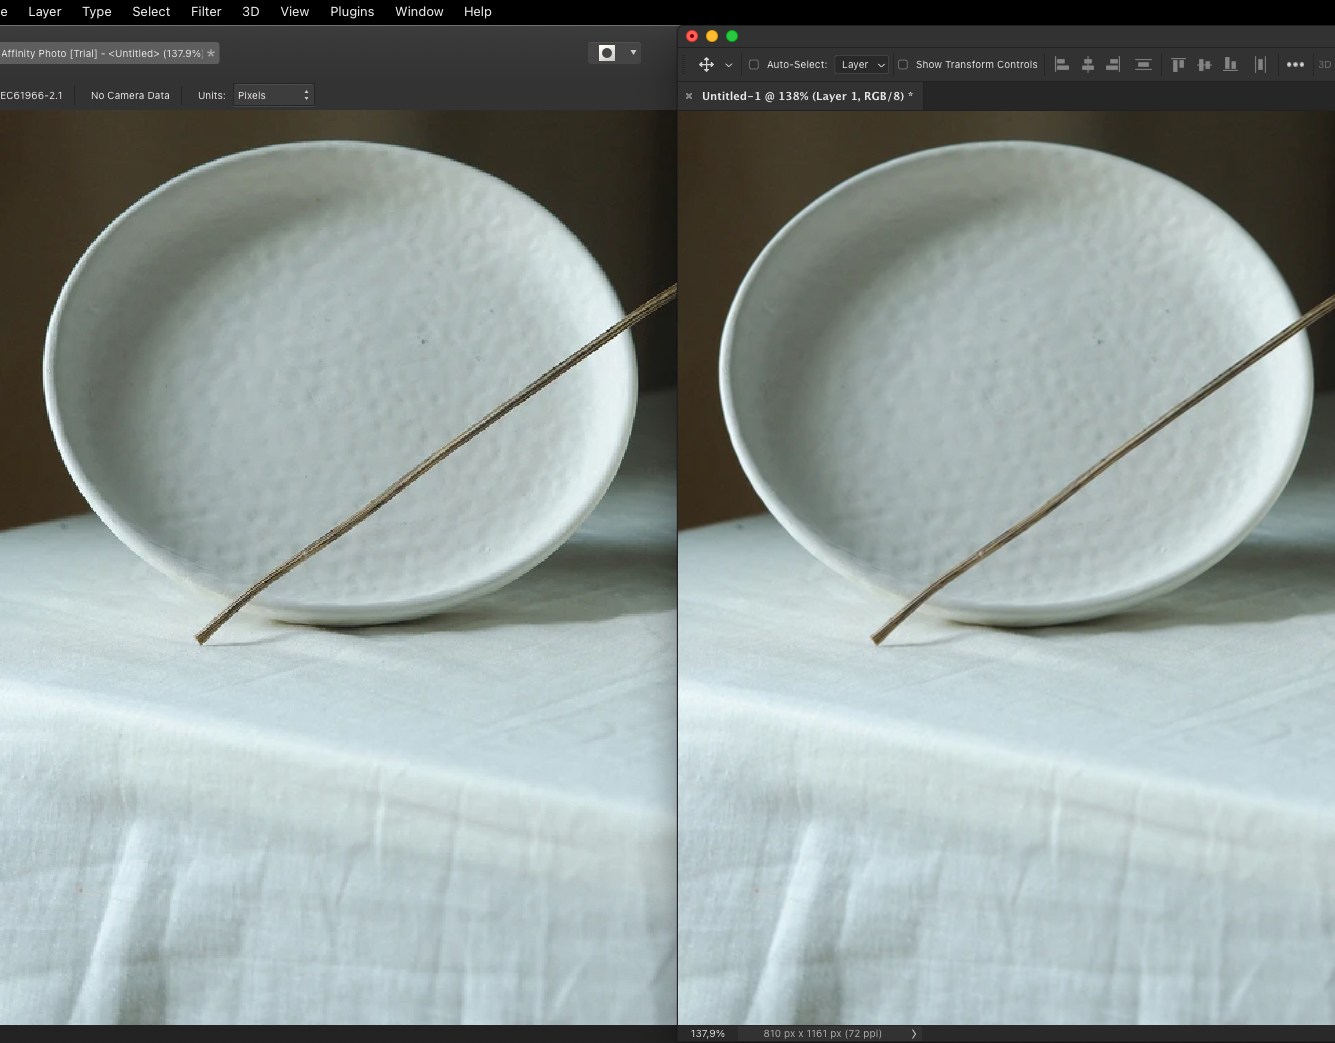
@NotMyFault Thank you very much for your time taking these tests for us. Now I'm finding this strange as I'm also on macOS right now and I'm experiencing exactly the same issues as @Renate RS As far as I can remember, AP canvas preview always was a bit jagged and distorted for me at any odd zoom levels between 100% and 200%. Very first time I noticed this was the moment I created a new document and you know... this default AP behaviour of fitting the canvas to the window instead of showing 100%. That was the moment I felt something is not quite right with the image quality. I started to dig down the problem and found that for any zoom levels below 100% AP runs one pass of Bilinear resampling. That's typically enough for getting an ok image quality. Somehow it doesn't happen between 100% and 200%. That's how I teached myself to forget all these odd zoom levels and work strictly at 100% and sometimes go to 200% or 400% to better handle small details if needed. I should also mention that I'm using 27" 2560x1440 display at its full native resolution and don't have any display scaling enabled in macOS. I'm attaching the sample document so everyone could try open it and see if letters are a bit distorted. For me it opens at 107.9% by default and I immediately see that overall document canvas is unevenly distorted as there's no Bilinear filtering applied to it. 100% is obviously crisp and sharp and 200% has proper Bilinear filtering. universi.afphoto Also, for comparison, there's another document (photo this time) opened in AP and Photoshop at the same 137.9% zoom level.
-
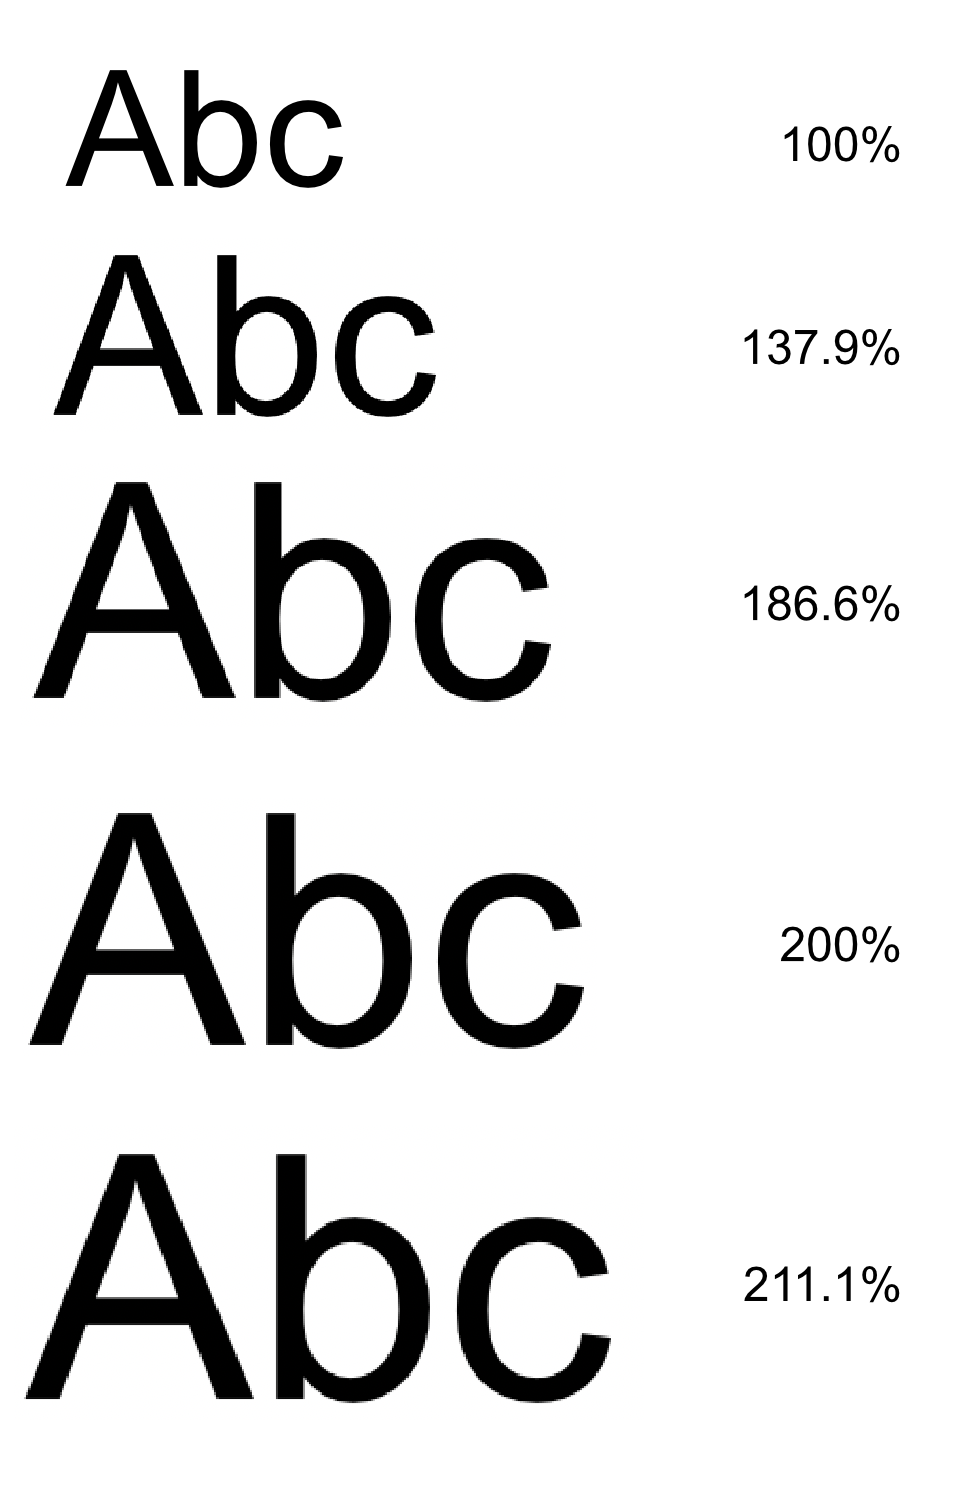
@NotMyFault Merge visible or rasterize have no visible effect on perceived rendering quality when viewing at such odd zoom levels. Seems to be a global thing for AP and how it renders the canvas. Btw, both Designer and Publisher always use Bilinear at all zoom levels in vector mode but their raster personas behave similarily to AP. Probably a performance optimization or something like this. Just to illustrate this a bit better I prepared an image comparing the canvas shown at different zoom levels. 100% and 200% are properly and evenly resampled while any intermediate ones are a rough upscales of a previous (100%/200%/..) mipmap without any resampling.
-
@Renate RS You have zoom level set to 113.2%. This is exactly the reason AP shows jagged/distorted image. Just change it to 100%. Unfortunately, AP doesn't use precise quality resampling and instead roughly upscales cached mipmap of 100% canvas for any zoom level between 100% and 200%.
-
@Being Frank I've inspected the document you posted here. The reason of the slowdown is Live Perspective filter being applied to a couple of groups in your layer stack. These are known to be very resource consuming as they constantly re-render the canvas everytime you change anything or change the zoom level. Once I hide those groups — zooming, panning around and all other actions are instant on my system.
-
@Being Frank I have an Intel Core i9-9900k paired with AMD Radeon RX 580. Running latest macOS Monterey on it. Zooming in/out and scrolling the document canvas are buttery smooth on my system thanks to working hardware acceleration with macOS Metal technology. As far as I know, these things are intended to be performed on GPU in all Affinity apps and don't put any serious pressure on CPU. Working with vector layers, groups of objects, editing or moving them around is another story. By design, AD will always aim to use 100% CPU to complete the job as fast as possible. On my system I also see sometimes 100% CPU usage. But these spikes are very short in time and everything instantly goes back to normal. So nothing like 5 mins redraw delays as you mentioned above. I believe that Ryzen 9 3900X is still a very good 12C 24T CPU and running AD efficiently on it shouldn't be a problem at all.
-
@Being Frank I'm trying to figure out this since I've started working with these apps. Even with very basic operations they tend to use way too much CPU resources and produce way too much heat. I've never seen anything like that in other apps I'm working with daily like Photoshop, Sketch, XD, Figma, Illustrator or InDesign. They all use less CPU resources and I've never seen such high CPU temps as I sometimes see when working with Affinity apps.
-
@Being Frank 1) You're using an unsupported GPU. All AMD cards starting from 5000 series are affected by this issue. See the details in this thread. 2) You're using vector based editor which is an opposite to raster workloads such as games and photos. It will primarily use CPU, GPU doesn't add much here. Vectors are better handled by CPU.
-
Thank you for your topic, Brian. Specs have little to no impact on this behavior, unfortunately. This is just the way Affinity apps render the canvas, no matter how powerful your system is. What they really need to do is to implement some kind of v-sync technology to sync all those random tiles before drawing whole visible portion of screen. We just need them all to "arrive" at the same time, preferrably under a 15 - 16ms time window. I can't believe this is an impossible task and a tough request. Hopefully, there will be some imporevements in future.
-
Another way of achieving similar effect would be using a real water ripples photo as a map for a live displacement filter. It gives us more control and realism over how we want our image look like in the end. We can apply various water ripple images and try them with live displacement to find the best look. We can control how much water overlays, shadows and highlighs you want over your house reflection. I just played a bit with your house image and here's my modest attempt.
-
@walt.farrell I guess they convert everything they receive from the user, be it a .JPEG or a .PNG file. As we know, JPEGs can also be pretty heavy especially when saved with 100% quality. Add here some people who upload full size 30-50 megapixel images from their DSLR cameras in search of an ultimate quality of their feed. Instagram knows all these tricks and just protects own servers storage space by converting everything accordingly to their own views of what an acceptable image quality means for them.
-
Whatever you throw at Instagram became converted to JPEG on their servers with aggressive compression settings being applied. Unfortunately, you can't avoid that. If Instagram used 100% or at least 80%-90% quality for avatars it would be way less prominent. But they are too greedy and probably use something like 30%-50%. Less storage space, less traffic, lower datacenter bills. JPEG as a format doesn't like sharp object edges with high local color contrast (your image has them). These areas will always have artifacts and quality will degrade severely here as compression ratio goes down from 100%. The best you can do is to try changing colors and see if it improves the quality.
-
Can't edit raw images
User_783649 replied to Bolbasor33's topic in Pre-V2 Archive of Desktop Questions (macOS and Windows)
@Bolbasor33 What file extension your file has? Are you sure you're exporting Unmodified Original from Apple Photos? -
@coque.regis It's way more advanced mouse than mine and it should be configurable as well. You should look for polling rate (it might be called – report rate) not sensitivity. You can check your current polling rate here — https://www.clickspeedtester.com/mouse-polling-rate-checker/