

augustya
-
Posts
902 -
Joined
-
Last visited
Posts posted by augustya
-
-
1 minute ago, walt.farrell said:
Here's a set that includes some hair brushes:
You might also try a web search for hair brushes for affinity photo
Thanks will give it a try.
-
Hi Everyone,
Can someone please help me with Hair Brush that I can add to the Affinity Photo on the Mac. I am looking out for Hair Brush.
-
Hi Everyone,
Can someone please help me with Hair Brush that I can add to the Affinity Photo on the Mac. I am looking for Hair Brush.
-
Guys,
Making a selection directly on the extracted image and then using CTRL C and CTRL V makes another layer with a Mask which I do not want. I just want a selection of the hair area from the extracted image. What am I doing wrong ?
Why is creating a new layer with mask?
-
I have an image which I have extracted from the background and applied Mask to it and Let's say from that image if I want to use some hair which is near the ear of the subject on the right side ear and I want to recreate and use those hair on the other side, left side of the ear.
Can I make a selection of the hair from the already extracted image which I have created and applied Mask to or will I have to make a new selection of the hair from the original image and then use it ?
The reason I want to use the hair from the extracted image with a mask is because the hair in that image is refined and worked upon so it gives me a good selection.
-
20 minutes ago, v_kyr said:
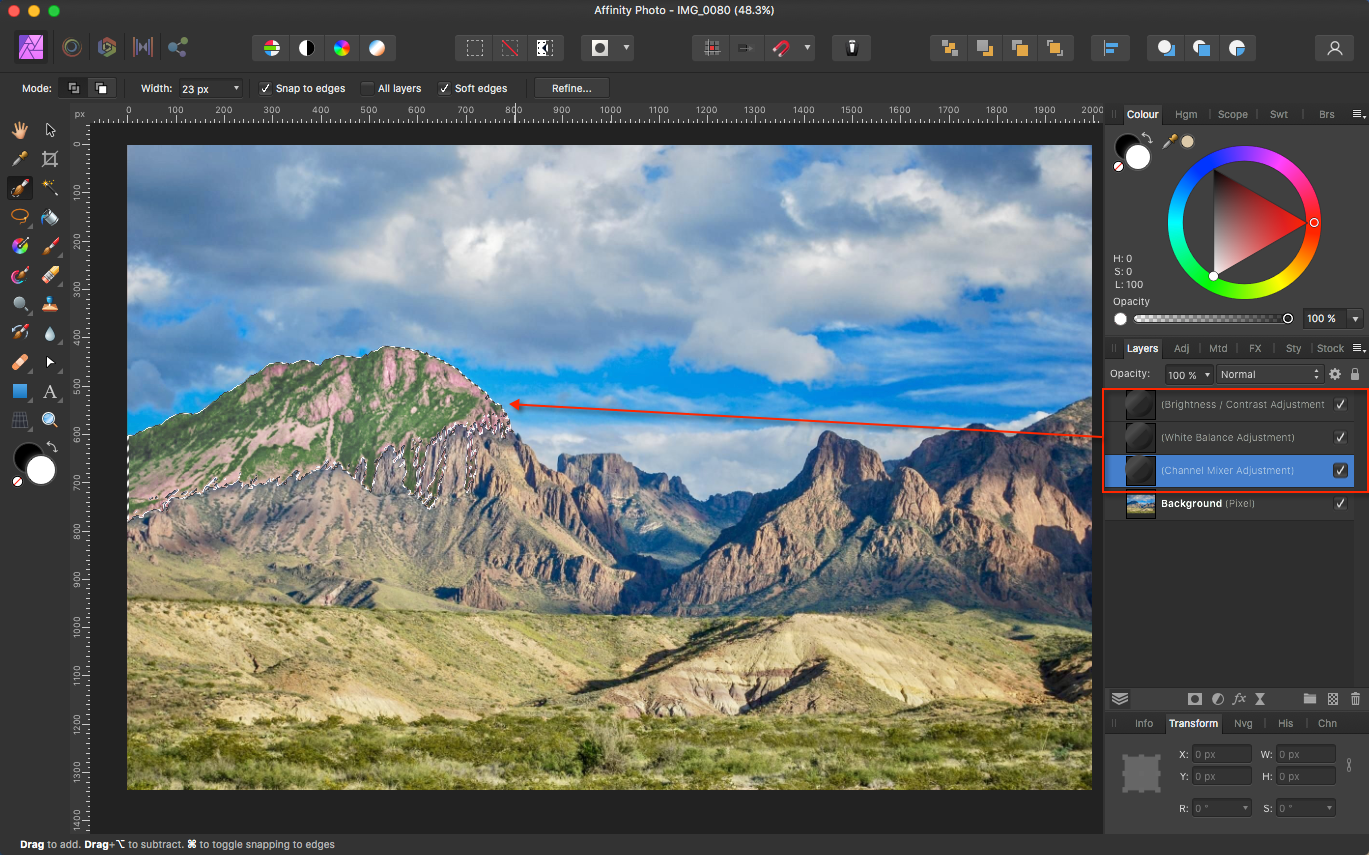
But it isn't different and pretty related to what you've asked x-times before in the pasts here. So in order to do what you want, you again need some selection and tweaking brightness, contrast, color channels ... etc. - It's pretty much nearly the same procedure of steps & tryouts etc. to perform here in order to alter that mountain area!

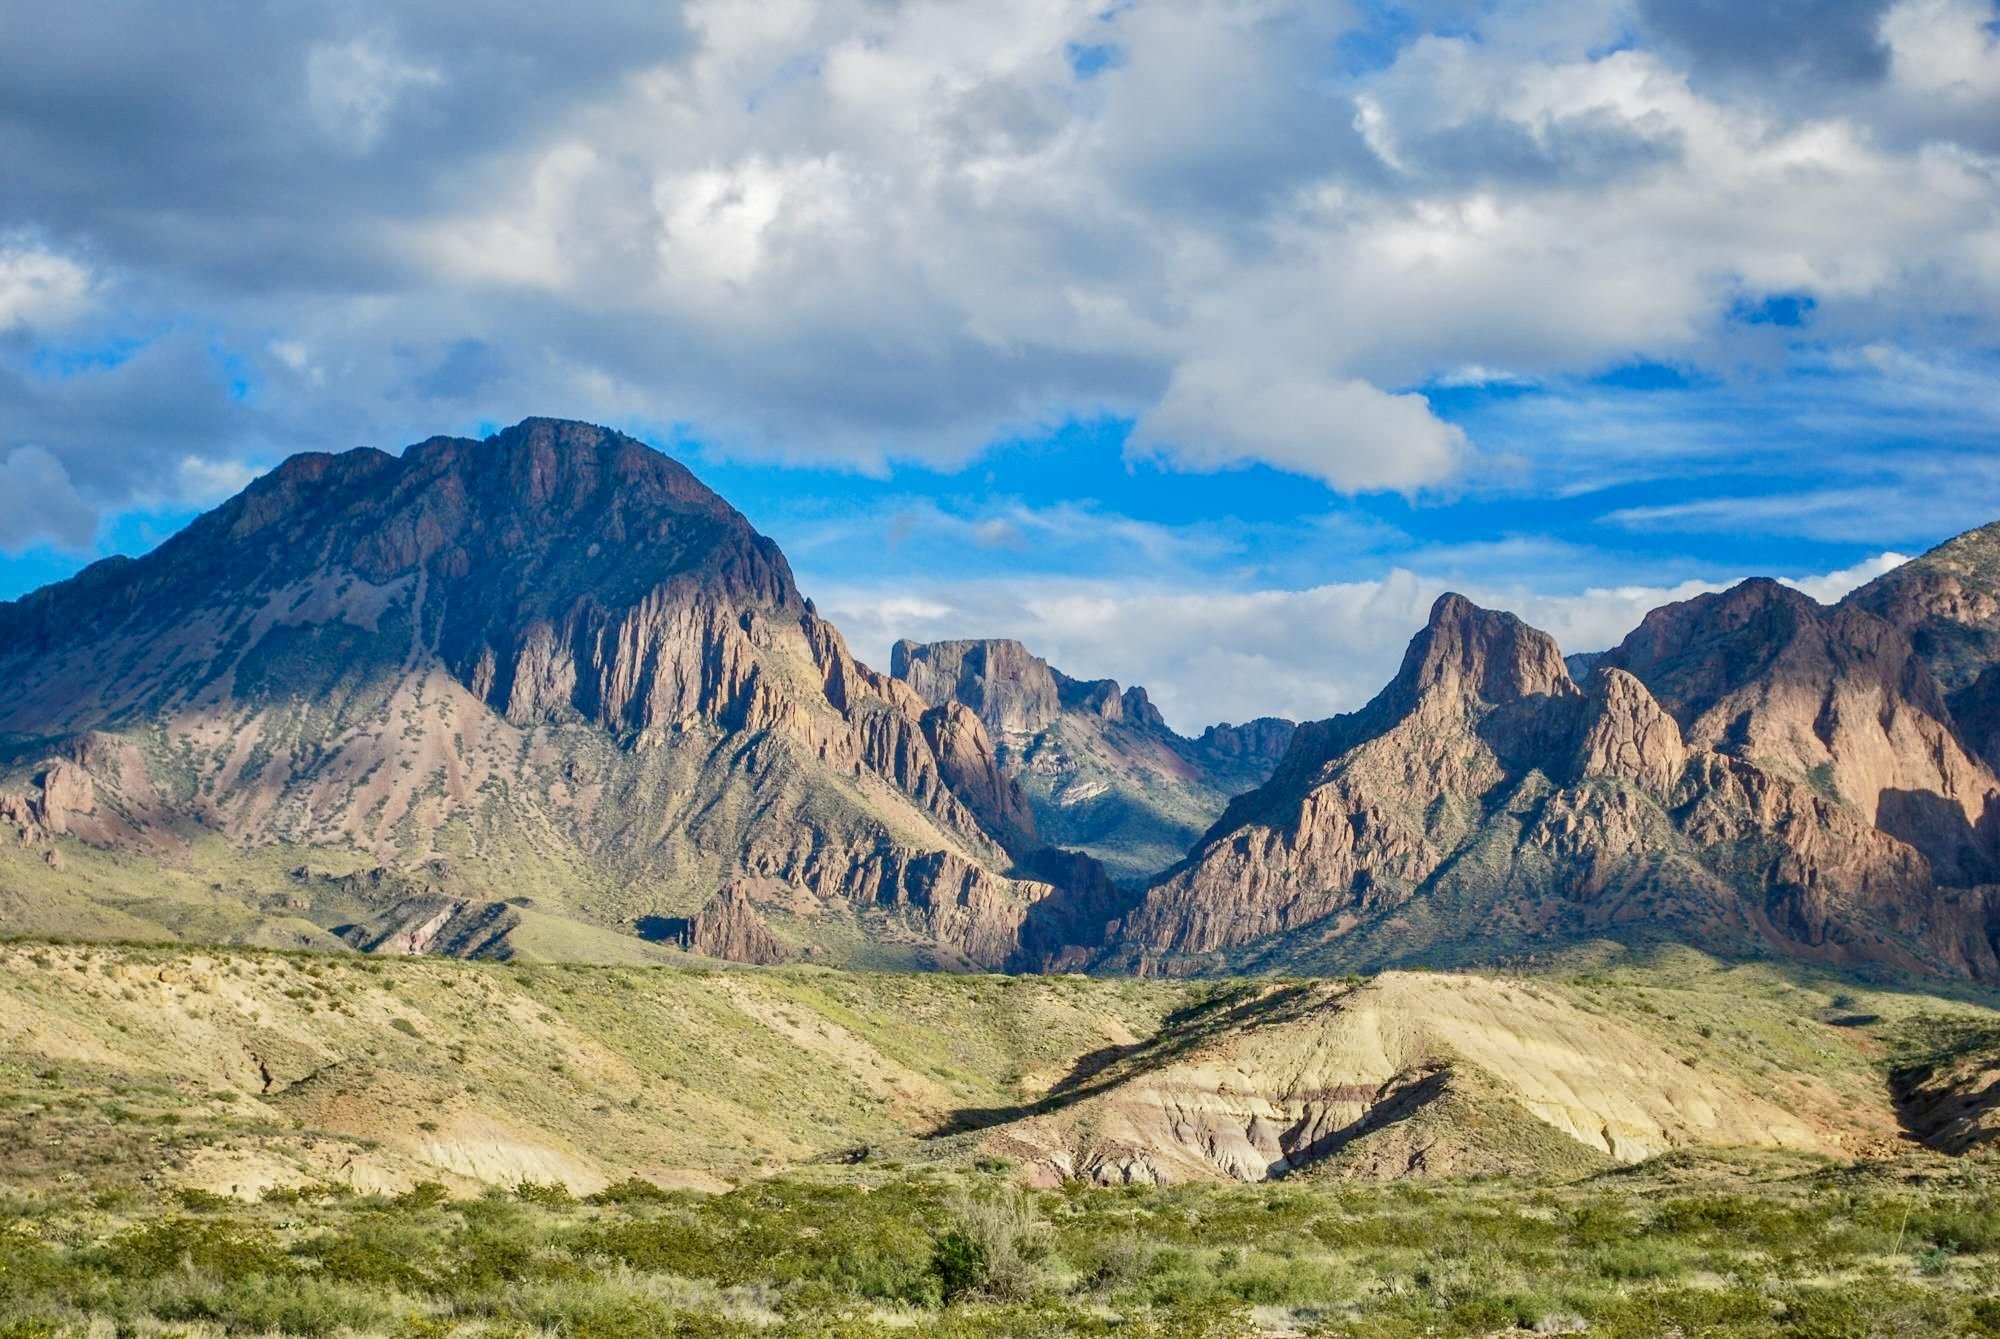
How did you get that Grass on that Rocky area of the Mountain ?
-
Now, before someone points out that I have asked similar question in the past. lol ! I know there are people here who would jump on to first pointing out that I am asking repetitive question, so let me clear it out, this is different, in the past what I have asked is brightening one side of the photo, but this photo that I have uploaded if you see there is a shadow on the left side of the mountain and my question is not about Brightening what if I want to remove the shadow from this picture and make that area of the mountain look sunny is that possible?
Look forward to your responses.
TIA !

-
1 hour ago, NotMyFault said:
if you want to ignore someone, go ahead - silent. No need to publicly attack anybody.
I do not want to do it to anyone, This Forum and the people here have helped me and made me learn a lot of things. but with this guy this is a marked observation and experience over a period of time and his back to back kind of accumulated replies to my posts. If you go through all his post on my threads it is all criticizing, blaming, trying to condescend me. Do you not see the insult all that causes to me. is he a forum moderator here ? How much does one take on ?
-
33 minutes ago, thomaso said:
The Brush options "Hardness" and "Flow" are related to the currently used Brush Size and thus can vary within a certain process. They were discussed & demonstrated in several posts in your recent thread:
All your comments here are as.if you are the Gate Keeper the Administrator here (Which sadly you are not) of what was discussed before and what could not be discussed again.
There is hardly any help in any of your comments here. Those are all Sarcastic Comments.
Why don't you just let peace be here by not commenting on my threads atall. I do not enjoy it like reading your comments as there is no help in it.
Only blood boiling and provoking comments that you make here.
I have put you on an ignore list but still this forum let's you comment on my threads.
@Dan C This guy is a repeated offender !!
-
1 hour ago, v_kyr said:
Look carefully it looks much lighter on the left eyes zone than what you've shown before. Now the left side looks like the right side.
If it's still too dark for you then pick up and apply something as brush source from a lighter face area, and take that over (applying) to those darker eye areas. You can use some of the retouching tools ...
... which are meant to be used for such finetune purposes.
What is the hardness and Flow that I should keep while.dong this ?
-
46 minutes ago, NotMyFault said:
- Add a selection with lasso tool
- feather selection
- add curves adjustment
- create nodes according to Screenshot
- set blend range accordingly
- reduce layer opacity to get natural looking result
Well ! This is a little too complicated for my Brain to Process....
-
36 minutes ago, v_kyr said:
Example adjusting the guys right eye area (from his point of view) to look more like his left eye area via the healing brush ...
But that would still make it look darker I want still lighter and brighter.
-
Hi Guys,
I need some help, If you have a Look at this photo, the area near the eye which is touching the nose. The inside of the eye which is touching the nose looks very dark. What is the best way to lighten it ? I tried using brightness and contrast adjustment but it is not giving a very natural look is looking very unnatural. How else can I brighten that area ?
-
Also from what I understand on this is, Basically Opacity and Hardness is got to do with how intensely you want to draw and Flow is all about releasing colour how much colour do you wanna release per stroke. But how does one decide in what circumstances how much percentage of Opacity, Flow and Hardness should I select ? That is what my core question is ?
-
20 hours ago, smadell said:
0% flow makes no sense at all to me, since it implies that no paint is flowing from the brush at all. Although you can do this, technically, it doesn't actually paint anything.
The Opacity and Flow settings (for brush strokes) work on a per-stroke basis. Setting opacity to 100% sets the maximum opacity you can attain per stroke. Setting opacity to 10%, for instance, means that each given stroke can only attain 10% opacity. In the latter case, you can move your brush over the same point multiple times, but the point will never get beyond 10% opacity. HOWEVER, if you start a new stroke (e.g., lift the mouse button and then press it down again) that new stroke will be able to attain 10% also. If you paint over the same spot again, you will increase the amount of paint on that spot by another 10%.
Flow is the rate at which the brush lays down paint. Think about it like you were shading with a pencil - put the pencil at an angle and start to stroke an area back and forth until the area gets darker and darker, the more you do it.
Hardness only describes the feathering of the edge of the stroke.
We can explain this in words all day long. The only real way to figure it out is to create a new document with a blank pixel layer. Start with a round brush with Opacity, Flow, and Harness all set to 100%. Lay down a single stroke. Now change the hardness to lower and lower values. See the difference - it's the feathering at the edge.
Put the hardness back to 100% and start decreasing the opacity. See what happens now. And, with opacity, put down multiple strokes that overlap in some areas. See how each stroke is the same opacity, but it gets darker where they overlap.
Do the same for flow. Start at 100% and decrease slowly down to 10, 5, 3, 2, and 1% settings. Again, make multiple strokes that overlay. With a very low flow setting, move the brush back and forth over the same area and see how the intensity of the paint builds up.
Last thing: Put hardness anywhere you like. Set opacity down to 25% and set flow down to 5% (random, small-ish numbers) and start laying down multiple overlapping strokes. Because the flow is low, each stroke is light. As you move each brush stroke back and forth you'll see the paint build up. But (and this is important) each brush stroke can never get darker than whatever you set for opacity. In this case, a single back and forth brush stroke with 25% opacity and 5% flow will build up in darkness until it reaches 25% opacity. Then, you can't get darker. UNLESS, you start a new stroke. This second stroke will work the same way, but if you overlap the second stroke with the first, the overlapped area will be darker than the 25% opacity would otherwise allow.
19 hours ago, iconoclast said:You can easily test it yourself: Choose a Basic Brush with a sharp edge (all settings on 100 %) and click on the canvas and paint a stroke. Then reduce only the "Hardness" to e.g. 50% and do the same. Finally reduce the "Hardness" to 0% and repeat what you did with the other settings. The strokes will look thinner, the lower the "Hardness" is, but if you measure the blended edges of the strokes by moving the curser over this areas and looking at the "Info" panel, you will see, that there are pixels with low opacity even in outer areas where you can't see them. So "Hardness" defines the sharpness of the brush. And the softest brush is blending the colour from full opaque pixels in the center to fully transparent pixels on the edge of the brush. But strictly speaking aloso the "Flow" can have influence on the sharpness of the stroke.
As smadell already said, 0% "Flow" doesn't make any sense, because the brush doesn't emit any colour in that case. The developers could cut the scale at 1% "Flow", but I think that would cause confusion too anyway.
Thanks @smadell and @iconoclast for the explanation.
What I was also looking was an example like, lets say painting with a Brush on an adjustment layer that you have applied lets say you have used frequency separation on a portrait photo and then you are working on low frequency to reduce the skin colour irregularities, in situations like this you want to use a low flow because you suddenly do not want a spot on the face to look too dark or too light. That way I was asking you guys if you can give me an example, that would kind of better print the concept in my Brain. That's what I was saying...
-
39 minutes ago, iconoclast said:
The "Hardness" means if the brush has a sharp edge or a blurred one. The hard stroke has the same base area as the soft one, but only his center of the soft one will be 100% black and opaque, while it is blended to full transparency at the edges.
Didn't understand this too well ? Can you give any example ?
40 minutes ago, iconoclast said:So if you hold a soft brush for a long time or with a high flow on the same spot, even the transparent areas of the brush stroke will be flooded with colour and become more opaque. It's like painting on the same spot again and again. With zero Flow, there will be no colour at all (zero colour per second).
So why and when would you use 0% Flow ? I have seen some guys select 0% Flow in some cases. Why would you use and in what scenarios would you use 0% Flow ?
-
12 hours ago, smadell said:
Also, in situations like this I've found that painting with a brush set to 1-3% flow makes the "revealing" easier to control. You can paint over and over an area until the degree of revealing is to your liking. (You should read up on the difference between Opacity and Flow as brush settings, since they are subtle but different.)
I often get way too confused between how much Hardness to keep and How much Flow to keep and which is more severe ? And in what scenario what needs to be increased or has to be reduced
-
11 hours ago, smadell said:
Hello again, @augustya. It seems that we're back to the original issue – getting the "grey" areas out of that portrait-like photo. I'll tell you up front that trying to create multiple masks that seamlessly run into each other is going to be too difficult; you'll always end up with a perceptible border between the masks and you won't like it. There's a better solution, although I'm not sure you're going to like the answer. Bear with me – it's reasonably straightforward.
There's an attached video. In a nutshell, you place an adjustment over the entire image (initially, no mask at all) and make your settings. Then, invert the adjustment layer (which effectively turns the adjustment layer's inbuilt mask to all black). Then, use a white paint brush to paint the mask so that the adjustment is revealed in only the areas you want it to.
Also, in situations like this I've found that painting with a brush set to 1-3% flow makes the "revealing" easier to control. You can paint over and over an area until the degree of revealing is to your liking. (You should read up on the difference between Opacity and Flow as brush settings, since they are subtle but different.)
Since a picture is worth a thousand words, here goes…
Ok so you’re saying if I want to apply the adjustment at multiple different places and those are a different spot and locations best way is to invert the adjustment and then paint in white to the areas where you want to apply, that’s what you saying right?
-
3 hours ago, smadell said:
Good morning, @augustya. Sorry it took so long to respond - I suspect we have a multi-time zone difference! Let me offer a few thoughts after reading your last post. Please note that these are my own feelings, and are certainly not dogma. I have no scientific proof that what I am offering is the best possible advice, but it works for me.
1) A lot of folks routinely make a duplicate of the Background layer immediately upon opening any document. To me, this is wasteful and meaningless. I suspect that the practice goes back to the early days of Photoshop when everything was destructive, and the only way to preserve the original document was to have it on an un-edited original copy. Those days are over. Nowadays, almost everything you can do in Affinity Photo (and in Photoshop) can be done non-destructively. In most cases, duplicating the background layer as a reflex action is unnecessary.
2) You can make a new pixel layer based on a portion of an existing layer by selection a portion of that layer and then (i) choosing "Duplicate Selection" from the Layer menu; or (ii) pressing Command-J (Mac) or Control-J (Windows); or (iii) by doing a Copy and then a Paste. The result will be a new layer containing only the portion of the original Pixel layer that was selected. See the video that follows, in which I will select the model's face using the Selection Brush, then use the Refine… tool to deal with the edges (the hair, especially), and then use Duplicate Selection from the Layer menu to create a new pixel layer.
3) Most of the time, duplicating a pixel layer (or a portion of a pixel layer) is not necessary. I did it earlier in this thread only because it made things easier to visualize. However, when I say that I would not do it that way "in the real world" I mean that I would use a Localized adjustment instead. Rather than making a duplicate of part of a pixel layer, I would make a selection on the original "background" pixel layer and, with the selection active, add an adjustment layer. Doing this will not only put an adjustment layer above the pixel layer, but it also incorporates the selection as a mask within the adjustment itself. You do not have to add a separate mask layer; every adjustment layer already has a built-in mask, and you can use this (i) by painting black or white directly onto the adjustment layer; or (ii) by creating the adjustment layer with an active selection. It is this latter method that I use in the video below.
That is a Great Explanation and great work to take all the effort and make those videos, that really helped. Thanks for it.
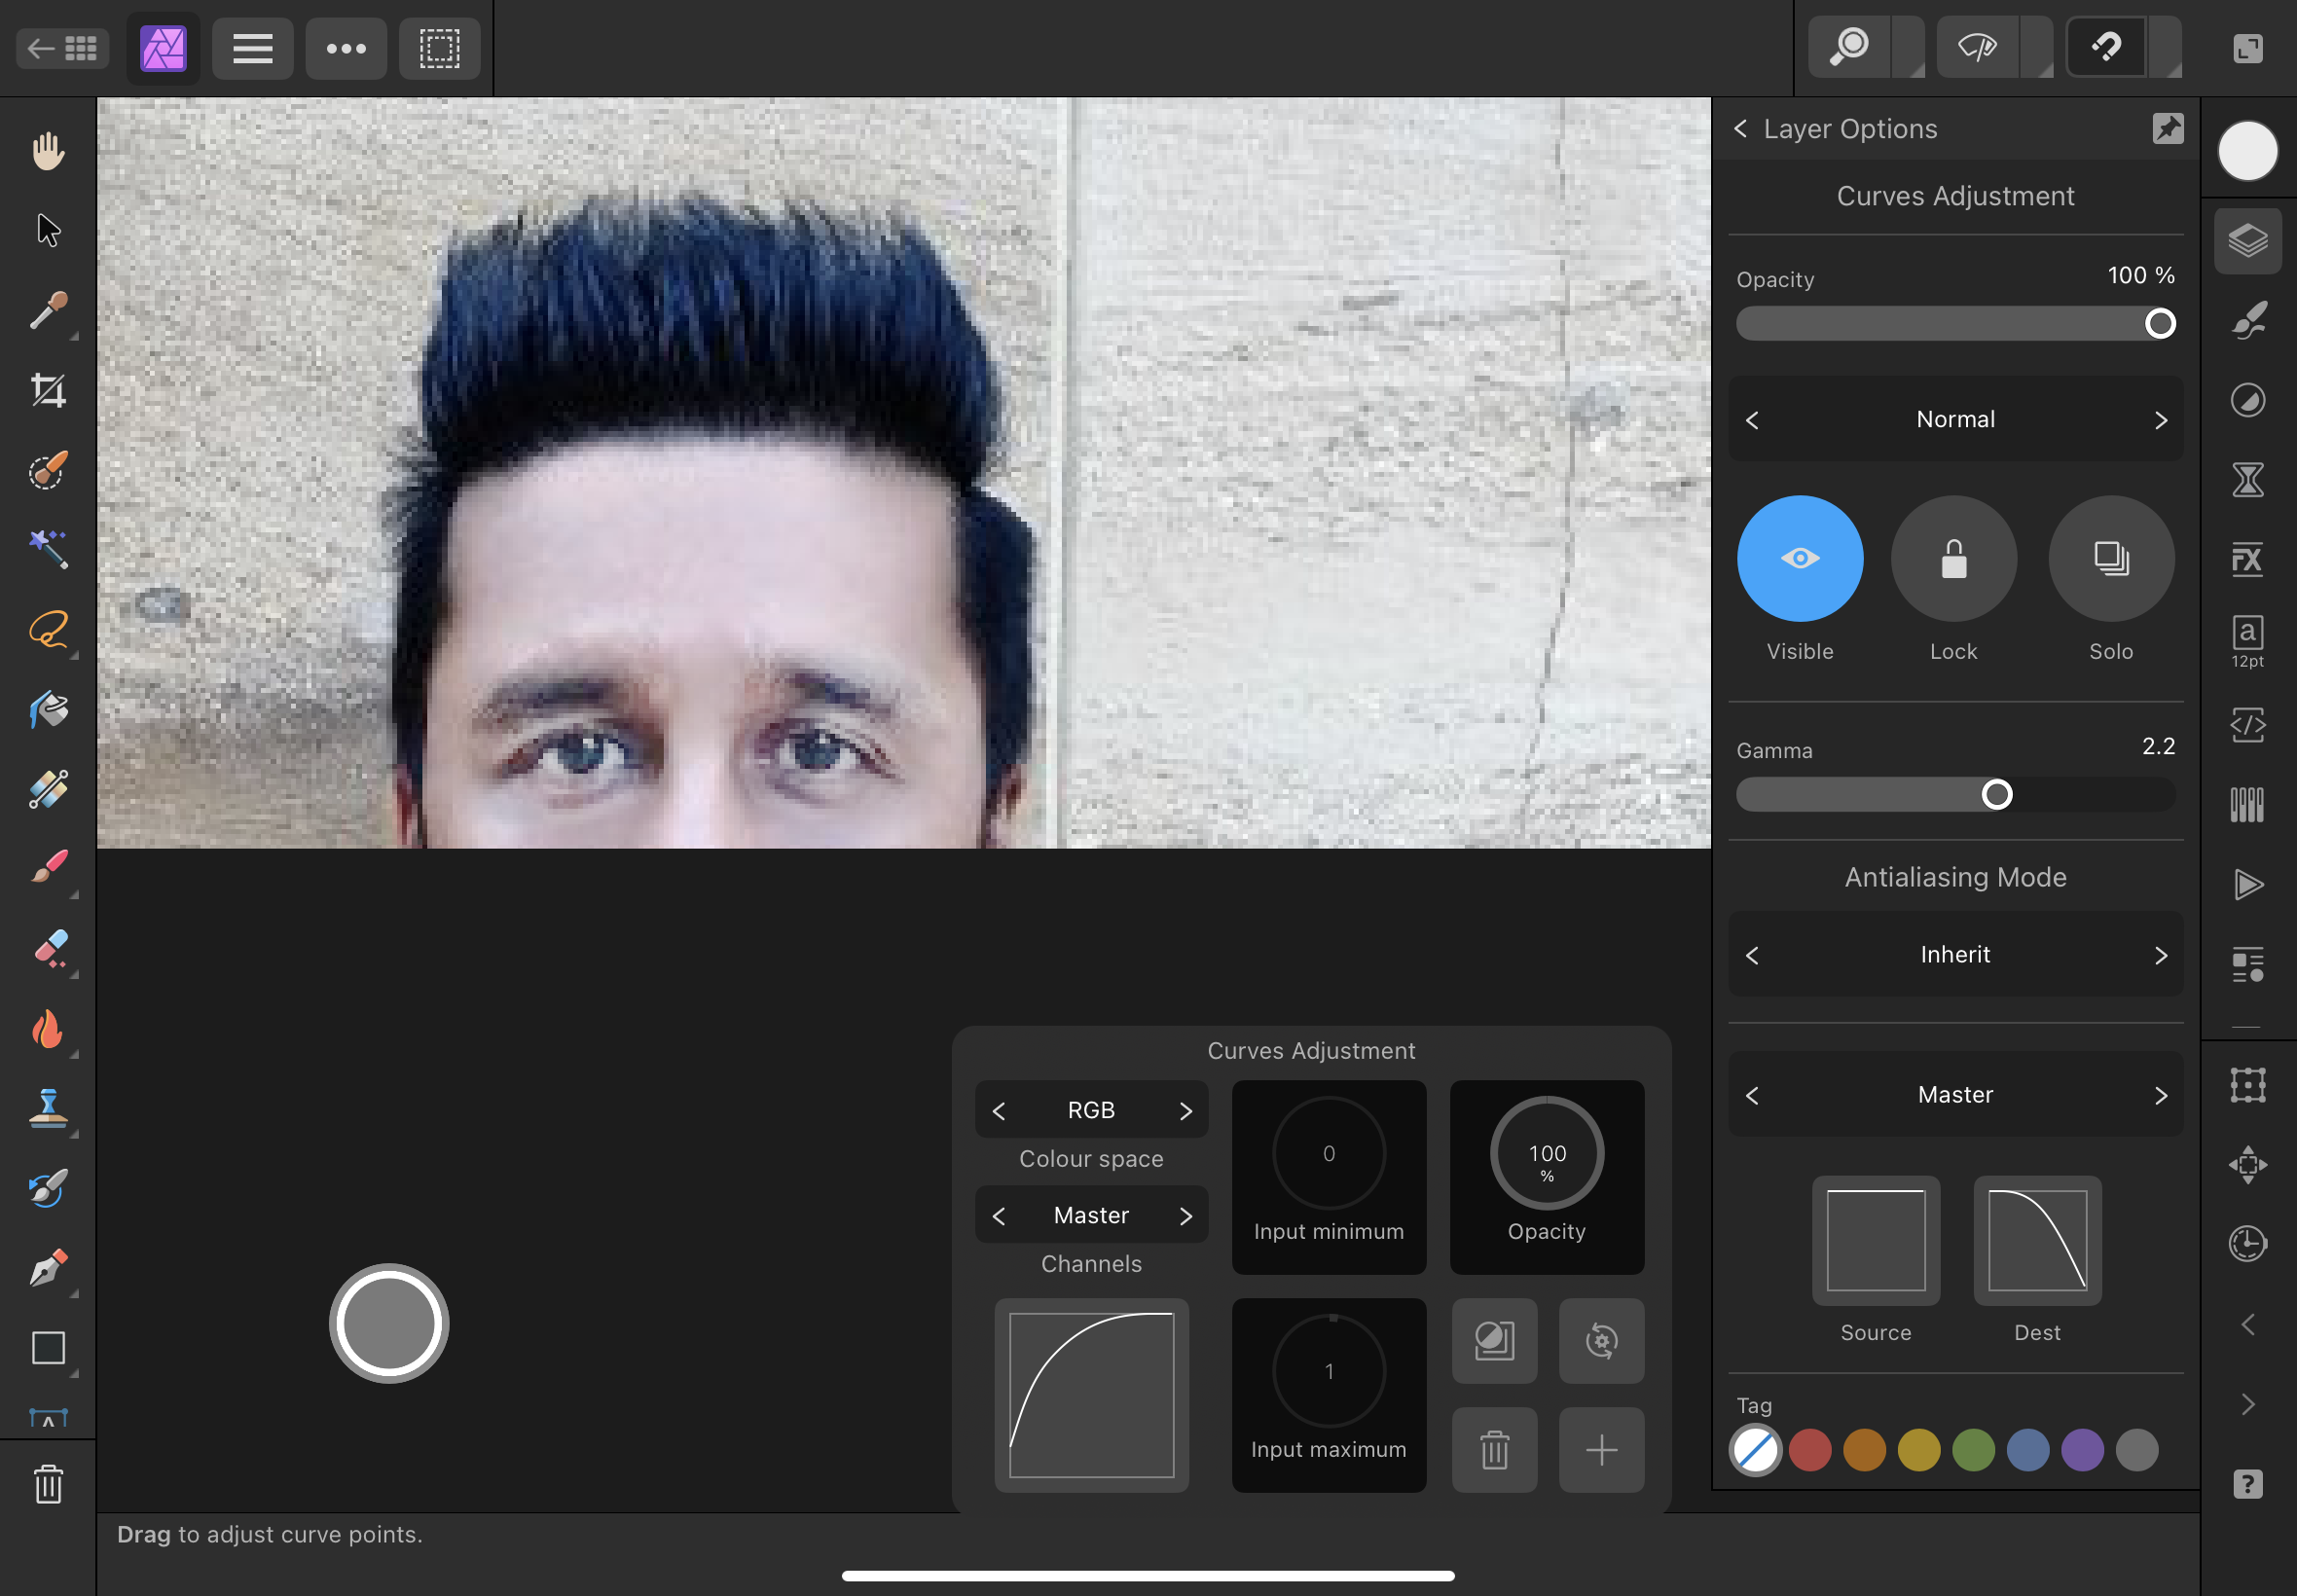
Just one more question lets say if I want to reduce the Hue which is scattered over the face for e.g. Forehead, Nose and Cheeks, and I need to make three different selections, so how do I cut the selection at one place and again continue at other ?
-
6 hours ago, smadell said:
Hello again, @augustya. With the original photo layer active (selected in the Layers panel) I used the Selection Brush and then the Refine… choice (to manage the selection around the hairline, mostly).
So I have some questions here to begin with. Let’s say after starting the project, if I have already made a duplicate layer, are you saying when you make a selection of just the forehead you again created a duplicate layer of that? Also when you make a selection don’t you need to add a mask, apply a mask to it to start working only on the selected area or if you make a selection as in this case, you made a selection and then duplicated the layer and then directly started applying the adjustments to it and it and it was only working on the forehead area is that how it works ?
6 hours ago, smadell said:In “real life,” I would simply have added a Selective Color adjustment which would limit itself to the selected skin, thanks to the inbuilt mask common to all adjustment layers.
So to use this method you are saying you can add a selective colour adjustment, place it above the main subject layer and directly start making adjustment to the selective layer, or if you want to apply it only to a certain area you will still have to make a selection and leave it there or add a mask to it ?
-
On 9/27/2023 at 12:58 AM, smadell said:
Hello @augustya. As far as how to pick the color in the HSL tool, you don't. As @Dan C said, the HSL tool is pretty bad at dealing with greys. There is so little saturation, that hue gets kind of lost in the shuffle. Also, as he suggested, the Selective Color tool is the way to go. What you'll want to do is (i) select the area of skin that you want to correct; (ii) optionally, put it on a separate layer; (iii) apply the Selective Color adjustment to the selected area only. (In my example, below, I've made it a child of the copied "forehead." You could do the same by making a selection and then, with the selection active, adding a Selective Color adjustment. The active selection will mask the adjustment so that only the selected areas are affected.
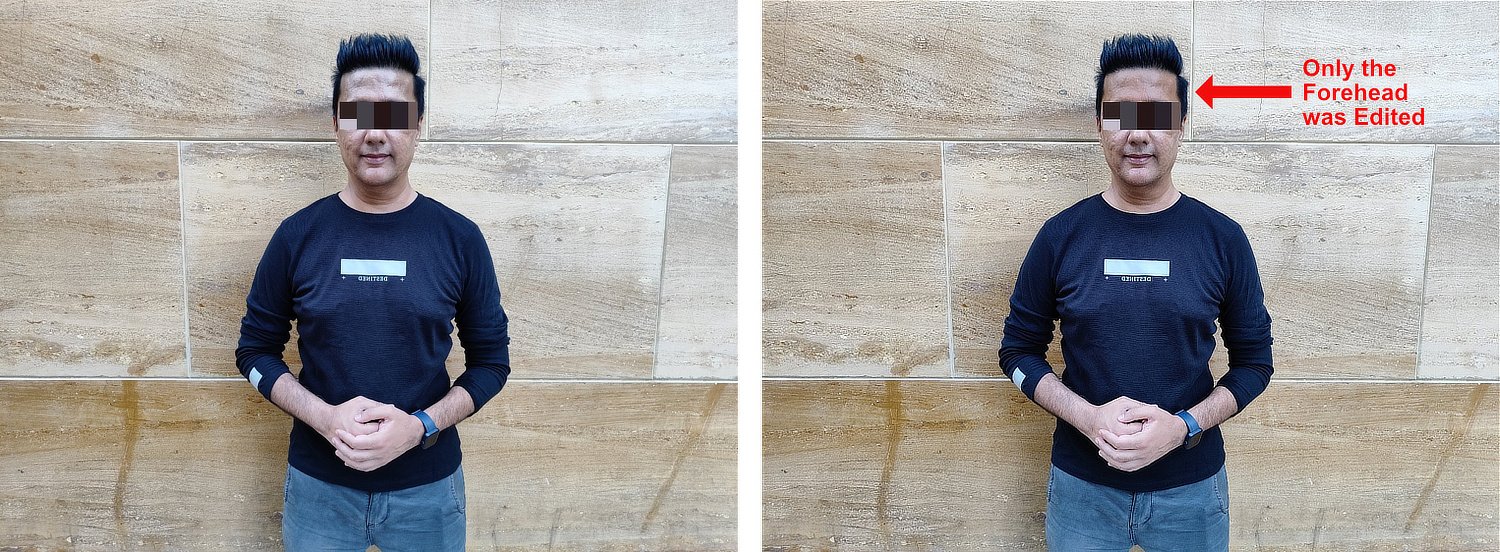
In the Selective Color adjustment, you'll want to deal with Whites, Neutrals, and Blacks (although not in this case). What you're about to do is "add" color to the highlights and midtones of the selected area. In this case, I deselected the "relative" checkbox and made modest changes to the Cyan, Magenta, and Yellow sliders for the Whites and the Neutrals. I also shifted the "Black" slider for each in order to lighten or darken the affected tones.
Here is a before and after of your photo, and also a copy of the Layers panel and the Whites & Neutrals area of the Selective Color adjustment panel.
Can you tell me how did you just make a selection of the forehead and work on it ?
-
11 hours ago, smadell said:
Hello @augustya. As far as how to pick the color in the HSL tool, you don't. As @Dan C said, the HSL tool is pretty bad at dealing with greys. There is so little saturation, that hue gets kind of lost in the shuffle. Also, as he suggested, the Selective Color tool is the way to go. What you'll want to do is (i) select the area of skin that you want to correct; (ii) optionally, put it on a separate layer; (iii) apply the Selective Color adjustment to the selected area only. (In my example, below, I've made it a child of the copied "forehead." You could do the same by making a selection and then, with the selection active, adding a Selective Color adjustment. The active selection will mask the adjustment so that only the selected areas are affected.
In the Selective Color adjustment, you'll want to deal with Whites, Neutrals, and Blacks (although not in this case). What you're about to do is "add" color to the highlights and midtones of the selected area. In this case, I deselected the "relative" checkbox and made modest changes to the Cyan, Magenta, and Yellow sliders for the Whites and the Neutrals. I also shifted the "Black" slider for each in order to lighten or darken the affected tones.
Here is a before and after of your photo, and also a copy of the Layers panel and the Whites & Neutrals area of the Selective Color adjustment panel.
So how did you only select the Forehead on the Photo ? And when you say put it on separate layer as in how did you create a separate layer ? And what if someone wants to work on Forehead and cheeks and chin then ? How can you make separate sections for separate areas then ?
-
On 9/25/2023 at 8:58 PM, Old Bruce said:
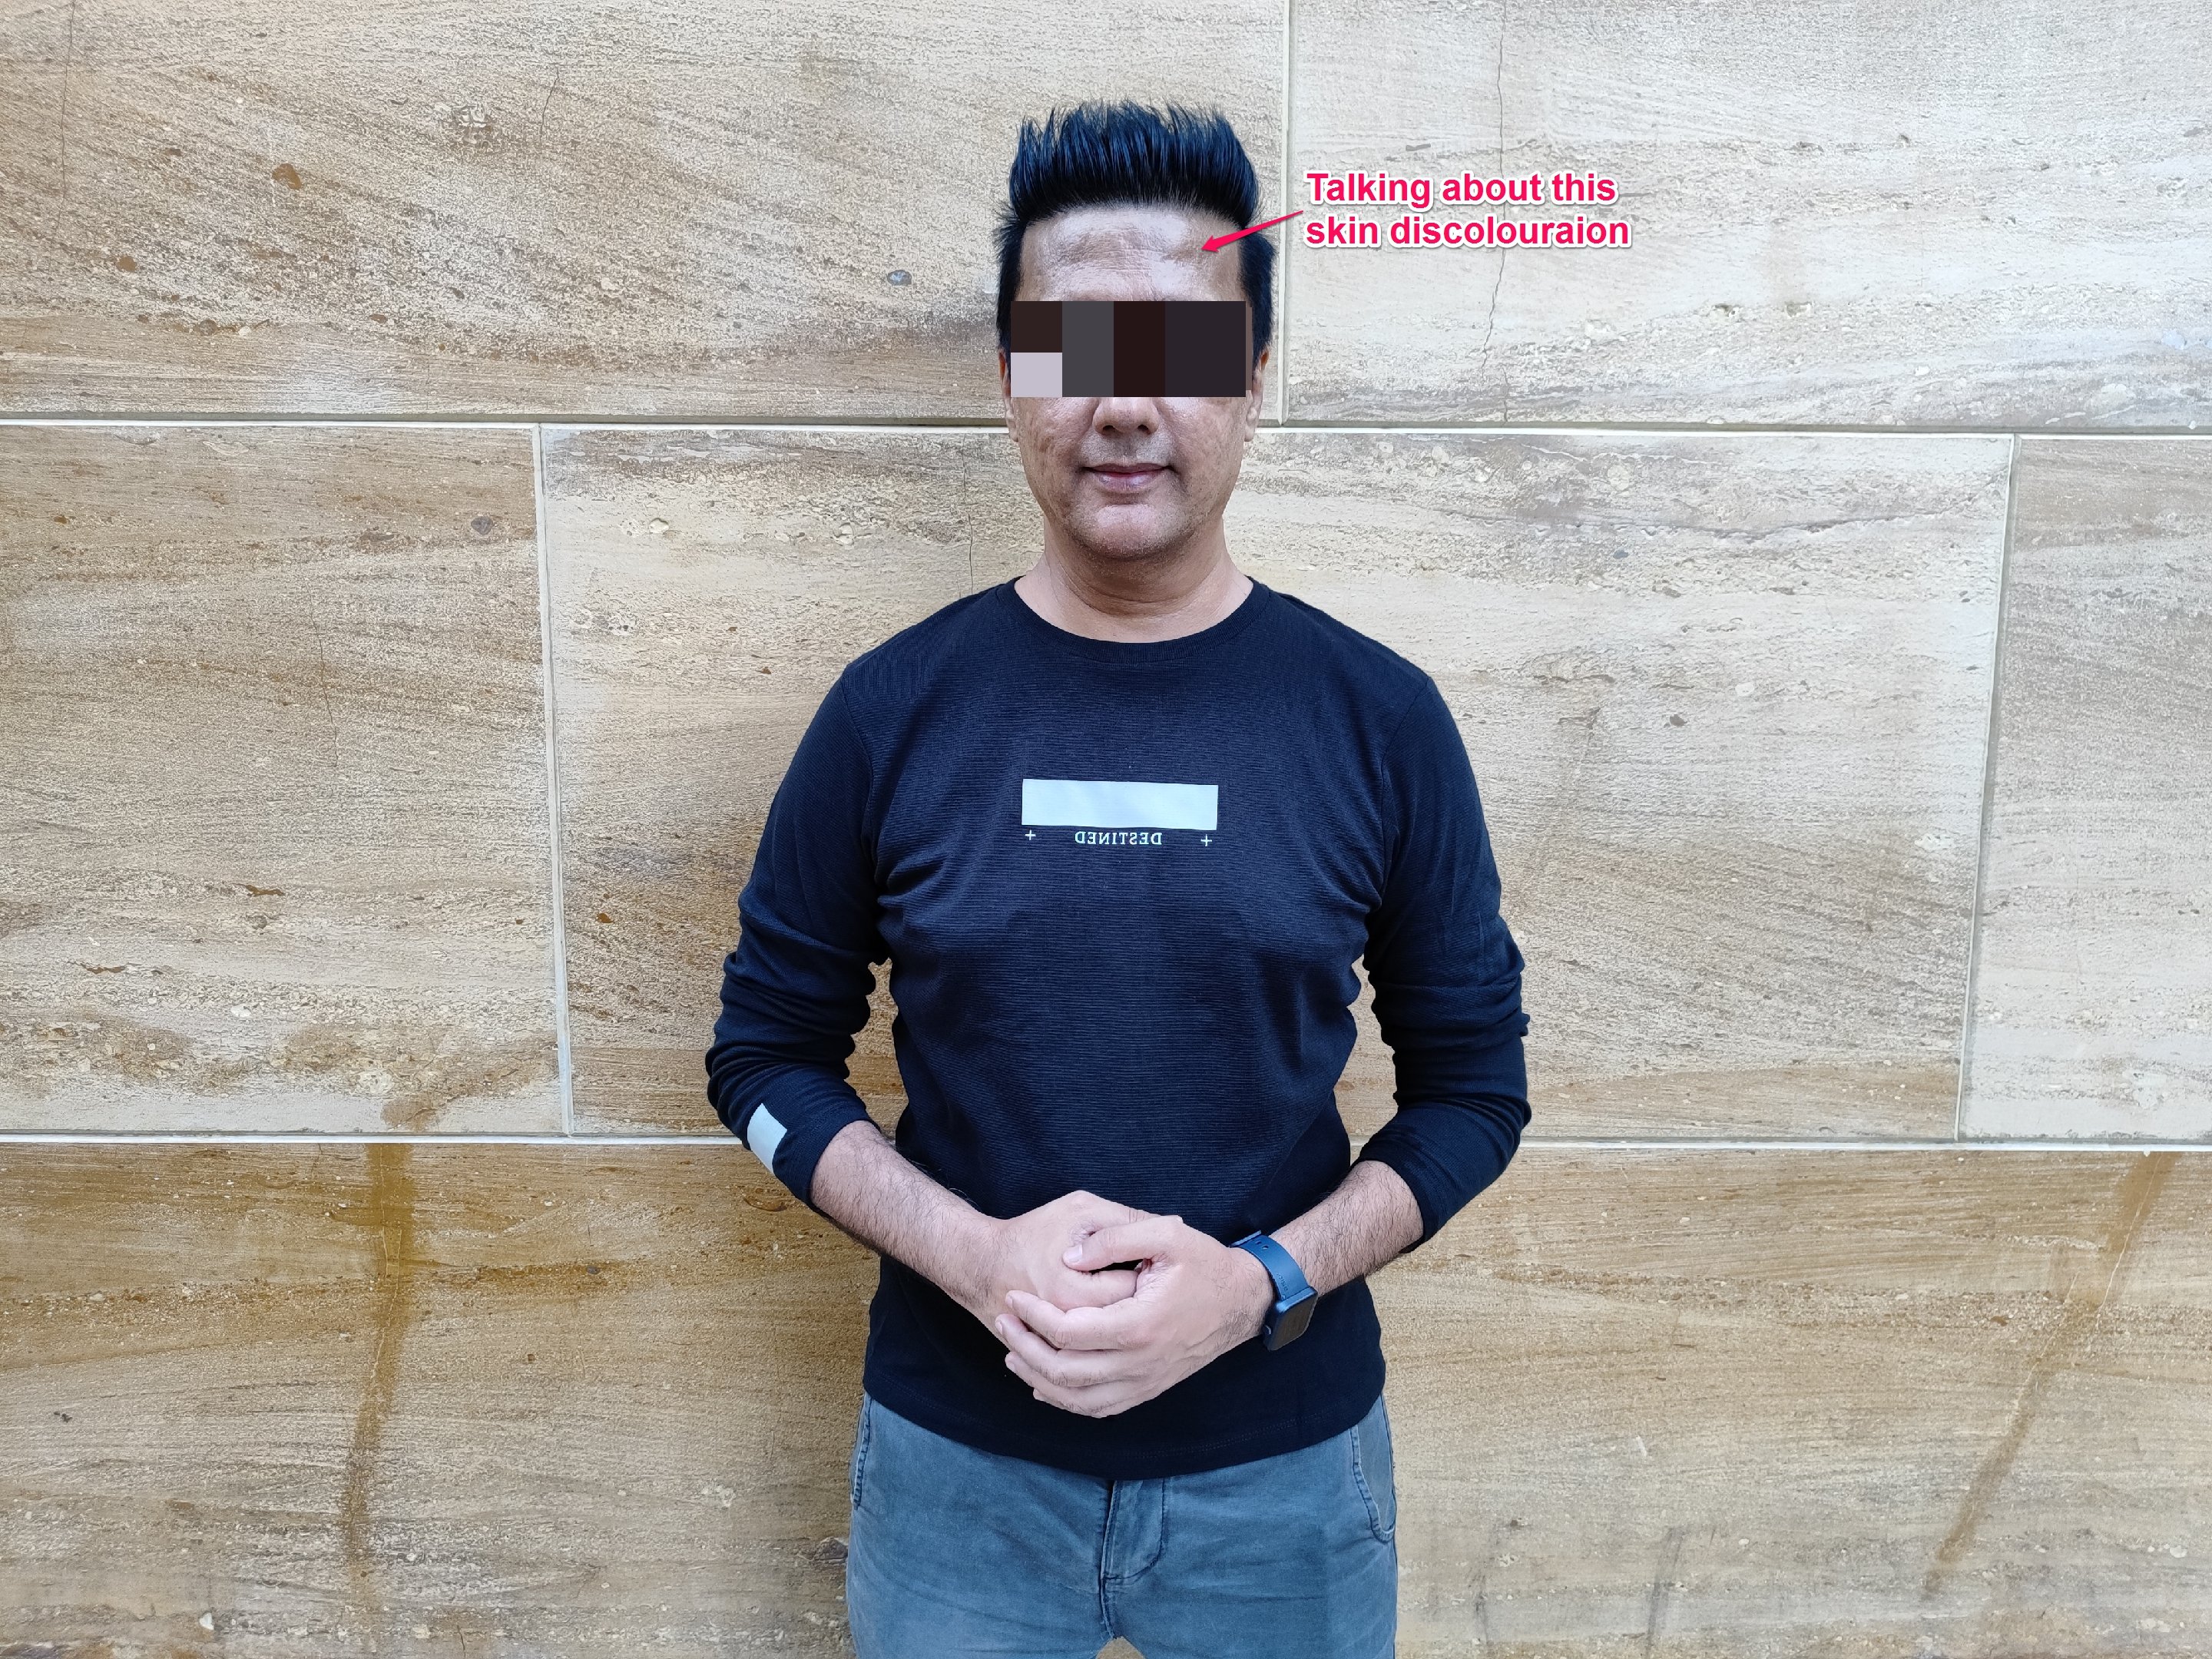
Depends on the photo. Example please.
Sorry for the delay. Here you go. If I want to reduce or get rid of this kind of discoloration on the skin what is the best way to do it ? How do I pick this colour in the Picker tool provided in the HSL tool ?
-
12 minutes ago, Old Bruce said:
I would select the area of the "greyish tint" *
Select an area of only greyish tint in a face in a photo how do you do that ?


Looking for Hair Brush for the Mac ?
in Affinity on Desktop Questions (macOS and Windows)
Posted
And I also Thanked you there 🤭