Valerio
-
Posts
7 -
Joined
-
Last visited
-
 Oasin reacted to a post in a topic:
Using a compound path as a clipping mask for inner shapes
Oasin reacted to a post in a topic:
Using a compound path as a clipping mask for inner shapes
-
 Oasin reacted to a post in a topic:
Using a compound path as a clipping mask for inner shapes
Oasin reacted to a post in a topic:
Using a compound path as a clipping mask for inner shapes
-
Valerio reacted to a post in a topic:
Using a compound path as a clipping mask for inner shapes
-
Valerio reacted to a post in a topic:
Using a compound path as a clipping mask for inner shapes
-
Thanks @Aammppaa, using symbols did the trick! I made a symbol using the compound path of the body, then duplicated it and used it as a mask for each individual inner shape (shading, belly). I was even able to throw in an outline! No color banding and the shape is nicely kept in sync thanks to the symbol functionality. It's such a simple and yet powerful feature.

-
firstdefence reacted to a post in a topic:
Using a compound path as a clipping mask for inner shapes
-
Aammppaa reacted to a post in a topic:
Using a compound path as a clipping mask for inner shapes
-
This is what I've been doing for outlines, having to sync it for multiple objects is kind of a pain. I think @Aammppaa's suggestion to use symbols should really help with this as well. Didn't know about symbols, I just watched a short video about them and they seem to be a great way to bypass the issue (and as a bonus to keep lineart in sync)! Color banding can be solved by not grouping the inner shapes, since in my experience it's caused by the pass-through rendering of the group. It should be easy enough to use the compound path symbol as a mask for every inner shape since they will automatically sync through the symbol feature. I'll be experimenting with symbols later and post any update. Thanks for the help!
-
Hi, I'm not exactly new to the software but I'm delving into some more complex topics as I keep using it for random stuff. For a simple illustration project, I'm trying to merge the shapes of a character's body while avoiding using destructive operations. What I'd love to achieve is to use a compound shape (made using Alt + boolean Add operation) as a clipping mask for some inner shapes. See the attached example for what I'm trying to achieve (with a very simplified character) and the tests I have made so far. From what I gather I have three options: Use a compound path. This will unfortunately break clipping functionality, and the clipped shapes will get lost inside the original containing shape (Body in teh example). If I move them to the root of the compound the simply become part of the compound itself. Make a compound path, group the inner shapes, then use a copy of the compound path as a compound mask for the grouped inner shapes. This works(ish) but messes with rendering and the inner shape with the gaussian blur FX will exhibit some color banding. Not sure it's noticeable in the example picture, but it definitely is there. This option is kind of a chore to maintain as well, as I'd have to make changes to both the compound path and the mask. It also makes a mess in the level hierarchy. (Note: the color banding seems to be caused by the pass-through rendering mode of the group. I could bypass this by not using a group, and just duplicate the compound yet again to make a mask for each inner shape, but that makes it even harder to maintain) Simply boolean add the shapes. This is visually what I'd like to achieve, but it's a destructive operation. I would need to keep a non-merged copy in case I need to move or redo the ears, for example. Maintaining both copies synced would be a major pain and simply not a good workflow. I'd like to just use the first option, since it's simple and non-destructive, to achieve the visual result of the third option, but I can't get it to work that way. Is it not possible for compound paths to act as clipping masks as well? What other options are there that I'm missing?
-
cutout3 reacted to a post in a topic:
Brushes in Photo have jagged/pixelated edges
-
I am running Windows 10. I did read that as well, but turning Windows Ink on/off in my tablet driver does not seem to make any difference Zooming in didn't work out either I am already using the stabiliser, tried both settings and with different length but the issue persists. Using a mouse seems to be somewhat smoother, but the jaggies are still present, just more blurred.
-
The jaggies get more evident the closer the stroke angle is to horizontal/vertical. Around 45 degrees, edges are pretty nice and there's barely a difference. Zooming in on the strokes, it looks like Photo's anti-aliasing tends to be less aggressive, which results in jagged/sharper lines for steeper angles. I'm assuming this is the default behaviour, but I'm wondering if there's any workaround to this.
-
Thanks for your input! Unless you're talking about some other setting that I'm not familiar with, increasing the document DPI does not change the result, AFAIK it just affects the physical size of the document.
-
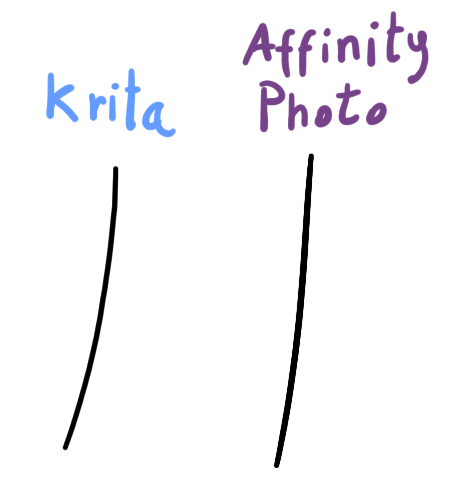
Hi all, I'm evaluating Affinity Photo (I'm a long time Designer user and absolutely love it) using the free 90 days trial before deciding on the purchase. I have an issue where a simple brush stroke in Photo will have jagged edges, it's most noticeable on certain stroke angles but it's generally very present. I am using a very simple brush, 80% hardness and 1% spacing. The problem does not seem to be affected by the stabilizer, or by using a tablet vs. a mouse. I tried searching the forums and I already made sure that my 'View Quality' is set to 'Bilinear (Best Quality)'. I drew a comparison using Krita, which displays a much smoother edge using an equivalent brush and stroke direction. Is there anything I can try to smooth those jaggies? Thank you.
- 13 replies
-
- 1
-
-
- affinity photo
- brush
- (and 2 more)


.png.69041772b20d2a861ff924fba17644d4.png)