

ronanski
-
Posts
114 -
Joined
-
Last visited
Posts posted by ronanski
-
-
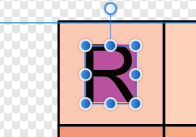
Now trying to install photo i get this error:

which is not anywhere on that install/troubleshoot guide
-
Oh no I was saying the article I saw before I made the post didn't have that bit. I can see it on the article mopperle posted so that's all sorted now.
However, new problem... It asked if I wanted to import all my stuff from affinity 1 to 2. I clicked yes and it didn't give me any error or anything but lots of things have not transferred...
No templates (downloaded or created),
assets (i have all my created ones but barely any of the downloaded ones (all groups but barely 5% of each group) and not the original ios12 group which I think came with the programme),
swatches, fonts & brushes I DO have,
-
Thank you, I did try searching but nothing came up. I saw that article as well but the one I saw missed out the 3rd paragraph about 'How to tell if my Windows PC is (x64) or (ARM)?'
-
Hi, I have recently bought V2 of affinity software but when I go to download it I am given a choice of 4 different versions (see screenshot) and I have no idea which one I am supposed to use.
-
Well you mention hold the right mouse button after dragging? I don't have mouse just trackpad so that isn't possible but when I right click I just get the menu. Also, in your video when you click the point transform tool the centre of rotation moves into a different place and then you select where it was to drag. If I try drag from here I end up just moving the centre of rotation not the object. And if I do move it out the way and then try click and drag from white dot where centre is (where centre of rotation was) it spins about the new centre of rotation instead of translating. But if I leave centre of rotation where it is I can just click anywhere on object space to drag it and it works fine then
")
-
OMG thank you! Point transform tool worked, (slightly different than you described) but it worked thank you.
-
46 minutes ago, NotMyFault said:
While move tool is active, use „cycle selection box“ to toggle between box sizes, and activate „move origin“ to see the actual center.
that doesn't solve the issue. As you can see from the original post the selection box is right to begin with but even with this one selected it does not snap to the centre of this it snaps to the centre of the alternate one. And I always have the origin visible and I know where that is but my point is it doesn't snap to this, only the fake (for lack of a better term) centre.
-
So the only workaround I have found is to create a circle from the rotational centre of star or polygon (this I can do (I can create something from the rotational centre but not move something already created to snap to it or snap it to something else)), then move the star or polygon inside of the circle, then position the circle's centre on the point I want, and then move the star/polygon back outside the circle layer, and then delete the circle. But this is rather laborious and seems silly, and if it gets accidentally moved, or I want to relocate it to a different point I have to do all that again!
-
Oh that's odd. My snapping settings are pretty much same as yours but screen tolerance is set to 5 and I also have snap to gaps and sizes and snap to pixel selection bounds selected. I just tried it on a fresh document and the same problem persists.

-
Hi, I am sure I used to be able to do this, but no longer seems to work. I want to centre a star in this case inside a circle. The star has not been converted to curves and still has it's bounding box allowing for this situation, i.e. the centre of box is centered on the rotational centre, however it will only snap to the centre according to the width and height of the star (as if it had been converted to curves or I had clicked cycle selection box). How do I get the rotational centre to snap/align to something?
-
6 minutes ago, walt.farrell said:
I think this was answered in another topic:
Hi, yes I just replied to that one few minutes ago. I did look for a few hours first and couldn't find anything but alas found this just after creating this thread
-
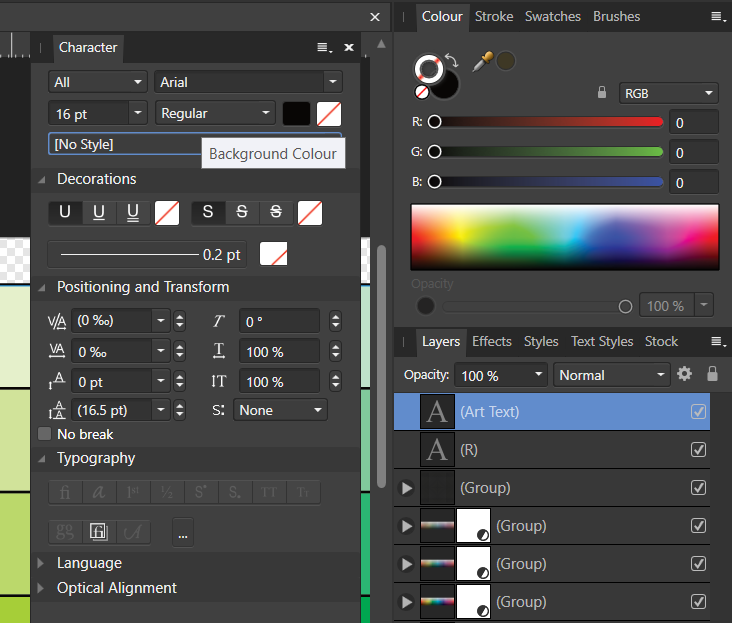
So there is an option to set background colour in designer. As i explained I can change this to any other colour on the character panel background colour option, but if I get rid of it, it reverts to pink.
And no I haven't opened anything from anywhere I just created the text in designer and it automatically had the pink background on.
However, I finally found another similar thread I didn't see before that addressed this problem... solution: If I go to Edit > Defaults > Revert, this resolved the issue. No idea how it happened in the first place though
-
On 11/11/2022 at 7:01 PM, Dekeb said:
the only way to do it is the Edit > Defaults > Revert
Thank you so much this worked! No idea why it went wrong to start with. Mine had a constant pink background on every text i made.
-
So I have a strange situation where my any text I type now has a pink background. The background is set as transparent/no fill. I can over ride with a different colour but I cannot get no colour it is always pink! There are no effects or styles present. No adjustment layers, and it is not part of a another layer with any kind of filter. Any new text I add as normal on top has a pink background. If I start a new doc this does not seem to happen though.
-
51 minutes ago, Brian_J said:
As you mentioned, in Illustrator, dragging a control handle onto the node snaps the handle to the node. If I'm not mistaken, snapping a control handle to the node basically removes the control handle.
As far as I can tell, alt/opt-clicking a control handle in Affinity has the same effect that's achieved in Illustrator by snapping the control handle to the node.
In the video below, the results appear to be the same:
- On the first shape, I dragged the control handle onto the node to simulate snapping it to the node.
- On the second shape, I alt-clicked the control handle to delete it.
Let me know if I'm not understanding something.
Oh I see you click and let go. I thought you meant alt click and drag it to the node like the previous suggestions. Yes that works as well thank you.
-
-
It just doesn't snap to the node. Unless you get rid of the handle completely both sides which is not wanted as we want one side still curved the other side of the node remains curved. You can put it pretty close but you zoom in and it is still curved so will never get a neat line joining it to the next node which is needed.
-
Like OP I would like this ability. I knew about the alt trick but this doesn't help as you can never completely get rid of it so it is still curved not an accurate straight line
-
17 hours ago, Brian_J said:
Type the text on the inside of the path, then on the context toolbar, set Baseline to position the text where you want it relative to the path.
See this Affinity help page for details:
https://affinity.help/designer2/en-US.lproj/pages/Text/pathText.htmlThank you Brian this worked. I would've preferred if I could snap it exactly so that the top of the text became the baseline but this'll do
-
10 minutes ago, Catshill said:
Hit return and adjust baseline to place text at correct height.
Not sure I understand... from which point do I press return. That seems to make it go upside down...
-
How do I make text follow a circle at the bottom of the circle without it going inside, upside down or backwards?
-
Oh I see what you mean. No I think it means both are fine as long as they are below 100 MB.
-
40 minutes ago, Dan C said:
It is Microsofts own words that confirm that PDF files do not support thumbnails in OneDrive, I am simply relaying information.
You both seem to keep misreading that bit, it does say larger than 100MB, which for most users is basically 0% of their files, so no microsoft is NOT saying thumbnails are not supported for PDFs at all.
-

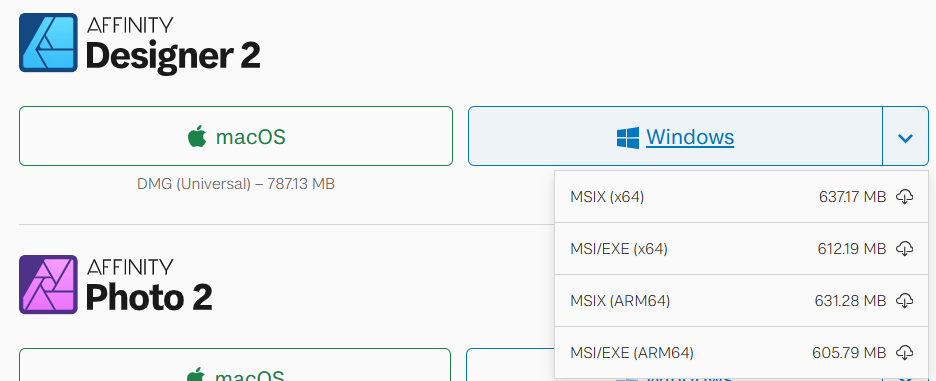


How do I know which version of Affinity V2 for Windows I need?
in Desktop Questions (macOS and Windows)
Posted
MSIX (X64) yea correct one. It worked eventually (the download not the transfer).
surely that is just a waste of tens if not hundred of hours of work?!