
AllAppsUser
-
Posts
364 -
Joined
-
Last visited
Everything posted by AllAppsUser
-
Affinity Designer Rasterize
AllAppsUser replied to Kent Davis's topic in Pre-V2 Archive of iPad Questions
Yeah, there’s lots of stuff like that they’ve to iron out. Totally different teams on the apps will be at the root of it I suspect. -
How do I convert ‘vector’ brushes to outlines??
AllAppsUser replied to Koshington's topic in Pre-V2 Archive of iPad Questions
Yeah, no. I’ve just been contemplating the use of vector brushes for some artwork I’m making that needs to be output at different resolutions - including ‘huge’. Vector objects are resolution neutral - they’ll be crisp no matter what size you output them (you probably know this and I state it for all readers). "Vector" brushes are a bit of a misnomer in my view. The path is a vector, but the brush effect is raster. This means they’re not resolution neutral and beggar-up the whole point of a vector illustration. If you’ve the one output size and can create a document to scale, it’s not an issue of course. Vector brushes allow you to alter the path after drawing, where you’re committed with a raster brush. From that point of view they’re good. However.. as you’re realising, you cannot then convert the raster element of a vector brush to outlines. Boy oh boy would that be useful eh. It’d need a trace engine built in and Serif have not done this (yet.. fingers crossed). I’m currently contemplating whether to export the texture I’ve just created to put it through a trace app I’ve downloaded... or whether to just construct some "raster-vector brush" vector texture (keh!?) myself using the pencil tool ....or download some scribble vectors.... Think I’m going for the second option... just need to ponder the use the artwork will be put to. -
Hum, yeah. If swatches was accessible from the colour overlay context menu, then I think you’d be able to do it. (Another thing I need to feedback to Serif). You set the noise on a colour in the colour studio. But you then can’t grab that into the colour overlay.. that I’ve found. So I suggest (getting creative here) you: Create a neutral grey colour in the colours studio with noise Fill a layer with an object with the colour (or fill a pixel layer with it, I tend to be 100% vector in Designer. I’ve not done any of this.. just thinking top of my head here) Set the layer to a suitable setting other than Normal so you get the noise effect without changing your colours too much Then add your colour overlay Of course you could not bother with the colour overlay at all, and use something other than grey. Have a play, hope I’ve helped. Edit: You might need to mask your grey noise layer. Lot’s of creative possibilities here.. hummm... pasting inside too 💡
-
Is There Direct Selection?
AllAppsUser replied to davidgall's topic in Pre-V2 Archive of iPad Questions
Hello. I assume you’re double tapping the objects you want? Also you may have to double tap them a few times in order to drill down through the layers and groups. The app can’t guess what you’re after so it starts at the top and works down. It can seem like nothing is happening when zoomed in because you don’t see the selection box of the bigger object. Try zooming out if it seems nothing is selecting. (There is also a ‘select inside’ and ‘select under" in the context bar - the thing that pops up middle bottom of the screen. I’ve not had to use these settings myself so I’m not sure they’ll help though I suspect it’s what they’re for. I intend to have a play some time.) Hope this helps. -
Affinity Designer Rasterize
AllAppsUser replied to Kent Davis's topic in Pre-V2 Archive of iPad Questions
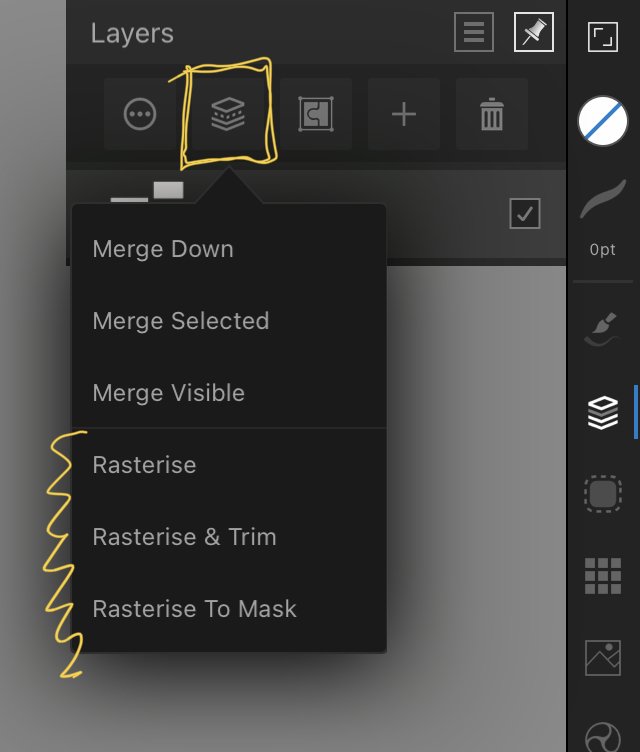
Hello @Kent Davis Does the attached help? (Screen capture Designer iPad)
-
Incorrect. I never create a palette of colours when starting a new document - so you don’t need to remember. For 90% of my illustrations or info graphics, I use a global colours palette, and I create it from the illustration as I go along. This is because I’m not for trying to guess how a set of colours will ‘play’ together, and I’m not always able to say upfront what will have the same colour and what won’t. Far too creative is my excuse and I’m sticking with it. I create global colours on the fly, and It is possible to create a global colour from an existing colour in an illustration ad-hoc. It’s a bit clunky at the moment in Designer iPad (I’ve not checked Photo iPad or the Desktop apps) - create your global colour with a random colour. Then (long press) Edit, and using the eye dropper, select the colour in your illustration. This replaces the random initial colour with the existing one you’ve already made. Yes, you then need to remember to make sure the object has the global colour assigned. I’ve fed the way this needs to work back to Serif, along with other stuff about Global colours, and they’re picking them up. See the topic on this below for ref Entirely up to you how you work of course - no right or wrong here. Just thought it might help you - maybe give you some power to your elbow. My comment is for Designer btw
-
No apology needed @Dan C. Glad to know you're looking at these things, and picking them up as you're able. Speaks a lot for you. If these things are added, it'll be fantastically useful.
-
Move/resize clipping path after pasting inside
AllAppsUser replied to AllAppsUser's topic in Pre-V2 Archive of iPad Questions
Thank you @DM1, really appreciate that. Can open it in the Books app as an overlay app while able to still see Designer workspace. Brilliant. -
Invert Selection in Designer Persona
AllAppsUser replied to ACC's topic in Pre-V2 Archive of iPad Questions
Not so much in vector only apps, that I've encountered much – possibly because of the complexities in how the artwork is constructed (groups etc.,). Yes, in raster (pixel based) apps, it's a standard, where selection is a simpler exercise relatively. -
There you go @Sani, Paul to the rescue!
-
It's not clear to me @Sani, that this new feature is across all platforms (iPad + Desktop). Not all of the features are .. I think. I've found a reference (see illustration), but it's not clear it's both iPad and Desktop as it's in a bit of a mop-up piece at the bottom of the page. The iPad versions are lagging behind the Desktop versions. The illustration is taken from: https://affinity.serif.com/en-gb/1-9/
-
Invert Selection in Designer Persona
AllAppsUser replied to ACC's topic in Pre-V2 Archive of iPad Questions
As @Alfred correctly says, there is no command specifically for "select everything except.." @ACC I can only suggest you: Make your selection. Then lock the selected (menu in the Layers panel / studio) Then select all. This will select everything except what's locked. I've done a simple trial of this with a 100% vector artwork (I don't tend to make hybrid vector+pixel art, atm). I've not tried selecting items within different and multiple groups or layers in any sophisticated (complex) way. So whether this will work as expected within your artwork, is something you'll need to experiment with. It may depend on how you've built your artwork up (groups, paste inside, layers, etc.,). -
Move/resize clipping path after pasting inside
AllAppsUser replied to AllAppsUser's topic in Pre-V2 Archive of iPad Questions
Lol, smart move @Alfred. I’m going to bookmark this page and pull it up in the browser as an overlay app! Should have known you’d swoop in with something clever ....and obvious... now I see it! Was thinking of asking Serif if they have any plans of allowing split screen, so I can pull up more than one instance of the app... one with the help in it. I’ve never been able to find a link to an online help for the iPad.. is there one?- 11 replies
-
- 1
-

-
- paste inside
- affinity designer
- (and 1 more)
-
Move/resize clipping path after pasting inside
AllAppsUser replied to AllAppsUser's topic in Pre-V2 Archive of iPad Questions
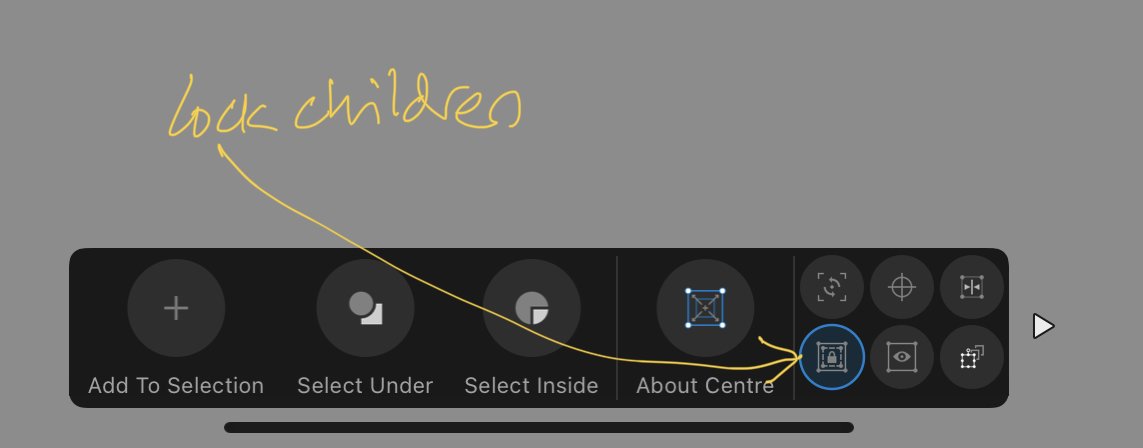
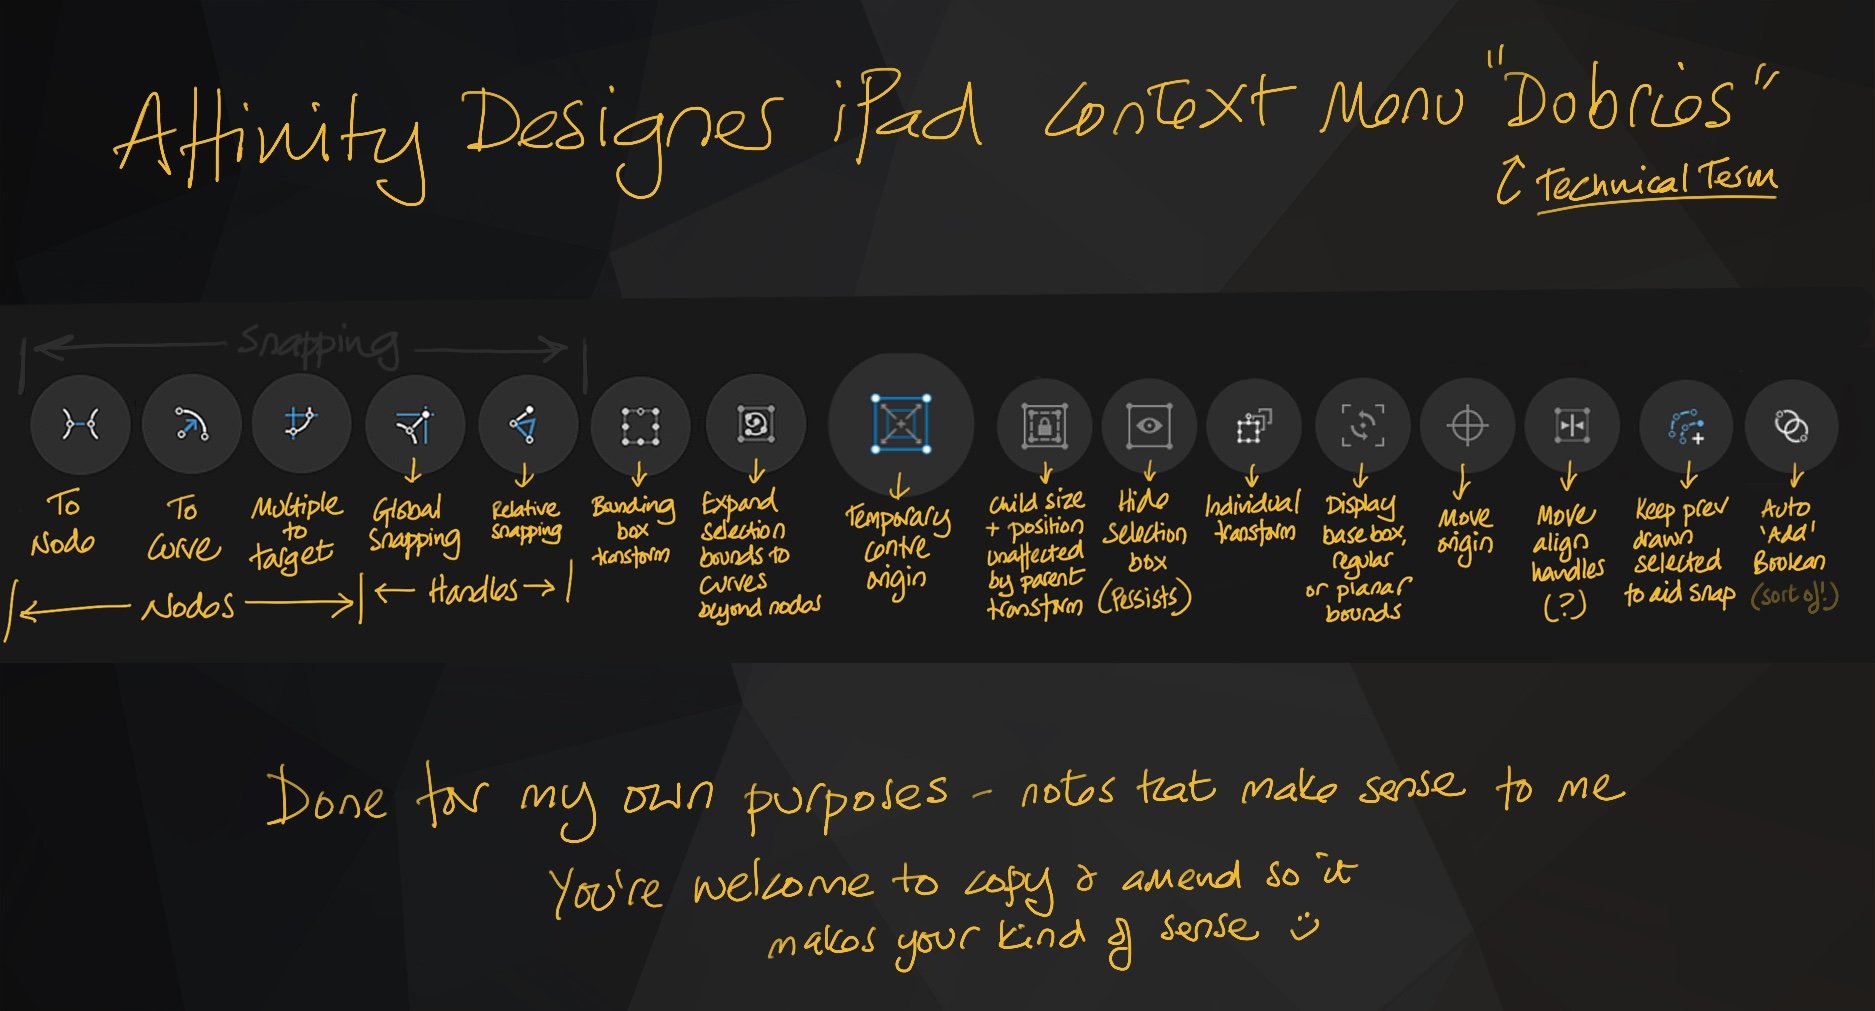
Brilliant @carl123, you’ve helped me out. Thank you. Can never remember what all the tiny icons are for. Am going to make myself a crib sheet for them. The tooltip doesn’t explain them either. You always have to trail out of the artwork to the help and hope you hit on what to search for. Thanks again for taking the time.
-
Move/resize clipping path after pasting inside
AllAppsUser replied to AllAppsUser's topic in Pre-V2 Archive of iPad Questions
Actually, no. There is a lock children in the bottom panel - which must be the equivalent to the context tool bar. Am just playing with it now. Can never remember what the tiny icons there are for. -
Move/resize clipping path after pasting inside
AllAppsUser replied to AllAppsUser's topic in Pre-V2 Archive of iPad Questions
Thanks for pitching in @carl123 By context toolbar.. what are you referring to in iPad Designer? Not with you at all I'm afraid. -
I’ve a simple rectangle. Pasted inside it, is a complex artwork which is much larger than the rectangle. Is there a way to move the rectangle without moving the artwork that’s inside it? I’ve tried locking the artwork that’s inside the rectangle = didn’t work. I’ve explored choosing the node tool = nope. Can’t think what else logically to do. All help appreciated, thank you.
-
Illustration explains... The pasteboard is hidden by default - or in Serif parlance: the view is always clipped to canvas. When using a lot of Boolean operations on shapes - (and after a recent conversation I’ve had) constructing constraints groups - the pasteboard becomes an essential part of workflow. Some work, such as when retrieving and importing a series of svgs to work with, leads to a lot of closing the artwork. Closing the artwork hides the pasteboard every time. * * Having to constantly unclip canvas after closing artwork briefly, quickly becomes really tedious. So.. either, a setting in defaults, or simply make the document remember which it was set to please. Thank you.
-
groups / constraints group confusion
AllAppsUser replied to Jaben's topic in Pre-V2 Archive of iPad Questions
Glad to have been a catalyst. I’ve learned too, so cool. The first part sounds logical - constraints settings on any object before grouping determine the kind of group created. Fascinating extra observations you’ve made. Just done a quick experiment myself. Created an ‘vanilla’ group and then added a constraint to an object within the group. It did not work the same way. The group converts instead - to a constraints group. My conclusion is that constraints always over-ride. Whether captured in the initial group command, or applied to an individual object within a group. So you have to always ungroup a constraints group in order to convert it to a ‘vanilla’ group. Additionally, also check each object before regrouping. Hum.. like you say: huge potential for tedious reconstruction. I’ve made a mental note to capture stages of constructing constraint grouped objects on the pasteboard (I’m in the habit of doing this a lot when using Boolean commands on shapes). Anyway, now you know, hopefully your life’ll be a bit easier. Ever hopeful, eh. -
Affinity photo e colore CMYK
AllAppsUser replied to LaRaBa's topic in Pre-V2 Archive of iPad Questions
Sì, scegli il menu del documento, quindi "converti documento" e imposta lo spazio colore su CMYK. La Guida installata con l'app è utile qui. Scegli Home e poi il punto interrogativo (?) E cerca il colore. Spero che questo aiuti, ho usato Google Translate quindi mi scuso se la mia lingua qui è strana. -
groups / constraints group confusion
AllAppsUser replied to Jaben's topic in Pre-V2 Archive of iPad Questions
Forgive the idiot question, but you're sure these settings have not crept into your app defaults, @StudioJason? I suspect it's all too easy to save to defaults, not realising there's a whole heap of settings included that you've chosen during the course of working. I'm, quite frankly, wary of the save to defaults feature for this very reason. Might be something I've not understood yet of course. It sounds like it's possible your defaults have acquired these nuances, if even creating an entirely new document doesn't reset these things... that's what defaults are afterall. I would not be surpised, however, if Serif have allowed the defaults to end up rather arbitrary - there are some careless aspects to these apps (in early versions only remember, so perhaps forgivable for now, as annoying as it is). I suggest quitting the app completely (dragging it off screen), and then opening a new document. See if the settings are still in place and if they are, then query whether and when you've used Save to defaults. -
Rubber band for pen tool on the ipad
AllAppsUser replied to Kdiver25's topic in Pre-V2 Archive of iPad Questions
Just been and checked the rubber band mode on the Desktop works the way I expect, and am used to - it does. The nearest in my view is the Smart Mode on the Pen Tool. As you say @StudioJason, there is no cursor and I suspect this is why it's a difficult thing to achieve on the iPad programmatically. The interaction is quite different if you think about it. There does seem an opportunity to me, though, for Serif to introduce the ability to adjust curve handles as you draw with the Pen Tool in Smart Mode. The three finger touch modifier doesn't appear to do anything in the Mode, at the moment - my quick test (could be wrong). It might prove a bit difficult to get the hang of, with only the really skilled able to use it perhaps. This may be why they've not done it. -
groups / constraints group confusion
AllAppsUser replied to Jaben's topic in Pre-V2 Archive of iPad Questions
Hum, I hesitate to try to help as I’m not practiced with constraints. As no one else has contributed, I thought I’d try. You’ve checked through the transform studio constraints to make sure there’s no lingering constraint setting on any child or parent object you’re then attempting to group normally? Long sentence - I hope you follow my logic there. -
Just to check - you’ve tried printing from other apps to make absolutely sure the issue is specific to Designer?
-
Rubber band for pen tool on the ipad
AllAppsUser replied to Kdiver25's topic in Pre-V2 Archive of iPad Questions
You’ve tried the Polygon or Smart settings on the Pen tool? These settings allow you to place a node and drag it around in one action... like a rubber band. You’d then need to refine the nodes after - though the Smart setting might mitigate this, to some degree, because it attempts to intelligently add handles, where the Polygon setting doesn’t. Must admit I’ve been concentrating on the iPad version of Designer, so haven’t played with the Desktop pen tool much at all. I’m assuming the rubber banding there is similar to what I’m familiar with generally. Will check it out later.