lacerto
-
Posts
5,783 -
Joined
Everything posted by lacerto
-
I am not sure if you had this fixed already but here is the solution anyway. sample_fixed.afpub A sample of merged document: double_sided_merged.pdf In case you did not resolve this, whenever you need to place data from the same record on separate pages (specifically on front and back of the same sheet), you need to have multiple Data Merge Layouts (as you did), but additionally handle the record pointer so that on the first page the pointer is not advanced, so that data is picked from the same record. The second Data Merge Layout then advances the record pointer. I additionally made sure that controls that receive data are placed as children of the data control. You had separate Data Merge Layout controls for the two fields on the back side, which can be done, but then you should make sure that the one at the bottom of the Layers panel also has zero as record advance value, so that the record pointer is only advanced after processing the topmost control in the Layers panel.
-
That is also possible, but there are some caveats: e.g. the "K-Only" button would not be available so I am not sure how grayscale images and tinted / colorized images would be handled. One would also need to take care that the underlying (latent) CMYK color profile will be the same that is used when finally exporting press-targeted CMYK PDF files (a new document will get its CMYK profile assigned from Preferences > Color, but the profile can be changed by switching to CMYK color mode, then defining the profile, and then switching back to RGB; this should ideally be done at the time the document is created because switching color modes will change the color mode of images that are on Pixel layers -- but not ones that are on Image layers). CMYK files with no embedded profile will get their profile assigned similarly as in CMYK color mode (based on setting under Preferences > Color) so it is a bit trickier to see that the document color mode and working color mode match so that export time CMYK profiles do not conflict and cause inadvertent conversions. I have not tested much working in RGB color mode when having printing press as the main target. But I do not see other benefits in this workflow than ability to use RGB color gamut. CMYK preview could be achieved by using Soft proof Adjustment, but that is not nearly as accurate as working in CMYK color mode using the same profile (this is true especially when using profiles for uncoated stock and newsprint).
-
Subtracting from vector polygons
lacerto replied to Robertson668's topic in Affinity on Desktop Questions (macOS and Windows)
Here is the final stage of the shapes before subtraction. They are basically just two merged filled and closed shapes so that one operation is enough to make the final construction. polygons_subtracted_finalstage.afdesign There is also hidden a group of octagons with outlines that I used to create the walls of the "labyrinth". You need to have either filled or closed curve in Affinity apps to get Boolean operations have expected effect (in version 2 apps unfilled unclosed curves are not autoclosed so if you try Boolean operations on such curves they might e.g. simply just disappear). For open curves to keep their visual appearance, the trick is to expand them so that they become closed curves. -
This is a tough requirement in context of Affinity apps. As mentioned, placing any PDF content in a document for "passthrough", while needing to export to PDF/X-1a, will result in this content to become rasterized. You would need to let Affinity Publisher interpret this content, and then you will risk inadvertent replacement of fonts, recalculated color values, loss of overprint settings, and misinterpreted rendering. You would need to make sure that the source profile matches your document target profile, and keep a close eye on fonts, and see that loss of overprint does not cause any essential changes. Transparencies will be rasterized so you'd also need to check that premature rasterization does not cause odd "seams" where flattened edges show excessively jaggy and then continue smooth as vectors (causing clearly discernible artifacts). You asked many questions, but I suppose these are the most fundamental things: If possible, always place RGB raster content (TIFF, PNG, JPG). sRGB works well, and should be your document and working RGB profile; if the files use any other RGB color space, be sure to include the color profile; RGB content will convert to CMYK optimally and the total ink coverage will be automatically covered If you think of possibility to pre-rasterize PDF files containing line art, text, etc. in Affinity Photo (or other software), you should use high enough DPI to avoid clear loss of quality. The problem is then that to keep the higher DPI in these placed files at the time you export, you should set the export DPI to the same setting, and this setting is then used for anything you have on your pages and in the whole document (unless you create page-wise exports with different DPI settings). This can make file sizes large. Affinity apps do not have color-mode specific downsampling triggers so you cannot e.g. set separate triggers for grayscale or monochrome images (they are not basically even supported as separate color modes). If you use hard-edged images (like logos or text) with deliberately low resolution (in purpose of letting the RIP upsample them without causing blurring), then don't, since Affinity PDF/X-1 export method might cause automatic upsampling, and especially if an image has been cropped by using the masking method. I do not know any low-cost prepress software but you can check against rich blacks, color space of included images, text, shapes, including spot colors, simply by opening the exported PDF in an Affinity app. You cannot see however overprinting issues because Affinity apps do not read in overprint attribute when they open a PDF for editing. I cannot tell whether PDF/X-3 or PDF/X-4 are acceptable for your printer, you need to ask. You should also understand that these export methods will rasterize any PDF content placed to be passed through that is produced without using PDF/X-based methods. If transparency flattening is required, then PDF/X-3 could be useful, since in addition to flattening transparencies, it will not rasterize placed PDF/X-1a or PDF/X-3 content (placed to be passed through), and if device-CMYK is required by the printer, you can force that by using the "Convert image color spaces" option. That would produce compatible output for most printers. Assign and Convert are the methods of controlling what will happen when you change a color profile within the same color mode (when you access File > Document Setup > Color in Publisher, or equivalent interfaces in the other two apps). The former will just assign the document with a new profile without changing current color values of native objects (texts and shapes) in the document; that means that the visual appearance of objects can change as the same color values will cause different appearance when using a clearly different profile; this should be done mainly in situations where the old and new color profiles do not differ much from each other. The latter method will convert existing color values of native objects (texts and shapes) trying to keep the visual appearance of the objects; this means also conversion of K-only assignments to four-color based (because Affinity apps do not have a fixed black swatch that is color mode sensitive and ignores profile changes). It does not unfortunately cause recalculation of swatch color values, which means that the links between objects and swatch assignments will get broken. In a complex document, you certainly do not want that (though ability to select similar objects / objects with the same attribute will facilitate swatch reassignments). You would need to use conversion method if the old and new profiles differ significantly, e.g. when changing from a profile intended for glossy stock to one intended for uncoated stock or newsprint; or vice versa. etc. It is important in Affinity apps that the document profile matches the intended export profile, since if you change the profile at export time, this well automatically cause conversion of all color values, which is a totally uncontrolled act since you could not make the same kind of manual restorations that you would do after having manually converted colors. What you need might be possible to be produced with Affinity apps, but requires much more knowledge and care than when done with apps like InDesign or QuarkXPress, and you are not likely to get any help from the printer / print shop.
-
You can use regex with Affinity specific formatting criteria, but I think that the list of found occurrences would not give you directly the count (although it would not take long to go through the list, counting first how many instances fit in a full view of listed occurrences. One way to work around this would be exporting to SVG and then opening this file using e.g. free Notepad ++ or other editor that shows the number of found occurrences of searched text: count_italics.mp4 Depending on what you consider constituting an italicized text passage, this could give an exact count. But you might have e.g. non-italicized space characters in the middle of the passage that is visually in one style, which could then result in counting more than one instance in something that would normally be understood as one coherently formatted text passage. EDIT: This workaround would fail also if you have e.g. bold italic text within italicized text (as reverting to non-bold would then increase the counter). Also, if you have separately just bold italic formatting, you would need to search separately for each style (and then also see if they are part of generally italicized text passage. So not necessarily a simple task without some scripting aid (or preparing the file e.g. by removing variations so that all ltalicized text uses that same style).
-
Subtracting from vector polygons
lacerto replied to Robertson668's topic in Affinity on Desktop Questions (macOS and Windows)
There are multiple ways of doing it. One would be drawing three octagons with a Polygon Tool using strokes and no fill, then expanding the strokes (Layer > Expand Stroke) to closed shapes, and merging (Layer > Geometry > Merge Curves). Then drawing the crossing lines at exact corner and mid points, expanding, and merging. Once you have closed shapes (in this case two Curves objects), you can apply a single Boolean subtract operation: polygon_subtraction.mp4 -
I have version 3.201 Pro from Hoefler & Co. (16 styles), OpenType PS flavor, installed on macOS Ventura 13.2.1 on Publisher 2.04 but cannot reproduce this. I have seen something like this happen when there is a name conflict (and this typically shows only at export). Could you by chance have multiple versions of Bold style installed?
-
macOS uses a bit different vertical spacing in typography so these kinds of issues are common. One way to try to avoid these problems is (so I have learned from this forum) using an exact line spacing, so instead of using e.g. Multiple of 1 leading, use an exact point size, like 15pt, etc. Another setting that might have effect on the behavior of text on these two platforms is initial advance of the vertical alignment at top of a text frame. This may be so especially if the text was initially imported from e.g. an IDML file and the original file might have used advance that is based on ascent. There might be point in trying one of the other options and see if this fixes the problem:

-
Here is a related post that might interest anyone struggling with Affinity way of handling gray values. Here Affinity Gray/8 color mode is used, showing how to handle these files when exporting them as K-based grayscale PDFs within Affinity apps. The rule of thumb is that Affinity gray-values and files based on Gray/8 should not be used with CMYK documents (if not wanted to be handled as RGB files and ultimately converted to four-color grays), unless in raster format, since then they can be forced to be treated as standard print-based grayscale images by using the "K-Only" button, after which the gray values are interpreted as black ink, rather than as RGB black intensity values. [EDIT: Note, too, that trying to specify gray values as values of K-only when using Gray/8 document color mode, results in CMYK to RGB conversion based on underlying profiles so e.g. K100 would result in something like R86 G86 B84, or G12 = appr. 88% of the intended solid K black.] gray_scale_issue.mp4 Here is the Designer exported Gray/8 file that is used in the video as a placed PDF (note how changing the placement method from Passthrough to Interpret does not solve anything; one must change the document color mode): gray_scale.pdf Here is the PDF produced from the placed grayscale PDF (yes, it is still grayscale): isthisstillgray.pdf ...and here is the file
-
There are multiple things that need attention. This clip demonstrates the problem: k_scale_issue.mp4 When you place a PDF in an Affinity document, it will by default be placed to be "passed through", that is, ignoring all color management and basically just pass whatever color values are in the source. So placing the kind of a K-scale PDF that you produced should basically be ok. The preview of a PDF placed to be passed through is always rasterized. When you pick colors from a rasterized image, you will see four-color values in a CMYK document, but this is illusory and not really the problem. The problem is that you have placed a PDF/X-1a document within an Affinity document and are in the process of exporting this kind of file using the last applied export setting, PDF/X-1a:2003 -- and yes, you already guessed, that violates Affinity app compatibility rules, so your placed PDF will be rasterized. The reason why placed PDF/X-1a:2003 is incompatible with PDF/X-1a:2003 is probably in blunt version check, and the fact that PDF v1.4 (of which type Affinity created PDF/X-1a files are) can theoretically contain RGB colors and transparency, so to play safe, the minimum PDF/X version that can export placed PDF/X-1a safely, is PDF/X-3. Or using any non-PDF/X-based export method. As you can see, Affinity apps warn about the violation and suggest that you use Interpret method to fix the problem. That, of course, is not a true fix, since interpretation: always loses overprint attribute of the source image may fail to map installed fonts, or silently replace non-installed fonts render vector graphics incorrectly may retranslate all color values in case the embedded profile of the interpreted file conflcts with the hosting document's CMYK target; or if the interpreted file does not have a profile, and its assigned profile (which is the one that you have defined in Preferences > Color, and which by default is. U.S. Web Coated v2) conflicts with the hosting document's CMYK target. The clip demonstrates the overprinting issue. Otherwise the "interpret" fix would in this instance work satisfactorily. The file where the bottommost placed PDF has been interpreted (color values are fine because embedded profile matched the hosting document's CMYK target, and the profile was not changed at export time), but overprinting attribute is lost. The "passed through" object is rasterized because of compatibility violation and has four-color gray values (it has also lost its overprint effect because Affinity apps cannot simulate overprint in rasterized graphics). gray_scale_nomore_and_partially_rasterized.pdf Truly fixed file exported using PDF 1.7 (the interpreted file of course still has its overprinting issues; EDIT: note, too, that if you need automatic transparency flattening, you would need to use PDF/X-3; that, on the other hand, would rasterize ALL non-PDF/X-based PDF content placed for pass through: all Affinity based PDF/X export methods do that): gray_scale_fixed.pdf Working with gray values in raster image formats is further complicated within Affinity apps because actual grayscale values are RGB-based, so whenever placing such files in CMYK documents, they are by default made "K-Only" by applying this attribute. But that is another topic. EDIT: Btw, there is a bug (or perhaps it is "by bad design"), where a copy of a placed PDF cannot have both "Passthrough" and "Interpret" attributes, if they do, both instances will be interpreted. Therefore I place on the video a separate file, even if with identical content, in the publication.
-
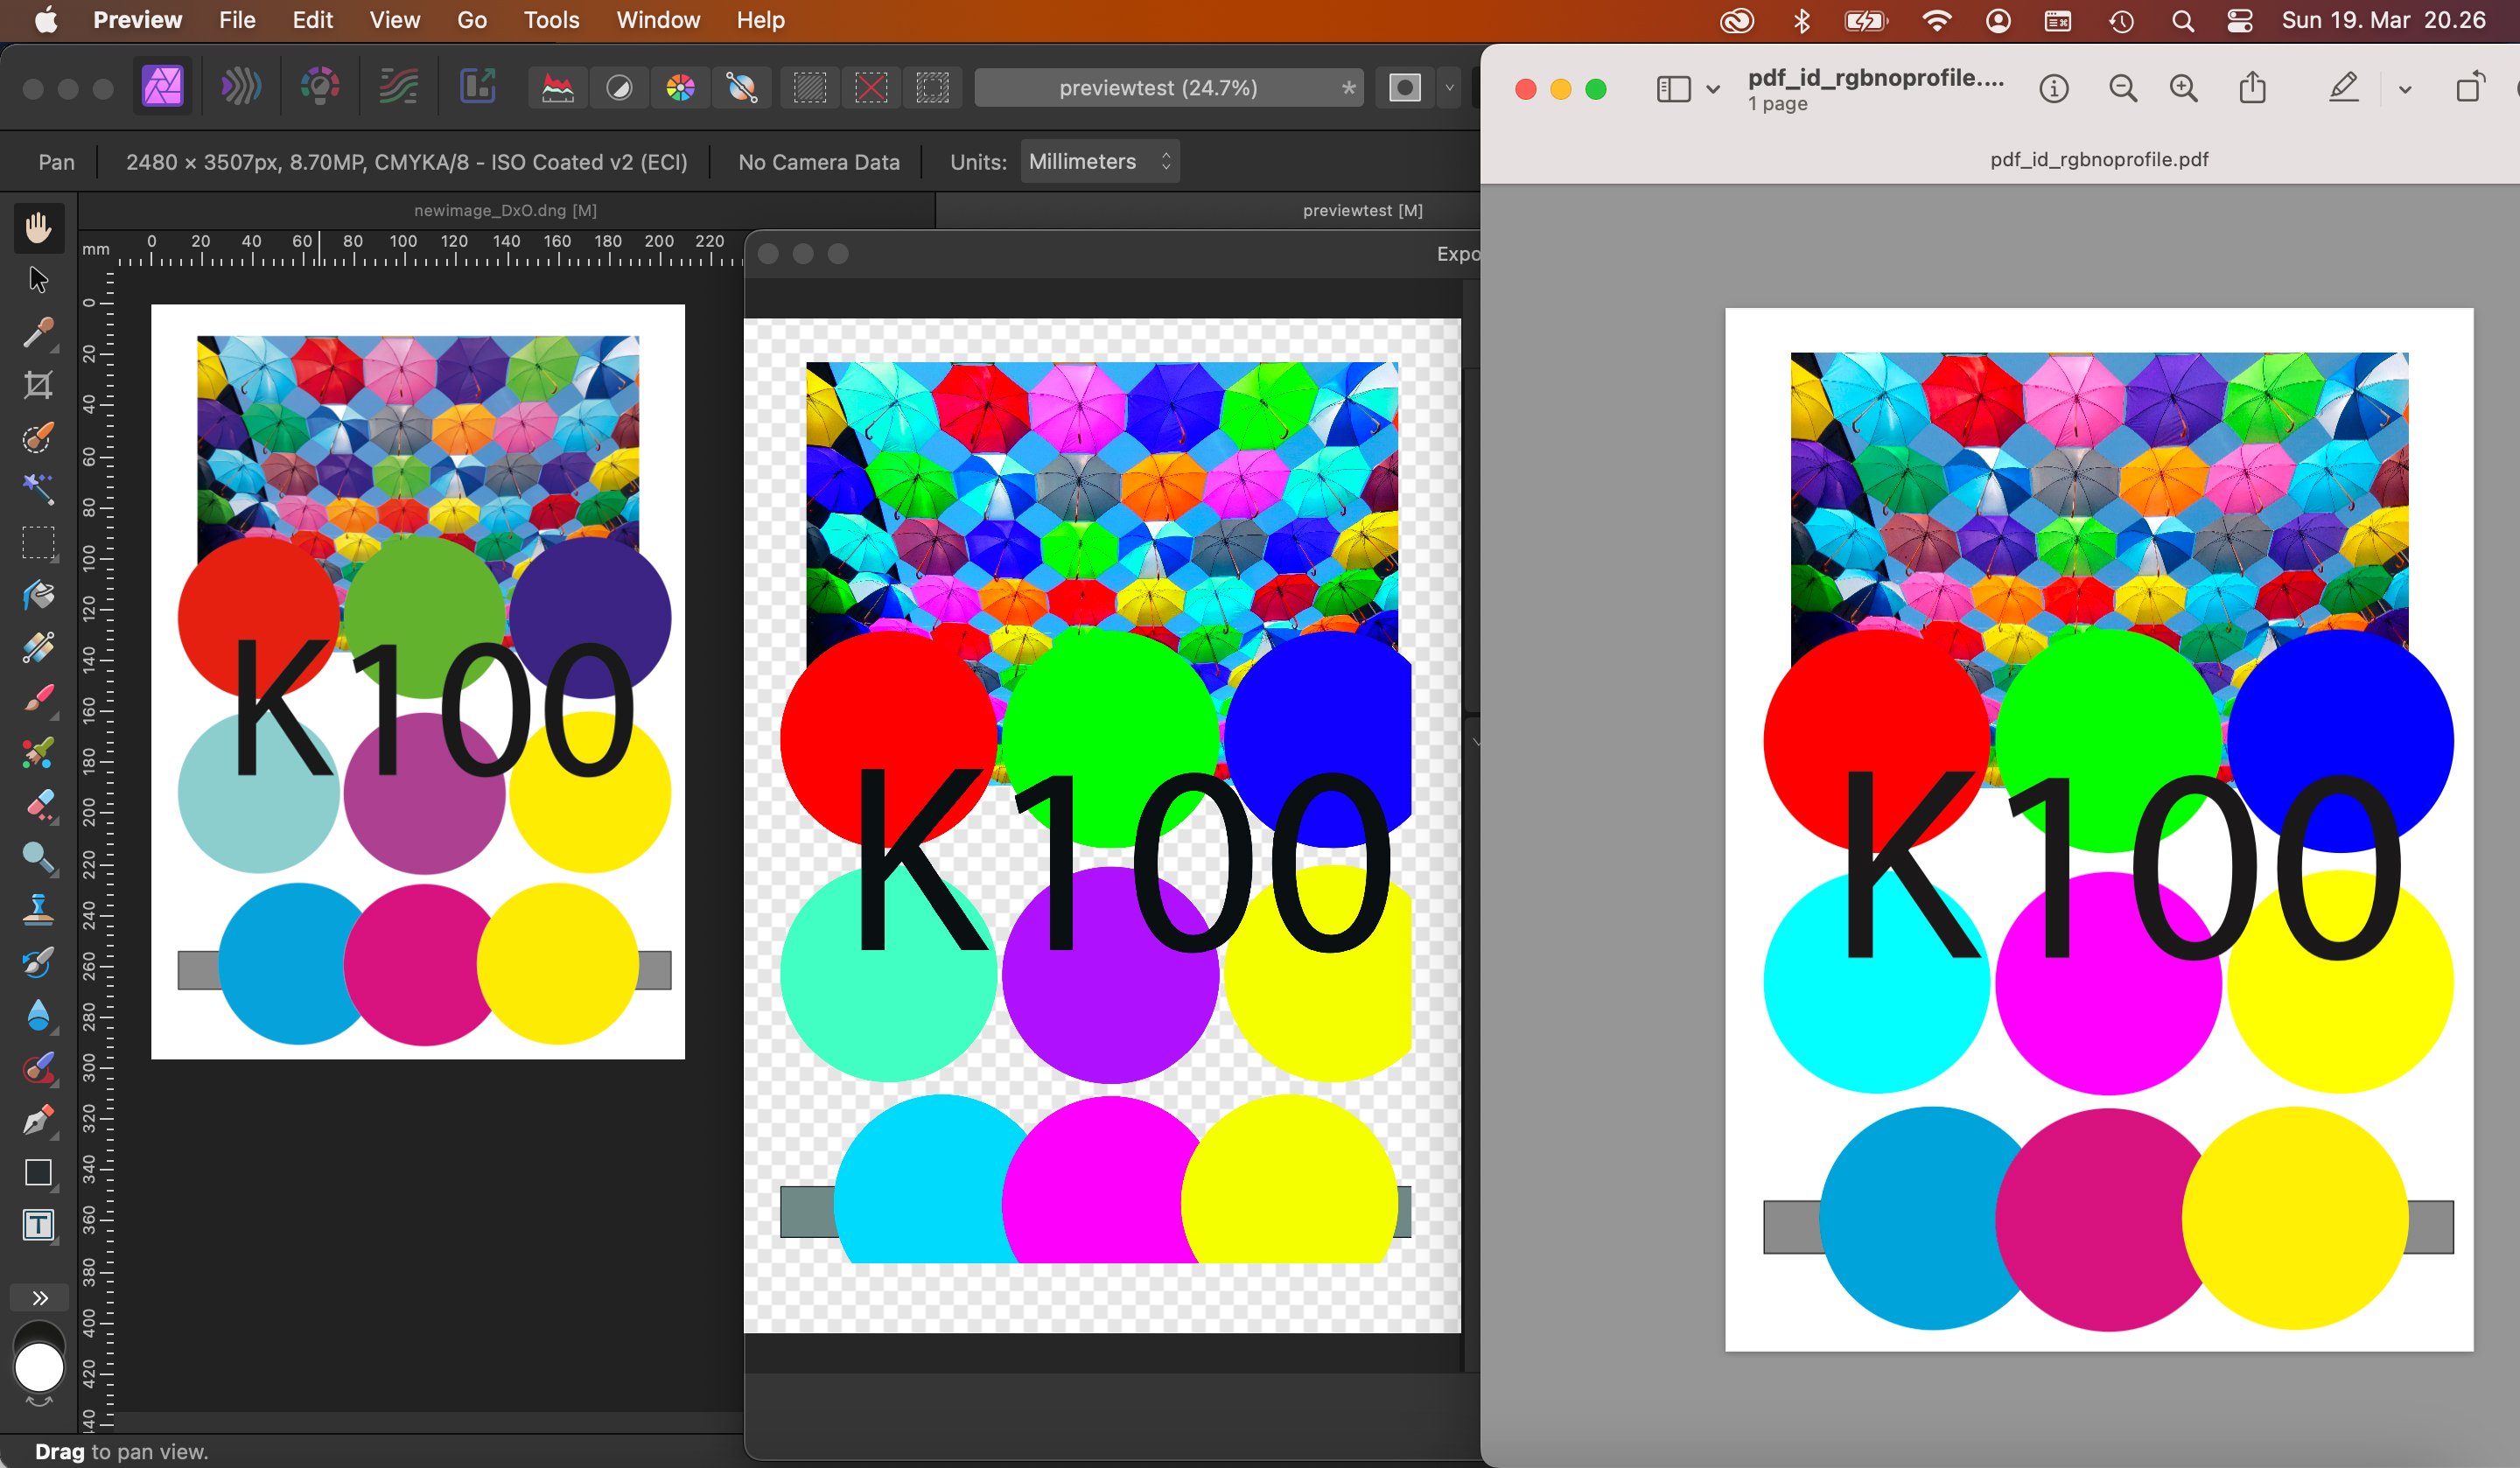
There might be a generic problem with your color management, related to what you are using as your system display color profile, as I could not experience any issues with the photo that you provided. The document canvas and the preview showed colors identically, and applying sRGB soft proof did not make any change (as it should not, when applied on an image that is already in sRGB color space). [Note that whenever you print or export, you should as a rule turn off Soft proof Adjustment, it is just for preview, not production.] Note though that there is a known issue with the standard (but actually legacy) sRGB 2.1 with Affinity Soft proof, causing that this profile actually never works, even when it should, like below when applied on an Adobe RGB image (note that the difference is less distinct here on the forum, but should still be discernible): srgbs_win.mp4 The alternative v2 2014 profile used in the clip can be downloaded here: https://www.color.org/srgbprofiles.xalter#v2 As a general note I would not be too concerned about seeing the preview showing colors that deviate from what you see on the canvas (except for in very simple situations as in your example, which indicate a clear problem) -- or what you finally get exported. E.g. in the screenshot below there is a mixed mode PDF placed in CMYK mode document and opened in export view to be saved as an sRGB PDF. The CMYK canvas is already limited to sRGB gamut so it cannot show realistically e.g. the 100% cyan ellipse (even if the display gamut supports it), then the preview seems to display the RGB color values in raw display gamut, the rightmost image showing what is actually output, previewed in macOS Preview app.
-
Kerning Type - hiding edges and boxes
lacerto replied to DGee's topic in Affinity on Desktop Questions (macOS and Windows)
Thanks, I seem to have been dreaming when testing this. I thought that I saw this working as mentioned, 1/1000 of a change with left/right arrow, and 1/100 when holding down the modifier. But it is 10 and 50. -
It behaves similarly, so the colors are shown inaccurately e.g. when placing a CMYK PDF interpreted, and working color profile defined in Preferences mismatches the document CMYK profile (that will by default be used when exporting using press-related presets). Some probably try, fouled by marketing hype. I have said this before, and have to say it again: that naughty, naughty CMYK.
-
Both modes are. Passthrough, because the source can be in conflict with Affinity "compatibility rules", resulting in rasterization of the source and retranslation of all color values; and Intepret, because the inherent color profiles of the placed files (getting assigned with the working CMYK profile defined in the Preferences), if conflicting with the profile used in context of export, will also result in translation of all CMYK color values, even if not causing rasterization. [EDIT: Though it should of course first be defined, what is meant by "reliable"; interpreted mode does rendering accurately according to the profile environment and its designed behavior, trying to keep the visual appearance, but that means translation of color values, which is typically not wished or wanted in CMYK context. Passthrough, on the other hand, when it works, means "reliable" in the sense that native values are passed through as they are. But rendering is inaccurate because the preview is rasterized.]
-
I guess this decision resolves the issue. In my tests only .DNG conversion introduced that tag (and with False value), including the .DNG conversion in your most recent post, while basically all apps that export to JPG appear to strip Camera RAW meta data. DxO does it for JPG, and also for TIFF. If a .DNG file is exported directly in Affinity Photo (e.g. using DxO PhotoLab), the image is simply just opened for editing, not developed. If it is saved on disk from DxO PhotoLab and opened in Photo, it will be opened in Developer Persona (and when developed, the value of "AlreadyApplied" tag stays "False").
-
Kerning Type - hiding edges and boxes
lacerto replied to DGee's topic in Affinity on Desktop Questions (macOS and Windows)
Good to know. In this topic OP was however talking specifically about kerning, and kerning can only be adjusted by placing the text cursor between two glyphs. Otherwise you would not have the blinking cursor, either... -
Thanks for the update. I need to put some time in this. I am not a photographer and have pretty elementary understanding of RAW workflows, especially modern ones, so I have written some confused text above e.g. related to RAW data in JPG formats. It seems that the issue is related to ability to use e.g. DNG image format converted from the initial .CR2 (which, as far as I know, does not have any Adobe XMP Raw Data descriptive information included), and this operation appears to embed Adobe Raw tags including the "AlreadyApplied" tag which stays "False" until the image is developed. I checked the way DxO PhotoLab behaves, and this specific app, when it processes a CR2 image and exports it to Affiniy Photo in JPG format, does not include the "AlreadyApplied" tag, but if exported in DNG format, does include it and its value is False. So this route, at least, explains how this tag gets in a file exported / opened in Affinity Photo (at least in version 2), and how, when subsequently exported to JPG, will have this tag exported with the rest of the meta data, and causes the non-desired behavior. Anyway, DxO PhotoLab, too, has options for the kind of meta data to include in exports, like this:
-
Kerning Type - hiding edges and boxes
lacerto replied to DGee's topic in Affinity on Desktop Questions (macOS and Windows)
I had a vague feeling (and may well be wrong) that it used to adjust (absurdly) tracking at some point, but it really does adjust kerning (spacing between pair of glyphs, not something that can be applied to characters / text selections themselves, like tracking). Anyway, this is how it now works at least in all desktop versions (1.10.6, 2.0.4 and v2 beta) and all three apps, including the Spacing menu commands. But I made a mistake: on macOS, the default shortcut for hundreds of em is not Opt+Shift but Opt+Cmd. It is just that I have changed this to Opt+Shift because this is how it is on Windows, and I want to have identical shortcuts on both systems. -
As the setting that triggers Photoshop behavior is something that is saved by camera within Raw Data itself, like this: <crs:AlreadyApplied>False</crs:AlreadyApplied> ...I suppose disabling saving raw data with JPGs would be the easiest method to avoid the issue. In Photoshop, the behavior (when "AlreadyApplied" is False) is determined by this setting in the Preferences, and it seems that the default is "Disable" in older versions of Photoshop (this is from PS CS6): ...while the feature seems to be by default enabled in newer versions of Photoshop (this is from PS 24.2.0): The user can also bypass the Camera Raw interface if they choose to open an image by using "Open As", and then choosing JPG as the extension. Perhaps Serif could add something like this in the Export options (these screenshots are from PS 24.2.0): ...and in context of exporting single images with "Export As": Including "Copyright and Contact Info" results in following data beiing included within Raw Data (I excluded/hid your detailed contact information) : <x:xmpmeta xmlns:x="adobe:ns:meta/" x:xmptk="Adobe XMP Core 9.0-c001 79.14ecb42, 2022/12/02-19:12:44 "> <rdf:RDF xmlns:rdf="http://www.w3.org/1999/02/22-rdf-syntax-ns#"> <rdf:Description rdf:about="" xmlns:xmpRights="http://ns.adobe.com/xap/1.0/rights/" xmlns:xmpMM="http://ns.adobe.com/xap/1.0/mm/" xmlns:stRef="http://ns.adobe.com/xap/1.0/sType/ResourceRef#" xmlns:photoshop="http://ns.adobe.com/photoshop/1.0/" xmlns:xmp="http://ns.adobe.com/xap/1.0/" xmlns:dc="http://purl.org/dc/elements/1.1/" xmlns:Iptc4xmpCore="http://iptc.org/std/Iptc4xmpCore/1.0/xmlns/" xmlns:tiff="http://ns.adobe.com/tiff/1.0/" xmlns:exif="http://ns.adobe.com/exif/1.0/"> <xmpRights:Marked>True</xmpRights:Marked> <xmpRights:WebStatement></xmpRights:WebStatement> <xmpRights:UsageTerms> <rdf:Alt> <rdf:li xml:lang="x-default">All Rights Reserved</rdf:li> </rdf:Alt> </xmpRights:UsageTerms> <xmpMM:OriginalDocumentID>0ED68538E9B1F07D891EAEA650B26B0A</xmpMM:OriginalDocumentID> <xmpMM:DocumentID>xmp.did:AC692581EB612646B8CEB62043E1F70A</xmpMM:DocumentID> <xmpMM:InstanceID>xmp.iid:FB1BA299D799984DBDD6253879E8DF5E</xmpMM:InstanceID> <xmpMM:DerivedFrom rdf:parseType="Resource"> <stRef:instanceID>xmp.iid:812ddcb1-a1cb-a448-83fd-3e18563a3807</stRef:instanceID> <stRef:documentID>xmp.did:e45e0f11-f8b8-45b7-824e-78d50d4d5aba</stRef:documentID> </xmpMM:DerivedFrom> <photoshop:AuthorsPosition>Photographer / Designer</photoshop:AuthorsPosition> <photoshop:LegacyIPTCDigest>689B73A9E1A00DABB2C332A1ED356F25</photoshop:LegacyIPTCDigest> <photoshop:ColorMode>3</photoshop:ColorMode> <photoshop:ICCProfile>sRGB IEC61966-2.1</photoshop:ICCProfile> <xmp:CreatorTool>Adobe Photoshop 24.2 (Windows)</xmp:CreatorTool> <xmp:CreateDate>2023-03-18T09:13:48+02:00</xmp:CreateDate> <xmp:ModifyDate>2023-03-18T09:13:48+02:00</xmp:ModifyDate> <xmp:MetadataDate>2023-03-18T09:13:48+02:00</xmp:MetadataDate> <dc:rights> <rdf:Alt> <rdf:li xml:lang="x-default">Ldina</rdf:li> </rdf:Alt> </dc:rights> <dc:creator> <rdf:Seq> <rdf:li>Ldina</rdf:li> </rdf:Seq> </dc:creator> <dc:title> <rdf:Alt> <rdf:li xml:lang="x-default">20220618-IMG_5684</rdf:li> </rdf:Alt> </dc:title> <dc:format>image/jpeg</dc:format> <tiff:ImageWidth>1600</tiff:ImageWidth> <tiff:ImageLength>1065</tiff:ImageLength> <tiff:BitsPerSample> <rdf:Seq> <rdf:li>8</rdf:li> <rdf:li>8</rdf:li> <rdf:li>8</rdf:li> </rdf:Seq> </tiff:BitsPerSample> <tiff:PhotometricInterpretation>2</tiff:PhotometricInterpretation> <tiff:SamplesPerPixel>3</tiff:SamplesPerPixel> <tiff:XResolution>72/1</tiff:XResolution> <tiff:YResolution>72/1</tiff:YResolution> <tiff:ResolutionUnit>2</tiff:ResolutionUnit> <exif:ExifVersion>0231</exif:ExifVersion> <exif:ColorSpace>1</exif:ColorSpace> <exif:PixelXDimension>1600</exif:PixelXDimension> <exif:PixelYDimension>1065</exif:PixelYDimension> </rdf:Description> </rdf:RDF> </x:xmpmeta> ....and the JPG will no longer be opened in Camera Raw view in Adobe apps. So, long story short: Adobe has chosen to edit (partially strip) camera-written Raw Data in context of JPG export, letting the user to choose what kind of meta data will be exported for common usage (none at all, or just basic data). Why could not Serif do the same? Your request is certainly valid. EDIT: I do not really know whether Adobe XMP meta data (optionally including the "AlreadyApplied" tag) is really included in Raw data written by camera, or something added e.g. by Lightroom, but both Lightroom and Photoshop mark the tag as True after having processed a raw file and subsequently exporting as JPG, so it would be interesting to know what the procedure was to have a JPG saved with "AlreadyApplied" tag left with the value of "False".
-
Kerning Type - hiding edges and boxes
lacerto replied to DGee's topic in Affinity on Desktop Questions (macOS and Windows)
There is also an inbuilt shortcut key, Alt/Opt + Left/Right Arrow, which decreases or increases kerning by thousands of an em (‰), or if you hold down the Shift key while pressing, in hundreds of an em (%). You can determine the shortcut via Preferences / Shortcuts / Text / Spacing > Tighten/Loosen and Tighten More > Loosen More. The operations are also available as menu commands under Text > Spacing. The feature is available across all three Affinity apps. I do not think hiding extras includes the blinking bar in anywhere else than in Photoshop. -
It could perhaps be an optional feature (or perhaps rather stripping only just RAW data itself could be, instead, in context of JPG export). I am not sure, however, if "AlreadyApplied" XMP tag is specific to Adobe Camera RAW, and accordingly should not at least automatically be touched by other RAW processors. E.g., when DxO PhotoLab processes images (though not just specifically RAW images), it creates a sidecar indicating if an image has been processed by PhotoLab, and then shows the following information in the UI (green corner added in the DxO created thumbnail image based on existence of sidecar file, but nothing written in the processed image file itself, whether e.g. .CR2 or even any regular file, with or without RAW content): An alternative could then be, as shown by @David in Яuislip above, using e.g. ExifTool command line utility (Perl script available also as command line apps for both Windows and macOS), to manually mark an image as "AlreadyApplied", whenever wanting to make sure that the file opens in Photoshop (or Lightroom) without showing the Camera Raw interface.
-
2023 pantone skintone guide
lacerto replied to Michael Bobarev's topic in Affinity on Desktop Questions (macOS and Windows)
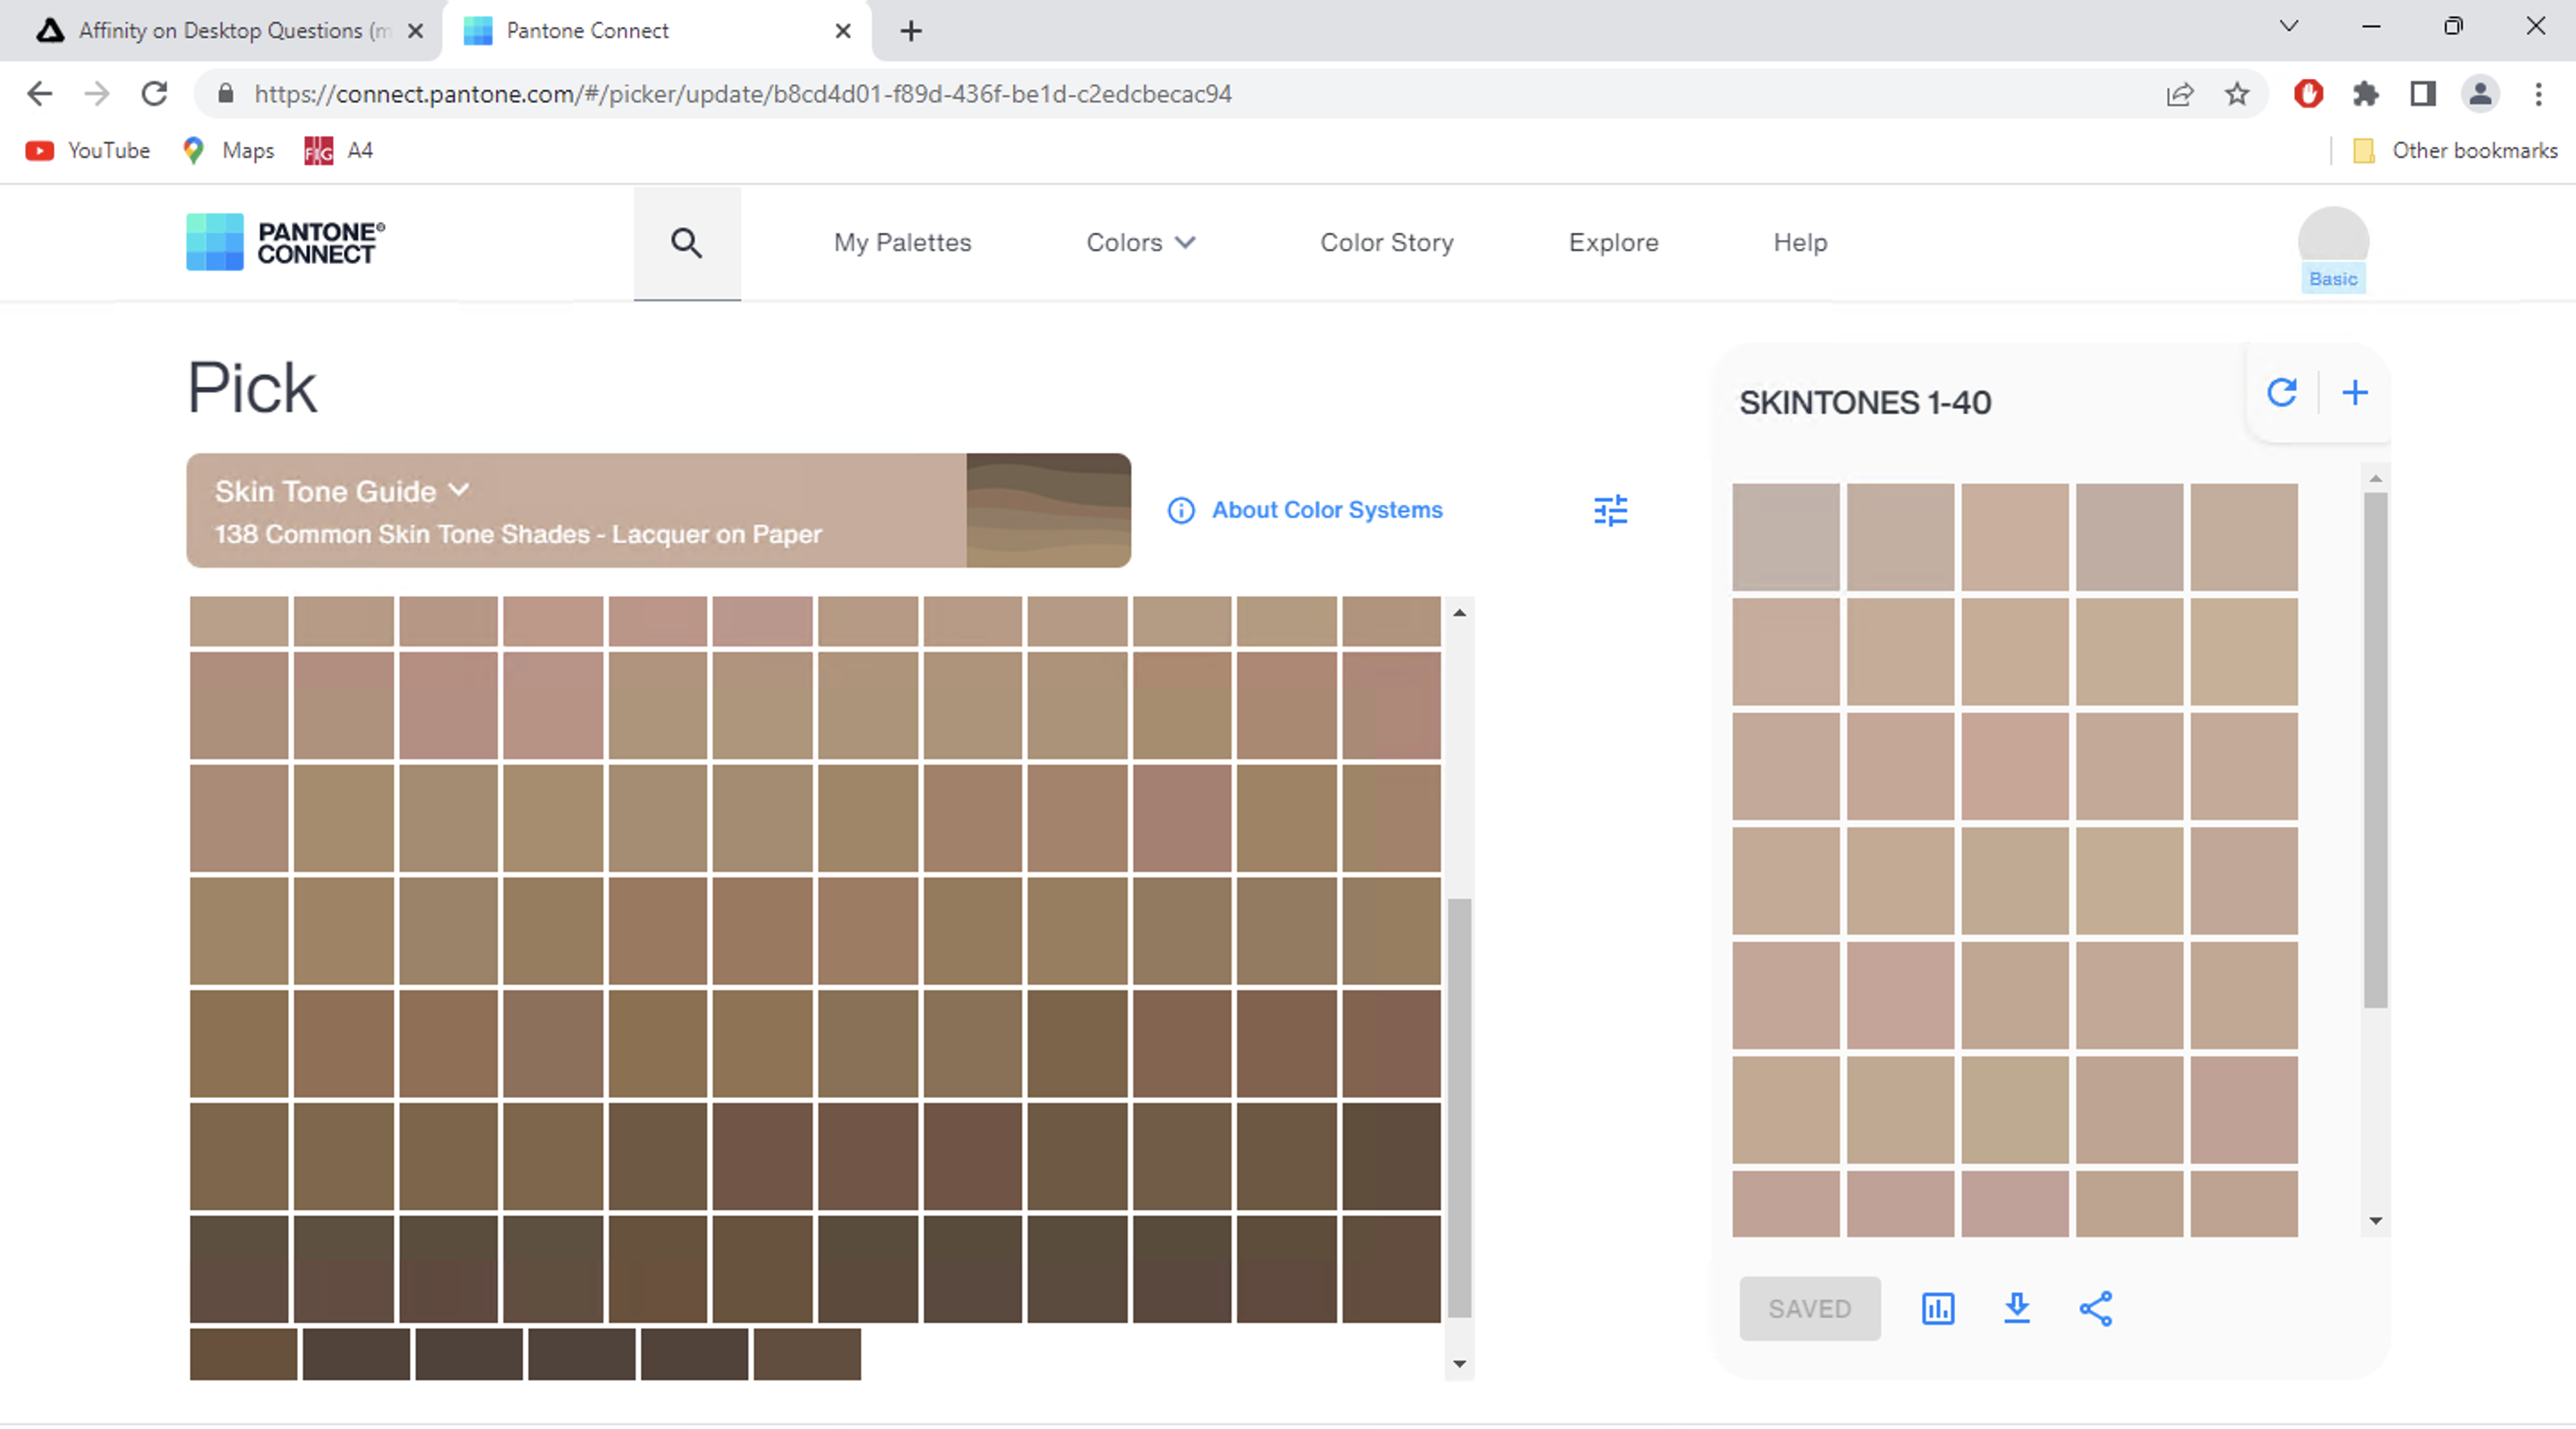
They do. However we are not required to. Some basic skills and a couple of hours of our precious time is needed, though. The free PANTONE Connect account limits the number of saved palettes, and only allows max 40 swatches per palette, but it only takes a couple of hours to create a fully legal PANTONE based Skintones library with Adobe RGB based color definitions, using a browser, and then create an app specific palette from the downloaded PNG bitmaps. A tool like VectorStyler would be useful in extracting colors to palettes and converting between e.g. CSV (allowing fast input of color names) and ASE (allowing importing to various graphic design apps). EDIT: GIMP can also create accurate palettes in pixel column order and export them to e.g. text files with hex values. On Windows Extract Text tool (part of free PowerToys) could be used to extract swatch names from bitmaps. The two text files could then be combined e.g. in Excel and if needed convert hex color values to decimal format. The resulting .CSV file could finally be used to prepare an .ASE file. Preparation of complete PANTONE swatch libraries based on PANTONE Connect provided bitmaps with proper tools (even when distinct) is basically much a matter of time it takes to build palettes (via mouse clicks) using the PANTONE Connect UI.
-
I think it should. Photoshop certainly changes this flag after a RAW image is developed. I think that the purpose of this flag is to avoid automatic redevelopment.
- 34 replies
-
- 1
-

-
- affinity photo
- develop
- (and 6 more)
-
Actually, stripping the EXIF meta data causes the RAW EXIF tag for RAW procedure having been non-applied or applied to be stripped, which also means that Photoshop will no longer open that file in RAW view! RAW data still exists there. But useful EXIF meta data will nevertheless be lost.
-
In the Metadata panel of Affinity Photo, there is a context menu where you can choose to strip EXIF and GPS Location meta data. You can also import and export meta data, and select and copy RAW meta data, but you cannot strip it.