Jörn Reppenhagen
-
Posts
98 -
Joined
-
Last visited
Everything posted by Jörn Reppenhagen
-
 carl123: What exactly did you do to recover all the blue tones in the sky? I ended up with similar results (also with the same erroneous blue in the clouds) - but with the lower part of the sky being gray instead of blue.
 -
IanSG: Exactly my own thoughts. Nille: If you've got a sky's RGB value of 255, 255, 255 (except in the brightest part of a cloud) in a JPG, there's no way of recovering anything, not with AP, not with CaptureOne, not with alien technology. Only way is replacing the sky completely. But just upload the RAW (not the JPG ), if you won't mind.
-
Affinity Photo 1.10.1.1142 crashes
Jörn Reppenhagen replied to phoenixart's topic in V1 Bugs found on Windows
Chris: No, I haven't. Where to find that on a Windows machine? -
Affinity Photo 1.10.1.1142 crashes
Jörn Reppenhagen replied to phoenixart's topic in V1 Bugs found on Windows
I had the same experience, Chris. Problems started after the latest update - previously, I had hardware acceleration on all the time, no problems. But after the AP update I experienced crash after crash while OpenCL was on. Then I updated NVidia drivers, which didn't change anything. Crashes stopped after deactivating the OpenCL option, but some processes (like frequency separation) now just take longer than forever. CORRECTION: AP just crashed while zooming - with OpenCL OFF! -
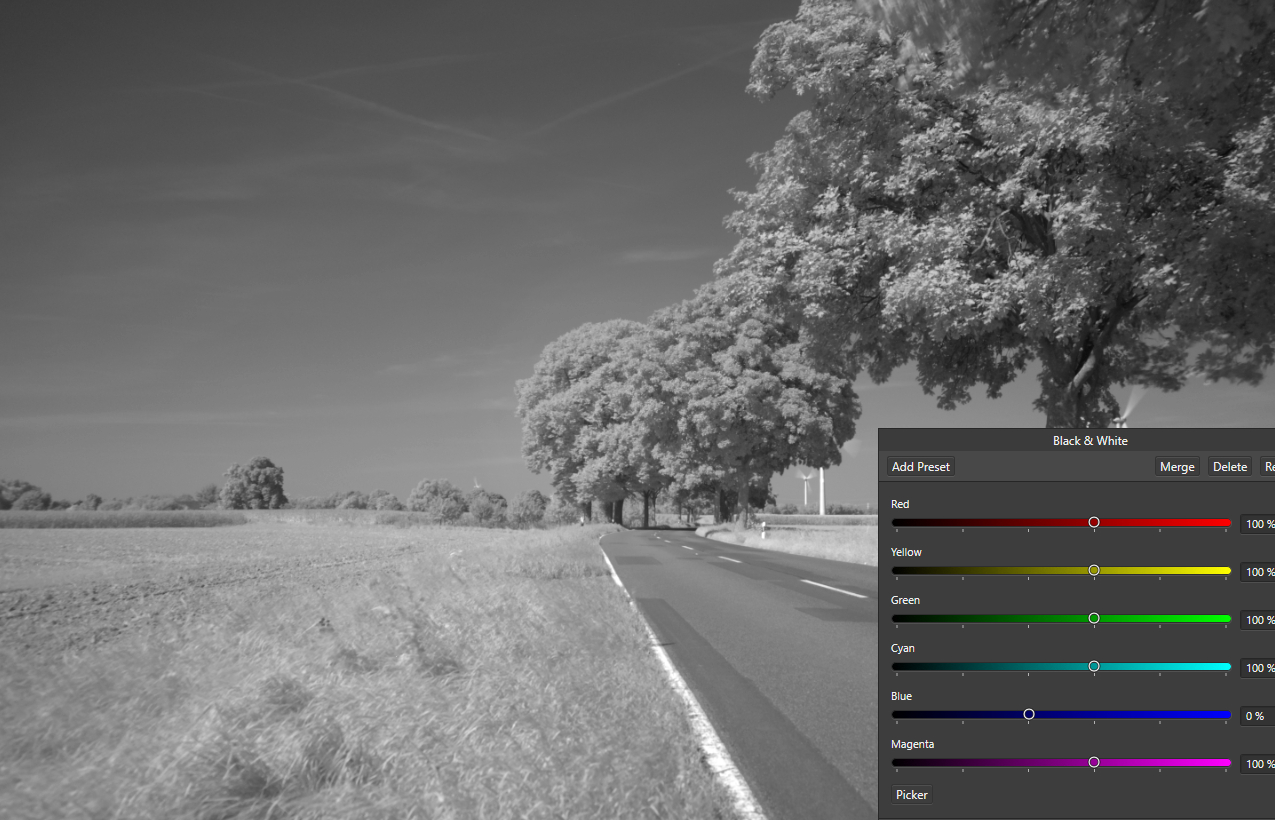
NotMyFault: Ach, du bist ja auch Germane! - Ich antworte aber in English, damit die anderen Leute das auch mitverfolgen können. I attached a super quick edit of your screenshot, of course it's low-res, but should illuminate the issue. It's just an HSL edit. See the quite distinct "circle of nothing" between inner circle and bleeding rim, plus the results of that bleeding into the background? You'll also notice there's more bleeding to the inside - invisible prior to the HSL adjustment. That's also exactly my own results. But I am quite sure there must be a real simple solution, I am just too blockheaded to find it. Just have a look at the second image, a black and white conversion. That spot is still there, creating a quite bright misty spot in the center. Now the third picture, same black and white conversion, but with the blue component set to 0. Spot almost completely gone! Also works after a channel swap, this time with the red component set to 0. There's still a faint discoloration, but I guess that's because the color of the blue (or red) component is not 100 % on the (hot)spot. Slight loss of contrast could be compensated by raising the cyan (yellow after channel swap) component accordingly. Thus it seems to be possible to eliminate that spot completely just by reducing a single color component of the right color composition. I'll experiment with a layer overlay of a single color (without any fading) and diverse blend mode settings for substracting that color from the background layer. Hopefully hitting the color on the spot does the trick. (Till now, it just didn't.) Maybe this finding might help working out a solution. - Or maybe it's just elaborated BS.

-
Thank you for your answers! Komatös: Den Text kannte ich leider schon (hab schon wie ein Irrer geforscht), der hilft ein wenig, wenn man gerade anfängt, kann aber auch keine Lösung vermitteln. Aber danke fürs Verlinken! 👍 NotMyFault: Thank you very much for trying and suggestion that approach. Looks a bit like my previous tries, unfortunately with the same issues - a distinct sharp-edged inner circle and circular red bleeding into the background. Doesn't look too dramatic, but becomes hair-raising if you try to process the picture further, e. g. try to recolor the sky to that deep dark blue we love with IR pictures, e. g. using HSL. I saw James' video about lens flare removal, will also try to use some of the techniques shown - but I fear it won't work. But let's see. Old Bruce: I already tried that method by taking photos of a blank white sheet of paper in the sunlight to isolate the color of the hotspot. Didn't work too well, at least I wasn't able to achieve anything usable; but that could just be me. I also liked the idea of creating a kind of "removal template" that way. But the hotspot seems to look different according to lighting conditions. And of course different apertures and focal lenght also contribute to the drama. So the challenge is still open.
-
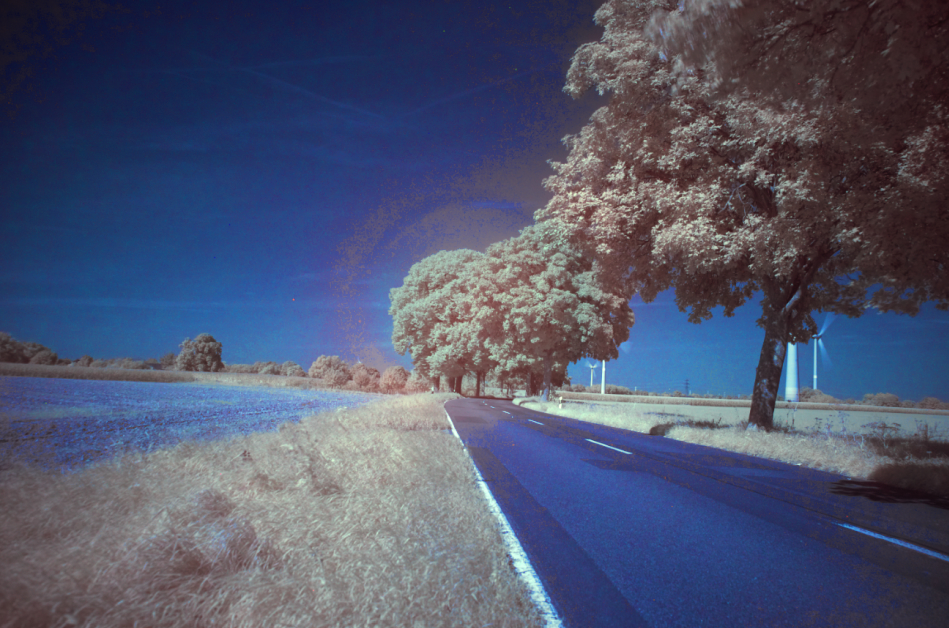
I guess almost every IR enthusiast knows that problem: That ugly lens hotspot in the middle of an image. Common hint: "Use another lens". So I did. And each lens I tried (all Fujifilm, XF 18 - 55, XF 27, XC 50 - 230) showed a hotspot. Search on the net: Lots of big-mouth "tutorials", none working. Next common hint: "Convert to black and white." Works if I reduce the red contribution (red after channel swap, blue before channel swap) during B/W conversion - but of course the result is black and white, not what I wished for when using a 720 nm IR filter. Another common hint: "Try different apertures." Helps a bit in changing the size of the hotspot, but doesn't get rid of it. Plus, I can't tell foliage not to move in the wind during a multiple seconds exposure (sample picture (un)clearly shows the result). Okay, I can tell - but it won't obey or just doesn't listen; not sure, yet. Thought after channel swap: It's a reddish-orange circle with faded edges, so how about drawing a reddish-orange circle of the same size with a radial filling and faded edges, then substract that from the picture, maybe using a blend mode? Tried and failed again and again, always ending up with a visual rim around the hotspot, getting extremely prominent with further image processing. Also tried other approaches, always happily hit the wall. Maybe I overlooked something obvious or just screwed up. So now I am calling fellow IR lover @James Ritson to the rescue. I guess this is an issue a lot of IR enthusiasts fight with and lose the fight, there's no working tutorial and/or sufficient funds for buying a non-hotspot lens just for IR purposes. Maybe it could even be possible to implement a "IR lens hotspot removal" feature in future AP versions - IF there's a working solution. Would love to see that. --- Two small images attached, before and after channel swap, saturation cranked up for making the hotspot more prominent, plus original image in RAF format for playing around. DSCF8979.RAF
-
Affinity Photo 1.10.1.1142 crashes
Jörn Reppenhagen replied to phoenixart's topic in V1 Bugs found on Windows
Just to add: Also experience permanent freezes/crashes (rotating blue mouse pointer circle) since updating to .1142. Hard to tell when - just seems like it's not connected to any specific action. Could happen after creating a few astro stacks, then simply clicking a different picture tab, or working with layers of IR photos - just didn't find any pattern, yet. It's an IMMENSE nuisance losing all your work again and again. Yes, hardware accelation is on. Has always been on, never did a single configuration change during the last year or so. Specs: AMD Ryzen 7 2700X, 32 GB RAM, NVidia RTX 2070 -
Just to confirm the wrong behavior: Same issue with Fujifilm X-T20: RAF files are properly displayed (with colors) if opened for regular editing, but lack color information when trying the strophotography stacking feature. Identical behavior with DNG files created from Fujis RAF files. Plus, I can also report a bug causing a crash: If choosing the "Monochrome" option under "Raw Options" > "FITS Bayer pattern" with an open astrophotography stack, AP just vanishes (closes). AP version 1.9.0.932, Windows.
-
Please allow quoting myself: "But the wheel spin alternative would be an addition, no replacement." And of course I second SrPx: Zooming with the wheel is the most intuitive and best way. This has nothing to do with habits of "old dogs". If cars feature a steering wheel, that's not because old dogs are used to it. It's because it's the best solution. If shoes are the way to go, it's not because old dogs just like walking in their shoes. It's because shoes are a proven means. Like the mouse wheel for zooming/changing sizes. Add some "innovation" by utilizing the spin speed for achieving coarse and precise changes, see happiness in the faces of old dogs and puppies alike. End of barking.
-
Of course not. I'd use the three-modifier-keys variant for "exotic" changes, only. Like flow. Main action (size): Alt. Secondary action: Alt + Strg - because it's a no-brainer hitting those keys blindly. Alt + Shift and Alt + Strg + Shift for "exotic", seldomly used parameter changes, only. But I understood that as a matter of course.
-
Sure, flow and transparency are quite vital parameters - while I have to admit I don't change the flow settings too often. For me, size is THE brush parameter, of course your mileage may vary. But I don't see any problems with implementing changing that other brush parameters also using the wheel - modifier keys. Like Alt (size), Alt + Ctrl (parameter 2), Alt + Shift (parameter 3), Alt + Ctrl + Shift (parameter 4) - just because we all find that keys blindly.
-
Personally, I dislike the drag options; too much fiddling and moving the mouse. Sure that's a matter of taste and habit. But the wheel spin alternative would be an addition, no replacement. I would be real happy if I could change the brush size with the wheel, as that's my mostly used brush customization. Would be okay for me to use drag options for changing other parameters (while using the wheel with modifier keys would be preferred) - but size is just predestined for being changed by spinning the wheel. Like zoom. Would you ever think of changing the zoom via dragging the mouse? It's just clumsy. By the way: Zooming would also benefit from a more dynamic handling of the wheel input. We all know the problem: We wish to zoom to a specific level - but the steps are too coarse, the picture either gets too small or too larger. Steps in between are missing. Wouldn't it be great if you could control the zoom stepless with pixel precision if needed? No problem if using dynamic increase/decrease by wheel. Only drawback: Needs a high-performance system as the number of redraws dramatically increases, would also slightly raise your electricity bill.
-
That's no greater problem: Spin the wheel slowly - precise setting, increment/decrement by 1. Spin the wheel fast - factor 10. Spin the wheel real fast - factor 50. Just natural and intuitive. Or even easier: Dynamic increase/decrease, no fixed factors, just one multiplicator and a "curve". As mouse wheels are quite different (fast "free" spinning versus slow and clicky "step-by-step"), menu settings for defining the factors and ranges (impulses per time unit) could make this feature work properly for all wheel types. If working with dynamic increase/decrease, a multiplicator and "curve" setting would be sufficient. And it's easy to do; I am a former programmer, would guess half an hour of programming effort would be sufficient to make it work.
-
@haakoo - Ah, I love spinning the wheel as it is a no-brainer. Dragging needs more focus, you need to make sure your movement remains horizontal/vertical for not changing other paramaters you didn't wish to change. Spinning the wheel using modifier keys doesn't need that precision, just intuition. (At least that's how I see it.)
-
Fully agree. We already got Ctrl + Wheel for zoom, I guess we're pretty used to changing "sizes" using the wheel. That's why I find it real natural changing brush sizes with the wheel, too. In fact I sometimes find myself spinning the wheel, trying to change the brush size in vain - but out of habit. And of course that option needs to be selectable, or better configurable. German saying: "Jedem Tierchen sein Pläsierchen" - different habits, different preferences.
-
Translation missing (german)
Jörn Reppenhagen replied to Fritz_H's topic in [ARCHIVE] Photo beta on Windows threads
A simple "sorry" instead of a follow-up using the same dismissive tone would have been sufficient and appreciated. -
@Guzzi: AP offers such a tool; it looks like the magic wand, it's called "Flood Select Tool". You click and hold e. g. on the sky area, then move the mouse to select more or less areas of a similar color. The range of movement controls the tolerance, you may choose if this affects the full picture or just the area around the place you clicked. Here's a quick'n dirty video:
-
Translation missing (german)
Jörn Reppenhagen replied to Fritz_H's topic in [ARCHIVE] Photo beta on Windows threads
@Patrick Connor: I had some fears my offer could be interpreted as kind of competing. That's why I wrote "free of charge". And as you could see, I also wrote "you can send me missing EN > DE fragments via eMail" . So this referred to missing parts or "emergency" situations, I just wished to do you a favor by filling the gap, while you obviously interpreted this as a kind of job application or a call for improvements, usually utilized for establishing a business relationship through the backdoor. Not my intention, simply not my style. As an experienced translator I am not really pleased about condescending formulations like "As a professional translator you should realize ...", suggesting lack of professional knowledge. As a perception psychologist, I know this particular formulation was meant to offend, otherwise you had chosen something like "As a professional translator you know ..."; but never ever instructional formulations like "you should realize". This is my very first encounter with Serif staff causing a real negative feel. German saying: "Jede Gefälligkeit rächt sich" - every courtesy takes it's toll. -
Translation missing (german)
Jörn Reppenhagen replied to Fritz_H's topic in [ARCHIVE] Photo beta on Windows threads
@Chris B - here's the missing translation: *.afphoto wurde mit der regulären Affinity-Photo-Version erstellt, nicht mit der Beta. Beim Bearbeiten mit der Betaversion können der Datei zusätzliche Merkmale hinzugefügt werden, welche die reguläre Version nicht verarbeiten kann. Es ist auch gut möglich, dass sich die Datei anschließend nicht mehr mit der regulären Affinity-Photo-Version öffnen lässt. Sie können das Öffnen der Datei komplett abbrechen, mit der Originaldatei oder mit einer Kopie der Datei weiterarbeiten. Wie möchten Sie fortfahren? Abbrechen Originaldatei bearbeiten Kopie bearbeiten --- Note: I am professional translator and (advertizing) copywriter, working for the big names. If you wish, you can send me missing EN > DE fragments via eMail. If it's smaller pieces like the above, I'll do the translations free of charge. Glossary or better - TM in Trados format (de-facto standard of the translation industry) would be appreciated to be able to maintain consistency with the terminology used so far. -
Ahh, sorry, I don't like that idea too much. Reason is severe interruption of the workflow, a major hindrance. Example ... Let's take a typical masking workflow, as usual you wish to isolate the sky in a picture, trees in the background. You grab the masking brush, easily mask the coarse elements, but then the fine work starts - like masking the space between twigs where the sky should shine through. In that situation, you constantly need to change the size of the masking brush, adapt it to the size and other properties of the area to mask, also need to quickly switch between Snap to edges and regular behavior. And you like to do that without interrupting your workflow, without moving the brush away. You constantly need to compare the brush size with the area to mask, you need to see the proportions, thus you always need to see the picture and the brush. And you need to see the brush exactly at the place where you wish to use it. Easy to accomplish if you use keyboard keys (if it's not "[" "]" with non-English keyboards) or mousewheel. But *impossible* to do if you need to go though a complex selection dialog with every single change of the brush size. Might take hours, you cannot compare the proportions of brush and area to mask, position of your brush also changes. A sound configuration might be: Mousewheel always changes the brush size if a brush is selected and the pointer is hovering over a picture. Fast spin: Quick and coarse size change. Slow spin: Pixel-wise size change. Configurable modifier keys, like Alt for changing the hardness or Shift for changing opacity and the like. Or Q, W, E for Opacity, Flow, Hardness - up to your taste. Mouse wheel button controls switches like Snap to edges, doubleclick for wet edges, keeping pressed for using a third switch etc., also configurable according to the features you need most. Just imagine that way - would feel just natural. Like changing the zoom using CTRL + mouse wheel. An intuitive no-brainer. (Yes, I am fighting for that idea. )
-
Hello again, Gabe. Yes, there's vast improvements with the beta (that's why I used the regular version in the video to clearly show the issue), but I still need to use Lightroom for Raw development of IR photos: Tweaking IR pictures further intensifies the "impurities" (e. g. if applying HSL), thus I am still forced to using LR. And believe me - I am really suffering of a natural aversion when doing so. (Maybe) interesting side note: Many Raw converters show this problem. Till now, I found just LR and Darkroom (if I remember right) mastering the challenge.
-
Crash when using QuickMask
Jörn Reppenhagen replied to Jörn Reppenhagen's topic in [ARCHIVE] Photo beta on Windows threads
Thank you, Chris; and Ron and Uwe for confirming. -
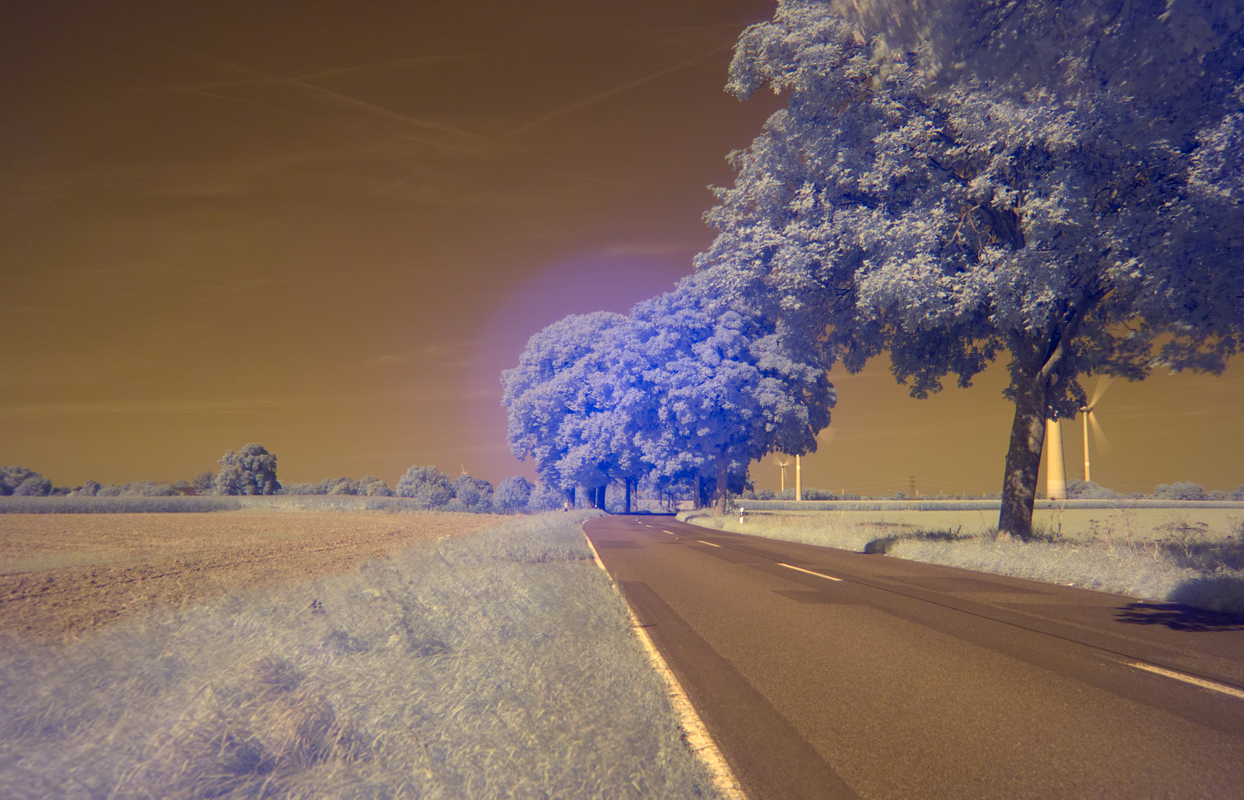
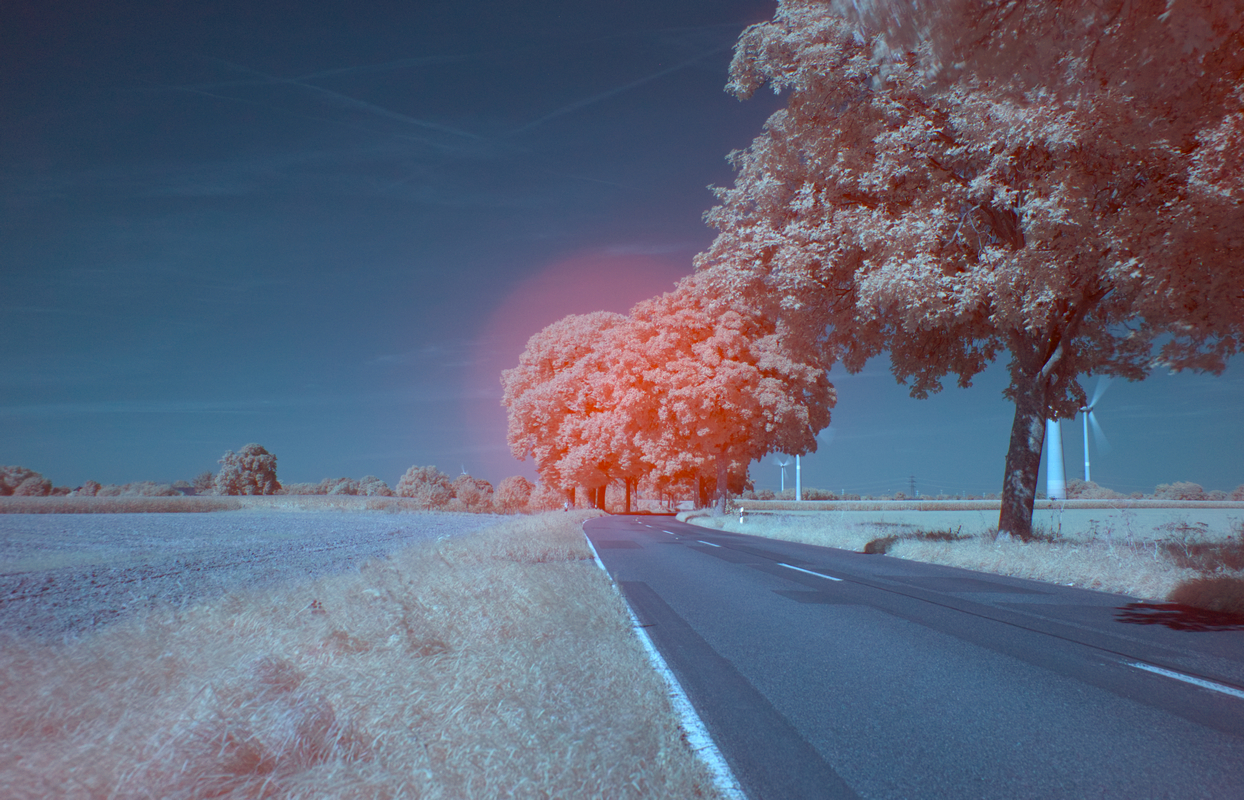
Ooops, sorry @GabrielM - forum didn't notify me about your latest post. I forgot to mention that my crops were taken after doing a channel swap (Channel Mixer, Red channel: Red 0, Blue 100. Blue channel: Red 100, Blue 0.) That's the typical thing you do with IR photos to get a blue sky. It's easier to spot the problems after doing that swap. But your WB is not okay, the problem won't show with that settings. You can't achieve a correct WB for IR photos using the sliders. Please use the White Balance picker tool (the one that looks like a CD) from the toolbar on the left side of the Develop Persona, click on one of the white spots in the gras. This should render the sky reddish while the grass becomes grey. Then do the channel swap - and the problem is there. Video:
-
AP Closes randomly
Jörn Reppenhagen replied to TEcHNOpls's topic in [ARCHIVE] Photo beta on Windows threads
Also got countless AP closures connected with many actions, just out of nowhere; just posted a topic in this forum dealing with one occurrence where the issue was reproduceable. I guess it's no memory problem as it happened with just one single picture (no matter if TIFF or JPG) open on a machine with 32 GB RAM.