Chris26
-
Posts
915 -
Joined
-
Last visited
Everything posted by Chris26
-
 Hallo Garry, No, it simply says Video, and then saves it as AVI. I have choices of compressions and Ffmpeg, but have absolutely no clue as to anything about what they mean, I have to say I avoid video technicalities all together so I simply accept whatever defaults there are.
 -
Thankyou all, I came accross OBS studio a week ago and found it too complicated to even look at, definitely for the professionals. Having deleted screen to gif I decided to re-install it, they have improved a few things.
-
Thanks thomaso, I have VLC player but only use it for the very basics now and again. I tried converting a 30 second screen video into mp4 for practise, but got silly error messages that just contradicted the "bleedin' obvious" as Basil Faulty (John Cleese) once said - really have no energy or time to start delving into the world of video technology so I will leave it and continue with the good old fashioned reliable GIFs. But nice to know it wasn't me.
-
this was a sort of very confusing concept within a software programme that despite having placed a mask on a single object it basically affects the whole page was a bit difficult to understand. I understand it now. Thankyou both for your input, I had missed that point.
-
Despite the concept of layer ordering with which I am fully aware I fail to understand why this little mask I was practising with affected the whole spread, I can assure you that the mask in no way went anywhere near that rainbow box, let alone the text on the othet page. I will be so happy to hear that this is a bug, really.......

-
Many times, when uploading a video, I get a box with a thoroughly descriptive reason as to why the video is not accepted IE: - 200, and that is all I see. I am assuming it has something to do with the exstension file type but can not find out what extnsions are accepted by the affinity forum. The size of the videos are well below what is allowed that I can see. Sorry I have to ask this, but that box really does not say anything that is descriptive.
-
I would have just stuck the image on top of another image, that seems more logical. But the adjustment layer affects both the blue and the man. Yes I know the gentleman is talking about A.Photo, but it is good to read what you said about raster masks, problem I am having is that there far too many options with masks in Publsher: Namely: Ratserise to mask...Edit mask (goodness knows what this is supposed to do having searched for meaning on this many times, no one appears to talk about this)......Refine mask (which has eactly the same meaning contextually as " Edt " althugh not in applicability no doubt, PLUS when accessed turn out to be 'Selection mask")......Make mask...... Really? A text wrap boundry? Ok - yes I moved it and you are right, I see it I get that now, but rather a complicated way to text wrap surely? I am doing the same thing with the pen tool and achieving the same effect - it took me 7 seconds to do this........ But my question remains: How did he create this mask, very tired of trying to work things out withot a single piece of instruction from anywhere, no video, no tutorial, nothing in help..PLEASE
-
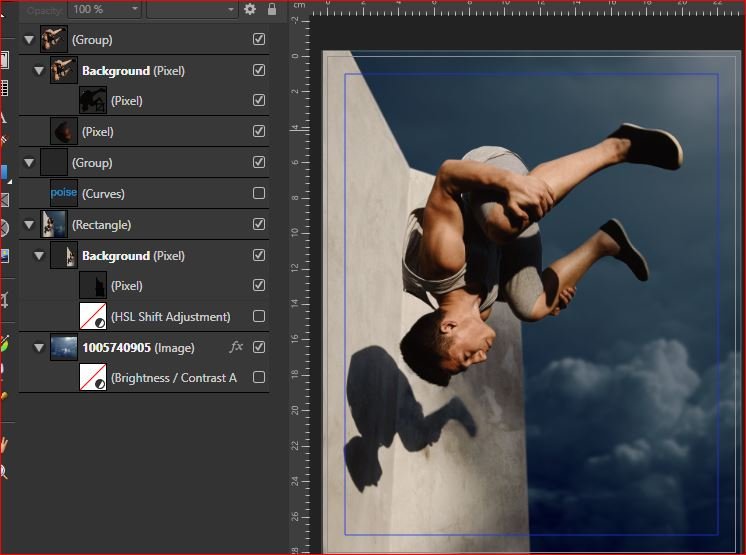
In this short clip I have removed all text and unnecessary images and left just the man and his mask. Since yesterday evening and this evening I have attempted to re-create this by copying the man and doing this mask myself. I have studied it and have watched many videos over the weeks in A.Photo. Shoot me with a pineapple pistol, but for the life of me I see no logic whatsoever behind the creation of a mask over this B/W adjustment layer. I have demonstrated in this video that the mask has no purpose to this layer whatsoever that I can see, and believe me I have tried to find the logic, the man and that very subtle blue background (which I clearly see has been masked as showing when you click the mask layer on and off and see the icon change white to black) but the B/W adjustment layer does it all anyway, without the use of a mask. Where on earth is the logic please? Lastly I can not re-create the mask as per that page 5 in the video, even after following for a second time various videos I refuse to believe that I am the only one who is finding Publisher's masking a nightmare, a confusing complicated process to simply hide a part of an object and reveal the rest. I would be so grateful if someone could, at the least, do a demonstration on how this mask was created in this picture, and above all WHY? PLEASE..... I have to date not found one single tutorial, either video or written, that describes the masking process in Publsiher. Any recommendations would be appreciated. At 2 min 50 seconds in this video you hear him say the words, (AFTER he has selected evrything) , ....you click on the bottom here and it generates a mask.." There is no selection tool in Publsher unless you enter the refine mask dialogue, but to do this Mmm, yes, you have to generate a mask FIRST. Fine but what exactly is happening when you generate that mask, you can then refine it, by selecting as per A.photo. But nothing happens except a mysterious new empty selction box appearing? https://www.youtube.com/watch?v=f7AG8tulGf0
-
I have been watching A.photo tutorials for over a week now, there are many excellent ones out there and I have no issues with understanding them, after all, a.Photo masking has simply gone about it slightly differently than Photshop, no problems there, but one has to admit, publisher masking is very different from A'photo. No matter, we'll leave it there. Thankyou for your input, it has not been entirely hopeless, I promise.
-
Pixel objects? Ok I understand this. So that Black Blob on that last layer, it is NOT a mask, it is a shape object done with the pen tool and filled with black then, Am I correct now?. Hi Anon, well I will take another look at page 5 in a minute, thankyou for pointing things out to me, I do appreciate this. However I have here a screen shot PLUS a comment from the Help manual of Publisher: Just trying something out here. QUOTE: To create an empty mask layer: From the Layers panel, click Mask Layer. By default, a created mask layer is applied to the current layer, but it can be moved by dragging outside the current layer, applying the mask to all layers below. Alternatively, the mask can be moved onto an object, applying the mask just to that objec So what did simpleton muggins do here? He followed instructions, created a mask, on the selection, added a BW adjustment for fun with the intention (since there are no brushes) of then manipulating the handles of the mask to cover only half of that bag. Now how helpful is the Help here I ask? I could not drag it, access it, move it. I followed the instructions, I moved layers into different positions, I rasterised it, smiled at it, fed it. No it don't wanna play! Am I really to blame for not getting it? I can not be the only one. I watched many tutorials from A.photo yesterday and the day before on masking and pro masking and whatever masking I could find in the hope that they would shed some light on Publisher's treatment of them, A.photo makes sense, a little different from Photoshop but that is not a bother, I get it. But not here! Sorry I forgot to say, yes mask to below worked and I understand that one, but not the obvious use of them nor these instructions. Oh and last thing, I understand a vector mask for mask to below, so if a vector mask is created with a shaoe or pen tool, what the hell is this stupid thing I am trying to create? Oh my temper...........
-
I am sorry Anon, but I have no clue what you are talking about. I do not see any M's, big or small, and also I have no idea what you mean anyway with this: It has Pixel objects being used as masks (note the small m).. A mask for me is always on any object regardless of whether it is vector or pixel, a mask is a mask, you hide, or you reveal. You have an object and you hide or reveal parts of it accordingly. This is how I have worked for 20 years. So forgive me if I am displaying an ignorance fit for a toddler at pre-school. Clipping in publsiher is a doddle, the refine selection tool has been wonderfully demonstrated by @GarryP and now that I have understood how this is intertwined with making a selection, filling with white, moving the layer etc etc .....so please tell me what you are referring to now. 🙂
-
I've been using 'Screen to Gif' for the last two years but it is buggy and created anomalies sometimes on playback, plus when I try video recording it creates huge files since MP4 and MP3 are always inaccessible don't know why.. I have spent some time googling but it is a minefield and best thing I thought was just ask! Prefer Free with no watermarks, Appreciate the recomendations in advance. Thankyou.
-
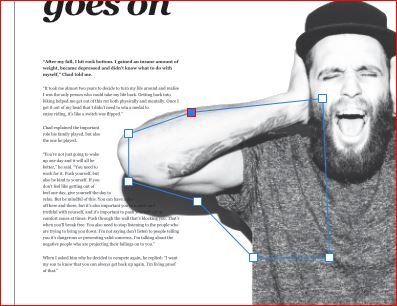
Hallo Garry this is very much appreciated, 15 years using all sorts of complex masks in Photoshop but Affinities masks in Publsher threw me off balance despite watching A.photo's masks which are similar to photoshop, but different in peublisher all together it seems. It is easy to reverse engineer masks from a layered image in Adobe, it all makes perfect sense, but this did not. I have made a gif video with just one question please. I threw away all text and adjustments and have gone down the layers as you will see clicking off and on, the layer I can not ubdersatand is the last one where he has placed a black mask to cover the sky on the left. My confusion here is/was the use of the word "REFINE MASK" on right click I find this totally misleading based on what the word 'Refine' actually means, and then have that same dialogue say "REFINE SELECTION", the wording led me to believe that I could actually edit that black mask. Which of course is impossible to do since I have tried. And there again that word "EDIT MASK" is confusing seeing that once again you cannot actually do anything to it. Or am I mistaken? I have not found anything, but since masks are availbale I thought it about time to understand affinity's confusing use of these terms, I might have a use of them in the future. - I do not need to complicate publisher with masks, the image on this cover I could do in photoshop with just THREE LAYERS (One man, one sky and one wall), ONE MASK for the sky and just a couple of aesthetic adjustments - bobs your uncle its done. So why all this nonsense of three bodies two heads one body split in half half a dozen masks and two skies and one grey background WOW 🤣 on that cover eludes me.
-
So you are saying that the masks I see in this magazine cover were created in A.Photo and that really one can not create a mask (as in the proper definition of a mask) in Publisher unless one has A'photo, apart from the clipping mask of course. And that refine mask, (which is then called "Refine Selction' when accessed) is in fact useless in publisher without A.Photo? I have the magazine cover from the Affinity publisher example shown on the welcome screen, it s a mish mash of complexity that re-defines masks all together. That cover image, after I stripped it of all text and adjustment layers and tried for 2 hours to reverse engineer is absolutely horendous and to my experience uneccessarily complicated. I simply can not fathom the logic behind it. It infuriates me 😖😠We have un-editable masks, three split half bodies of that man, one chopped off half head from his face, three skies and AAaaaghghghghg...and accessing any refine or edit mask to see what is happening well that's a joke. Now I have finished my bottled up volcanic chin wag of a rant, I hope you will overlook my tantrum.
-
"... it complains about missing fonts,.." I think you misunderstood me......So I do apologise, I was making a feeble attempt at trying to inject some humour into this statement by using the personal pronoun instead of the impersonal, you know, humanizing the computer. And yep that failed, I was in a silly mood that moment, whoops.
- 38 replies
-
- 1
-

-
- affinity publisher
- (and 2 more)
-
Searched high and low for tutorial, you tube has only two tutorials and they are not very in depth and are short. No written ones either. SO I am back again, fedup with this one and only one thing in publisher that I have never understood. Clipping masks I use quite a lot, they are simple. years of avoiding publisher's mask feature and now I need to be shown how it works please. I have demonstrated in this video what I can not understand, 1. The refine mask and the edit mask, How on earth does one edit an 'edit mask' How did he paint that the and how do you edit this black on the mask he has over the cover photo? 2. The refine mask simply baffles me, I have never in 2 years been able to get it to do anything? Please please can someone be kind enough to put me out of my misery and demonstrate how publisher uses these two tools?
-
I did read ot some hours before posting, but sometimes, written instructions go over my head, even the apparantly simplist ones, that's just me, when you spend so much time reading reading reading, things get over-looked as well, especially when they are explained so formally. But thanks for the input Psenda.
-
OK, Hooray, Got it. - I saw this pressure curve and had no idea what it really meant so never thought to mess with it. (I am not a designer and have very very basic knowledge of graphics, but I thought it was about time I tackeled the scary stuff in Publisher - it's long overdue).
-
Appreciate this Walt and thankyou. Just discovered my own answer to the multi coloured gradient question I posted, just far too impatient with myself .....
-
Hallo Walt, nothing works, so I suppose it can only be accessed through designer, seems strange though to have this as though it can be accessed from within Publisher?
-
Just a demonstartion of what is happening Walt.
-
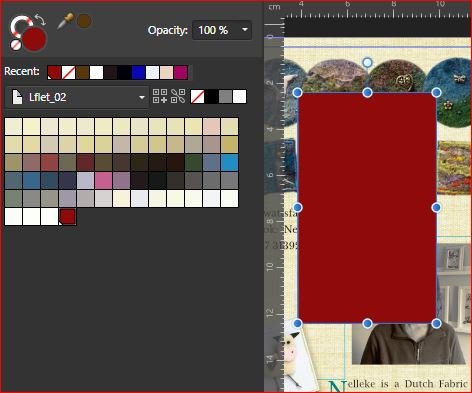
I am trying to get to grips with aspects of publisher that I never used before. I have watched many you tube video tutorials and they are very good, unfortunately I am experienting with things that I can not find in any tutorial to date. Unfortunately the Help documentation is silent on this particular tool under 'Stroke Panel". I am confused as to why the Blue stroke line has not changed according to the adjustments I made in the properties as seen here in the screen shot.
-
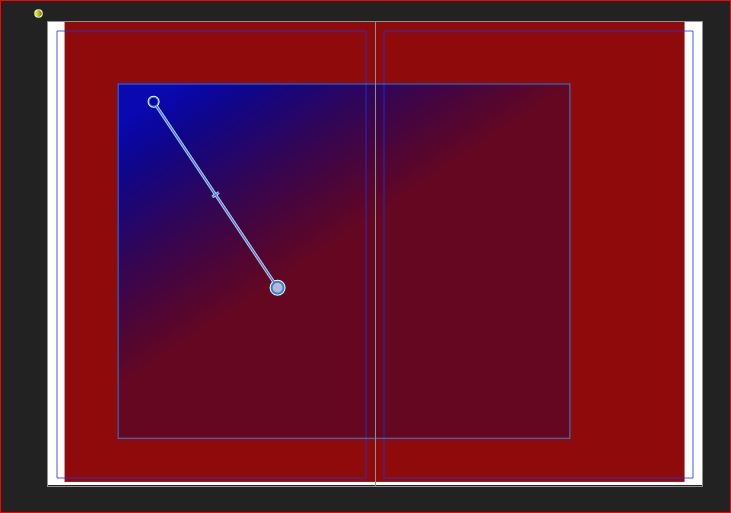
Two questions please: 1. The first screen shot shows when I simply clicked on Blue and filled the Square shape. The second screen shot shows when I clicked on a global colour as referenced by the last colour in the swatchs that has a littke white "thing" bottom left. QUESTION: When is a global colour not a global colour since both clicks produced the same result? Bit confused as to what defines a global colour here. 2. QUESTION, earlier on I used the Gradient fill tool (simply called "fill tool"): for one colour this makes sense when you drag out a box or fill a box and apply it, BUT, I also accidently managed somehow to create a gradient that went from bluish through to reddish without being able to fathom out how on earth I achieved this within that same square box. I remember clicking on one colour then another, but what happened in between I have no idea since I was practising things too quickly to take note. EDIT: Is this the way to create a gradient of two colours ormore by creating several boxes within each othe or is there a more professional way to do this?
-
Well, I wouldn't accuse him of complaining, it's just a wee litte moan, he'll get over it..he is just trying to be helpful...😁 but the good news is that this is normal, publisher is simply telling you that the fonts in the pdf are not on your system, this is normal.
-
Well I never noticed that, I have the free version and open all types that I need, have no need to open DNG in file viewer but yep, checked and you are right, only in the paid version, which is fair I suppose. What John John Rostron said above is a good sign that this is definitely not affinity, but rather a perception under different viewing conditions, the only absolute proof of Truth, f I may call it that, is to do an aesthetically pleasing global processing of your dng file, then a target edit in Photo, and print it out. Do not compare anything to anything, and do not compare screen to screen, this is all truly subjective and can never give an accurate portrayal of what actually exists in the image nor how it will look to a viewer who sees it in print. My camera images on the camera screen are always different when I take them into Bridge (I never bother looking at my preview images, waste of time, I alwys focus on where the Histogram begins nd ends, then at 200 or 300 percent comparing the bridge raw developed image with what I now see in photoshop often needs a littel more global adjustment than whhat I did in Bridge, they are often subtely different. I have once or twice seen my photoshopped end product on other screens and YUK is the only word I can think of. But my print is the ultimate judge.