thetasig
-
Posts
272 -
Joined
-
Last visited
Everything posted by thetasig
-
Text appears outside of text frame
thetasig replied to PKBran's topic in [ARCHIVE] Publisher beta on macOS threads
Thanks very much for the explanation! I'll need to educate myself so I can use those types of adjustments. -
Sure - it is via a right-click of the object, a context menu drops down and one of the choices is "Arrange" and it has several options. I use it to "layer" the objects along the "Z" dimension so that I can have a background photo and overlapping objects.

-
Thanks - I had not realized that Apply Master (to pages) would not achieve the same result as using the Spread Setup. Is it only the dimensions that are not applied when using Apply Master to pages? I still think there is something a bit untuitive here. Recall that when I enlarged the master's dimensions, all the fields (in corners) ended up being rescaled and outside the actual page borders since the pages themselves did not also change size, just their fields moved. But glad to know how to do it in future.
-
Yes, correct. However, to be clear, the icon and drop-down menu I'm referring to is not the "Studio" panel, rather, the top row of settings just above the main document window pane (above the ruler) that are visible when a text frame is highlighted. This is the area that is malfunctioning. Click the icon there are the setting will toggle back and forth between two alignments. Click a drop-down choice and you may or not get your wish. There is something weird going on there with both the icon and the drop-down menu.
-
When rotating a frame using any of the Move or frame tools and a mouse, a measurement of the degree of rotation pops up so you can see how much the frame has rotated. It is very difficult to get to an exact number of degrees just using the mouse to do the movement especially when the frame is small. What would be very useful is to be able to manually edit the measurement - to enter in the exact value you want. Perhaps something along the lines of double-clicking when the rotate (curved arrow) is showing to pop up a manually entered degree value. Most applications use that approach when a "fine-tuning" is helpful to the user.
-
When using the Move Tool to move text or picture frames and you have highlighted a frame, you can then use the arrow keys (left, right, up, down) to move that frame in small increments - and a measurement value pops-up so you can monitor the spacing. Unfortunately, when working with either the Picture Frame Rectangle Tool or Frame Text Tool, the pop-up measurement isn't visible. Now there are some measurements when using either of those tools as you move the frames, but they are only useful for rough placement as you hold down the mouse button to move the frame - it is difficult to get an exact measurement. So to do a fine-tune movement, you have to switch to the Move Tool. Having had to do that hundreds of times, it occurred to me that if those spacing measurements were visible any time a frame is highlighted, then I wouldn't have to keep switching back and forth between a frame tool and the Move Tool to do fine-tuning of spacing. So that is a suggestion to consider, please.
-
I have a Master with section and page number fields. Each document page has a background photo set to "Move to Back" with other objects in front of that. The section and page numbers are visible on those pages. When I move (drag and drop from the "Pages" list) a page from one place to another position in the document, both the original location and final location pages hide the Master Fields - they do not appear. The background photos are still set to "Move to Back" but the fields are hidden "behind". Remove the background photo and the fields are still on the page. Have to remove and replace the background photo and "Move to Back" to fix it. This has a randomness as some other actions can cause the hiding of the Master fields (just opening the working document, for example).
-
What happened is that the text fields on the enlarged Master were applied to all of the document's pages. However, the dimensions of the Master (that I had changed to be larger) were not applied. Since the "Master A" now had a larger spread, all of the page's inherited text fields were outside the document's page dimensions - off the printed and visible page. I am at a loss to understand how that is good by design. I do understand how to use different Masters and spreads that can be applied to specific pages. But it would seem intuitive to me to be able to also apply other features, such as dimensions, of the Master to the document pages. Imagine having to manually change each page in a 100-page document from 10 x 10 inches to 12 x 12 inches.
-
Text appears outside of text frame
thetasig replied to PKBran's topic in [ARCHIVE] Publisher beta on macOS threads
OK - thanks for the link to the other thread, which I read through. However, it seems that most of that discussion talks about horizontal left-to-right issues. In this thread, I noted lower-case descenders (vertical) below-the-line (frame) situations, too. See screenshot - frame set to align to bottom using Times New Roman font. What appears to be often the case is that text can and will extend beyond the text frame boundaries under certain circumstances. What i don't understand is whether this feature is "as designed" or an anomaly. For example, is there is a way to use "optical alignment" to account for the descenders? If so, how? Thanks.
-
I started with A4 page size in the Master. After creating some 12 pages I decided to change to 12" x 12". So I changed the Master to those dimensions. No matter how I did it, I could not get that change "applied" to any of the following pages (context menus "Apply to" at the Master itself, and context menus at each page or multiple pages). I had to manually change the "old" pages to the new size. After making the change to the Master all "add"ed pages have the correct size. Maybe I'm missing something?
-
I agree - the choices are applied correctly. My problem is that, by just looking at the text, it is difficult and sometimes impossible to see which alignment is truly in effect. I tend to use both "top" and "bottom" alignment but sometimes miss setting the alignment. As I proofread, I check things like that. So I would like to rely on the alignment icon to validate the choices, but cannot. It is rather time-consuming to have to drop down the Alignment menu for each frame to see which alignment is in effect.
-
This is with mainly picture frames that have a background photo. I use a background on each page with additional picture frames/photos and text on the top of the background. The Master has page number text frames and (Section) information text frames for the border areas. Today, after working several days on the document, the page numbers and section information were not visible, but the "on-top" photos and text were. But the Master text fields were hidden. When I tried to arrange the background and "send to back" that option was missing from the context menu. Apparently AP thought the frame was already at the "back" and the only way to remedy this was to delete the background and reinstate it. Happened somewhat randomly to about 4 pages out of 14.
-
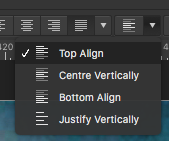
Noted what appears to be a cosmetic issue with the Align text drop-down and its icon. For example, I have already formatted some text in a frame as "Top Align" yet the icon next to that "Align" setting is showing the "Center Vertically" icon. If you select "Top Align" again, then the icon changes to the "Top Align" icon. However, if you leave that frame and come back to it, the icon will revert to the "Center Vertically" icon again. Repeatable. 1.7.0.227, OS X High Sierra 10.13.6. See screenshot.
-
Text appears outside of text frame
thetasig replied to PKBran's topic in [ARCHIVE] Publisher beta on macOS threads
I had the problem at first, then started using the "Paragraph Style" that had formerly been defaulted to nothing. I decided to use "Body" (mostly) for the Paragraph Style and then the text moved inside the frames. However, I just noted today that some serifs (notably the lower-case letter "f" in my case) extend to the right, outside the frame. I don't know whether this is just a screen cosmetic thing or whether the final print would also show the extension. Using "Justified Left" for the paragraphs. See screenshot. AP 1.7.0.227 OS X High Sierra 10.13.6.
-
Pub BUG: Random Caps caps Caps
thetasig replied to moonliner's topic in [ARCHIVE] Publisher beta on macOS threads
Confirm, but it's not as random for me as I thought. For example, every time I type in a text box the letter (capital) "I" (eye) followed by another word, the word after "I" is capitalized. Example "I Had a great time", "Funny that, I Don't like that type of sandwich" -
Decorative frames for pictures?
thetasig replied to Steps's topic in Feedback for Affinity Publisher V1 on Desktop
Plenty of published books, magazines, sales pamphlets, and brochures, etc., use decorative frames, or nested frames, to contain graphics and photos. The idea should not limited to "photo book" publishing. I love the idea of integrating it into Affinity Publisher in some way that is flexible for many publishing needs. -
Decorative Picture Frames Museum Style
thetasig replied to thetasig's topic in Feedback for Affinity Publisher V1 on Desktop
I used the term "bevel" incorrectly - meant to say "mitre" when referring to the corners of frames. -
Suggesting an extension to "picture frame" features for Affinity Publisher. If you go to an art museum, many of the paintings have decorative picture frames. They often have visible bevel lines at the corners, and some have very decorative textures and colours. Some would be more plain in nature. Some are not rectangles, rather, ovals, circles or, sometimes, polygons. I would like to be able to publish a document (album) of photos and some of them would have such frames. I would like to be able to "design" the frame look and feel and then save it as an asset to be reused as needed. In some cases, it would be helpful to be able to copy/paste textures and colours from an external source to design such a frame. These frames would function as a type of (existing) Affinity Publisher "picture frame" in which one can place a photo. It might be possible to include an extension to Affinity Publisher (plugin?) with pre-made frames. Try as I might, could not find any forum content on this topic.
-
Excuse if this is not the right place in the forum to add this suggestion. I could not find anything just like it. For a long time now, I've had a need to create a book. It would be a bit like a photo album but with text and photo captions. Now the key here is that all of the photos I have (in Lightroom) already have plenty of metadata, including "Caption" (also named "description") and keywords, etc. Caption display area has to be auto expandable to several sentences and could, conceivably exceed the width (or height) of the actual photo. The caption area should ideally be capable of manual sizing, orientation, and placement. A workaround might be to display/copy any available metadata easily (right-click - "show metadata") and then paste it into a separate text box. Not familiar with InDesign, but the metadata should include, perhaps, the IPTC and EXIF at a minimum so the user can choose which one (multiple?) to choose.