
DeepDesertPhoto
-
Posts
174 -
Joined
-
Last visited
Posts posted by DeepDesertPhoto
-
-
6 hours ago, firstdefence said:
Yes, I tried with Photos and could open and edit the jpf file.
Out of curiosity why are you using a jpf file, is it a file that your camera produces?
To my knowledge no still camera uses the JPF format. My Nikon only produces NEF files at full resolution.
These files are very old, with some in my collection dating back to about 2007.
Back then I had very limited hard drive space on my computer and external HDs were very expensive at the time, so I was using the JPF format to save space since JPF supported the same color modes and bit depth as TIF yet was about half the size of a TIF because the compression algorithm was similar to a PNG.
The reason I did not use PNG was because PNG only supported RGB 16 bit and I used LAB color. Only TIF and JPF supported LAB color so I chose JPF to save HD space.
But now that HD space is larger and external HDs are cheaper than they were back in 2007 I wanted to convert my old JPFs to TIF for easier editing.
-
2 hours ago, firstdefence said:
Just tried this file in XnViewMP and it looks like this.

XnViewMP probably has trouble handling the LAB color mode for this image.
GIMP also cannot open a JPF in LAB color.
That is why I had to use Mac Preview to open it and then convert it to an RGB JPF. I then use GIMP to open it and save it as a TIF for editing in AP. -
2 hours ago, MikeW said:
Never have opened a jpf file before...I didn't even know it was a thing.
This is how it opens in Photoline.
Cool image!
I can see that PhotoLine opened it as 16 bit LAB, which was the way it was originally encoded by Photoshop CS5.
Affinity Photo can't do that yet. Hopefully AP will be adjusted so that I don't have to use other programs to open these older files. -
2 hours ago, firstdefence said:
My Gimp says it is an unknown colourspace
I do get that sometimes, but just manually select sRGB and then it opens.
-
I'm not sure I am posting this in the proper forum but Patrick Conner asked me to post samples of JPF files that were not opening properly in the "Questions" section of the forum.
He mentioned that JPF support was just added and might need tweaking.
To give some history of the issues I had before JPF was added in the past when I tried to open a JPF file using AP I would get an error that it was an unsupported file. To get around this problem I used another program called GIMP to open the RGB JPF files and converted them to TIF. I would then use AP to reopen and edit.
GIMP does not support LAB color so I had to use the MAC Preview App to open those particular JPFs and convert them to RGB. Then I would open those with GIMP to convert to TIF for editing with AP.
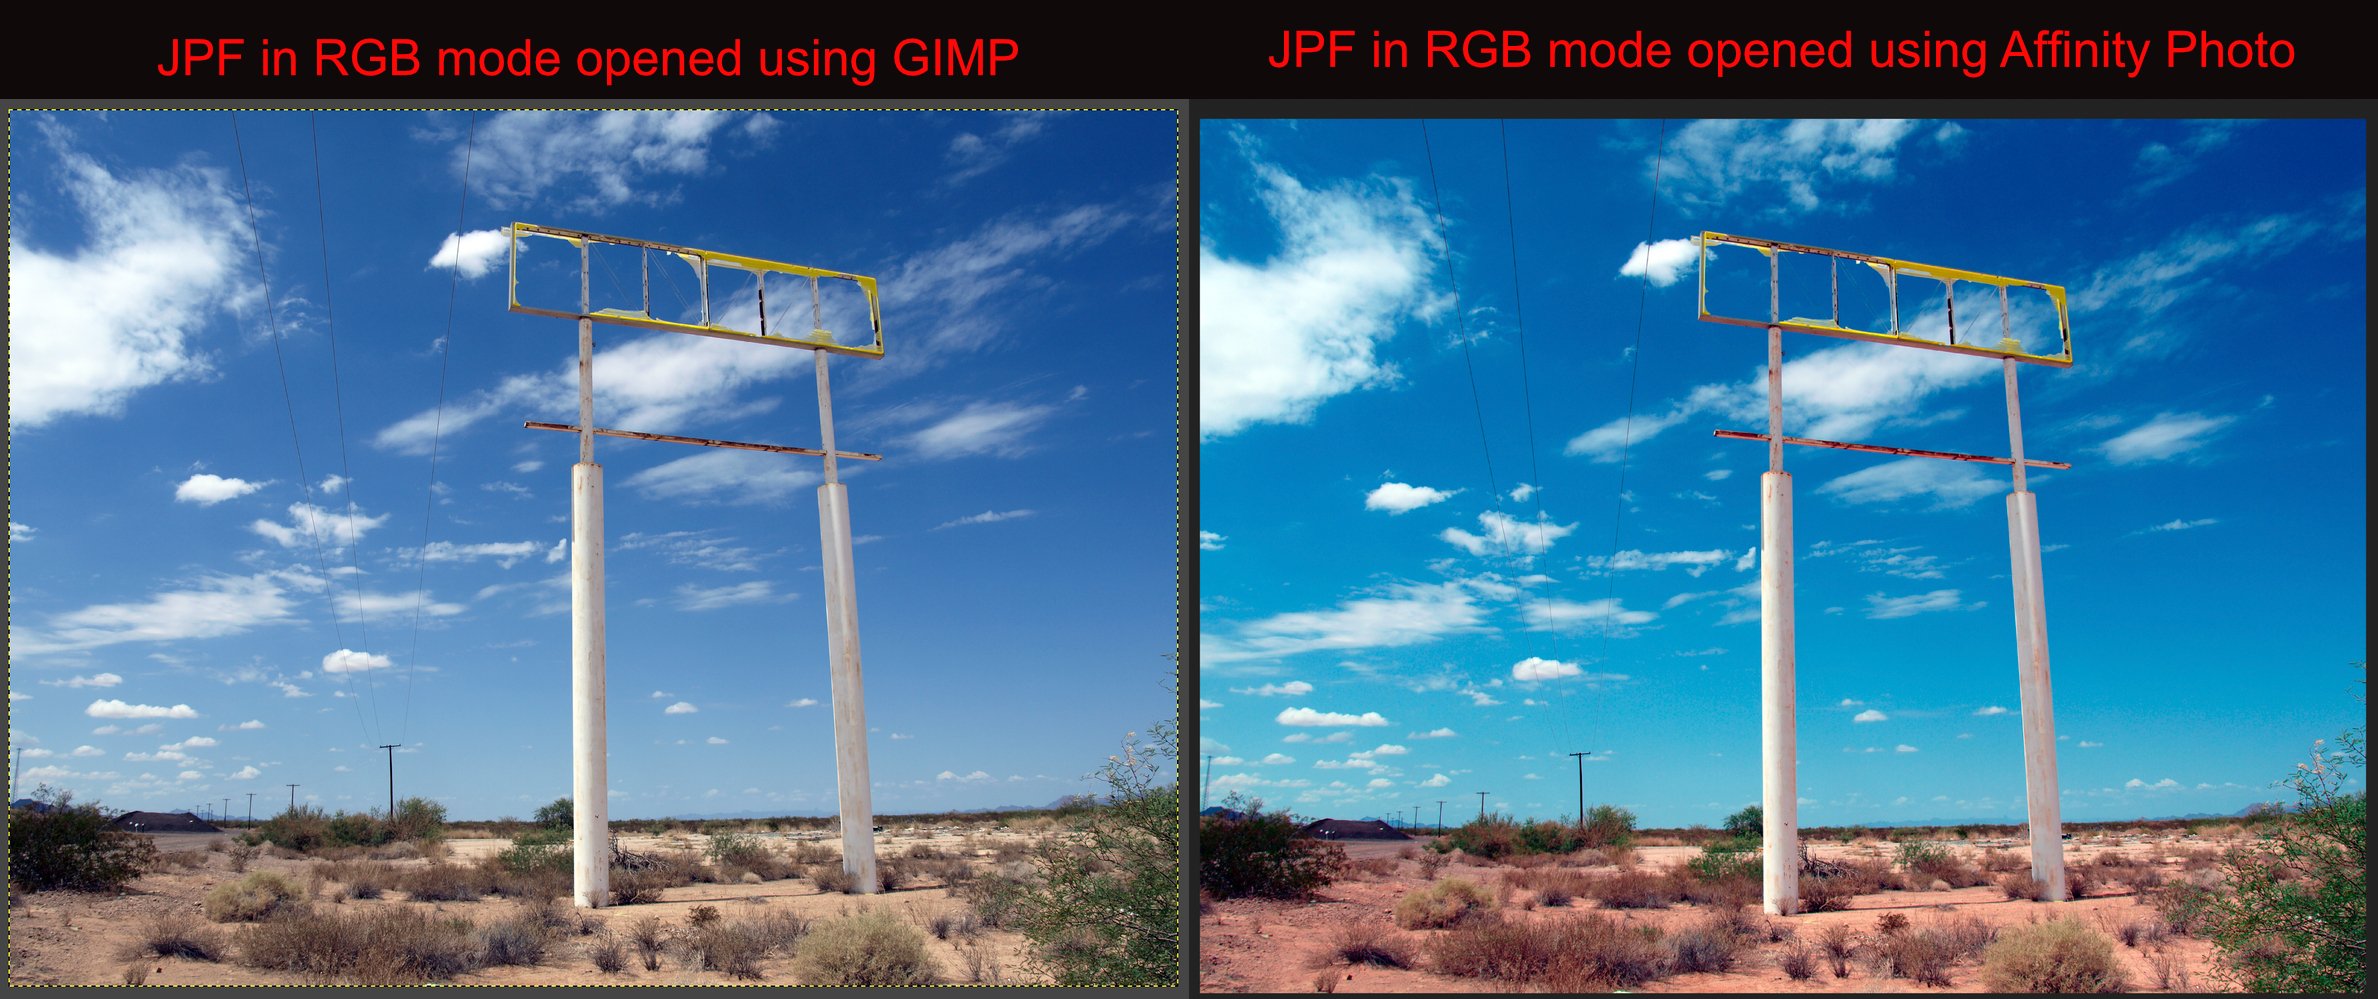
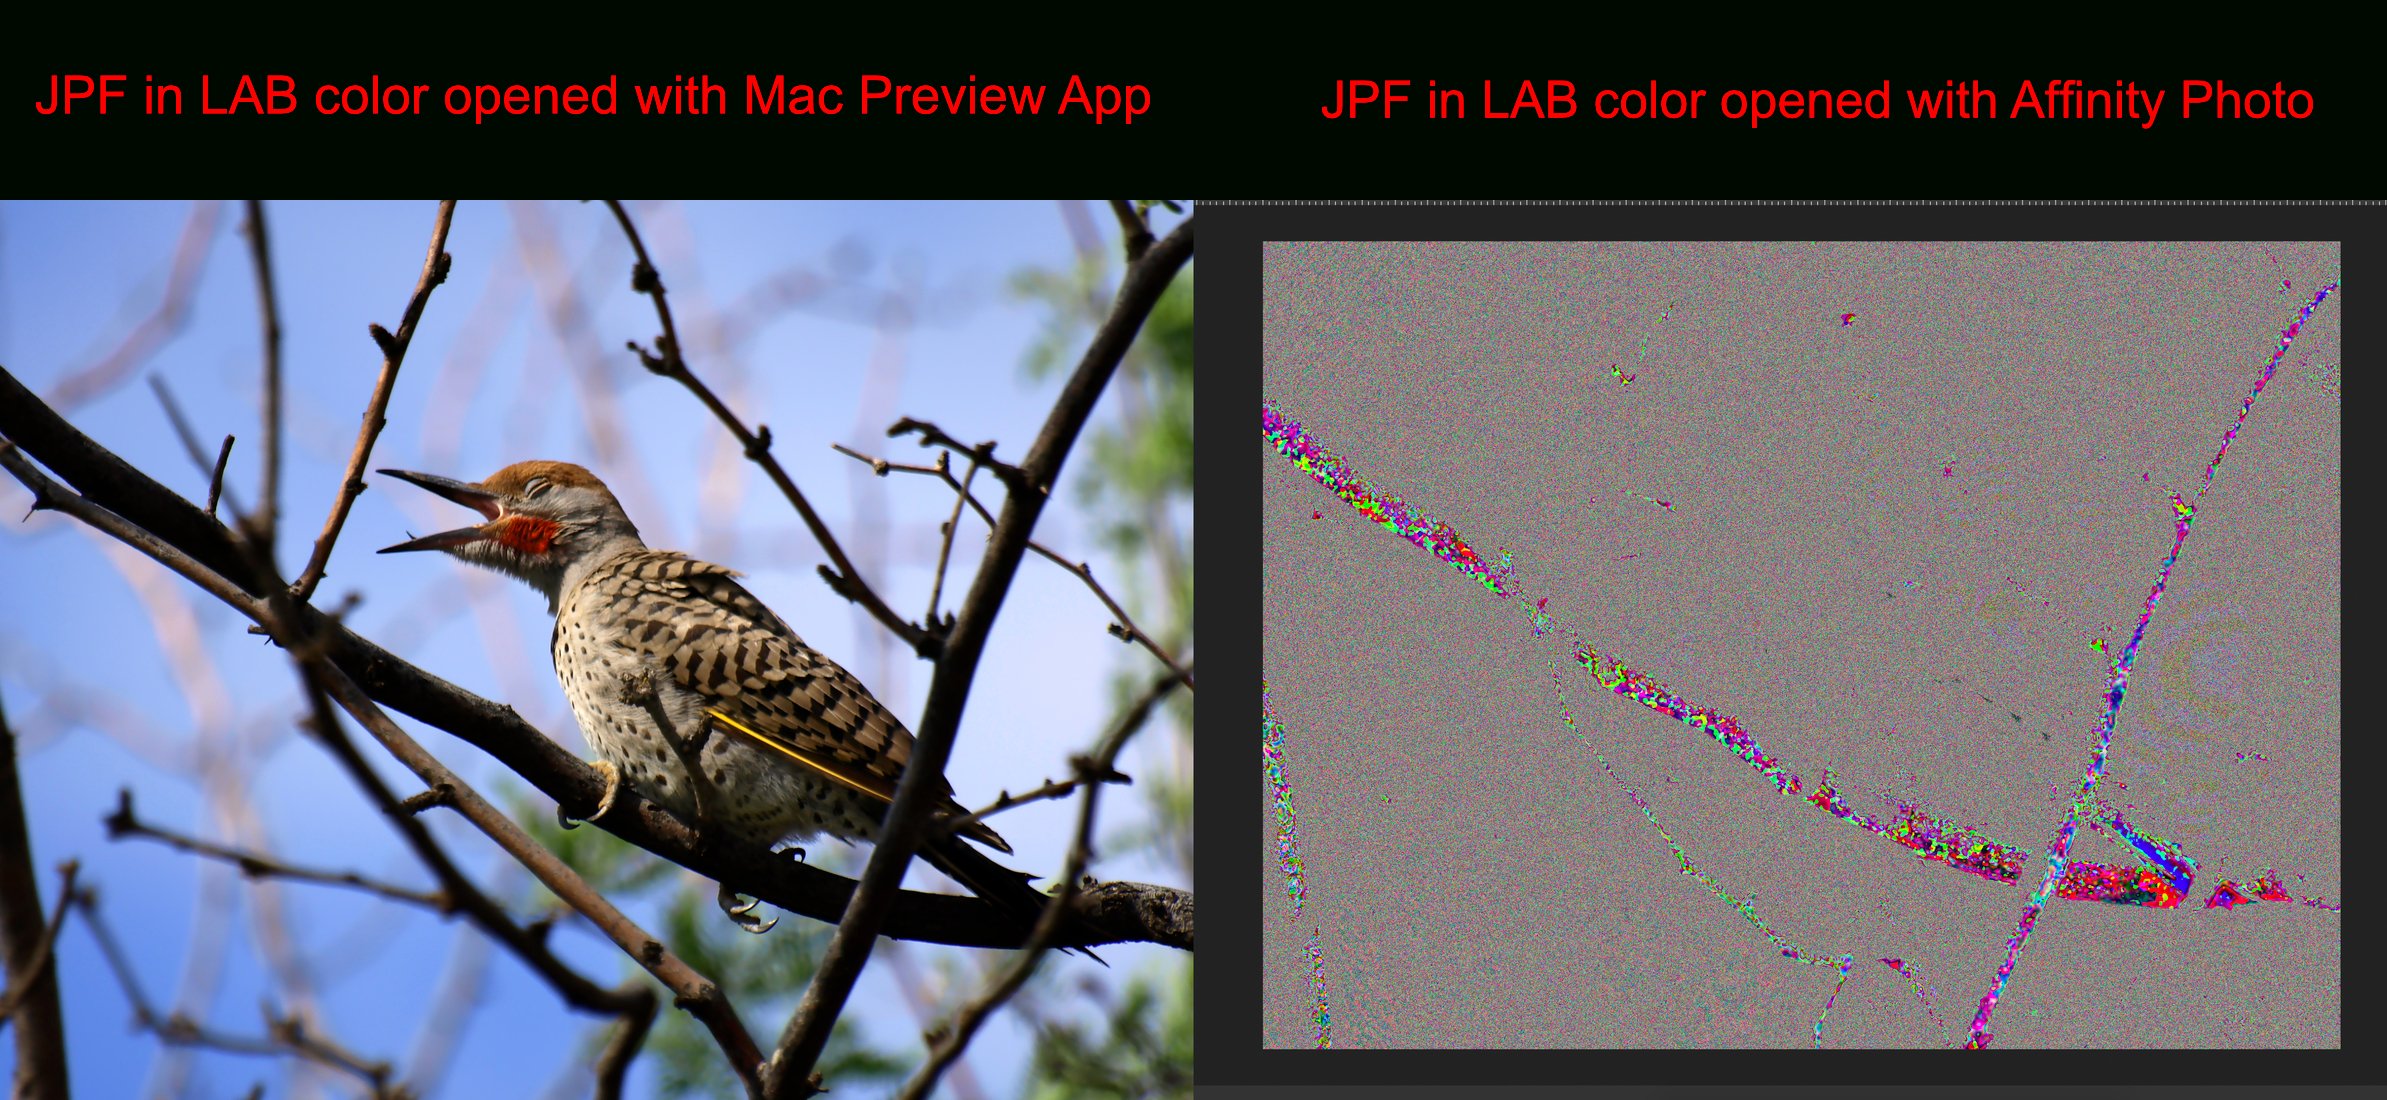
Now AP can open the files but they are not displaying correctly. If the JPF file is in RGB mode it will open with AP but the colors are shifted to the red and are over saturated. If I try to open a JPF that is in the LAB color mode the image is completely scrambled.
As per Patrick's request here are 2 screenshots to illustrate the problem.
I will also include the original JPF files so that you can use them to tweak the software.
-
5 hours ago, Patrick Connor said:
Please can you make a post about this in questions with a sample that does not work as JP2/JPF is newly added and may need some tweaks.
Sorry for the late reply, the notification I got ended up in my spam box for some reason. I will get to this shortly and post some screenshots showing the differences.
-
I only updated my version of AP a few days ago, but I wanted to say thank you for addressing something that had been on my wish list since I first got the program over 2 years ago: full metadata control. In the older version I had I could only write descriptions into the metadata. Now I can also write a title, put in my author name, and most importantly for me, add keywords. I sell my photos through stock agencies and it was always a pain to manually type them in through the agency's website upload window because I had to do it with each website I uploaded to. Now I only need to add the keywords once using AP in the original file and those keywords will now be recognized at each site I upload to. This will save me a lot of time when uploading to multiple sites.
Another improvement I noticed is defringing. When I was editing my Nikon raws I always had a problem with high contrast images fringing heavily toward the edges. In the older version of AP I could never get that fringing completely removed without created weird color distortions elsewhere in the image. In the latest update that problem has been eliminated and the images come out near perfect with I apply the defringing preset I created.
Also, I had been inquiring in other threads about JPF support since had several hundred older JPF files. The older version of AP could not open those. The new update does seem to have the ability to open JPFs if they are in the RGB color mode, although the colors are little more saturated than I would like. However, color saturation is correctable. However, when I open JPFs in the LAB color mode the image opens with the colors all scrambled, but I have found a work around for that by using the Preview App in my Mac to convert those JPFs to RGB and then reopen them with AP for editing.
Perhaps the next version of AP will have full JPF support, at least for opening JPFs so that can be edited and saved in a more conventional format like TIF of PNG. -
About a month or so ago I posted a topic asking when APh was going to add JPF (JPEG2000) support.
During the discussion I was told by several forum members that they were able to open files with extensions of JP2.
However, all of my old JPEG2000 files had the extension of .JPF and I kept getting an error that this file type was not supported.
This was most likely due to the JPF extension being only used by Photoshop.
A couple of members pointed me in the direction of other programs and online services that would do the job but I found those programs cumbersome to use and I did not like doing online conversions since image theft is rampant on the internet.After much searching I finally found one program that is free and will open older Photoshop JPF files.
It is called GIMP.
Many of you probably know about it.
In the past GIMP only supported 8 bit color depth, but in their newest release, version 2.10.14, they have now added 16 and 32 bit color depth support. They also added support for what they referred to as "Rare Formats".
They did not state JPF specifically but I decided to take a chance and download the program.
To my relief GIMP was able to open my older JPF files if they were already in RGB mode.
Because GIMP does not support LAB color I had to use my Mac's Preview App to convert the JPFs that were in LAB to JP2 RGB.
I then opened the JP2s produced by Preview App with GIMP and exported them to 16 bit RGB TIFF.
The only thing I had to do before converting the JPF to TIFF was change the display resolution from the GIMP default of 72PPI to 300PPI so that the resulting TIFF would be at 300PPI.
After the conversion using GIMP I was then able to open the new TIFF file with Affinity Photo and simply convert it back to LAB color before saving it to replace the original JPF version.
Just thought I would alert all of you that there is now a free solution to the conversion of older JPFs in case any of you still have files in that older format.
On an additional note about the conversion, if you have to use the Preview App to convert a JPF to JP2 set it for lossless to preserve all the original quality.
I know that Affinity Photo can open JP2, but when I tried that the colors displayed were over saturated.
I also tried using the Preview App to convert the JPFs that were in LAB color directly to TIFF but the Preview App would not give me a 16 bit option and the result was duller colors.
By using GIMP to convert the JP2 to 16 bit TIFF the color saturation stayed original.
- walt.farrell, DeJeanB and Fixx
-
 3
3
-
Apparently this is an issue that the techs for Affinity Photo will have to answer.
It is not causing a problem with processing the photos, it is just an inconvenience when I have to drag the file tabs into their proper order before I begin processing the photos.
Maybe someone from Affinity Photo will address this later or perhaps it will be fixed in a later update. -
2 minutes ago, Brad Brighton said:
I have an old bug report on the topic lying around somewhere... my SWAG based on experience is that the tabs are filled in in order of _completion of load_, not _initiation of load_. Larger files in a group will wind up later in the tab order on launch/open group. Predictability among larger files is not high given variations of code performance at the time of file open, available required system resources that may vary depending on the content of the file, and speed of retrieval from underlying storage.
Like I mentioned, if I open the files one at a time they do line up in the tabs in their original order.
I can also drag the tabs into their original order, but that takes a little time if I have 8 or 10 files open at the same time.
I also mentioned that when opening RAW files in which the file sizes are almost identical the opening order is completely random.
I am wondering if this has something to do with the camera metadata because the only thing that varies a lot from image to image is the camera settings for each shot. -
33 minutes ago, Pšenda said:
I read through that thread and it seems the problem has not been addressed yet by those that write the code for APh, especially since I have the current version 1.7.3
I know it is not a problem with my Mac's Finder App because when I use the finder to select a group and open them with the Preview App they all open in their assigned alphanumeric name order.
This random opening of the files seems to be only when I use APh to open them. -
2 hours ago, v_kyr said:
AFAIK on Macs it opens the files ordered according to their date (newer to older) instead of file sizes. However it doesn't show them up in the initially selected order (first selected, second selected, third selected ...) here. The same happens when accessing APh from a terminal and passing over the files to open as app arguments.
If I open the files one at a time they will line up in order in the tabs.
The problem starts when I select a group of images to open together.
When I am opening RAW files as a group and they are close to the same size or have identical file sizes APh opens them in a totally random order.
It seems the date does not matter because when I select a group of RAWs they all have the same date with only the hours and minutes varying.
But even then when I select them they are in an order and yet APh opens them randomly.
Does anyone have a technical reason APh might be doing this?
Could it have something to do with the camera metadata for each file? -
I am not sure if this topic has been covered before.
I really love Affinity Photo. In my opinion it is superior to photoshop in many aspects, at least when compared to CS5 since that was the last photoshop I used to use before switching to APh.
But there is one thing about APh that is kind of annoying.
When I highlight a group of images I want to open at the same time APh always opens and orders them in the tabs according to their files sizes and not the order they are arranged in according to their alphanumeric names.
This is particularly annoying when it is a group of photos I am processing to be made into a panorama.
I went into the preferences and cannot find anything listed for how the files are opened or ordered in the tabs.
Is there a way to make a group of files open in their alphanumeric order and not their sizes? -
1 hour ago, R C-R said:
The builtin calibration app does not produce accurate color calibration, just a rough, OK for casual use, approximation based on subjective estimates that change depending on several factors, including ambient light color, the color of nearby objects, & even time of day & diet.
For accurate calibration you need a hardware device & the appropriate software. See for example this article, one of the linked ones I referred to earlier.
I'm using a MacBook Pro Retina Laptop.
I went to a website for testing the accuracy of my LCD screen and even though it is not 100% accurate it is in the "good" range.
The only thing that is visibly out of adjustment is the gamma.
The site also said that all monitors should be calibrated once every month or two depending upon usage.
I checked the date of my last calibration and it is dated January of 2019.
So it is overdue for a calibration.
I ran a builtin utility for the color profiles in my Mac and out of 65 profiles it only found 3 errors.
Since it takes a significant amount of time to do this calibration I will have to get to it another time.
But another way I know that my photo colors are accurate, or at least good enough for commercial use, is through the agencies I sell my photography through.
They are very harsh critics and if something is visibly wrong with the photos I submit they will reject them and tell me what is wrong with them.
I have never gotten any rejects for color problems.
-
5 minutes ago, R C-R said:
What are you using as a standard for judging the most accurate colors? It won't be the same for every photo, & unless your monitor is calibrated the on-screen representation could be quite inaccurate. Among other sources, please refer to this article & the similar topics list at the bottom of the page, plus the "Image Content" section of this one.
If left on factory default you would be correct. The LCD screen of my Mac would not give me color accuracy straight out of the box because the default setting tends to have a bluer tint.
I carefully calibrated my LCD display by running the calibration program built into the Mac.
It actually took 15 minutes to properly calibrate because I had to manually select some of the test patterns according to how I perceived the blacks and grays.
If white objects looked white on the screen after calibration that is how you know if the colors are correct.
If any white objects or white patterns on the screen have any kind of tint then the calibration needs to be redone.
-
55 minutes ago, v_kyr said:
What is the purpose of Lab
There are many things that you can do with Lab. Here are but a few:
-
It is the best color space to use when it comes to color conversion as it gives you a precise reference point and it offers the widest range of possibilities.
-
When measuring color with a spectrophotometer you'll usually use Lab, even though most spectrophotometers will also give RGB and CMYK. As I mentionned before, CMYK and RGB are affected by many external factors, which makes them unreliable when you try to reproduce a color.
-
Because of the 3 axis, a Lab color can easily and clearly be represented on a graph.
-
In the printing industry, for example in flexographic printing, Lab is used to measure color variations and to adjust the press/ink accordingly.
As you can see above, it is the best tool for color conversion and for getting a precise color reading when trying to precisely reproduce a color. Because of this, many professionals need Lab.
This is the reason I use LAB.
Color accuracy.
When I print my LAB color images they do come out very close to what I see on the computer screen.
RGB and straight CMYK color modes don't always look right when compared to what I see on the screen. -
-
1 minute ago, R C-R said:
A printer can print only using the inks or dyes or whatever other type of colorants the process uses. That is what restricts the gamut, not the document color space. Specifying an appropriate color profile, & soft or hard proofing as needed, is the only way to get accurate prints that I know of.
Like I said, I came to my conclusions through experimentation.
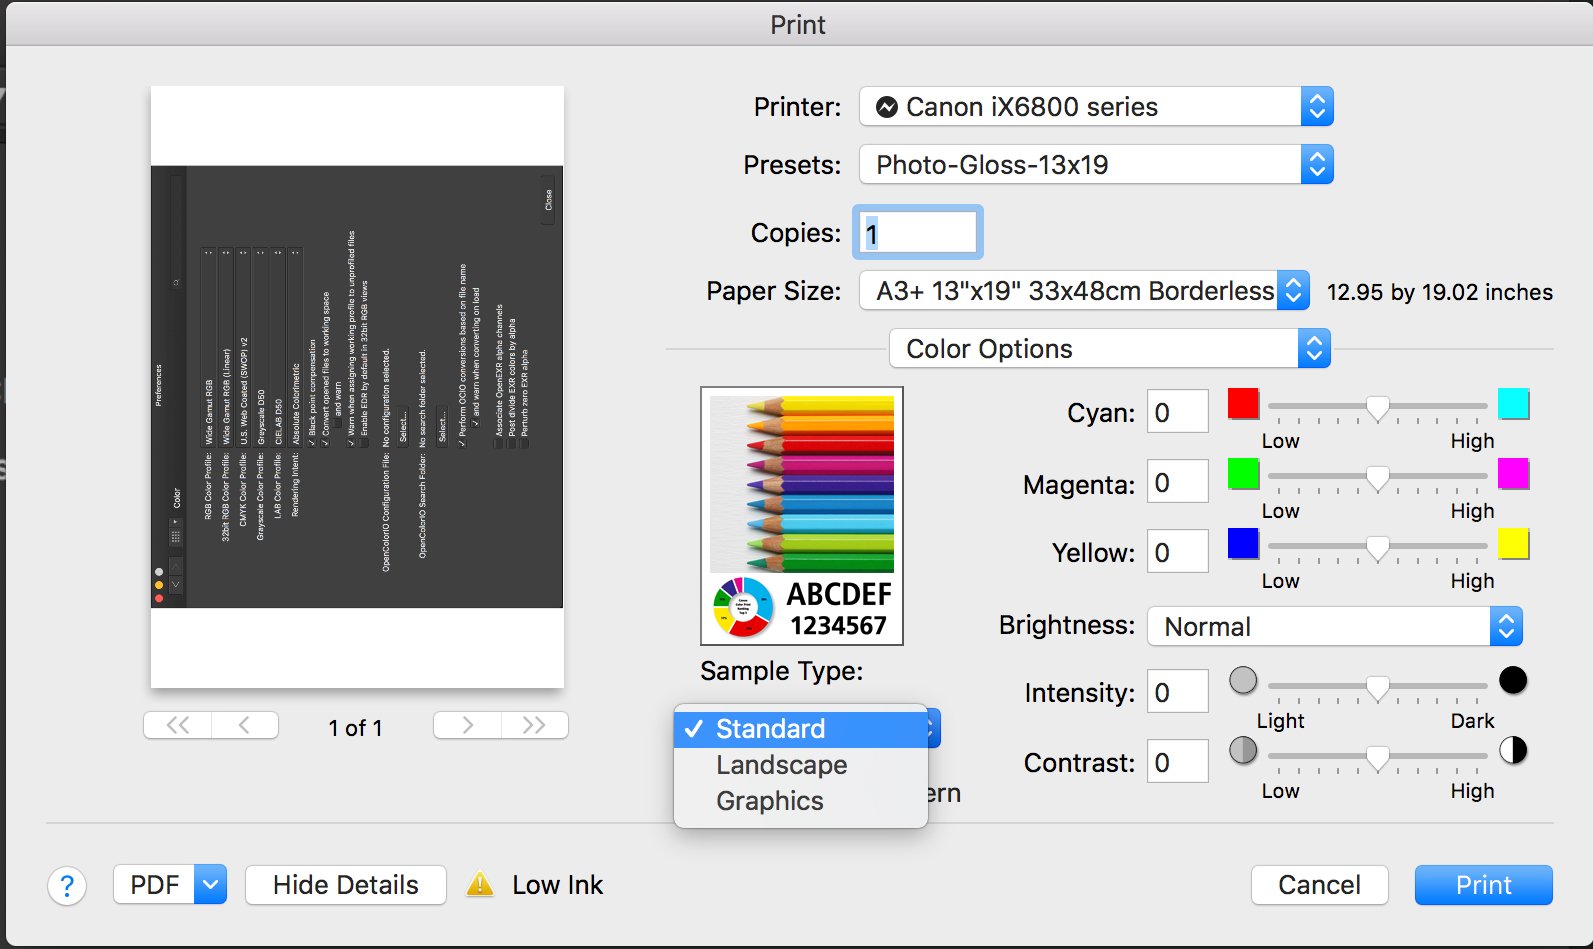
When I found a setting in my printer that produced the most accurate colors I saved that setting as a separate preset so that I did not have to adjust it every time I tried to print an image.
Notice in the screenshots of my prior comment that I have a preset called "Photo-Gloss-13x19".
That setting is a preset I created specifically for LAB color mode images being printed on 13x19 inch photo paper.
I have similar presets for different sizes and types of images. -
14 minutes ago, R C-R said:
OK, but printing is inherently device-dependent so at print time color accuracy & gamut are determined by the conversion from whatever color space & color profile are being used in the document to whatever the printer must use to get the best results from its inks, the paper, etc. ... right?
I am not an expert on printers.
What I know is based on experimentation.
I know that printers are inherently CMYK because all printers have at least 4 to 5 ink cartridges.
I use a Canon Printer and it has the standard Cyan, Magenta, Yellow, and Black(K).
But Canon also has a 2nd Black cartridge that is listed as Pigment Black.
All of the other cartridges are made of dye ink.
When I open an image that is already set to LAB color mode the print window that pops up has several setting options for color.
Here are two settings I tweak to make sure my images in LAB get printed correctly.
If I leave these settings in factory default the prints don't turn out right when I try to print LAB color mode images.
So it might not be just the LAB color, but also how the printer is set up to handle that color mode. -
3 hours ago, walt.farrell said:
I'm curious why LAB offers any advantages when making prints. (And I'll freely admit that I'm a complete novice about LAB.)
First, I'm not aware of any printers (home printers, at least) that use LAB, so there must be a conversion somewhere from LAB to either RGB or CMYK (or some other combination of inks) depending on the printer.
Second, in my experience (largely limited to EPSON Photo printers of various makes) the colorspace of the image is not the limiting factor. The limiting factor is the gamut of the inks and paper that I'm using.
I used to use Epson printers but I found certain colors just did not come out right and black and white images always had a greenish tint to them.
I switched to Canon and the prints had more accurate colors and black and white images came out with more accurate grays with Canon.
I am not sure why Canon is better, it might be due to how the printer drivers handle images in LAB color mode.
I set this stuff in the printer settings.
I do know that if you leave the printer on factory default settings it will print using whatever the factory settings are.
I don't think the printer actually prints in LAB color.
I think the driver software takes the LAB profile and configures it as close as possible to whatever color gamut the printer is capable of.
All I know is that when I open an image in LAB color the resulting print colors seem closer to what I see on the screen.
When I try to print images in RGB some color shades of don't look the same as what is displayed on the screen. -
4 hours ago, v_kyr said:
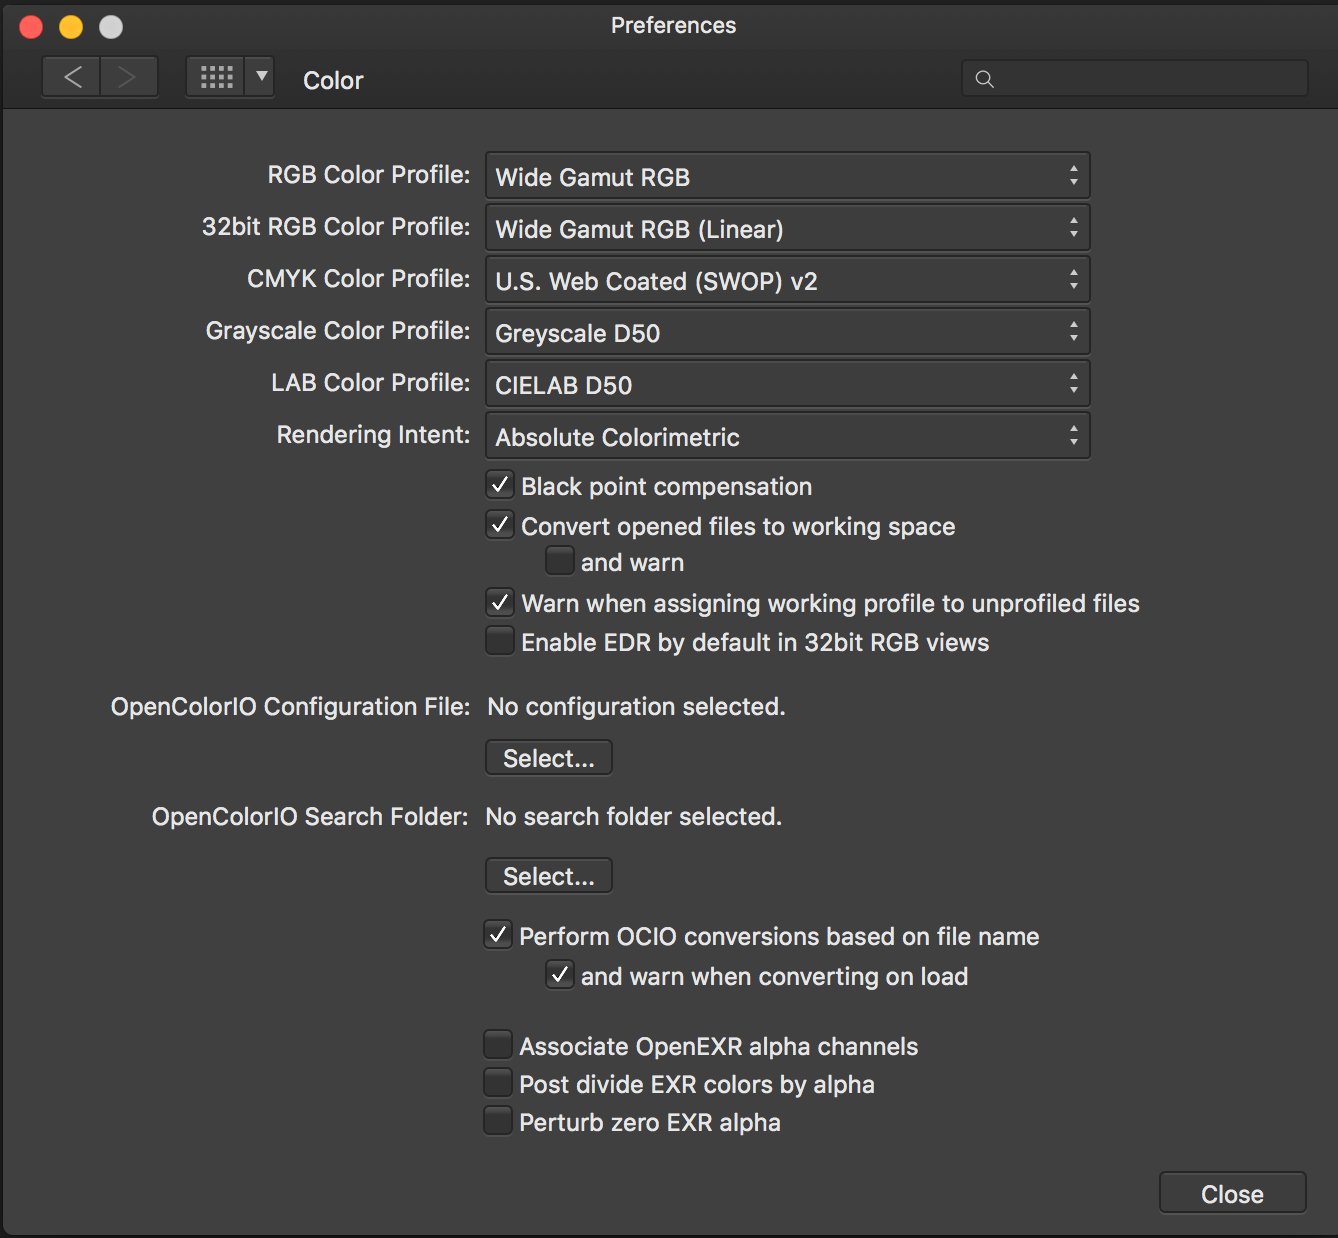
If I remember correctly APh Develop Persona uses a ROMM RGB like mathematical color space when processing RAW files, though some former forum member then showed/proved in the past, that only the sRGB gamut seems to have been used always instead. But I don't know if in the meantime things have been fixed or changed here in this regard during APh version updates. - However, since RAW images do not have color info at pixels and so are not in any color-space (instead they have color primaries corresponding to the wavelengths that the Bayer filter on each pixel defines), using an RGB based color space (even a wider gamut one) in/during RAW development limits the overall possible and theoretical available color spectrum. Thus RAW -> LAB should offer more possibilities than RAW -> RGB -> LAB here from the beginning.
I set it up that way by going into the preferences.
Here is a screenshot of the preferences I set for color. -
14 minutes ago, v_kyr said:
Yes, using the Lab color space often has it's advantages, since it's first of all perception oriented (so not device specific) and thus offers a much larger color gamut than every RGB based color space.
Though AFAIK, Affinity Photo doesn't offer or support to use LAB in it's RAW (Develop Persona) processing module, instead just after RAW -> RGB conversion inside Photo Persona ...
... where other RAW converters (like RawTherapee for example) do offer LAB based manipulations inside their RAW develop mode (RAW -> LAB) and thus not from a predefined color limited RGB color space.
Yes, that is true. APh does not have LAB for processing NEF or other RAW camera formats.
When I process my NEF files I have APh set to open the NEFs in 32 bit RGBA Wide Gamut.
After editing I then develop it and convert to LAB 16 bit for any final editing. I then save the final edited image as a TIFF in LAB 16 bit.
I use that TIFF version as my master copy for making any prints and RGB 8 bit JPEGs that I upload to the art sites and stock agencies I deal with.
I would send them the TIFF but most of the websites I deal with only accept JPGs.
-
7 hours ago, R C-R said:
That is not true. LAB is a 3 dimensional color model based on the opponent theory of human color perception. RGB is another 3 dimensional color model, an additive one based on the concept of primary colors. CMY is a 3 dimensional subtractive model, based on the absorption of inks or dyes.
All these color models can be represented as 3 dimensional color spaces; the horseshoe shaped charts you often see depicting color gamuts are really 2 dimensional slices of the 3D space. To fully understand color management & color space conversions it is important to understand the differences among the terms color models, color spaces, & color profiles.
I've been using LAB color for 17 years. I find it better than straight RGB.
Here is an article explaining LAB. http://geraldbakker.nl/psnumbers/lab-explained.html
The biggest advantages of LAB are that the Luminance is separate from the colors and LAB has a wider color gamut than either RGB or CMYK.
I can adjust colors using LAB in ways that just don't work with RGB.
And for me the proof is that way the prints turn out.
You can also make adjustments using LAB that you cannot do with RGB.
Here is a video about making adjustments using LAB in Affinity Photo. -
15 hours ago, R C-R said:
OK, but are you sure all those extra bits actually are used to match the original's 32 bits worth of color variations, or maybe just truncated or rounded to the nearest 8 bit values?
Also, what is the maximum bits per channel your scanner supports without interpolation? Does the color quality of the original photos in their presumably currently aged state really justify even 16 bit depths?
All I am suggesting is it might be worth running some tests before deciding what the best way to go really is.
Sorry for the late reply.
I just got back home from a 7 mile hike at the Grand Canyon.
My scanner is an Epson V-300 flatbed.
Maximum resolution is 9600 PPI without interpolation.
I've used it to scan 2x3 wallet photos and turn them into 8x10s.
The scanner supports RGB 16 bit TIFF.
Unless the photo is a black and white I always scan in 16 bit for all color photos.
Since the photos often need editing, such as sharpening, dust removal, and even repair of tears, I save it in LAB color after editing is complete.
As I mentioned before I find that Lab reproduces the colors better when I make prints.
According to my research LAB is a 3 dimensional color model that combines RGB and CMYK.
My mistake was saving them in JPF.
All photos I still have the original prints for will be rescanned.
NEF files will be reprocessed into LAB 16 bit TIFF.
The OpenXLR 32 bit export I did was more of an experiment. I don't know if I will use it yet.
I will have to see how many JPFs I have than cannot be rescanned or reprocessed from original NEF files. -
24 minutes ago, R C-R said:
Are you sure either one really supports this or just converts the files to the .jp2 standard at 8 bps & RGB?
When I open the JPF file with Preview App it does display it normally.
When I go to export it gives me the options of JPEG, JPEG2000, TIFF, PNG, and OpenXLR.
Exporting to JPG, JP2, TIFF, or PNG converts it to 8 bit RGB.
But when I export to OpenXLR the result is RGB 32 bit.
The OpenXLR file that gets created does have all of the original colors that were in the display, but they are more saturated and lighter.
The heavier saturation and lightness can be adjusted if necessary.
After readjusting the color saturation and lightness I then convert the OpenXLR file into TIFF 16 bit LAB.
Like I mentioned in another reply I will only do this for JPF files that do not have photo print for me to rescan or an NEF version that can be reprocessed.
Got to leave in 10 minutes to do some photography work so if you reply to this I will check for your reply either late this evening or tomorrow morning.


JPF tweaking required
in Pre-V2 Archive of Affinity on Desktop Questions (macOS and Windows)
Posted
JPF does not show up on my AP "Open" dialog either.
But I am using a Mac. I am able to open JPF with AP by right clicking on the JPF file directly and in the Mac Finder dropdown menu it does give AP as a program capable of opening it.
If your Windows does not have that right click on the file option then that is a Windows issue.