cadobir
-
Posts
64 -
Joined
-
Last visited
Everything posted by cadobir
-
I just spent an hour trying to figure out, WITH documentation, how to wrap text around an object in Design. I eventually stumbled on the solution in the Forum, here: "Create your object, choose 'Layer - Convert to Text Frame', paste or write in your text, then..." have at it. This is NOT easy to find in the help, and completely unintuitive. If Affinity intends to stick to this method of implementing text wrap in Design, then PLEASE PLEASE PLEASE provide adequate documentation. This has been an exceptionally annoying and frustrating experience, that could have easily been avoided had you made "text wrap", "wrap", or "repel" search terms in your help document. You have overall done so many good things in Design, the failure to implement text wrap OR to clarify the workaround is really unpleasantly surprising. On this one, I have to say: DO BETTER.
-
This feature is not explained in the documentation, and the lack of clear commands and/or documentation costs me billable time. I have just struggled for an hour to do a very simple text wrap, and I am very angry about it. I expect better from Affinity.
-
Let Text flow around an object
cadobir replied to MarcV's topic in Pre-V2 Archive of Desktop Questions (macOS and Windows)
I second the request for text wrap around an object in Affinity Design, at least until Affinity Publisher is released. -
I'm just starting to explore the Macro function in AP, and I'm very pleased to see it there. But one thing I use a lot in Photoshop is missing: the ability to pause for user input. For example, I have a Photoshop macro that calls for a Curves adjustment layer, and when that layer is introduced, the macro pauses to allow me to set the curves values; then the rest of the macro proceeds. If I can't pause for user input and then allow the macro to proceed with the following steps, the macro becomes useless because I then have to either run another, separate macro or do all the other steps by hand. I am sure you are thinking of this functionality, and I encourage you to bring it out soon. It's very important for the way I work.
- 1 reply
-
- 1
-

-
1bit / bitmap mode colour format?
cadobir replied to Clyde's topic in Feedback for Affinity Photo V1 on Desktop
I work a lot with calligraphy, which I scan from original on paper. The printers will not accept ANYTHING except pdf in bitmap (1-bit) mode. I really want to use Affinity Photo instead of Photoshop, but this is a very important missing piece for me. -
1 bit color mode is absolutely essential for line art and certain printing applications.
-
I'm just curious - what is it that you can do in Photoshop but not in Affinity Photo? If you need to take an image you've been working on in AP and edit it in Photoshop, you can export it. You may not be able to keep it as a layered file.
-
I'm pretty sure, based on years of experience, that spotting dust and scratches remains a largely manual task. Filters such as "Dust and Scratches" introduce artifacts. Some times you can select dust by color range and run a filter; sometimes you can lift an area of the image to a new layer, set it to Darken or Lighten and move it to cover dust and scratches. Now for the other aspects of restoration, you want to find and correct your black, white and gamma points; fine-tune color and contrast; retouch damaged or missing image areas; introduce clarity, and sharpen. Shadow-Highlight is very useful.
-
Edit selected item in Photo
cadobir replied to cadobir's topic in Pre-V2 Archive of Desktop Questions (macOS and Windows)
I did not close the AD document. AD remains open and running, but AD closed the document when I choose File > Edit in Photo. I think I understand your rationale for not linking placed images, but I think that in practice, the problem of surprise edits is unlikely to happen. If you have worked in InDesign, you may have used their "Edit in..." commands. They're really very good, and I wonder if Affinity may try to r-create that functionality in a future version of AD/AP. If they do not plan to do so, I will want to understand how they address this workflow. -
What about the Spot Healing brush?
-
Edit selected item in Photo
cadobir replied to cadobir's topic in Pre-V2 Archive of Desktop Questions (macOS and Windows)
You are correct, I meant a photo placed in AD. And of course, I could go edit the photo in AP and re-place it in AD. I haven't used the "Replace Image" button in AD yet; I will try it. But the convenience of editing the image in AP without closing it in AD, and having AD update saved changes to the photo is terrific and very desirable. -
Suppose I have a photo placed into an AP document, and I want to edit ONLY the photo and have the changes update in the AP document. So far this does not appear possible; when I choose File > Edit in Photo, the whole document closes in AD and reopens in AP. I do not want to edit the entire document in Photo, only the selected item. Does Affinity have any plans to develop this capability?
-
Another approach is to go into quick mask mode, blur your mask, and use Levels to refine your selection. I don't think AP offers a Maximum/Minimum filter yet.
-
Saving as an Affinity Photo file
cadobir replied to TAM's topic in Pre-V2 Archive of Desktop Questions (macOS and Windows)
Now I am happy. And... saving as .TIFF, too, or is that (a) later or (b) probably never? -
Saving as an Affinity Photo file
cadobir replied to TAM's topic in Pre-V2 Archive of Desktop Questions (macOS and Windows)
Hi, MEB, Actually, if I open a layered .TIFF in AP, it is flattened on opening. That is NOT a desirable behavior. I see that you respect the PSD file structure, and I appreciate that. Why not .TIFF too? -
Saving as an Affinity Photo file
cadobir replied to TAM's topic in Pre-V2 Archive of Desktop Questions (macOS and Windows)
From a not-so-newbie perspective: for years, working in Photoshop, I have saved most of my work as .tiff, with .jpeg or .pdf for output as necessary. I like to save in a non-proprietary format, because 1. I might have to turn over my work to someone who doesn't use Photoshop of Affinity Photo. 2. Sometimes software breaks. 3. Sometimes companies go out of business. Is there any possibility that you might consider allowing the user to keep images in a non-proprietary format? That is, to open, save, close, and re-open layered .tiff files, etc? Or do you want to keep all editing in the .afphoto file format forever, and keep all other file formats as export options only? -
Thanks, JimmyJack, you are absolutely right. I tried what you suggested and it worked very well. Thank you so much!
-
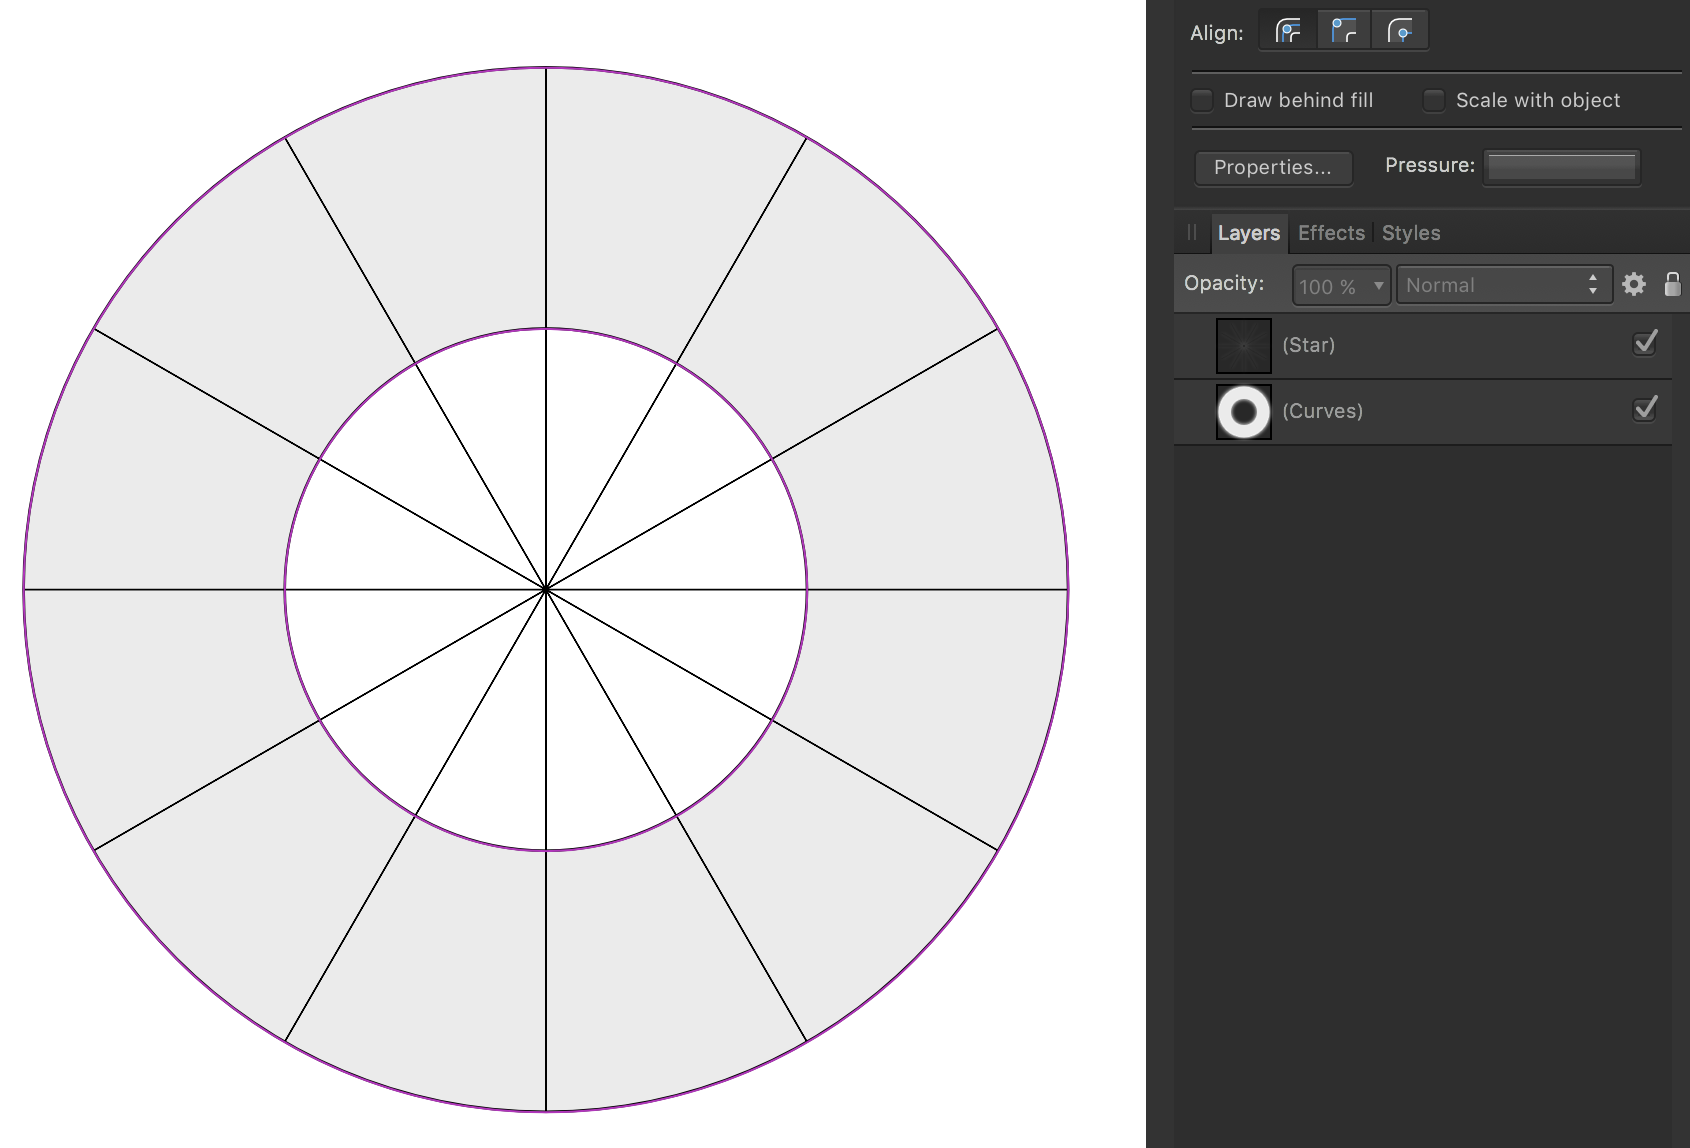
A poster on the AD/AP group on Facebook asked: "I need to create a 'doughnut' shape (so a larger circle with a smaller circle punched out the middle) that is divided into 12 sectors" I offered him this solution, which seems like it should work - but it doesn't: (See screenshot: Method 1.png) "Make a circle with the ellipse tool. There is an option to "convert to donut"; choose that. Then make a 12-point star to the same diameter, with inner diameter set to zero. Align them and select both, then choose divide." Then I offered him this solution, which does work: (See screenshot: Method 2.png) "Start with the ellipse tool and draw a circle. Then choose the option to "Convert to Pie", Accept the Start Angle to 90 degrees. For 12 equal segments, you'll want them to be 30 degrees each. AD reads the circle counter-clockwise, so set the End Angle to 120 degrees. Set the Hole Radius to something suitable, like 40 degrees, for example. You'll now have one-twelfth of a circle with a hole in the middle. Duplicate the layer. Make the Rotation Center visible and place it where the center of the circle should be. The new layer contains a duplicate of your segment; with the Rotation Center aligned, rotate the new segment 30 degrees. Then just duplicate that layer 10 more times." My question is: Why doesn't the first method work? It doesn't work even if I convert the objects to curves. I can't understand why it wouldn't.

-
How to Acquire Slides
cadobir replied to Katya's topic in Pre-V2 Archive of Desktop Questions (macOS and Windows)
OK, I just ran a quick test. In AP, if you choose File > Acquire Image, it will apparently invoke Apple's Image Capture by default. I believe that Image Capture will recognize slide scanners, but have not tested it for that. Image Capture is sort of crude, but if you have nothing else, it will do. For any other scanning software, you may have to install a plugin and show Affinity Photo where to find it. I'm sure the AP moderators can comment about this. Based on years of experience scanning, retouching, and so on, I find that there's no particular advantage in scanning "directly into" an image editing program. I just scan images with the scanner software I prefer (currently Image Capture for line art and VueScan for color). When I need to open the files, I either double click them, drag them onto AP (or some other image editor), or right click and choose from "Open With...". It's not hard. I would suggest scanning conservatively - don't push the contrast, and try not to allow details to get lost in bright or dark areas. You'll adjust everything in your image editor of choice later. Hope this helps! -
In AD, it's very easy to add custom Pressure effects to pen strokes and brush strokes. Out of pure curiosity, I wonder if the programers might make it possible to add pressure effects to a dashed line, so that it could be thin on one end, thick in the middle, and thin on the other end, for example. I've included a file to demonstrate the rough idea of the concept. Needless to say, it was not made by combining brush pressure with dashed line. Follow-up: I have tested this in Adobe Illustrator, and they have made it work, so I am sure that the Affinity team can do it, and hopefully do it better. Pressure Dash.afdesign
-
How to Acquire Slides
cadobir replied to Katya's topic in Pre-V2 Archive of Desktop Questions (macOS and Windows)
Affinity Photo shouldn't care about the original media. It should only care about the size, resolution, color space, and quality of the image. I think the question is what scanning software you're using - does it handle transparencies and opaque materials equally well? -
Thank you. Have I phrased it clearly enough?
-
In AD, it's very easy to add custom Pressure effects to pen strokes and brush strokes. Out of pure curiosity, I wonder if the programers might make it possible to add pressure effects to a dashed line, so that it could be thin on one end, tick in the middle, and thin on the other end, for example. I've included a file to demonstrate the rough idea of the concept. Needless to say, it was not made by combining brush pressure with dashed line. Pressure Dash.afdesign
-
Starburst lines (for shading)
cadobir replied to cadobir's topic in Pre-V2 Archive of Desktop Questions (macOS and Windows)
Actually, this is the closest I have gotten so far. Star tool set to 60 points, inner radius 0. Mask with Ellipse tool set to Donut; duplicate layer, rotate slightly, adjust Donut Mask. It doesn't let me customize the strokes, which I would like to do; but it's much better than my earliest attempt. Sunburst.afdesign -
Starburst lines (for shading)
cadobir replied to cadobir's topic in Pre-V2 Archive of Desktop Questions (macOS and Windows)
Thanks, everybody. I think the Power Duplicate method is most likely to get me the result I want. ABC, thanks for the note about the Cog Tool. It might work better for me than the Star Tool. I don't want closed shapes at this point. If I want some really unusual shapes in the mix, then I might try using closed shapes. Right now I'm after separate lines. Thanks again!