PixelSnader
-
Posts
14 -
Joined
-
Last visited
Everything posted by PixelSnader
-
 Hey, I was wondering if anyone had figured out a way to use a mask, or a z-depth image to blur an image? In Photoshop you can use a black and white image to partially blur an image, to get a narrow depth-of-field effect: I've already tried to use a full-image blur with a mask, but that gives 80s-esque halo effects. The halo is there because the whole image (BG+dress) is blurred, while the dress should not be taken in to consideration for the BG-blur. It is quite noticable around the dress here: Anyone have a usable method for this effect in Affinity?
-
That's dandy, but the OP is talking about migration from Photoshop to Affinity Photo. No mention of Designer.
-
I'm going to point out that this section of the forum is for Affinity Designer, which would compete with Adobe Illustrator. Discussion about Affinity Photo and Adobe Photoshop shouldn't be here.
-
Move canvas with cursor key
PixelSnader replied to robert_muench's topic in Older Feedback & Suggestion Posts
You don't have to use the scroll bars. These days UIs tens to treat scrollbars more like positional indicators than buttons. There are plenty of other ways to navigate in Affinity. You can tap [H] to switch to the view tool and then click and drag to move the canvas. Or hold down [spacebar] if you don't want to constantly swap between tools. If you have a multitouch trackpad you should also be able to move the canvas around with a 2 finger gesture. If you have a magic mouse or a 4-way mouse on PC you can scroll up and down with the regular wheel and use the tilt of the scrollwheel to move sideways. If you have a regular scrollwheel you can press shift to scroll sideways. Lastly, you can zoom out , move your cursor and zoom back in again to refocus. Downside is that you may end up at weird zoom percentages. -
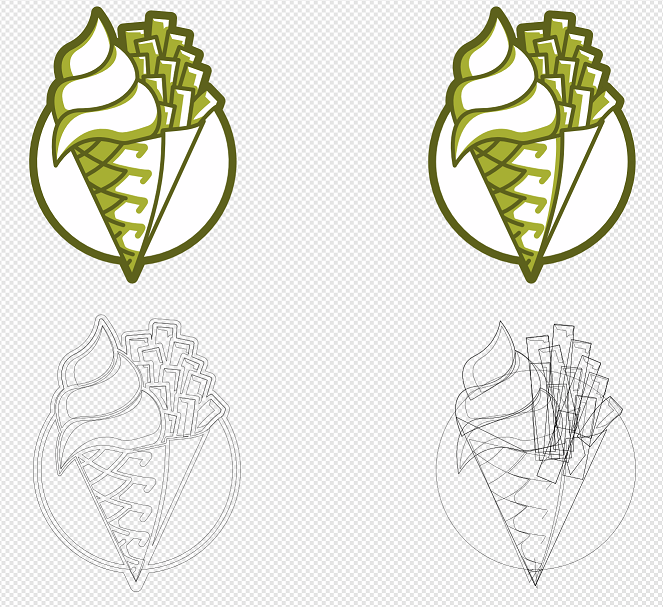
I spent the past two hours reducing a logo from a billion separate elements to three (white, light, dark) for vinyl printing. But this shouldn't take as much effort as it did. I couldn't find a simple way to 'flatten' this image, so I had to manually add/subtract/divide many elements many times. The outermost line and white background are not a problem, simply select everything and add. But the darkest shade is made up entirely of outlines of shapes such as the fries. So I cannot simply add those together as it will create one big clump. I also can't just make them all outlines and transparent centers because you'd see the underlying layers. So for each fry i had to: -expand stroke -copy the inside -copy the shape and make transparent (so you only have the stroke) -subtract the stroke from the inside. -subtract the result from the original shape -subtract all the higher layers from the original shape Does anyone know a decent workflow for this type of work in Affinity Designer? I also reckon this is something that can be done algorithmically. At least in the sense that we should be able to divide the visual end result in contiguous blobs of one color. That means the dark green would be 1 element, and the white and light green about two dozen islands each. I'd still have to manually group those into one element but it'd already be much closer to what the endresult would be.
-
Nik Software Petition
PixelSnader replied to John Rostron's topic in Pre-V2 Archive of Desktop Questions (macOS and Windows)
Google must do as we please. ;) -
Thanks! That weird window is proving to be quite useful.
-
Linux version
PixelSnader replied to pigeon's topic in Pre-V2 Archive of Desktop Questions (macOS and Windows)
Not necesarilly. Many consider 'free' as in freedom more important. In fact, Linux users pay the most per person for the Humble Indie Bundle; http://cheesetalks.net/images/humble/humble_average_platforms.png And it's not like the average OSX or Windows user pays for their OS; it's all bundles with their laptop. -
This might be a lot more intuitive in Affinity Photo, where you would desaturate, increase contrast, and then use the result as a multiplied layer. The same effect can (I think. I'm new, but it LOOKS to work) be achieved with two grouped layers. Bottom layer - your image, use the gear icon to open some the blend options window. I'm not quite sure how it works, but it's something like curves/contrast? Fiddle a bit with the 'curves' to get a nicely aliased look. For this example fading from 0.25 to 0.5 worked well enouhg. Set this bottom layer to be 'Normal' Desaturation layer - a simple white rectangle. Can also be black if you prefer. Or any sort of gray. Set the blend mode to 'Color'. Group these. You now have a sort of stamp, going from transparent to black. Put the blend mode of this group to 'Multiply'. Put whatever color you want underneath.
-
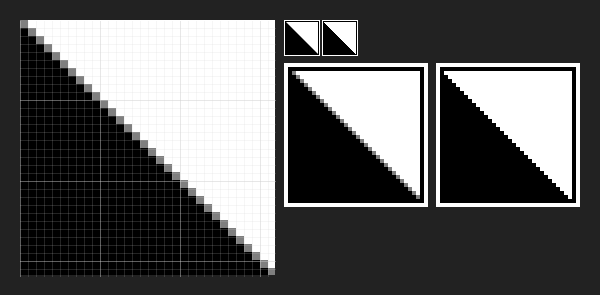
When drawing a 45° angle, the program (understandably) tries to anti-alias. It doesn't matter if I put the vertices on whole pixels or half pixels or somewhere else, each pixel will always end up part white, part black, and thus end up as a grey pixel. However, I'd like to have some lines be aliased, because it keeps a crisper image, like the edited versions on the right. Is there a way to achieve this in Affinity Designer? Aside from manually making the stairstepping for every pixel, of course. I know it's a relatively small issue, but given my background in pixel art, I tend to notice these small things ;) As a sidenote, notice how the grid in the editor doesn't adhere to the grid (despite my zoom level being exactly 800%) - is this a bug, only an issue on my device, or a setting somewhere?