GarryP
-
Posts
14,680 -
Joined
-
Last visited
Everything posted by GarryP
-
Welcome to the forums @Crazybirder It would have been better if you had asked this question in the appropriate “Questions” section of the forums rather than in the “Resources” section of the forums as the “Resources” section is for people sharing resources for others to use rather than asking questions. No harm has been done, but posting questions in the “Questions” section is the right thing to do. A moderator might move this thread for you so there’s no need to duplicate this elsewhere.
-
 An extra problem with this comes when the user clicks in the value field and then presses Enter without making a change. In this instance, the value displayed for user input is the (rounded) integer value and that is then used as the ‘underlying’ value. Pressing Enter causes the ‘underlying’ value to change even if the user didn’t make any change. See attached video – the green line shows where the grid should be with the correct ‘underlying’ value and the red line shows where it is after the second ‘edit’ where nothing should have changed. 2025-07-02 09-05-14.mp4
 -
One way you can try and get round the “Error code: -200” problem is to convert the image to a different format (e.g. PNG → JPG, etc.) before uploading. That doesn’t always work, and whether it works seems to be random to me, but it does work sometimes. Another thing you can try is to reduce the dimensions of the image but that’s not always useful when we need to see the image exactly as it is (in this case, with a screenshot, it might not be much of a problem). I have found that a maximum height/width of 800 pixels seems to work most of the time but that might not be great if we need to see all of the fine details.
-
On Windows that is Ctrl+click on the thumbnail of the layer in the Layers Panel, rather than just Cmd/Ctrl+clicking on the layer.
-
You can get rid of the grey line at the top of the image with the Erase Brush Tool. (Be careful what you erase.) One method to make the ‘background’ fully transparent would be to: select the Flood Select Tool; set the Tolerance (on the Context Toolbar) to 1% (or another very low value); set Contiguous (again, on the Context Toolbar) to ON; click on the area that you have seen in my video which isn’t fully transparent (Alpha = 6); press the Delete key to delete the selected pixels; use menu “Select → Deselect”. Then you can export the image and it should be okay. See attached video for a demonstration. 2025-07-01 13-22-28.mp4
-
The problem as I can see it is that the ‘background’ of the “Pixel” layer is not fully transparent. See attached video where I use the Info Panel to look at the pixels that I move the mouse pointer over. Some pixels are fully transparent but some have a very low opacity white (Alpha = 6). You will need to make those pixels fully transparent also. (And there’s also a grey line at the top of the layer.) 2025-07-01 13-13-03.mp4
-
Using the document format in the export process doesn’t tell us whether the two documents have different formats or not. That is the important information I am trying to elicit – if the formats are different then you will probably have problems.
-
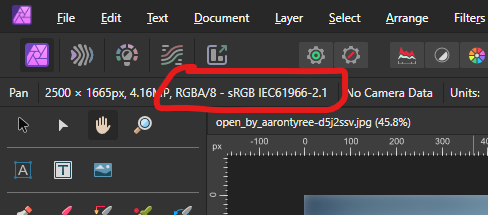
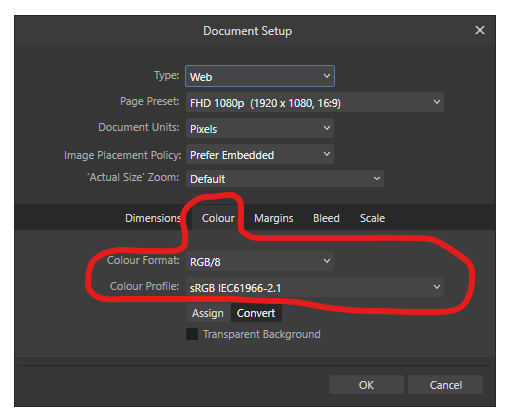
To find the colour profile information you can: open the document; in Designer or Publisher, use menu “File → Document Setup” and choose the Colour tab (see first attached image); or in Photo select the Pan Tool and the information is at the left-hand side of the Context Toolbar (see second attached image).

-
Thanks for making that clearer. What is the colour profile of the ‘icon document’ and what is the colour profile of the ‘recipient document'? And can you share the ‘icon document’, as suggested, so we can analyse it?
-
Welcome to the forums @rollvideo You have you shown us an image of your Export Dialog which shows you exporting to TIFF (16-bit) but you are talking about PNGs. Which do you want to use? Is your recipient document, the document you are placing the exported images into, a 16-bit RGB document, to go with your 16-bit TIFF? Can you share the ‘icon document’ before it is exported so we can look at it properly?
-
Why have you shown us one example in the image but given us a different example in the document? Please give us an example document where we can see the problem as it is described in the image and text.
-
Can tool handle be made larger in Photo?
GarryP replied to General Disarray's topic in Desktop Questions (macOS and Windows)
The Tool Handle Size can’t be made any larger than the “Large” size setting in Settings / Tools. And we cannot change the colour of those handles. We also cannot change the colour of the pixel selection ‘marching ants’ which is always black and white, but should normally be visible on any background as it is the only thing that is ‘moving’. We also cannot change the colour the marquee selection rectangle which is visible when dragging with the Move Tool. -
Publisher not printing barcodes
GarryP replied to XYZ3D's topic in Desktop Questions (macOS and Windows)
The PDF import process isn’t perfect and there can be times when an imported document looks okay on-screen but something ‘behind the scenes’ – which we users have no control over – has gone wrong, thus causing problems ‘along the way’. The problem might be ‘fixable’ but you might need to have to apply the ‘fix’ to every label you use, which could be time-consuming. I would recommend seeing if you can get the label in a different format, e.g. SVG, PNG, TIFF, etc. -
affinity photo/designer shuts just after startup
GarryP replied to resunoiz's topic in V2 Bugs found on Windows
Is that a crash report from your system or did you get it from somewhere else? There’s generally not much point in us users reading/interpreting the crash reports as we don’t know how the applications work internally. Better to leave it to the staff members who should be able to advise further. -
Publisher not printing barcodes
GarryP replied to XYZ3D's topic in Desktop Questions (macOS and Windows)
Was the label supplied to you as an Affinity document, or have you opened/imported a different type of file to get the Publisher document which you supplied to us? If it was a non-Affinity file type, what type was it originally and which import settings did you use? -
Publisher not printing barcodes
GarryP replied to XYZ3D's topic in Desktop Questions (macOS and Windows)
What do you get from the Royal Mail – what’s the file type – and how do you put it in your document? -
Publisher not printing barcodes
GarryP replied to XYZ3D's topic in Desktop Questions (macOS and Windows)
How is the barcode constructed? Image/pixel layer, vector layer(s), mixture of types of layers, text from font, or something else? Can you supply an example document which contains a barcode which isn’t getting printed? -
affinity photo/designer shuts just after startup
GarryP replied to resunoiz's topic in V2 Bugs found on Windows
This thread has some suggestions that you can try: -
Moving, simply changing the position of, a text frame - within the same document - should not normally resize the frame, and I’ve never seen that happen. Can you supply a full-screen (whole application UI) video showing us where this occurs? One way that some text can ‘disappear’ from a text frame, when the text frame is moved, is where the baseline grid is being used; sometimes the baseline grid is ‘incompatible’ with the combination of frame size and font size and a line of text can ‘disappear’ from the bottom of the frame. If you are using the baseline grid – either the document baseline grid or an individual layer baseline grid – this needs to be checked.
-
Photo2 Ramdom freeze after update to win11 with version 2.6.3
GarryP replied to Stef71's topic in V2 Bugs found on Windows
Repeating the same problem in multiple posts/threads has no positive effect, to my knowledge, from a user-perspective, on the speed of problem resolution, and doing so goes against the forum guidelines. -
Photo2 Ramdom freeze after update to win11 with version 2.6.3
GarryP replied to Stef71's topic in V2 Bugs found on Windows
Is this the same problem that you reported here?: -
Yellow Dot on Layer Thumbnail
GarryP replied to Boylergirl's topic in Desktop Questions (macOS and Windows)
Yep, that was the thread I was thinking of; thanks for finding it. (It was posted more recently than I thought.) It’s a shame that we didn’t get a response from a staff member to give us an idea of what it is though. The layer types in the screen-grabs that we have don’t seem to point to any one particular situation – curves and pixel layer in one, picture frame, image layer and adjustment in the other. If we can get a copy of the document we might be able to ‘pin down’ one or more possible causes, or see if it’s just a macOS-thing, but my guess is still that it’s just a ‘development marker’ of some type. -
Welcome to the forums @itsYourManJean My guess is that this could be related to a known problem with the NVIDIA 50-series GPUs. See here for example: https://forum.affinity.serif.com/index.php?/topic/229666-hardware-acceleration-visual-artifacting-on-nvidia-50-series-gpus/ The current ‘fix’ is, as you have done, to switch Hardware Acceleration OFF until it is fixed. If you follow the linked thread you will be notified of any updates on this.
- 1 reply
-
- 1
-

-
- nvidia card
- flood fill tool
- (and 8 more)
-
Why does my cloning brush do this.
GarryP replied to Stable76's topic in Desktop Questions (macOS and Windows)
You have the Stabiliser ON. You can switch it OFF via the Context Toolbar. Note: It's better to show us the full screen (whole application UI) in videos so we can see everything that you can see. -
Publisher PDF export dropping image files
GarryP replied to SSA's topic in Desktop Questions (macOS and Windows)
What do you mean by “dropping images”? Which type(s) of images – Image Layers, Pixel Layers, Picture Frames, etc. – are getting ‘dropped’? Is it always one type or a mix? Are these images embedded or linked? If they are linked, what type of storage are they linked to? Does this happen only in one document or more than one? If it’s more than one, is there some ‘resemblance’ between the documents? Also, what are your export settings?