Benergizer
-
Posts
43 -
Joined
-
Last visited
Everything posted by Benergizer
-
Thank you for the informative reply. That's very interesting. I've been avoiding this problem just by duplicating the layer, then making my selection, refining, and just choosing the output to "mask." But good to know this isn't a bug. Thank you.
-
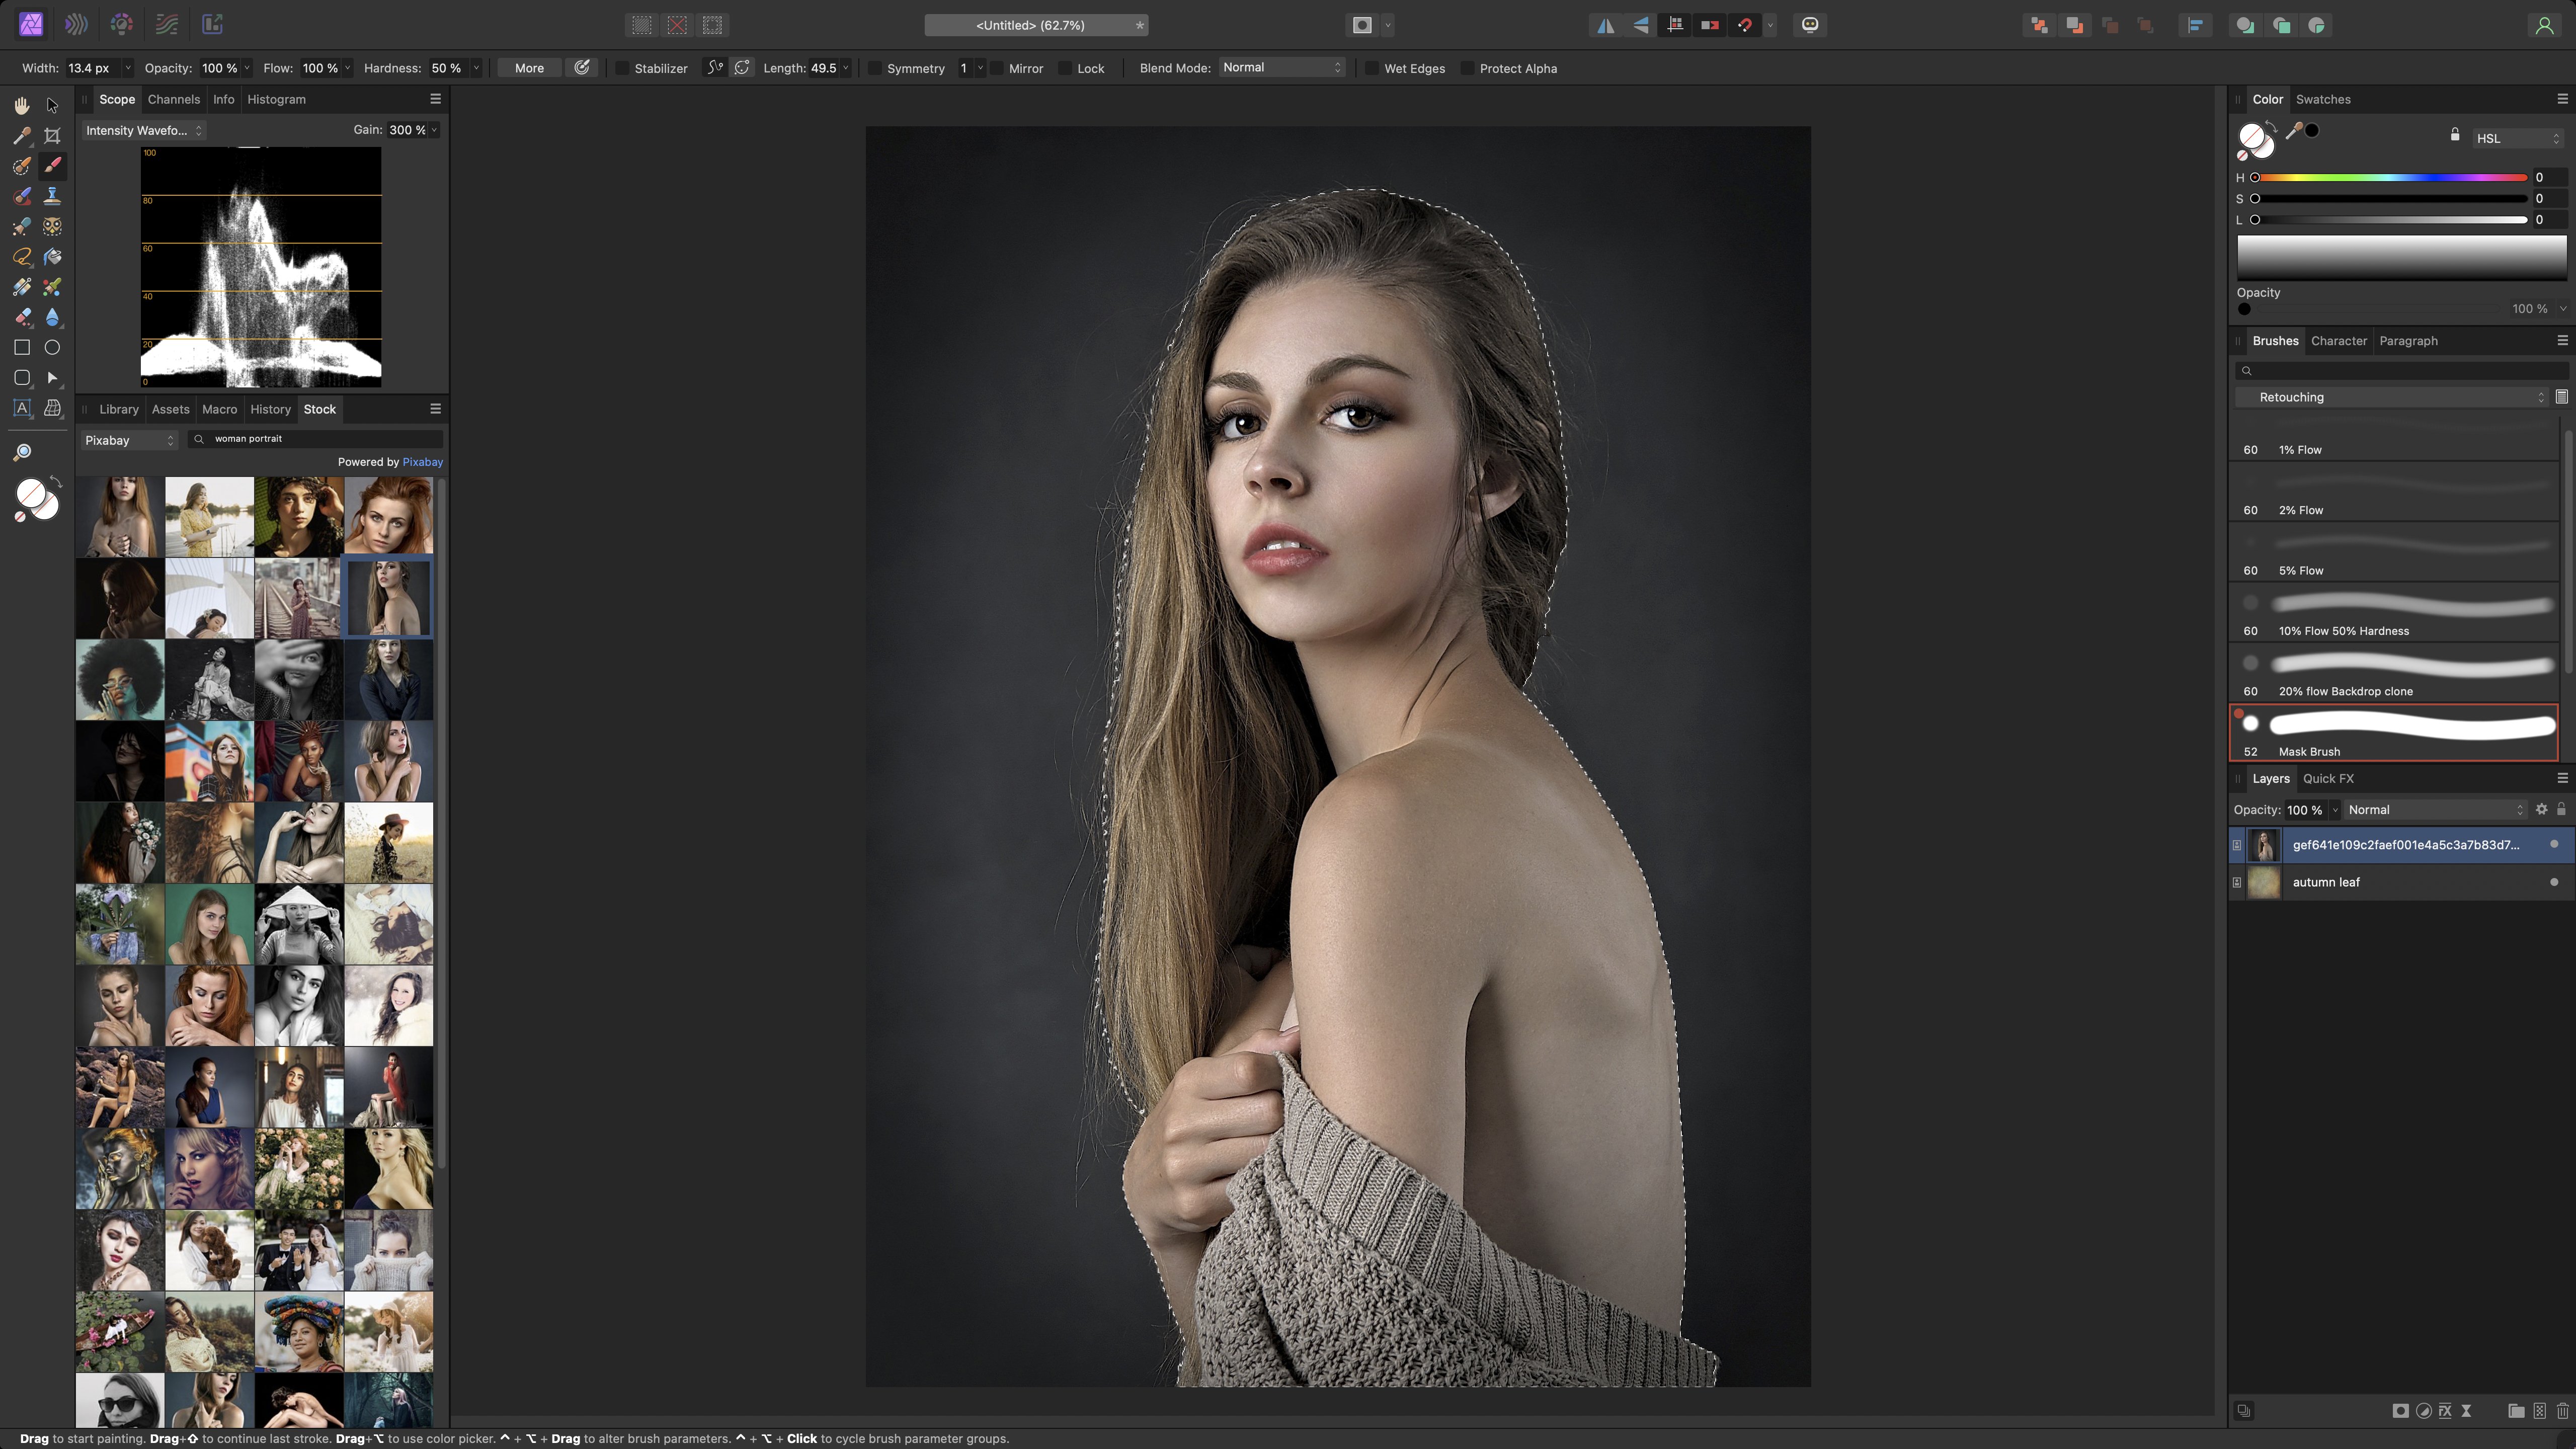
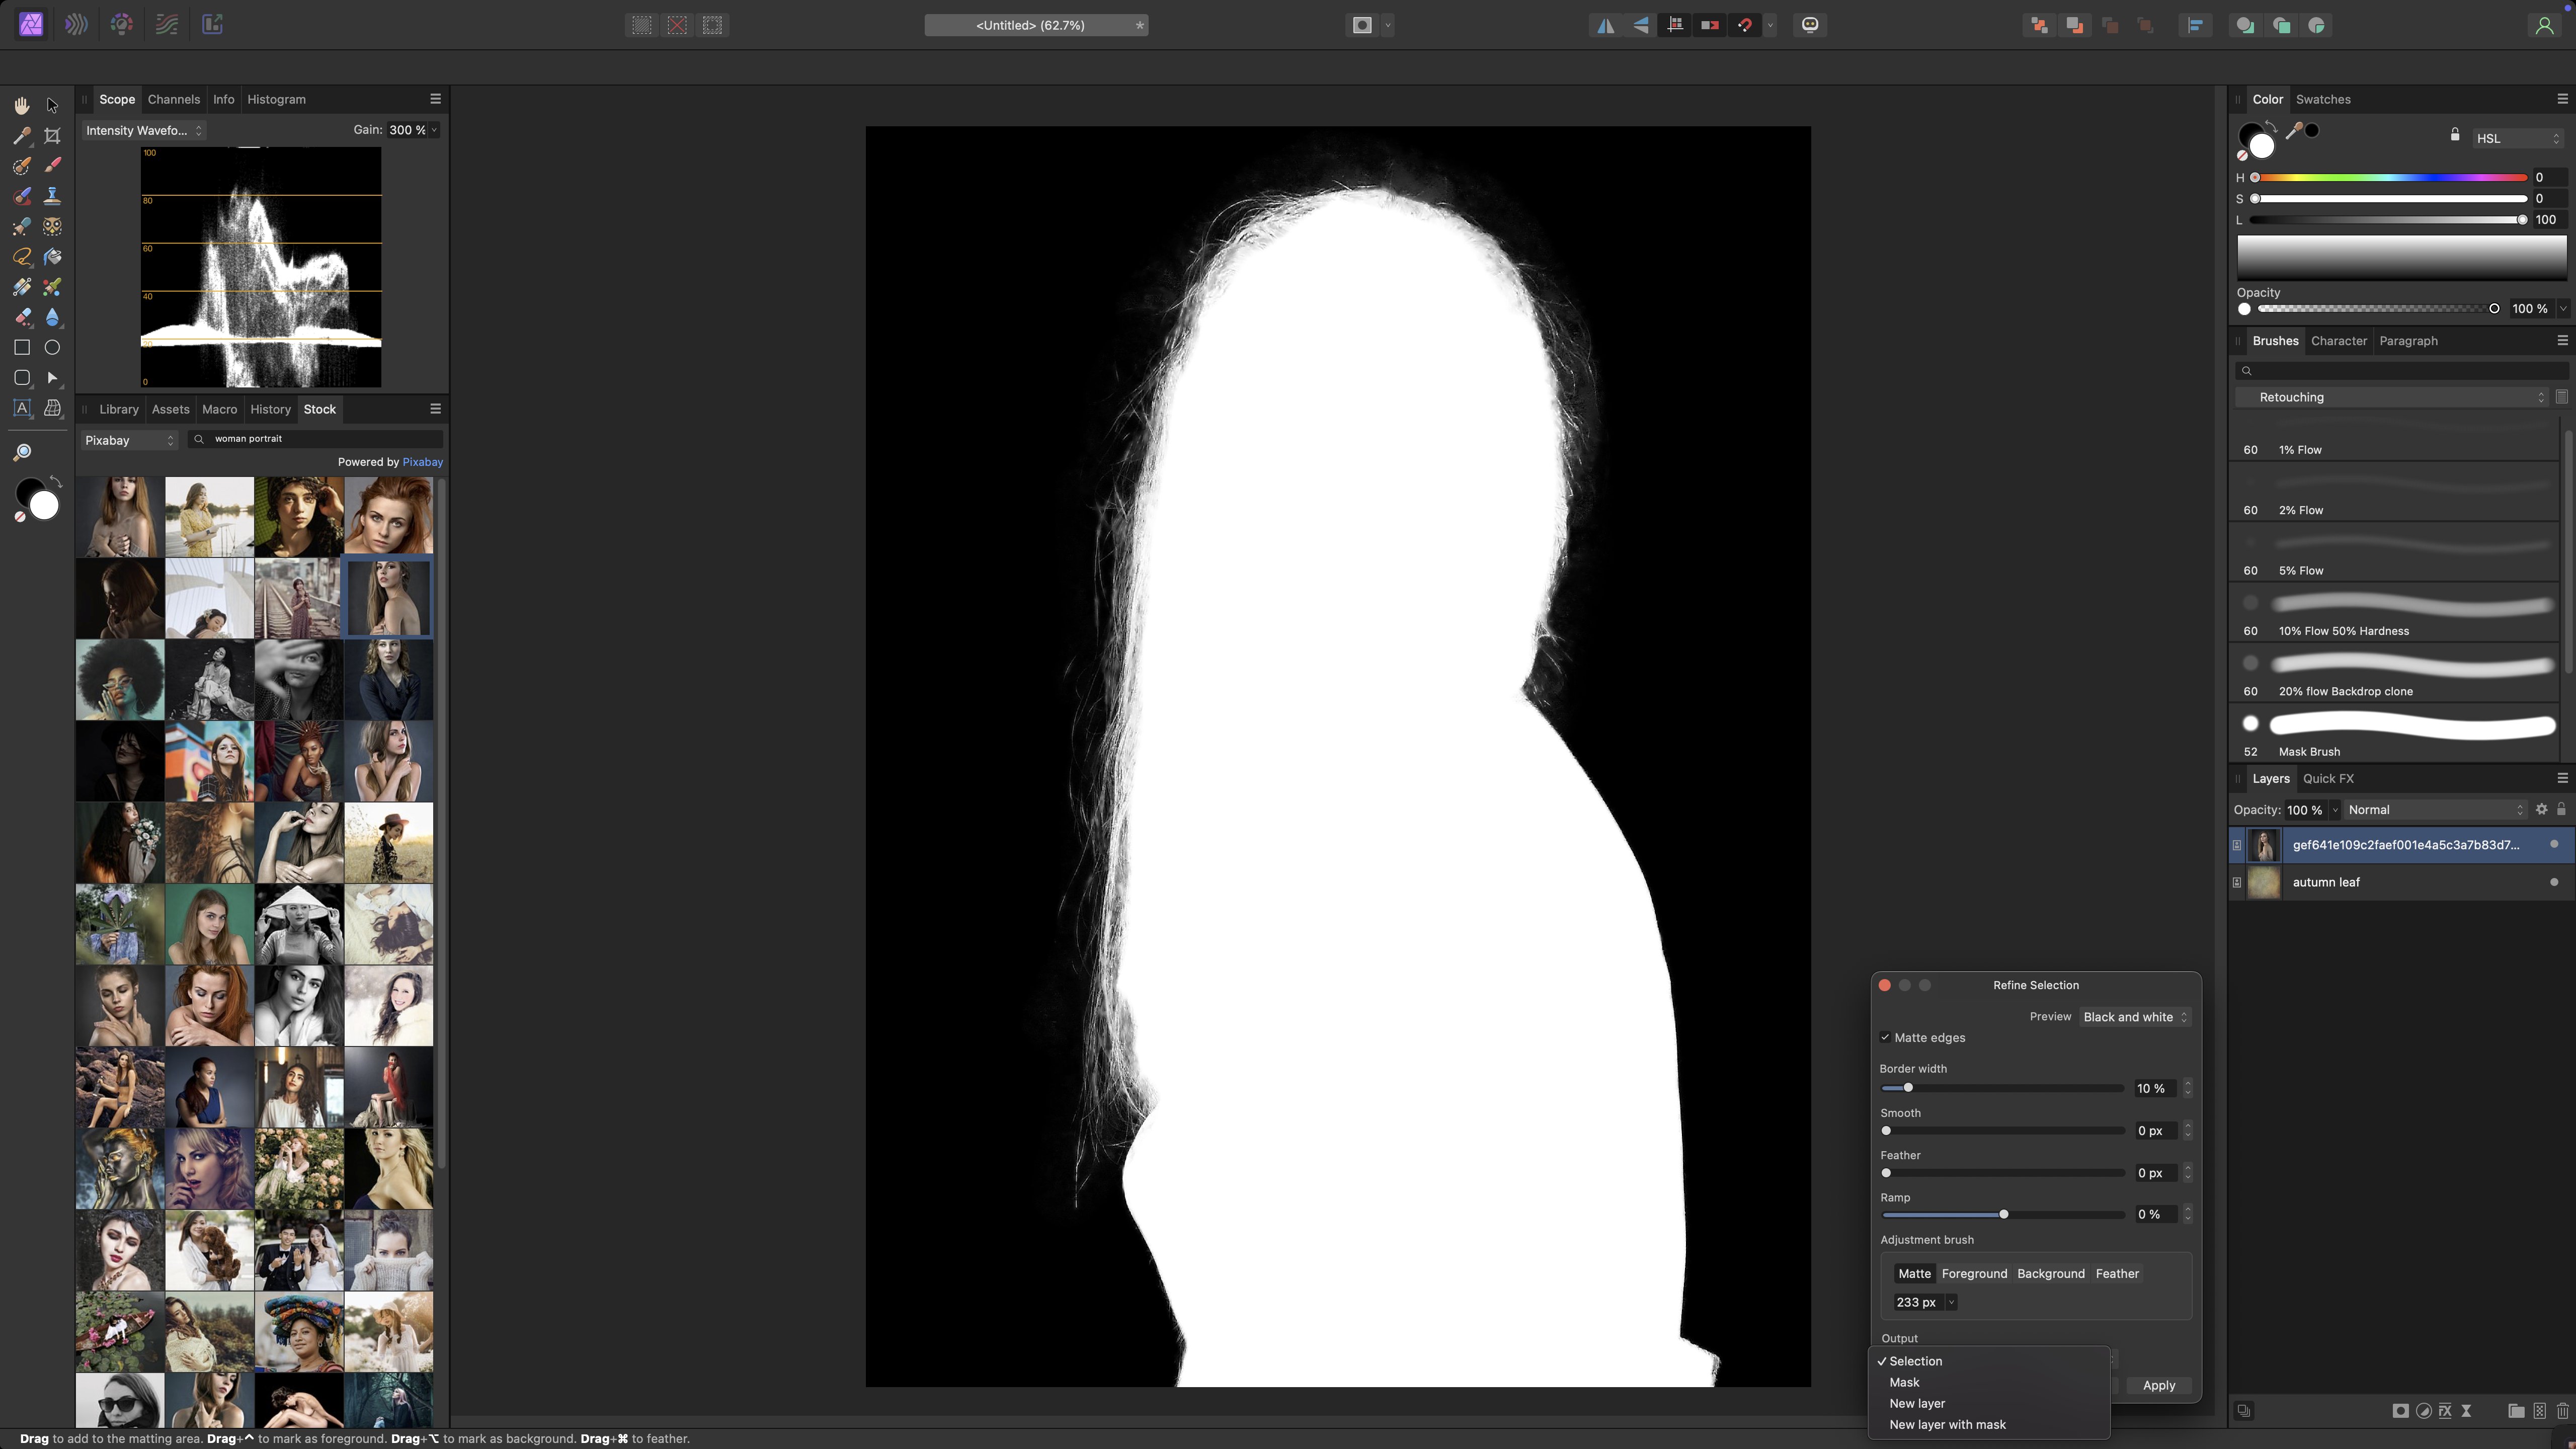
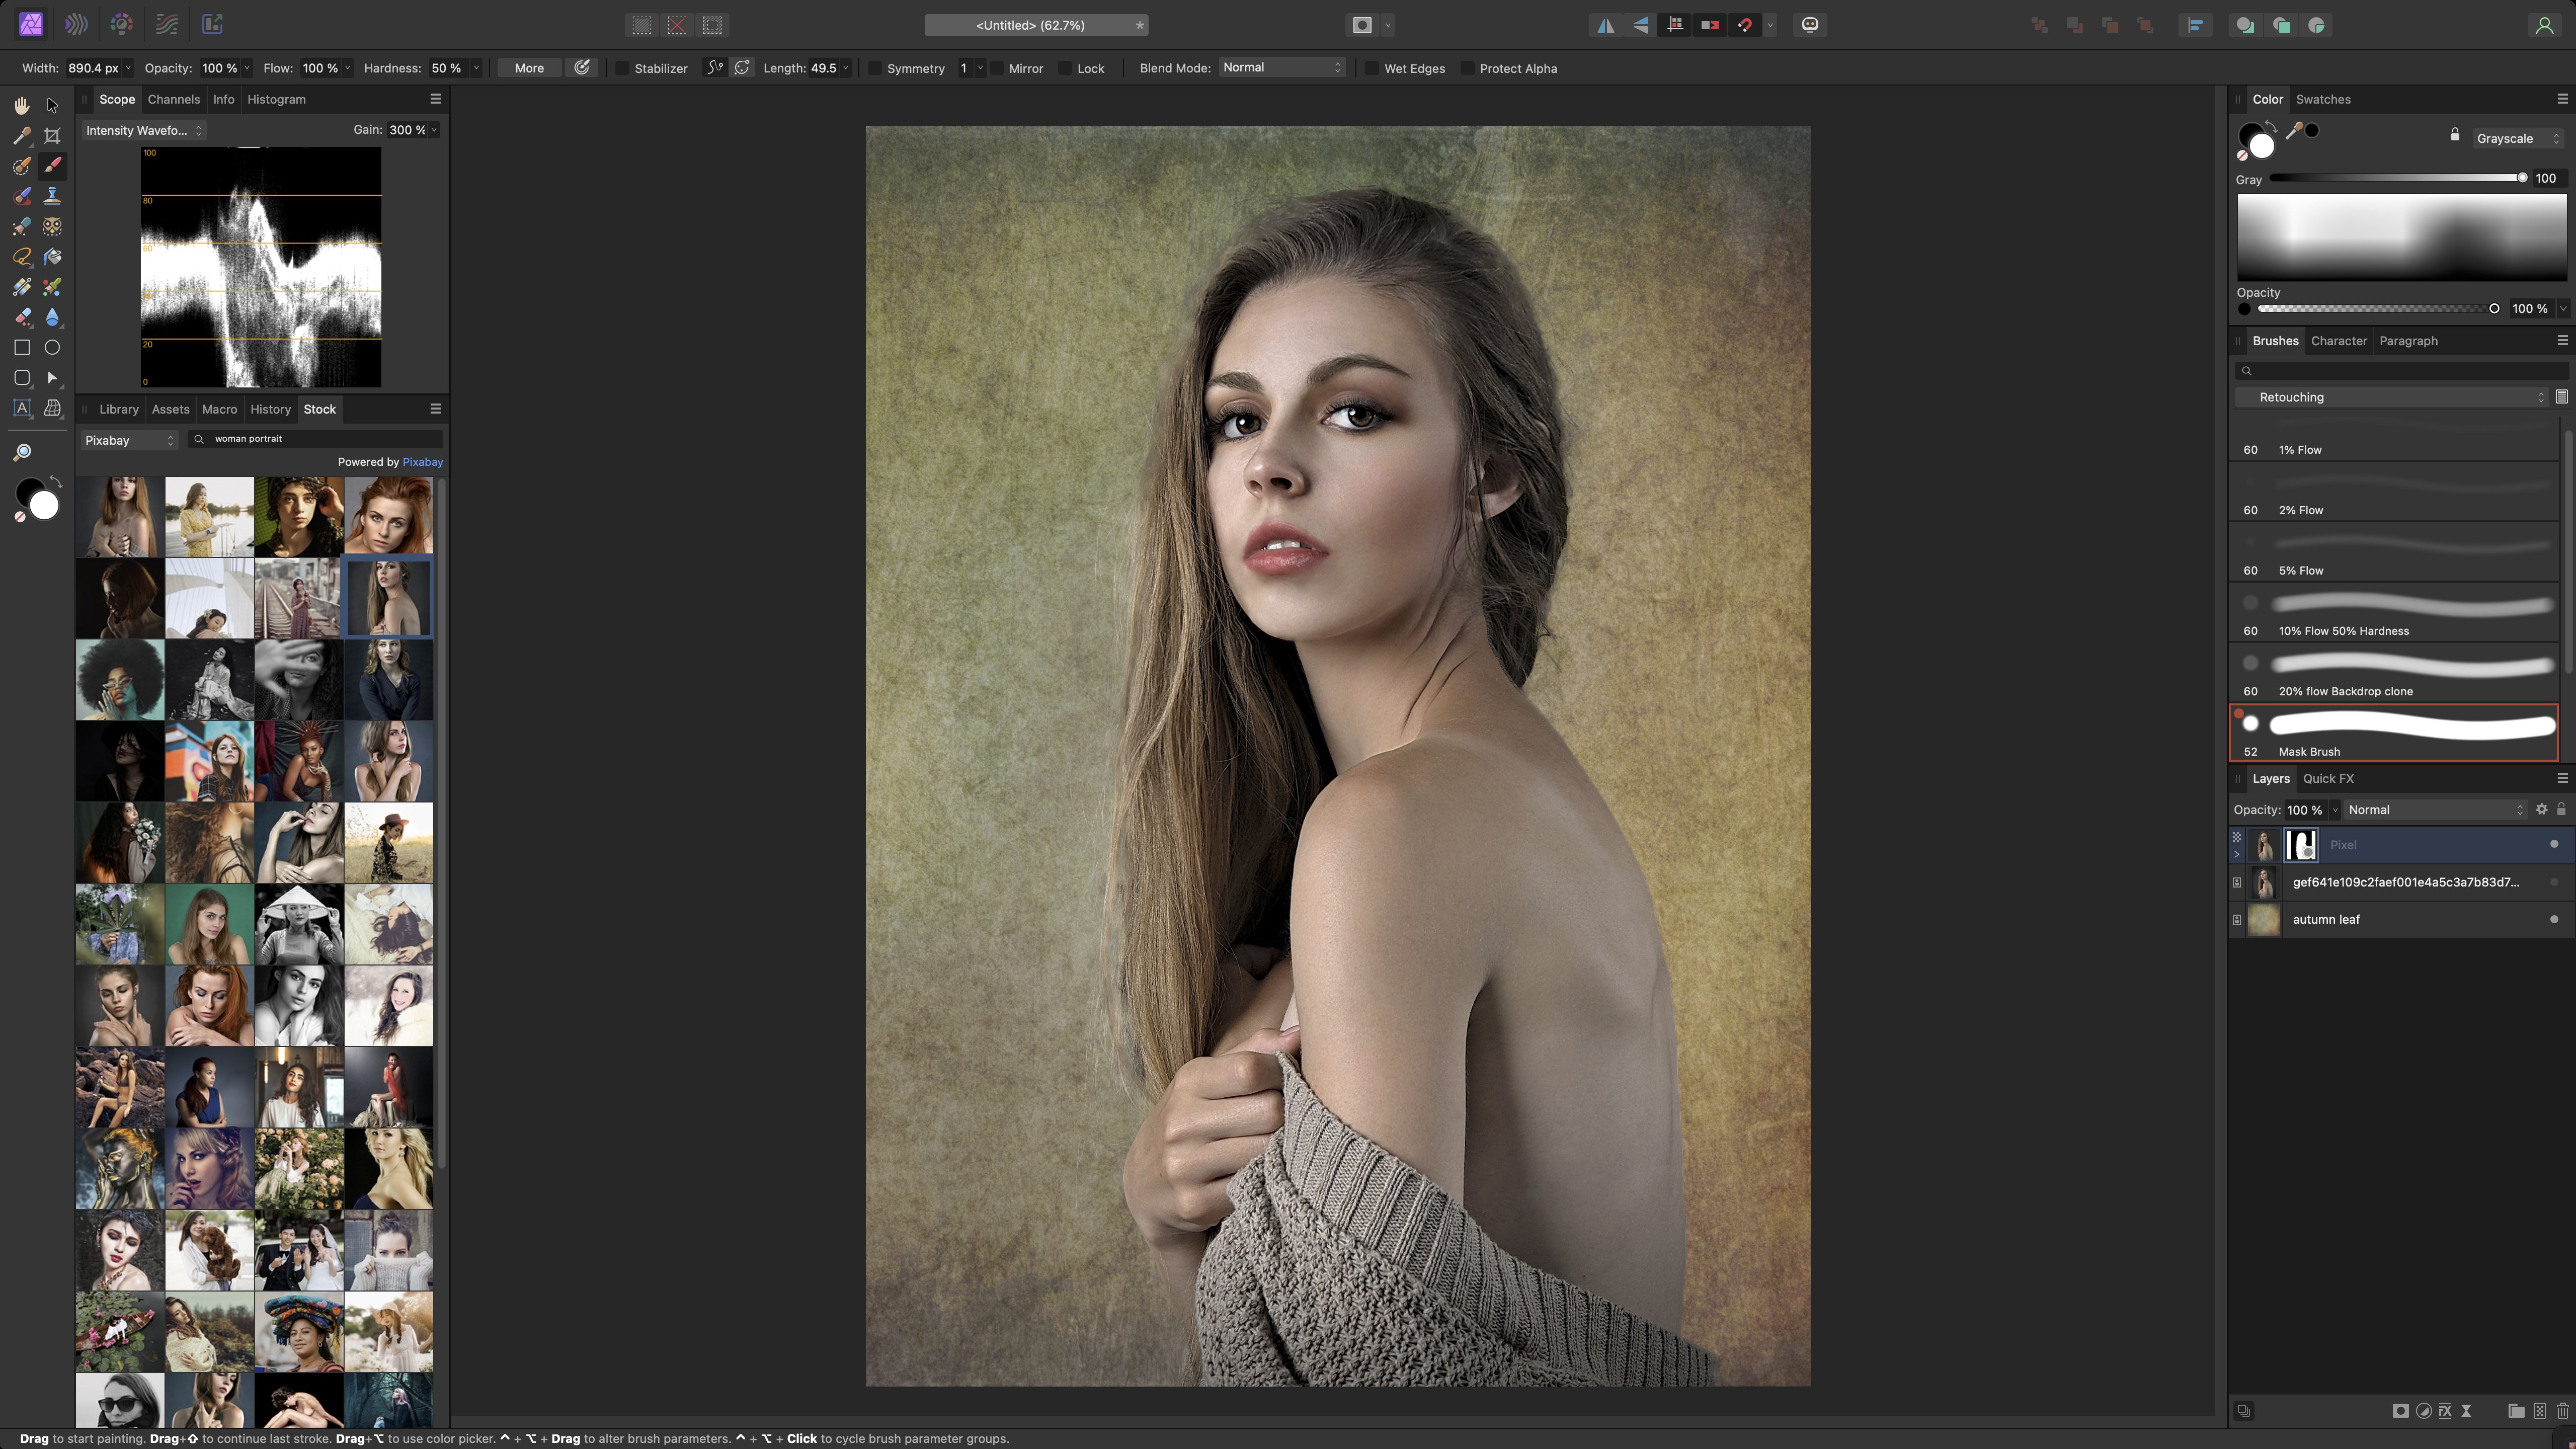
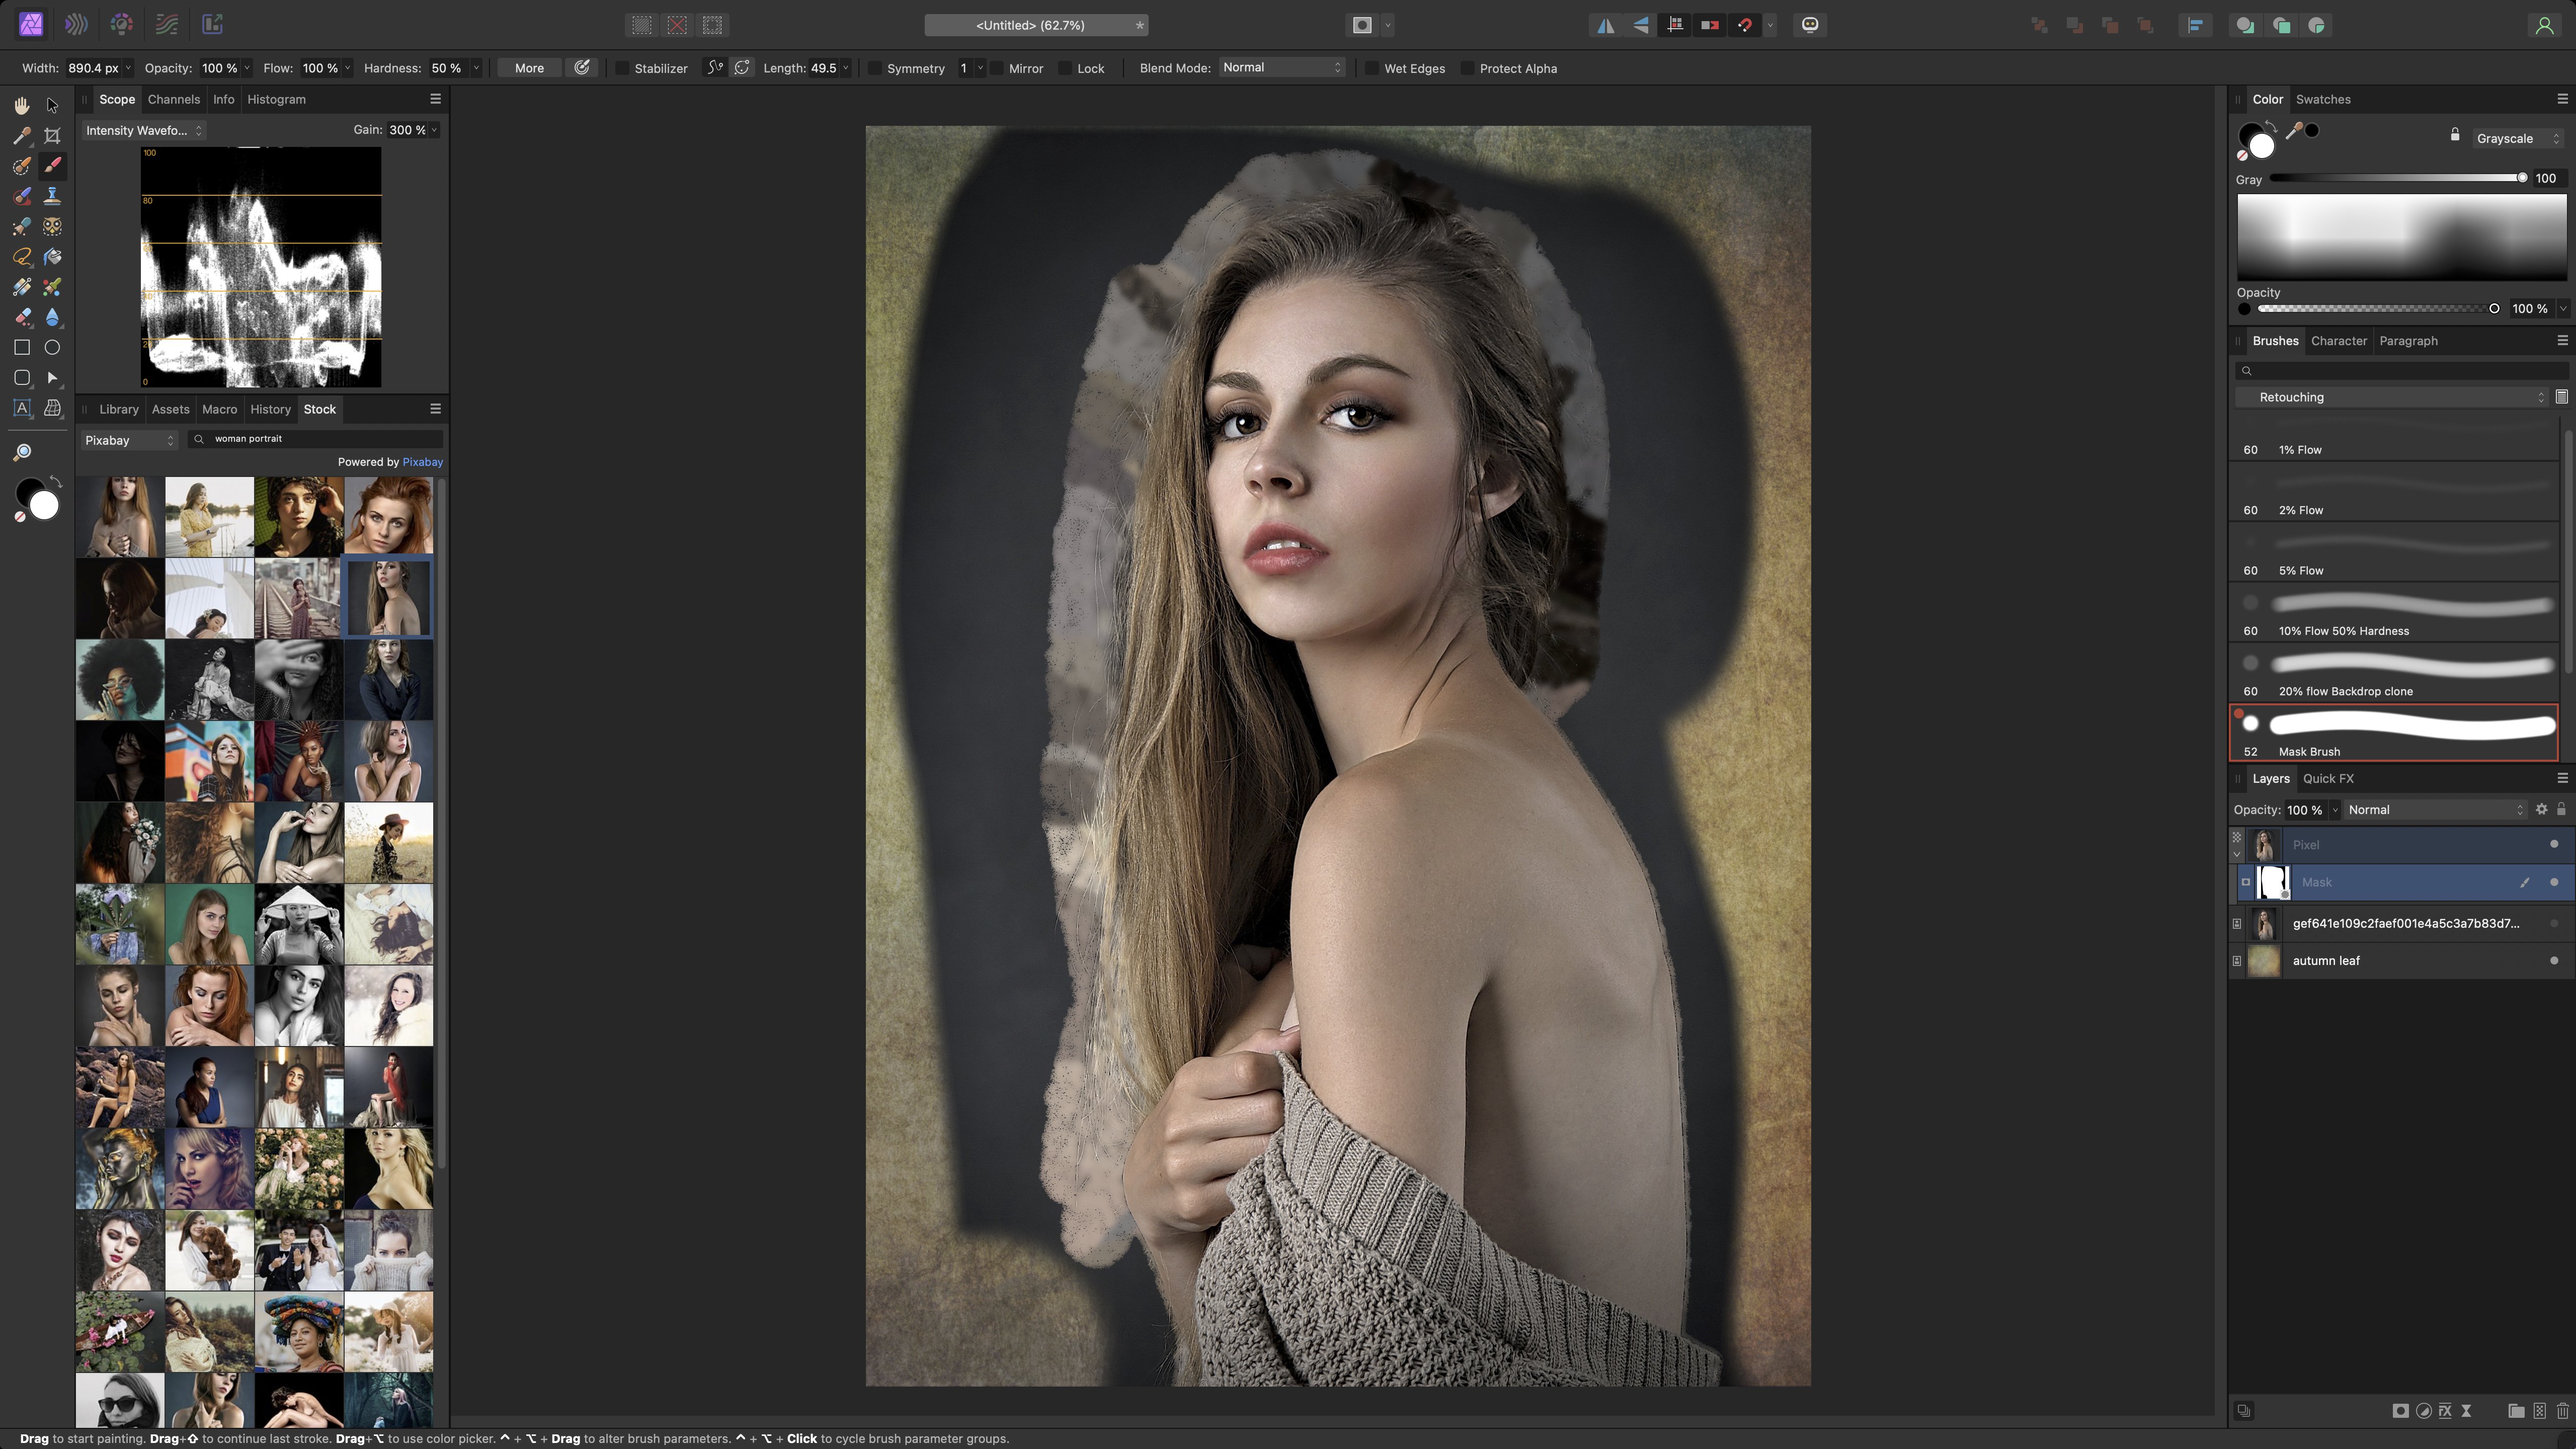
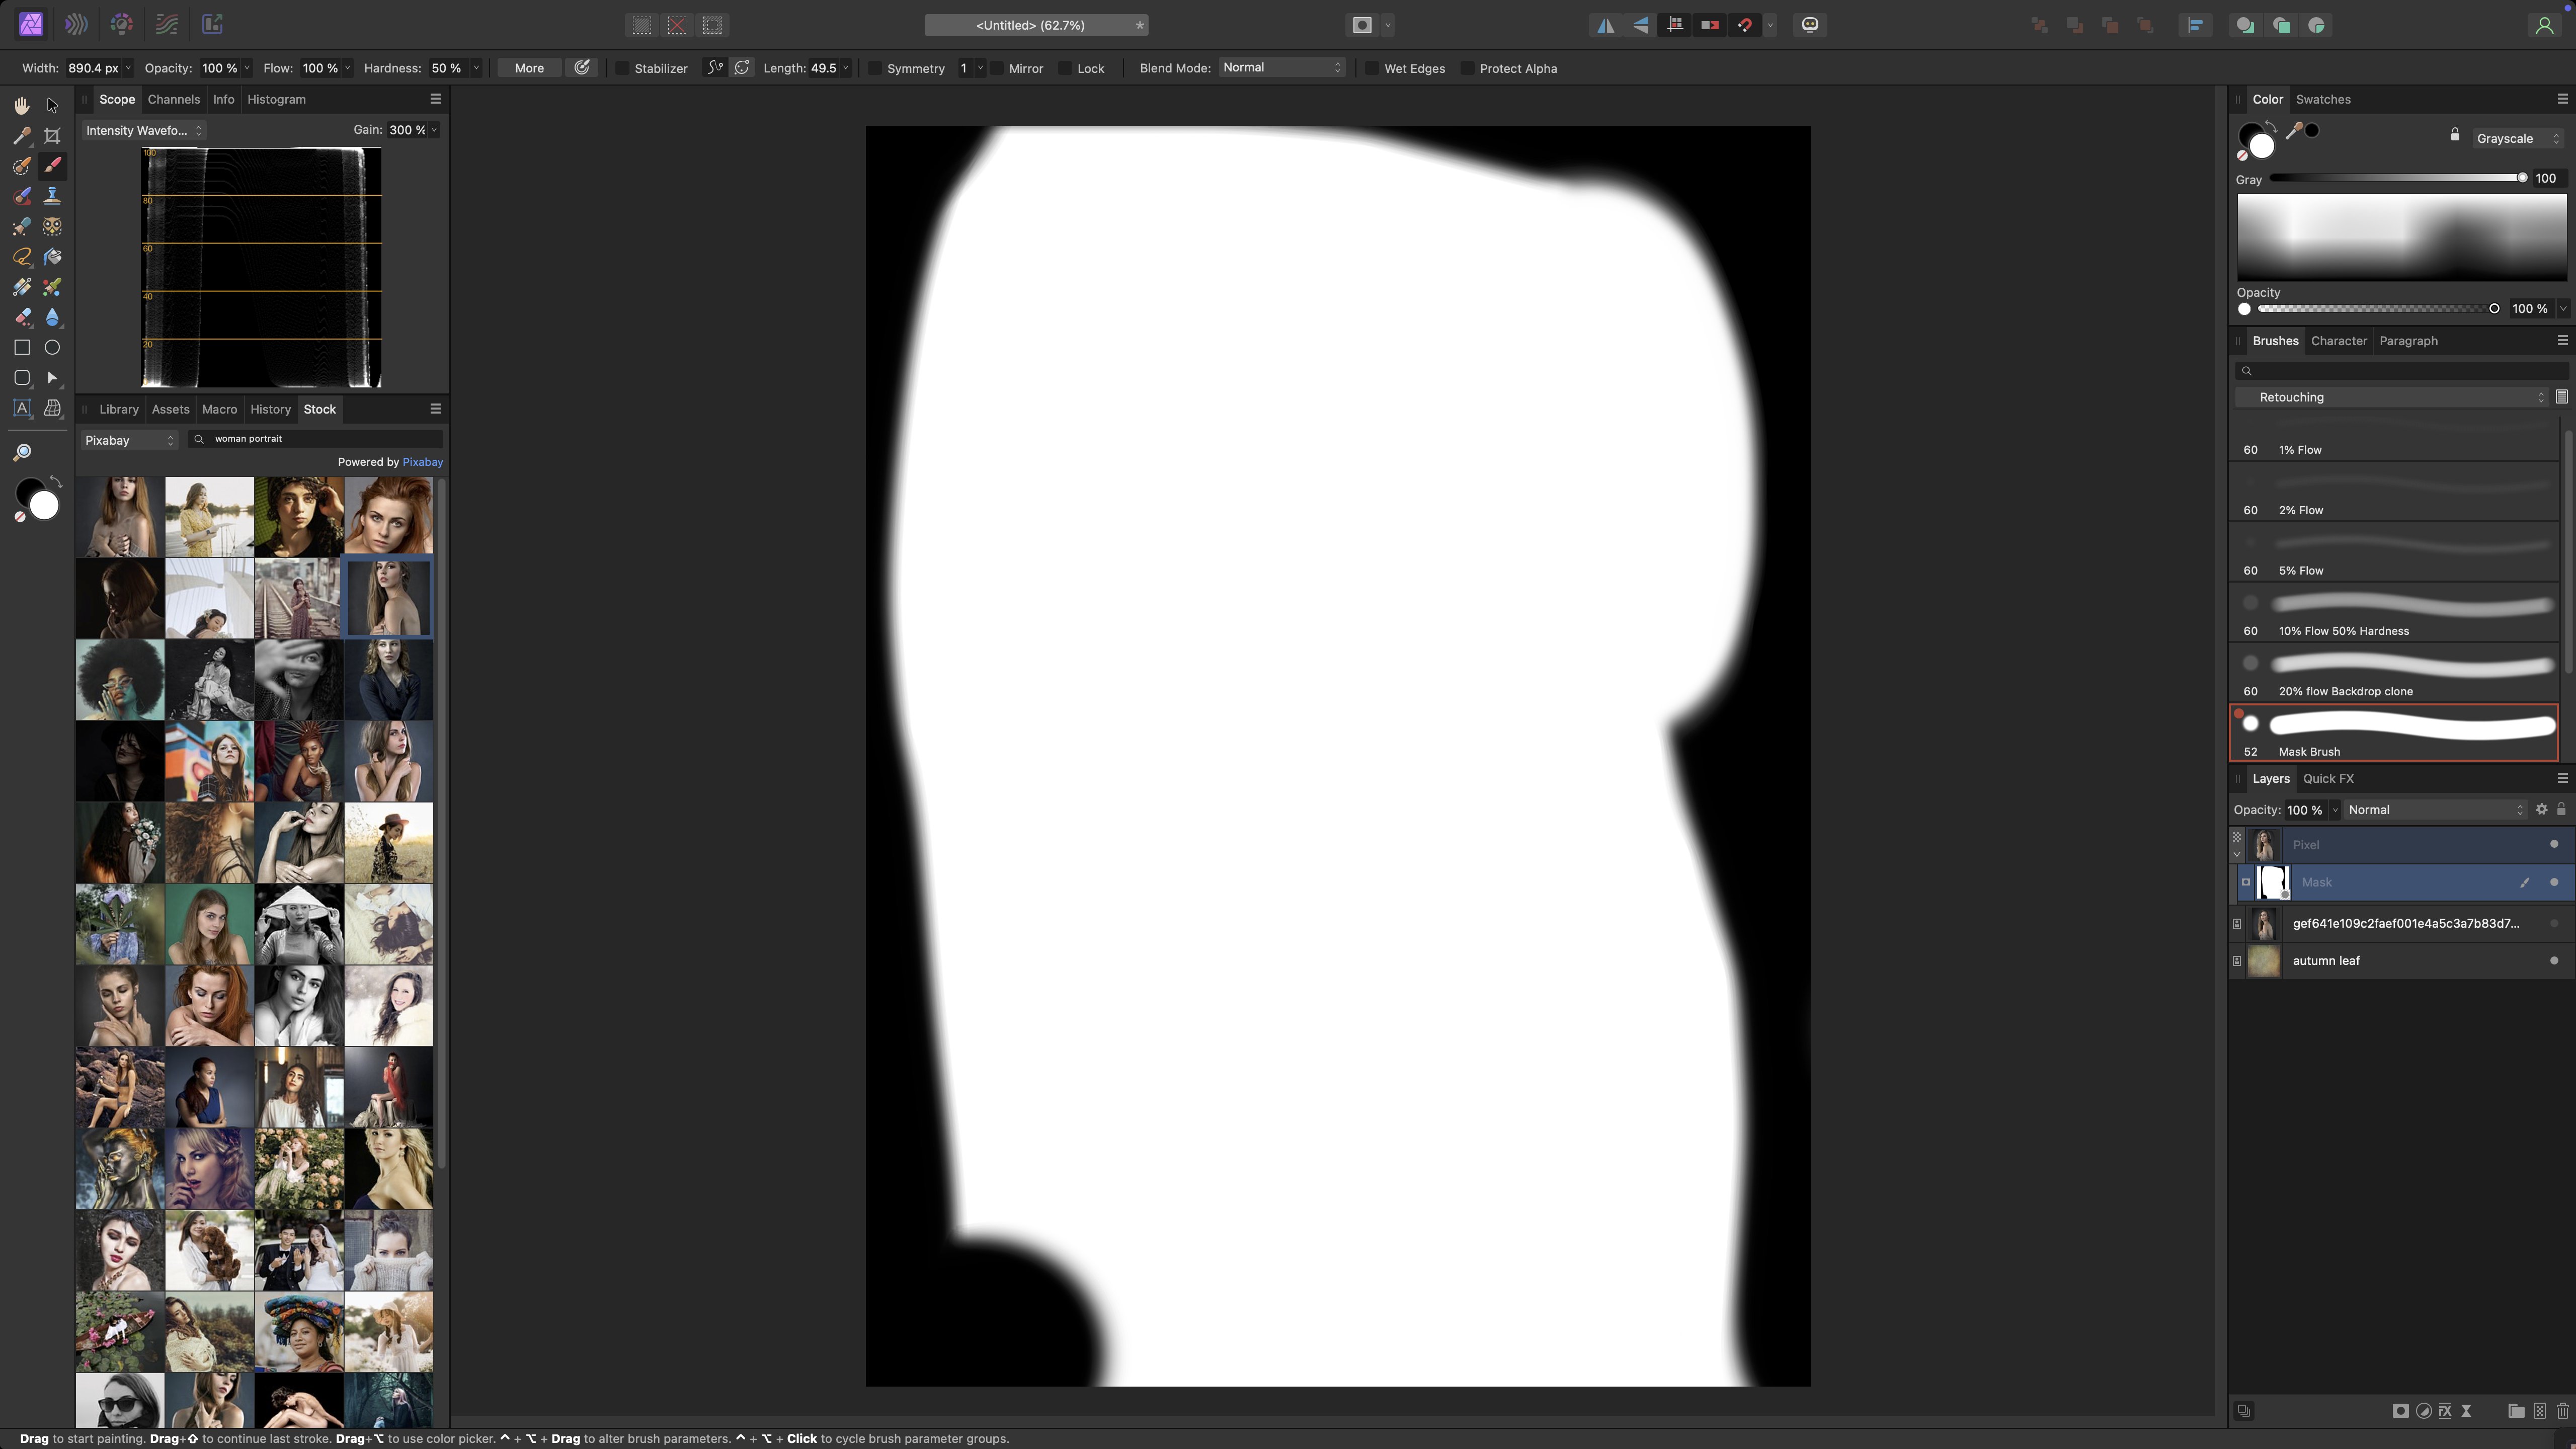
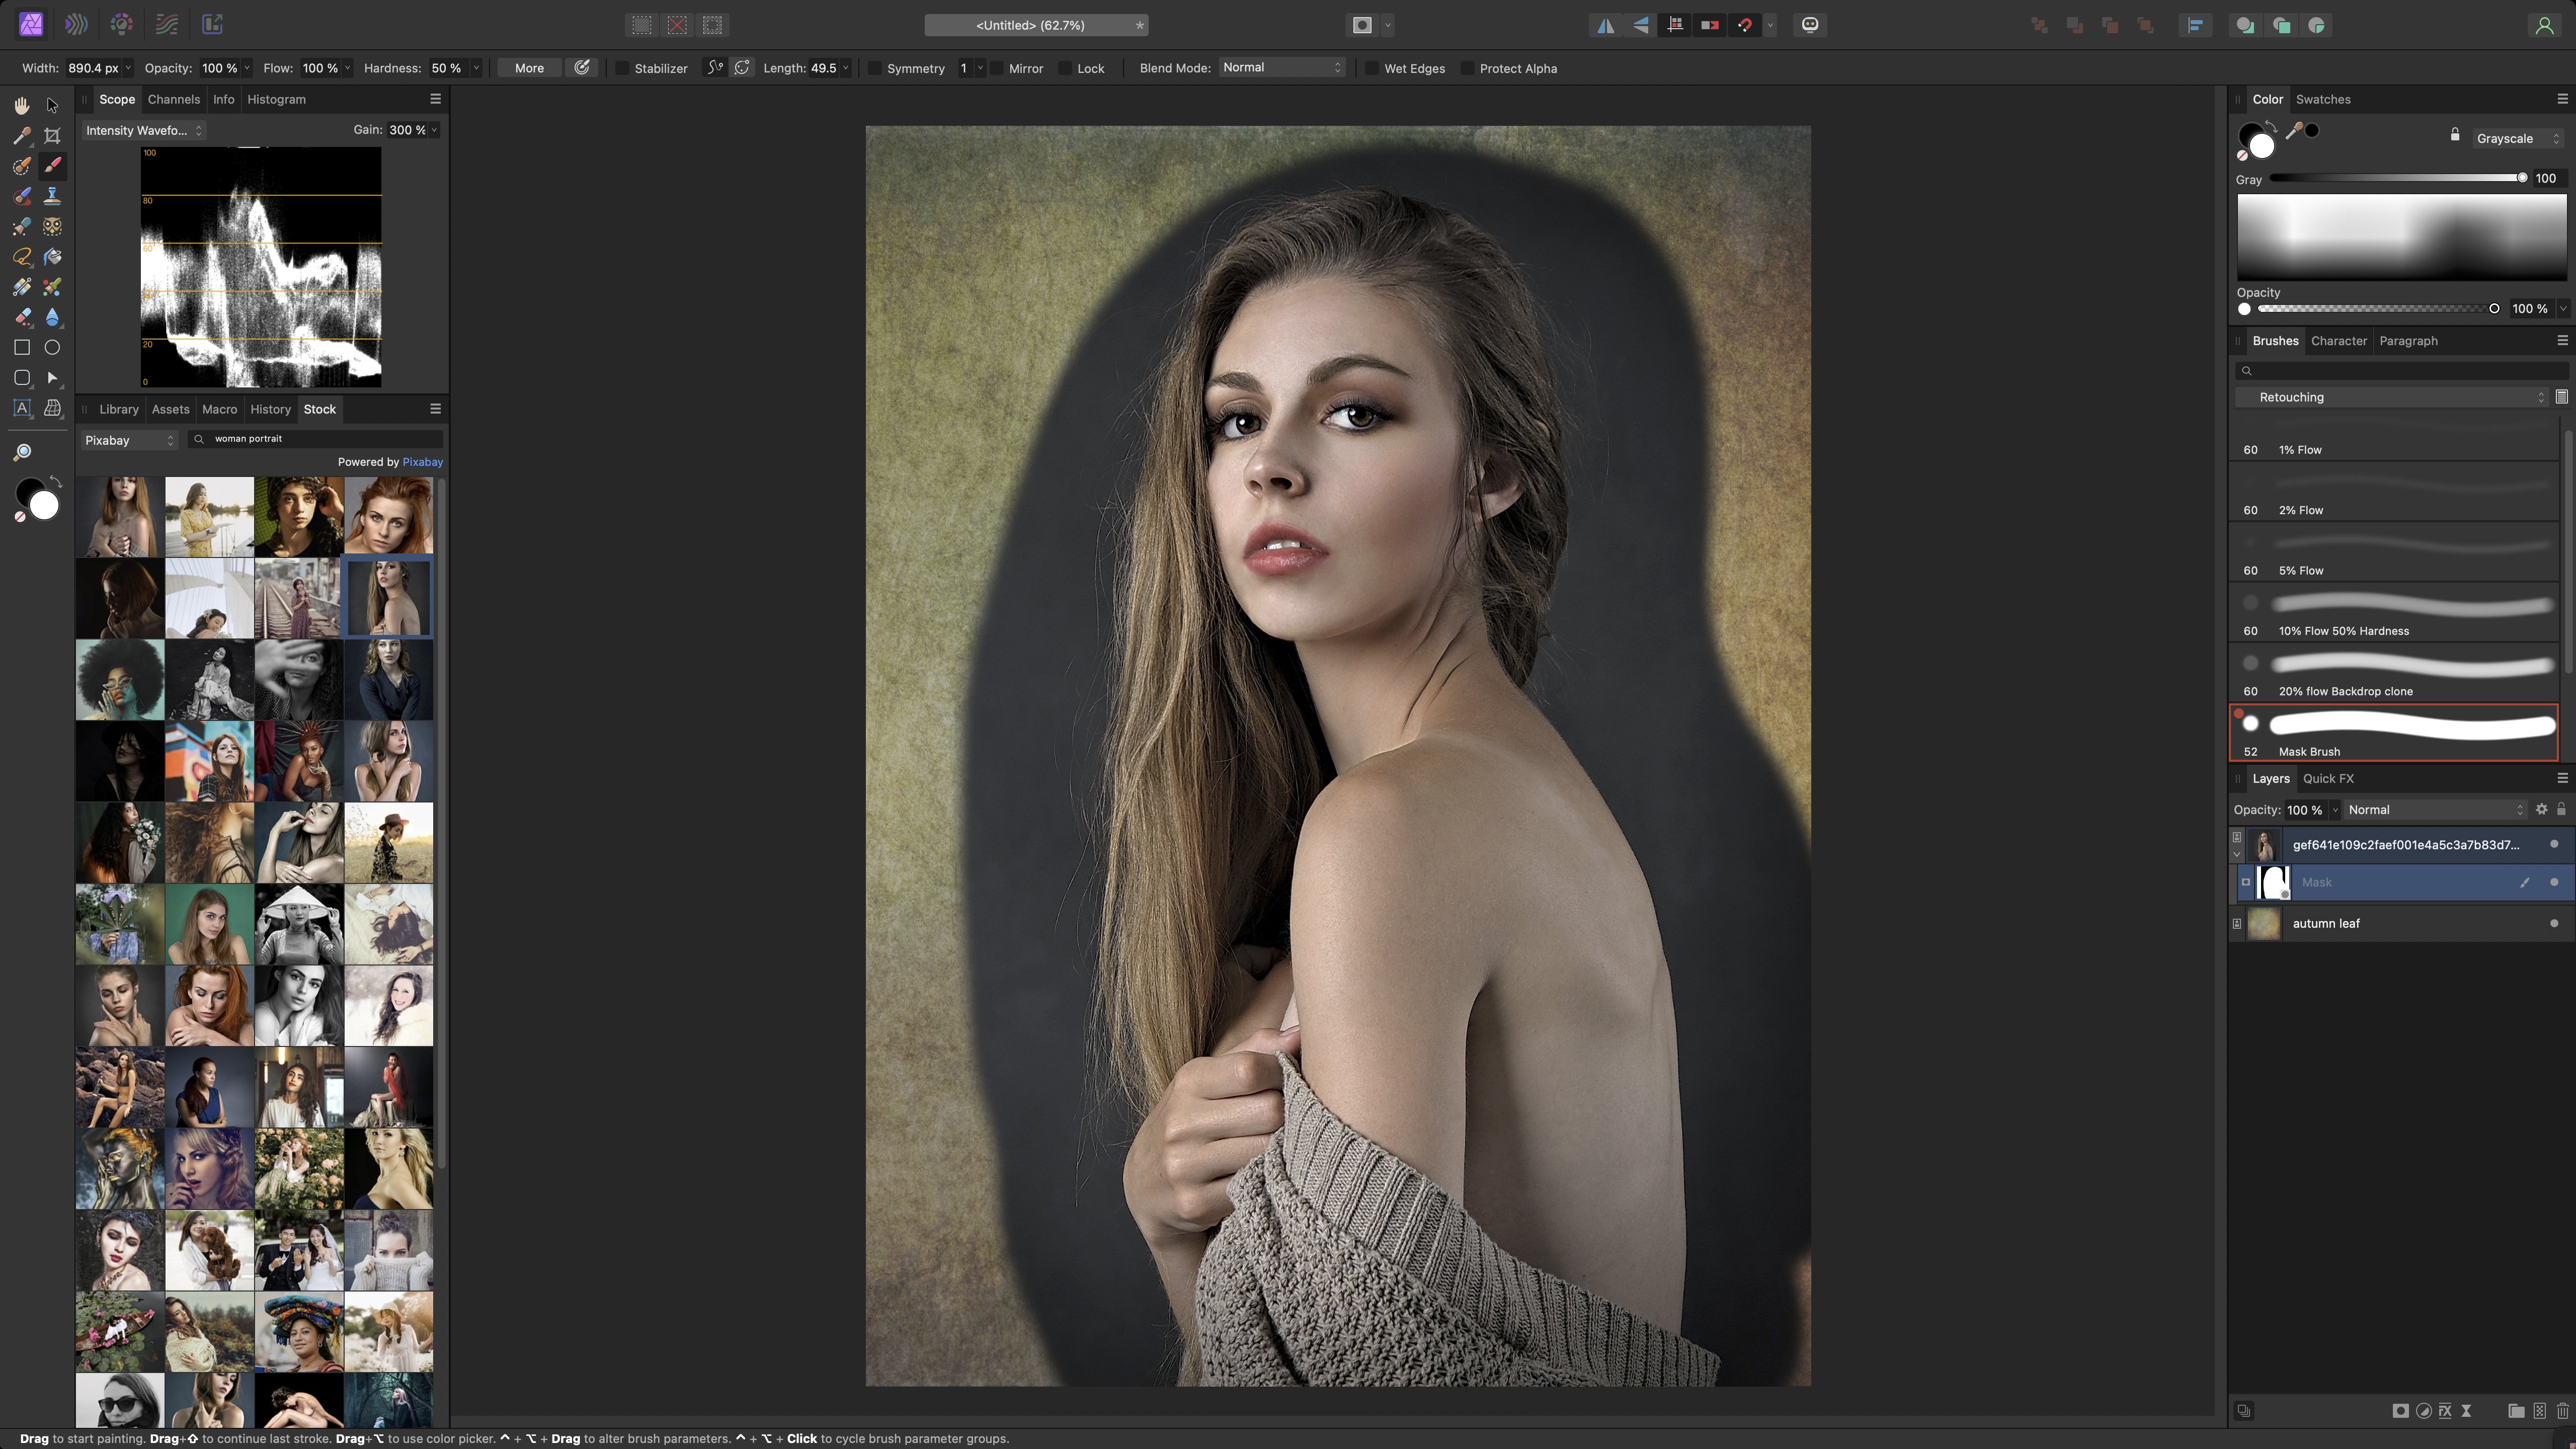
I've actually had this problem since V1 across two computers. When making a selection with either the selection brush tool, or the new subject selection tool, when refining the mask, if I choose "New layer with mask," if I paint with a white brush (on the mask to reveal the image below) it creates strange harsh edges around the original selection. Choosing the output as "New Layer with Mask" Now, if I paint with a white brush on the mask to bring back more of the original image, it creates these weird edges. But, if I just choose output as " Mask" if don't have the issue. I can repeat this issue every time, and I've never been able to resolve it. Running the most current version of both Affinity Photo and Mac OS. Like I mentioned, this has been an issue over the past 4 or 5 years across multiple versions.

-
I use the black Magic mouse and a wacom tablet.
-
I've have this issue everyone in awhile. Often times the brush preview will turn into the regular cursor. Often happens when switching to the move tool for example, then switching back to the brush tool. The brush preview will stay the arrow icon until I start painting, then it will show the brush preview. This has been a bug for a while unfortunately.
-
Yup. Exact same problem. M1 Studio Max, Ventura 13.2, Affinity Photo 2.0.4
-
No. On a Mac, you go to Settings->Accessibility->Pointer. You can change the colors and size of the mouse pointer.
-
Also, here is a short video showing the scroll bar. As you can see, the scroll setting is set to "When Scrolling" because in the brushes panel it shows up when I scroll, then disappears. Same with the Library panel. But the layers panel, always has the scroll bar present. Even after I scroll it doesn't disappear. Scroll bar ON.mov
-
Try making more layers in V1 that require scrolling. The scroll bar should show up. If I just have one layer the scroll bar doesn't appear. But once the number of layers exceed the height of the window, the scroll bar appears. At least in V1. In V2, it doesn't. That was my issue.
-
I don't know if maybe it's a bug, or a feature, but here is both apps open. And a screen shot of my scroll settings. My settings are set to "When scrolling." You can clearly see, that on V1, the scroll bar is (and always has been) present for me. Also, I'm not 'accidentally' scrolling to make the scroll bar show up. Once the layers go past the window height, the scroll bar appears. And as you can see from the brushes panel, even though I can scroll because there are more brushes, the scroll bar is not there. But (for some reason) it's always ON in the layers panel. But in V2, even when there are more layers, the scroll bar doesn't appear unless I scroll.
-
That's exactly what I thought, but in this case, Affinity photo V1 always had the scroll bar. I have both apps open right now, with my Mac settings to "Show scroll bars when scrolling" and there is no scroll bar in V2, but the scroll bar in always on in V2. But what I just noticed is, it's only the Layers Panel that the scroll bar is always on. The brush panel, the library panel, only show the scroll bar when you scroll. But in the Layers Panel, it's always on. That's why I thought it must be some Affinity setting, but I can't find anything. Here is a pic showing the scroll bar present in the Layers Panel, but no the other ones.
-
One thing I noticed in V2 is they removed the scroll bar always on in the studio. Especially in the layers panel, V1 always had the scroll bar on the right side on the layers panel. This is really useful for me because I use a pen, and it's a pain to scroll with the pen. So I liked in V1 the scroll bar was always next to the layers panel so I could use my pen to press the scroll bar to scroll up and down my layers. But in V2 the scroll bar only appears once you start scrolling. Which is annoying when using a pen. On a Mac, I have my scroll bar settings to "When scrolling" so they don't show up unless I'm scrolling. Which I like for a cleaner interface. And it sometimes causes issues when watching full screen videos as the scroll bar stays sometimes even in full screen. I looked in the settings, but couldn't find any option to keep the scroll bars present in V2. Anyone know if this is an option?
-
Well, it looks like the current version 2.0.3 seems to have fixed this issue. At least for me.
-
Same, but for every brush for me. Paint brush, clone stamp tool, inpainting, etc...
- 18 replies
-
- 1
-

-
- bug
- inpainting brush tool
- (and 1 more)
-
MacOS Ventura inpainting brush vanishes after use
Benergizer replied to JohnoGolfer's topic in V1 Bugs found on macOS
Same issue here after Venture update. Same with the normal brush tool. Sometimes its fine, and sometimes the circle brush icon will return to the mouse pointer icon. the will return to the brush icon after painting or increasing or decreasing the brush size. -
Thank you!
-
I have my increase/decrease brush size keys set to "F" and "G." They work for everything (brush, clone stand, inpainting brush, etc..) except the refine selection brush tool. In the keyboard shortcuts menu, I go to "refine selection tool" and manually set the increase/decrease brush size keys to "F" and "G." And they work fine until I close Affinity Photo. When I restart Affinity photo the keys (just for the refine selection tool) have reverted back to "[" and "[."
-
Thank you! Worked perfectly!
-
In-painting brush tool defaults
Benergizer replied to spacecat's topic in Feedback for Affinity Photo V1 on Desktop
I feel your pain! As a retoucher, I only use "current layer and below." You would think it was be as simple as just making it an option you can choose in the preferences. To be able to set the default behavior for each tool like the Clone Stand, Healing brush, In painting tool would be perfect. -
3 years ago I purchased (or got free through a promo, can't remember) the Dirk WÅstenhagen-Fine Art Texture Collection. In my Affinity profile, it shows the collection under my purchases. But it has the Affinity logo icon and store next to it. Clicking it takes my to the page showing all my purchases. I can re-download them, but this texture pack isn't set up to be used for assets. It's just 99 .jpeg files. So I can't access them through the Assets tab in Affinity photo. I know that I can open one of the files, then add it to a created asset category by "adding from selection," but I would have to do that for all 99 images, and it won't keep the file name, unless I manually re-name it. Is there a quick way to make an asset pack from a folder of images? I also have an older Uplift Epic skies Overlay pack that I would also like to add to the assets tab. Thank you.
-
low flow brush not reaching 100% opacity in center
Benergizer replied to Benergizer's topic in V1 Bugs found on macOS
Yes, I've definitely noticed that. I use the low flow with the clone stamp tool for portrait retouching, so the banding isn't an issue when doing skin. But it definitely becomes noticeable when I am removing hair fly-aways against a solid background. I've tried different ways to minimize it, but like you said changing to 16-bit it the only thing that makes it go away. -
low flow brush not reaching 100% opacity in center
Benergizer replied to Benergizer's topic in V1 Bugs found on macOS
That's very interesting. I always, assumes that with a low flow brush, the brush would eventually build itself up to 100% over time. But what you say makes sense. Each dab is only giving 2% flow, it's impossible for it to ever reach 100% because it's on;y ever giving a percentage of 100%. Kind of like halving a number, then continuing the half the result. You would never reach true 0%. I assume the same is for opacity then? if I have a brush set to 50%, it will never achieve true 100% opacity, because it's only ever putting down 50%. Make a lot of sense. Thank you. -
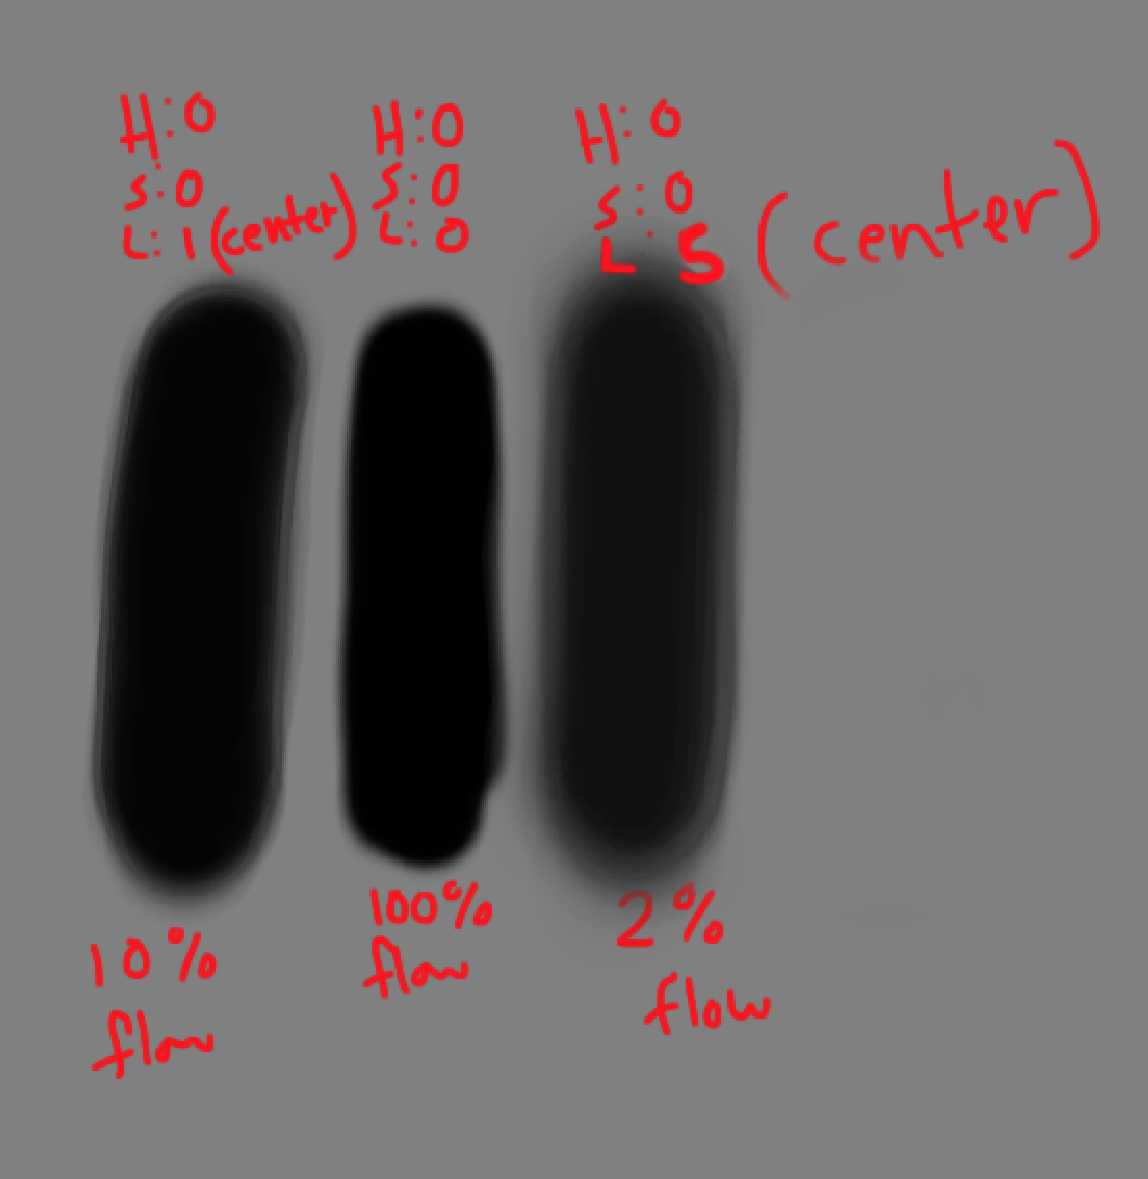
I was just playing with some brushes just now and came across something that I'm not sure is a feature or a bug. When using a brush with a very low flow (2%, 0% hardness) the brush never reaches full opacity. it looks like it does at one point, but as I continue to paint the inside starts to become lighter. I provided a picture using 100% black agaisnt a 50% gray background to give an example. For the 2% flow brush I repeatedly moved the brush up and down (without lifting it) until the value not longer changed. I'm not sure it this is the way it's supposed to work, or if it's a bug. Everything else is set to 100% (Opacity, accumulation, shape) spacing set to 5% with wet edges set to "don't set wet edges."
-
This just came up after working on a file for about an hour. The started randomly. Just moving the cursor around the screen would cause a graphic glitch trail. It goes away when you zoom in or out, but it didn't go away. I had to restart for it to correct itself. Not sure if I'll be able to reproduce it, as I'm not sure what exactly caused it. But I just thought I would put it out there. affinity_bug.mov
-
Photo 'Current Layer & Below'
Benergizer replied to keypix's topic in Feedback for Affinity Photo V1 on Desktop
For me, I don't understand why only the inpainting tool always defaults back to current layer only. The healing brush and clone stamp tool don't. I'm sure there was a reason for this decision for this, but I at least wish we had an option to have it stay or default back to current layer only. -
Great. That would be a nice feature. Thank you for your time! Loving the beta so far. The performance increase is amazing! great work!