vr8ce
-
Posts
9 -
Joined
-
Last visited
Recent Profile Visitors
378 profile views


-
Yeah, I need to use the font shown. Rectangles it is. Thanks!
-
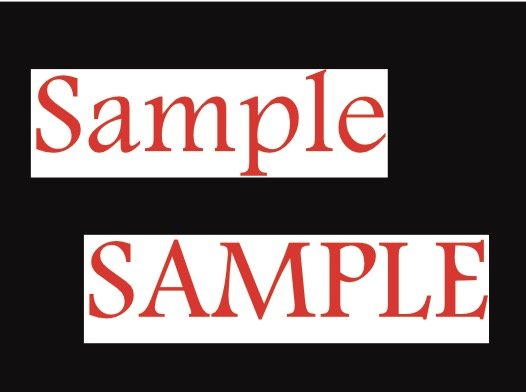
The background color for text is positioned to work with ascenders and descenders, i.e. for mixed-case text. It looks great with mixed-case, but not for all-caps. I have some instances where I need to use all-caps text, and it looks off with a background color (because it is). (See attached picture.) I've played with all of the various controls on Character and Paragraph, and I don't see anything that lets us control that. Is that the case, i.e. is there anyway to control the positioning of the background color (or the text within the background block)? If not, I assume I'm going to have to turn off background color, draw another white rectangle and put the text on top of it. I'm just hoping to not have to do that much work for all the places I need to do this. Thanks!

-
Yep, Studio was it. How obvious… (sarcasm alert) Thank you very much! (Everything on the Default menu was greyed out until I opened a file, unlike Studio, which displayed the box immediately even without a file loaded.)
-
Designer 1.6.1 on OSX 10.14.2. I accidentally hit Tab while I was working. I didn't know what I'd hit at the time, and I didn't know what Tab did, either, so it took me several minutes to figure out what the heck happened. When I finally did and hit Tab again, most everything came back. What didn't come back are the Character/Paragraph "boxes" (don't know the technical term), and I can't get them to reappear. I've clicked the Character button on the context toolbar, I've chosen "Show Character" from the Text Menu, I've used the Cmd-T shortcut, but it will not appear. I've quite and re-started the program. How do I get them to reappear?
-
@v_kyr, Thanks for the pointer (which ended up showing yet more problems with the built-in Designer Help), but no, that doesn't contain the "rules". It says nothing the two things most pertinent to this conversation, which I pointed out in my reply to @gdenby: It doesn't say anything about the differences in caps, specifically between butt and square. It doesn't say anything about the caps taking up the equivalent of a line width. Those were the two major things missing from the tutorial, and they're also missing from the documentation, and they're why I couldn't figure out the answer to my question without help from here. And for the next problem: Searching Designer Help within the (Mac) app for "Stroke Panel" yields an entry, but clicking it takes you to the main help screen, not the section on the Stroke Panel. In fact, clicking on any of the entries in the attached "Stroke Panel search" picture, i.e. Stroke Panel through Move Tool, takes you back to that main screen. Rendering the built-in help essentially useless. I had to click on several of the items on the left until I finally landed on where it is (Workspace/Panels/Stroke Panel). Serif needs to pay a lot more attention to their documentation (like get it working, to start with).
-
 vr8ce reacted to a post in a topic:
Special kind of dashed-line in Designer
vr8ce reacted to a post in a topic:
Special kind of dashed-line in Designer
-
@gdenby, Most important thing first — thank you! That is perfect. I really appreciate it. But that is the opposite of easy. It's only easy if you 1) Have access to the information, and 2) Can make sense of the information. I don't know where the "rules" are, but I haven't been able to find them. Searching the program help for "dash" turns up a big bag of nothing. The Dashed line tutorial mentions nothing about the caps taking up a unit. I have found at least two more posts here from people asking similar types of questions about dashed lines, because the current method is durn near imcomprehensible. It makes zero sense that a first unit of 1 (as in a non-zero number) and a square cap results on no dash. It makes even less sense that a first unit of 0 (zero!) and a second unit of 2 results in a square dash. What? You know what should result in a square dash like I want? A first unit of 1 and a second unit of 1. According to the tutorial, that should work. But when I tried it before I posted here, it resulted in a solid line! What?! Of course, unbeknownst to me, the square cap was set, either by default, or by something else I inadvertently did long ago, that was carried forward onto the line I tried. Did I mention the tutorial makes no mention at all of the caps and how they impact the length of the dash? Now knowing that, I just now tried it, changing the square cap to a butt cap, then lo and behold, it worked. So I wasn't persistent enough in my playing with it, my bad. And 1 and 1 and a butt cap makes a lot more sense to me (meaning I will remember it in a few months when I look at this again ) then 0 and 2 and a square cap. (And what is the difference between a butt cap and a square cap? I have no idea, and I don't see that information anywhere, either. (I don't need an answer to that, the point is the documentation is sorely lacking.)) The point here, again, is that this is far from easy, and that's because Serif has provided far too little documentation on this (that I've been able to find, anyway). Serif needs to fix that, along with several other things related to dashed lines. (Control over start/ending, etc.) But, thank you again for your help, I now know a couple of extra pieces of information, and I have a perfectly formed square dash line! @JimmyJack Right, see above. Having been armed with the information that the caps take up space, I changed it to 1 and 1 with a butt cap, and it produced the same line. Still don't know what the difference between the caps are, but it works and produces the line I want and I'm happy.
-
(My apologies if this is a basic question; I am not an artist, and I don't have much experience with programs like Designer. I did watch the line tutorials, and none of them addressed what I am trying to accomplish. I also tried a few web searches, and apparently don't know the right words or phrases for what I'm trying to do.) I want to create what looks like a dashed curved line, but with alternating black and white squares (same length as the line's stroke width). The smallest dash line setting (1) is still longer than it is wide, so I don't see a way to make a dashed line work. (Feature Request: Rather than numbers that don't really mean anything, the dashed line settings would be a lot more useful as raw lengths, i.e. specified in the same manner as stroke width.) Imagine I have a 1.5pt stroke black line. I want the line to be alternating black squares of 1.5pt by 1.5pt and white squares of 1.5pt by 1.5pt. I want to whole thing to be easily editable and modifiable, which is why I was hoping a dashed line would work. Is there a relatively easy way to do this? (And maybe a line isn't even the best way to do this; that was just my first thought because I can make it the right width and put it on a curve.) Many thanks in advance!
-
Using AP 1.5.1 with Lightroom 6.8 on OSX 10.11.6. When setting AP as an external editor with LR, what is the preferred file format — TIFF or PSD? PSD sounds like the obvious choice, but there were issues with using it prior to AP 1.5.1. I've watched the new video on PSD round-tripping, but it just addresses the AP preferences, not the LR ones. Thanks!