LCamachoDesign
-
Posts
367 -
Joined
-
Last visited
Everything posted by LCamachoDesign
-
I don't really have any other information about this other than the title. Sometimes loading displacement maps work, others it causes the app to crash instantaneously. I'm making my own maps using the same technique for all and saving in the same format, TIFF 8bit greyscale. No point in attaching the files that cause crashes since it seems to happen at random, sometimes the exact same files crash the app while other times it works just fine. I have however attached the latest crash report, which happened with a displacement map. It might help narrow down the cause. Thanks! EDIT: I was just fiddling around and it seems like saving the displacement maps as JPEG instead of TIFF reduces the amount of crashes. Might just be a coincident too. f831d2b6-6567-487b-9d67-b5a32cddc877.dmp attachment_Log.txt
-
Mesh Warp Live Filter Please
LCamachoDesign replied to Mark Oehlschlager's topic in Feedback for Affinity Photo V1 on Desktop
Photoshop has, as of version 22.5, a warp mesh of nearly the same functionality as Affinity Photo. Nearly because it's still weird to convert anchor points to sharp (Alt+click), and the handles are still tiny and heard to see. But it's getting there. Photo's is still better and easier to use, it just needs to be live rather than pixel. -
I've bumped into another situation related to this. Opened a PNG image, added some vector elements, saved as AFPHOTO. Upon reload the pixel image is blurred, but the vectors are sharp. I've done the layer nudging thing, the pixel layer looks fine, save and reload again... the pixel layer is blurry again. It seems like the layer nudging trick doesn't always work? I don't know if it's related to having vector content. Perhaps related to this, unlike the tests I've demonstrated above, nudging and saving does not increase this particular file size, it's always about 7Mb. I can't post the file since it's client work, but it's another bit of information to try and look into what's causing this. EDIT: Ok, this is getting pretty absurd. Check this out: Do steps 1 to 4 of my first post. Blurry as expected, file size about 9.8Mb Unlock the layer, nudge once to the left, and once to the right, so the image is back in the place, save and close Check the file size, it's still around 9.8 Mb, and still blurry if you open Nudge just once to the left, so the image is one pixel to the left, save and close Image size is now 17.4 Mb ??? (and no, I'm not saving the history) Image no longer blurry on open What is going on??
-
I'd say the content of the file, not so much the pixel content, but rather some form of metadata, is interfering with that process. Otherwise it's hard to explain why the same image, saved in the same format, but in different ways, causes different render results. In any case, I think Serif was enough information in this thread to replicate the issue on their end and see what actually going on. One last step by step bug hunt: Download my image, do the steps 1 to 4 of my first post. Create a new image that's larger than my image, for example, 5000 x 4000 Drag and drop the blurry AFPHOTO file into this new document Center it, and set the size to 100% using the context toolbar Notice it still looks blurry anyway Doing the layer nudge trick to the embedded document layer changes nothing Double clicking the embedded document, and doing the nudge to the source layer does fix both that and the embedded blurriness Not sure if this adds much, but it's another thing to look at. Thanks!
-
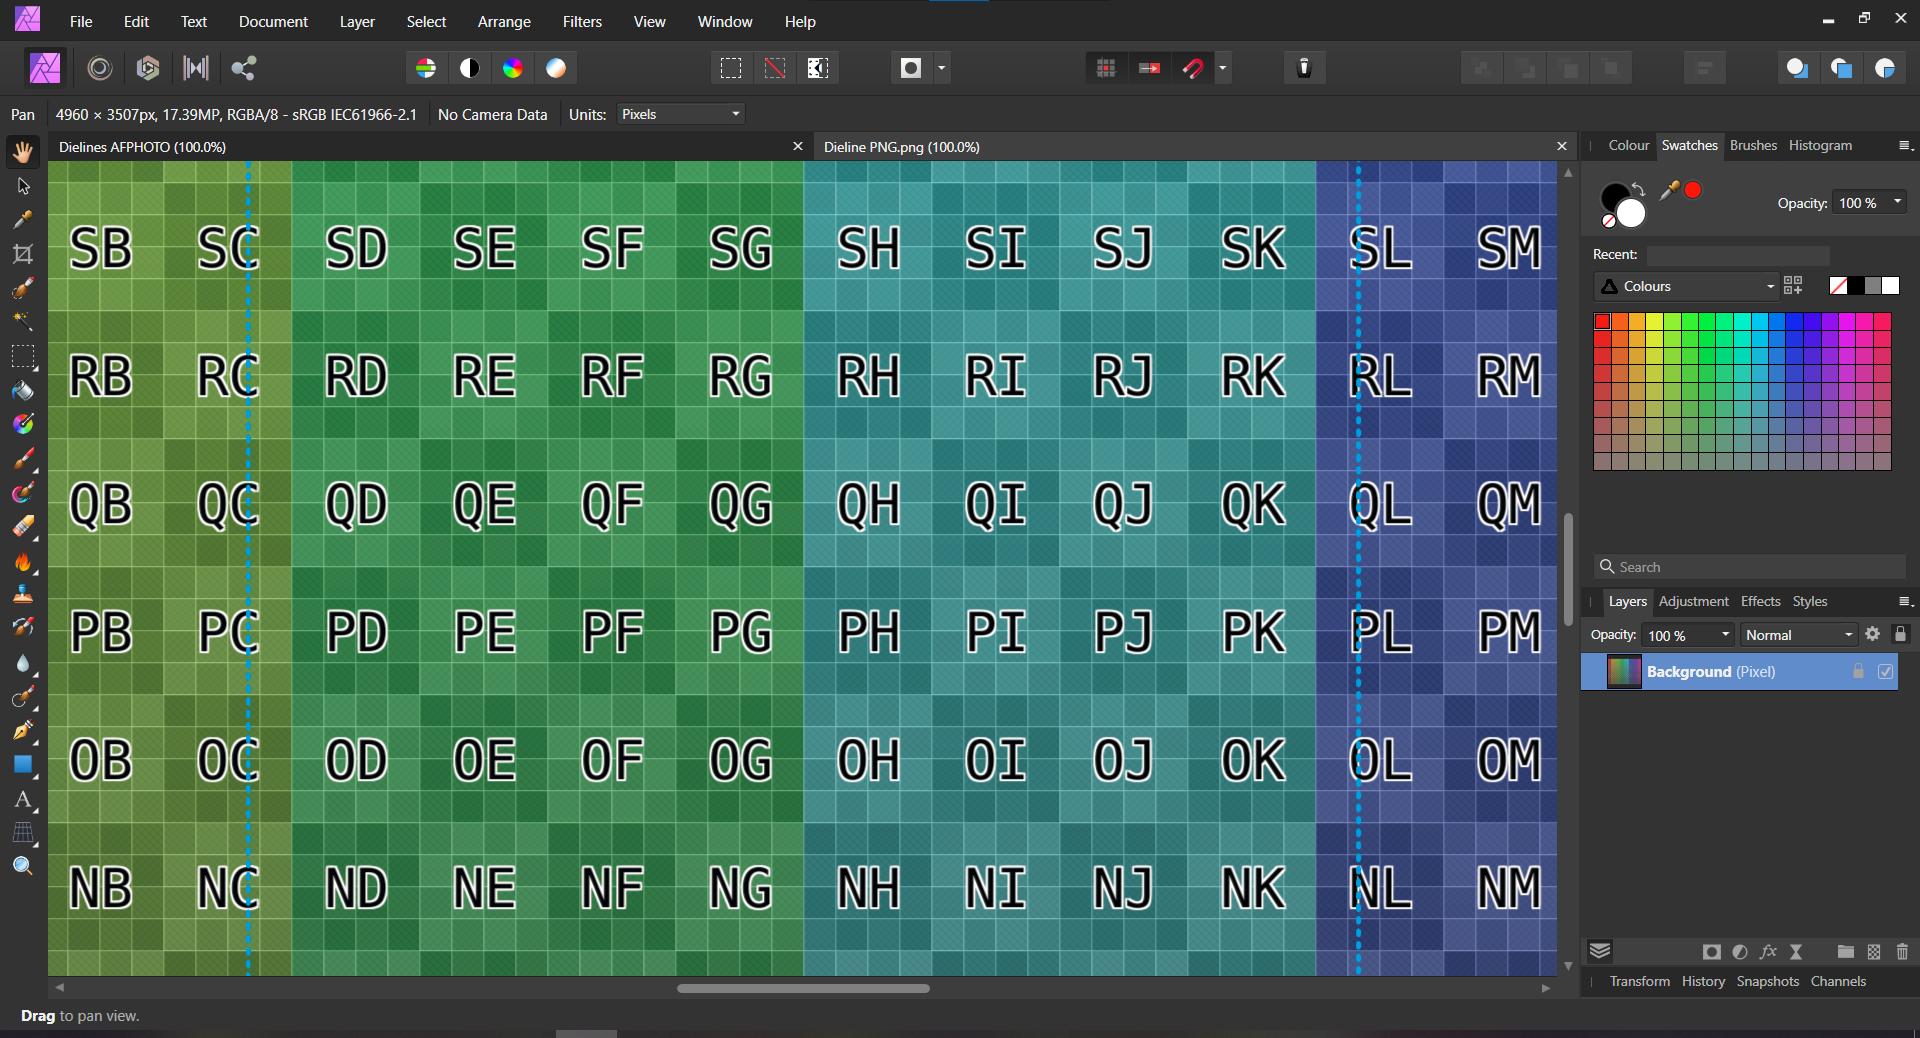
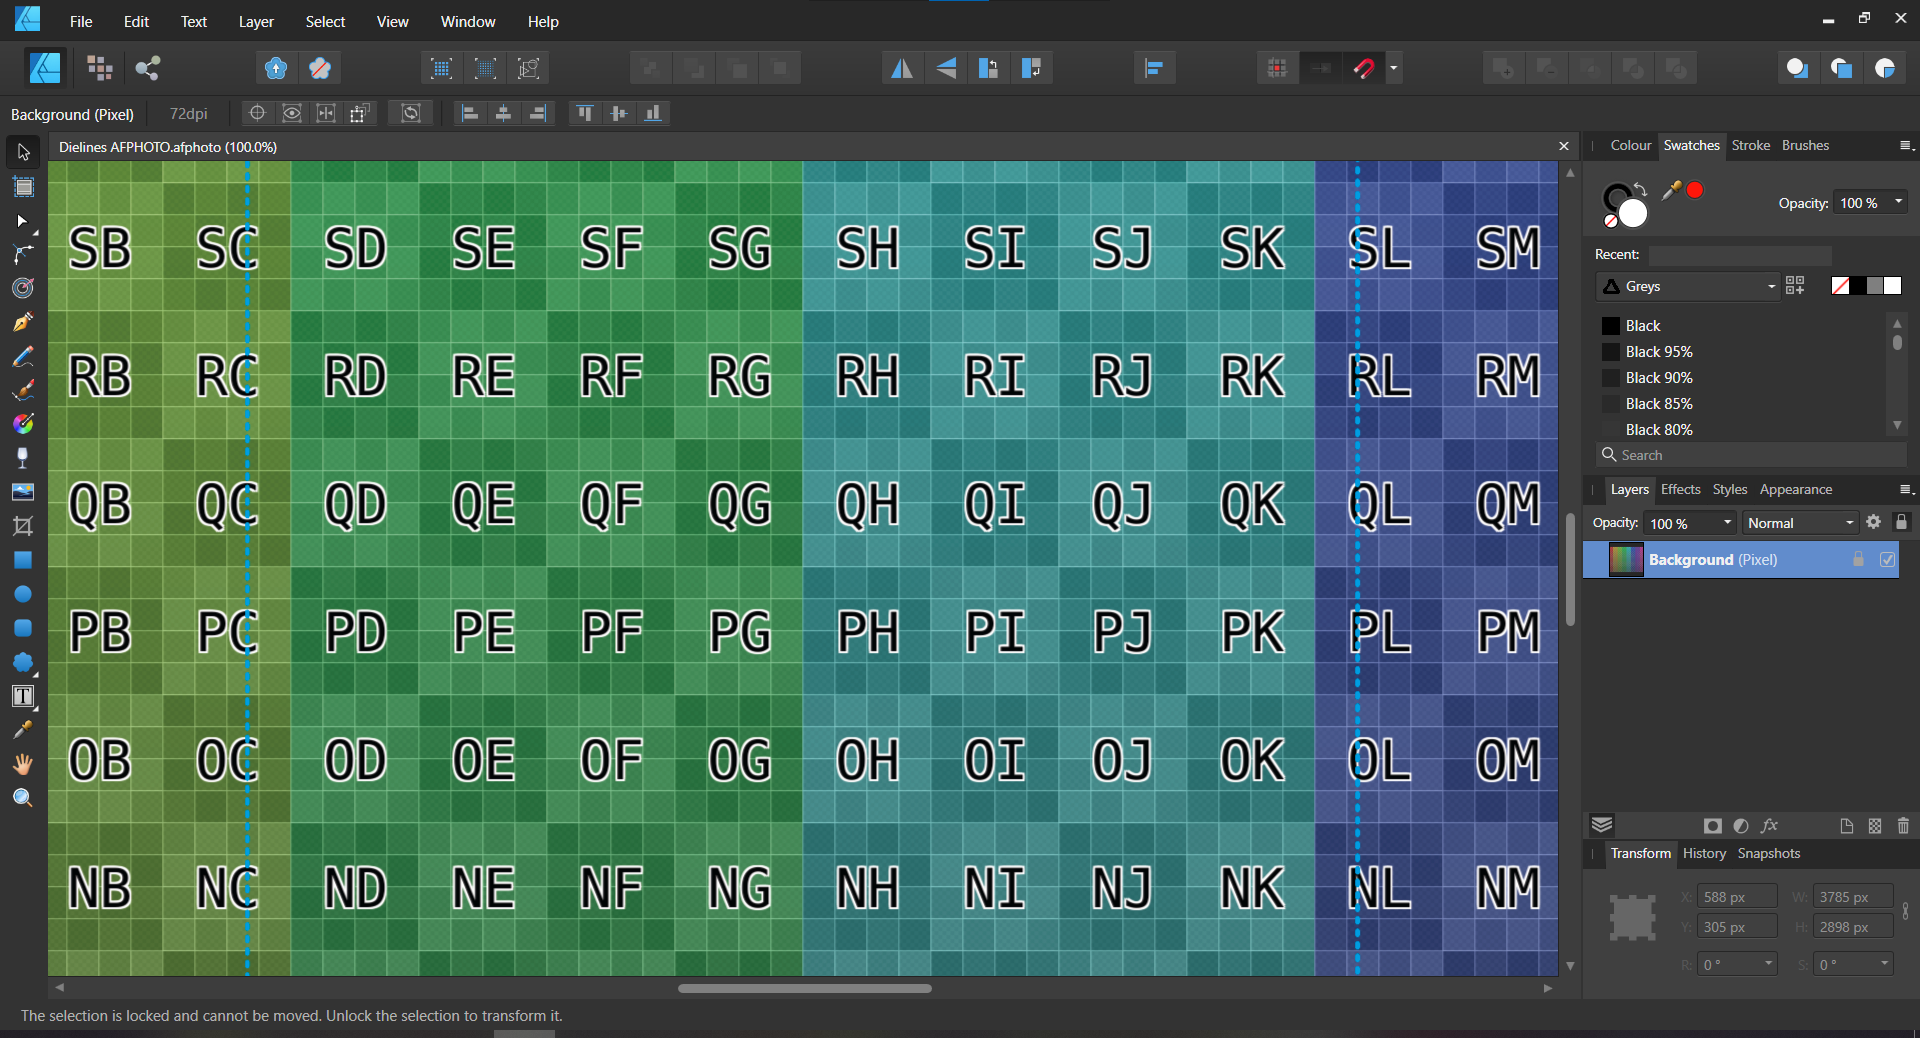
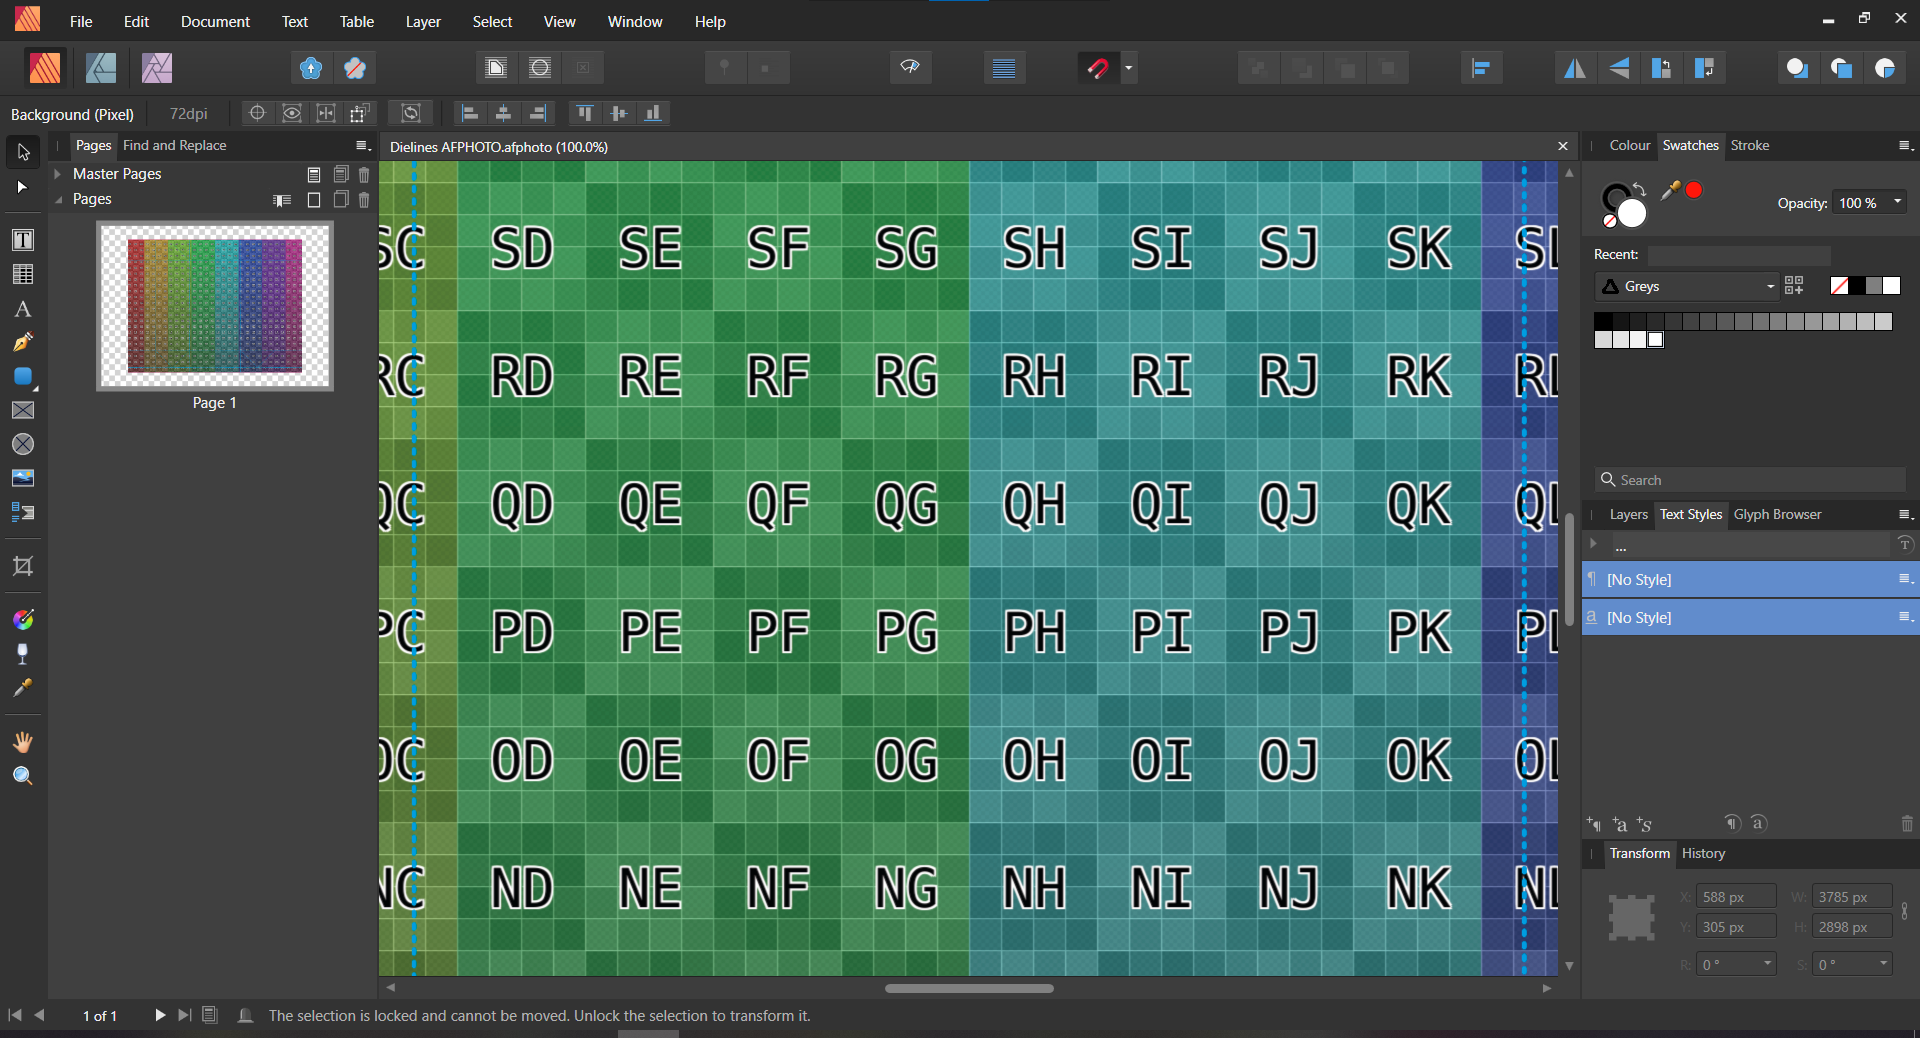
Oh wow... this is crazy! Check this out! I'm reattaching my dielines image as a zip file, so the forum doesn't mess with it and you can also try these steps with me. For Affinity Photo: Download my zip file, extract the image and use it for the next step. Not because it's a special image, but it's easier to see the artefacts, and we can compare a few things below. Do the steps 1 to 4 of my initial post. The image gets blurry as know, do no not close the file just yet. But look at the AFPHOTO file size. It's 9,18 MB (9 634 488 bytes) for me. Now unlock the layer, and move it a bit with the Move tool. The image is suddenly sharp again! Amazing! Gets better, now save the file again. Just Ctrl + S. You can close the file now. Check the AFPHOTO file size, it's now 17,4 MB (18 330 913 bytes) for me. It nearly doubled! Reopen the file again... yes, you guessed it. The file looks sharp from the start now! And I can't get it to look blurry anymore. Now for Affinity Designer: Download my zip file, extract the image and use it for the next step. Do just the steps 1 and 2 of my initial post on Affinity Photo. Repeatedly open and close this file on Affinity Designer Most of the times you get a sharp file, but sometimes it does get blurry! But in Affinity Designer, zooming to 200% and then back to 100% seems to always solve it, while on Photo the only solution is to nudge the layer. If you do get the blurry image, do to the unlock and nudge layer, and save it (Ctrl + S), the file size is bumped to 24,7 MB (25 993 976 bytes)! Now, no matter how many times you open the file, I can't get it to be blurry again on both apps. Bonus round for those of you that have an iPad: Download my zip on the iPad, extract image. Do the steps 1 to 4 of my initial post. Check the size of the AFPHOTO file created by the iPad, for me it's 8,95 MB (9 394 671 bytes), a bit smaller than the first "revision" created by Windows. Open the file on Affinity Photo on Windows. File looks sharp even though is still the small size. Still on Affinity Photo Windows, move the layer around a bit, save the file and close it. File size bumped to 11,7 MB (12 331 292 bytes) for me. Reopen the file. Still looks sharp. Extra extra bonus: if you take the 17Mb of step 5 of my "For Affinity Photo" section above, and save a copy on the iPad, the file size will remain. It will not shrink back to 8Mb. Well, I don't know what to say anymore. The more we poke, the obvious it becomes there's something wrong with how saving files is working. EDIT: This keeps getting stranger and stranger. The steps below are for Affinity Photo Windows: Download the zip file and extract it Notice my image dimensions, it's 4961 x 3508 px Create a new Affinity Photo file with those dimensions Drag and drop my image onto the new file, center it so it fits the canvas, and rasterize the layer Save this file as AFPHOTO, close it Notice the file size, it's 8,96 MB (9 400 848 bytes) for me. Nearly the same as the iPad files. This file is also sharp every single time. Dieline Guides.zip
-
Thanks for helping everyone, but I feel you're taking this in the wrong direction. This is a simpler problem than what you're making it to be, no need to fiddle blending modes or what not. I'm going to reiterate a few points, and add a couple more to help narrow down the issue. There's nothing wrong with the pixel contents of the AFPHOTO file, no need to test this. This is clear, opening the file in Affinity Designer or Publisher shows the contents in a sharp way, as expected. Also, as noted by @Komatös copy pasting the layer to a new file shows the contents sharply. It's not related to white colour at all. You can see the blue and purple lines on the image also look pixelated. And as I've mentioned, this issue happens with any image, not just this one. Try with something else without white and you get the same results. It's also unrelated to the renderer, at least in general. Otherwise all files would exhibit this, not just raster files resaved as AFPHOTO. New information: This is unrelated to hardware or drivers, I've opened the files in my Surface Pro and the same issue happens. My desktop is AMD/Nvidia, the Surface is Intel/Intel. If I open the file saved with Windows Affinity Photo on my iPad Affinity Photo, the file also looks blurry. Further cementing this is unrelated to hardware. If I create the AFPHOTO file on the iPad by following the steps 1 to 4 of my first post, the file will render correctly on the iPad, and it will also render correctly on Windows. With the above new information I think it's becoming clear there's some sort of issue with the Windows build when saving raster images as AFPHOTO files. There's no damage to the pixel contents, but it seems like there's some error when saving so sort of metadata. I feel like a "divide by two" typo slipped in somewhere on the code. At least there's no damage to the pixel contents, and it's limited to Windows (can't say anything about macOS, but if iPadOS is any indication, it should be fine). Thanks!
-
You need to click on the image on the topic to open a full screen view, then you can try to save that image into your computer. Otherwise you're actually just saving a smaller thumbnail generated by the forum.
-
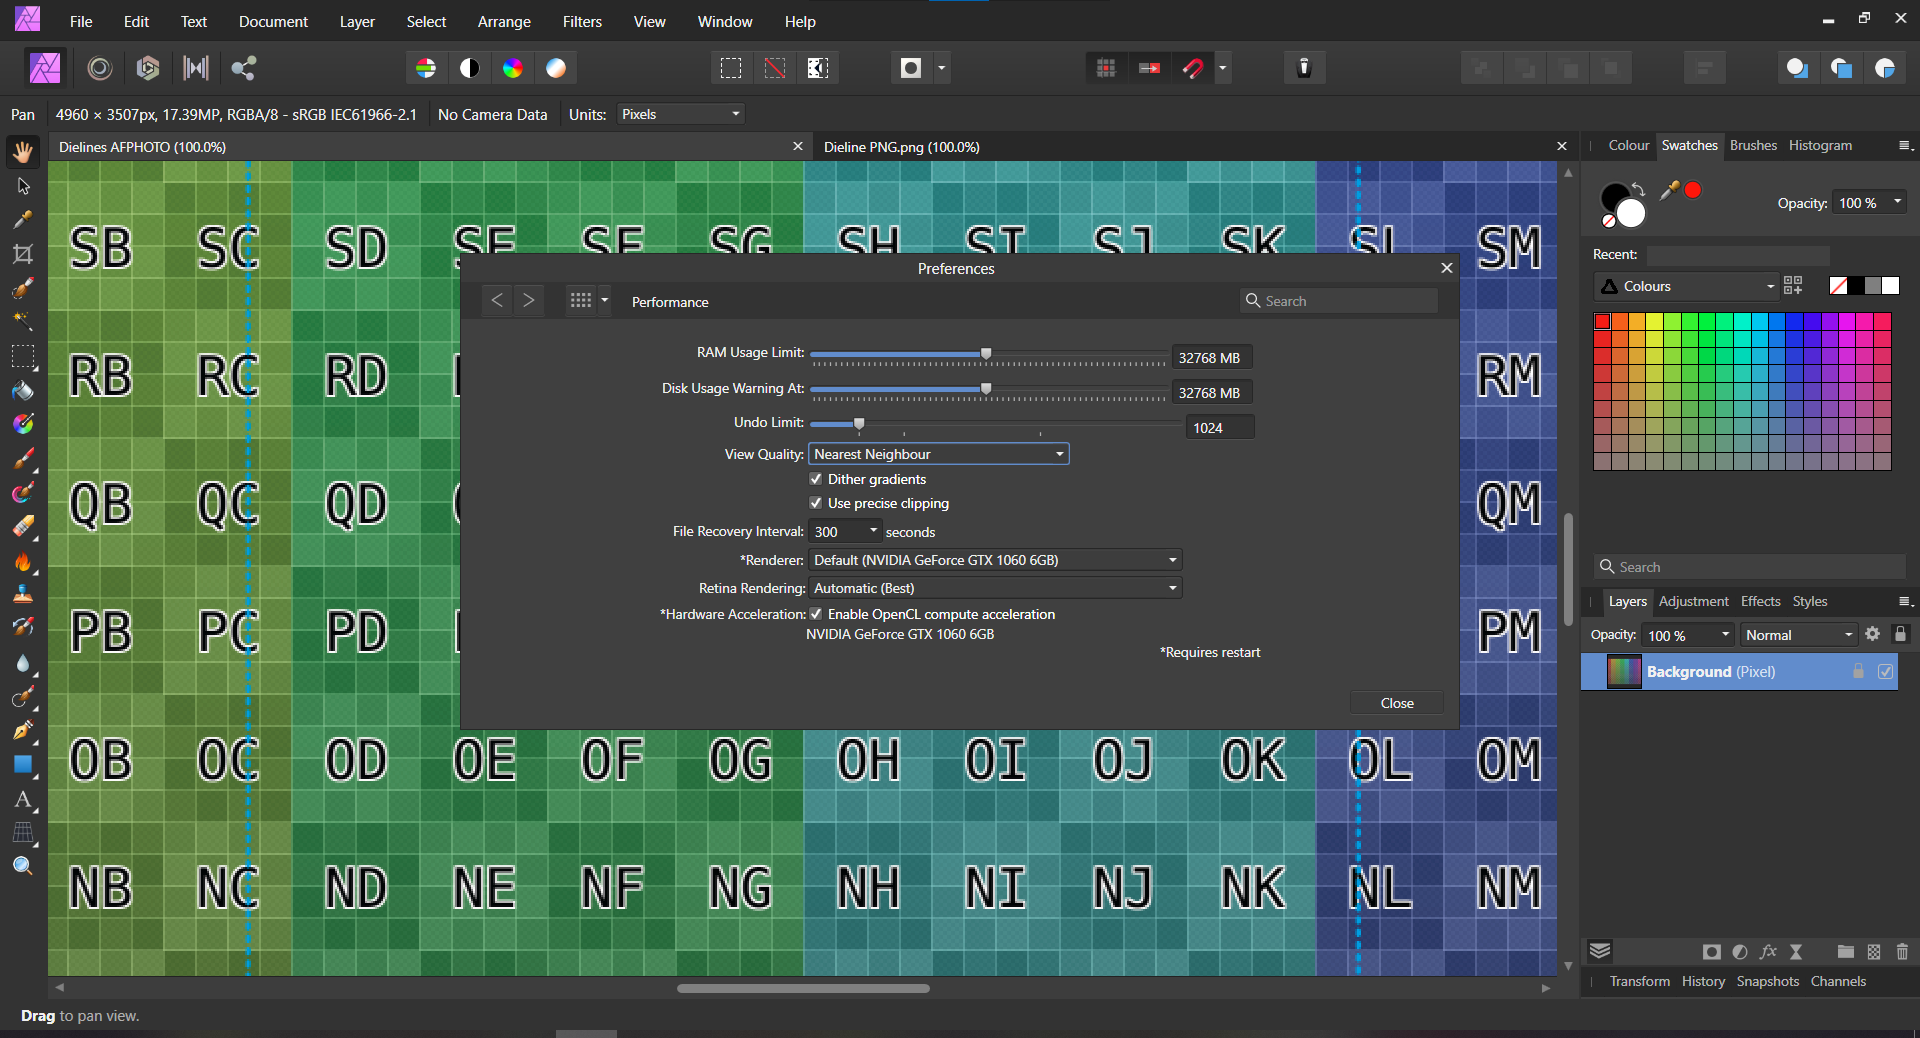
I've noticed that any image I save as a native AFPHOTO file will render blurry when read back in. EDIT: More info on the steps to reproduce Steps to reproduce: Open an image in Photo, any raster image (png, jpeg) seems to work, but images with sharp lines are easier to notice Save as AFPHOTO as you normally would Close the file, reopen it again Notice the image is blurry when compared to the original, and then close the file Use File -> New to create a new image file, any image file seems to work, but let's go with Web -> QFHD resolution Drag the same file from step 1 into the document, rasterize the layer so it's a 1 on 1 comparison with above, so there's no doubts Save the file as AFPHOTO and close it Reopen the file just created, notice the image is sharp and working as expected Seems like Photo is storing something, like the DPI scale, incorrectly when saving a raster image into APHOTO files? Stranger still, I don't think the files are damaged at all. If you open the AFPHOTO file in Affinity Designer or Publisher, it looks normal and sharp. So this is something limited to Affinity Photo's render. Changing the Renderer to WARP or disabling OpenCL does not solve the issue. I did notice something odd though. If you change the View Quality to Nearest Neighbour the AFPHOTO file will look pixelated, this shouldn't be happening. Indeed if I swap back to the PNG version of the image, even with Nearest Neighbour the image looks sharp, as it should. Feels like there's some sort of internal error on the app itself, as if it's rendering the file internally at... half the resolution I'd guess? Let me know if you need further information. Thanks! Dielines AFPHOTO.afphoto

-
It's bumping time! Can we please have a: I've started mentioning this feature back in 2016! Without it we're still stuck using Photoshop for many types of mockups. There's already a perspective filter, and the whole Liquify persona as a live filter! Thanks!
- 1 reply
-
- 1
-

-
Mesh Warp Live Filter Please
LCamachoDesign replied to Mark Oehlschlager's topic in Feedback for Affinity Photo V1 on Desktop
New beta is around, time to bump this up and see if it comes around this time. We really need this to produce good packaging and print mockups. -
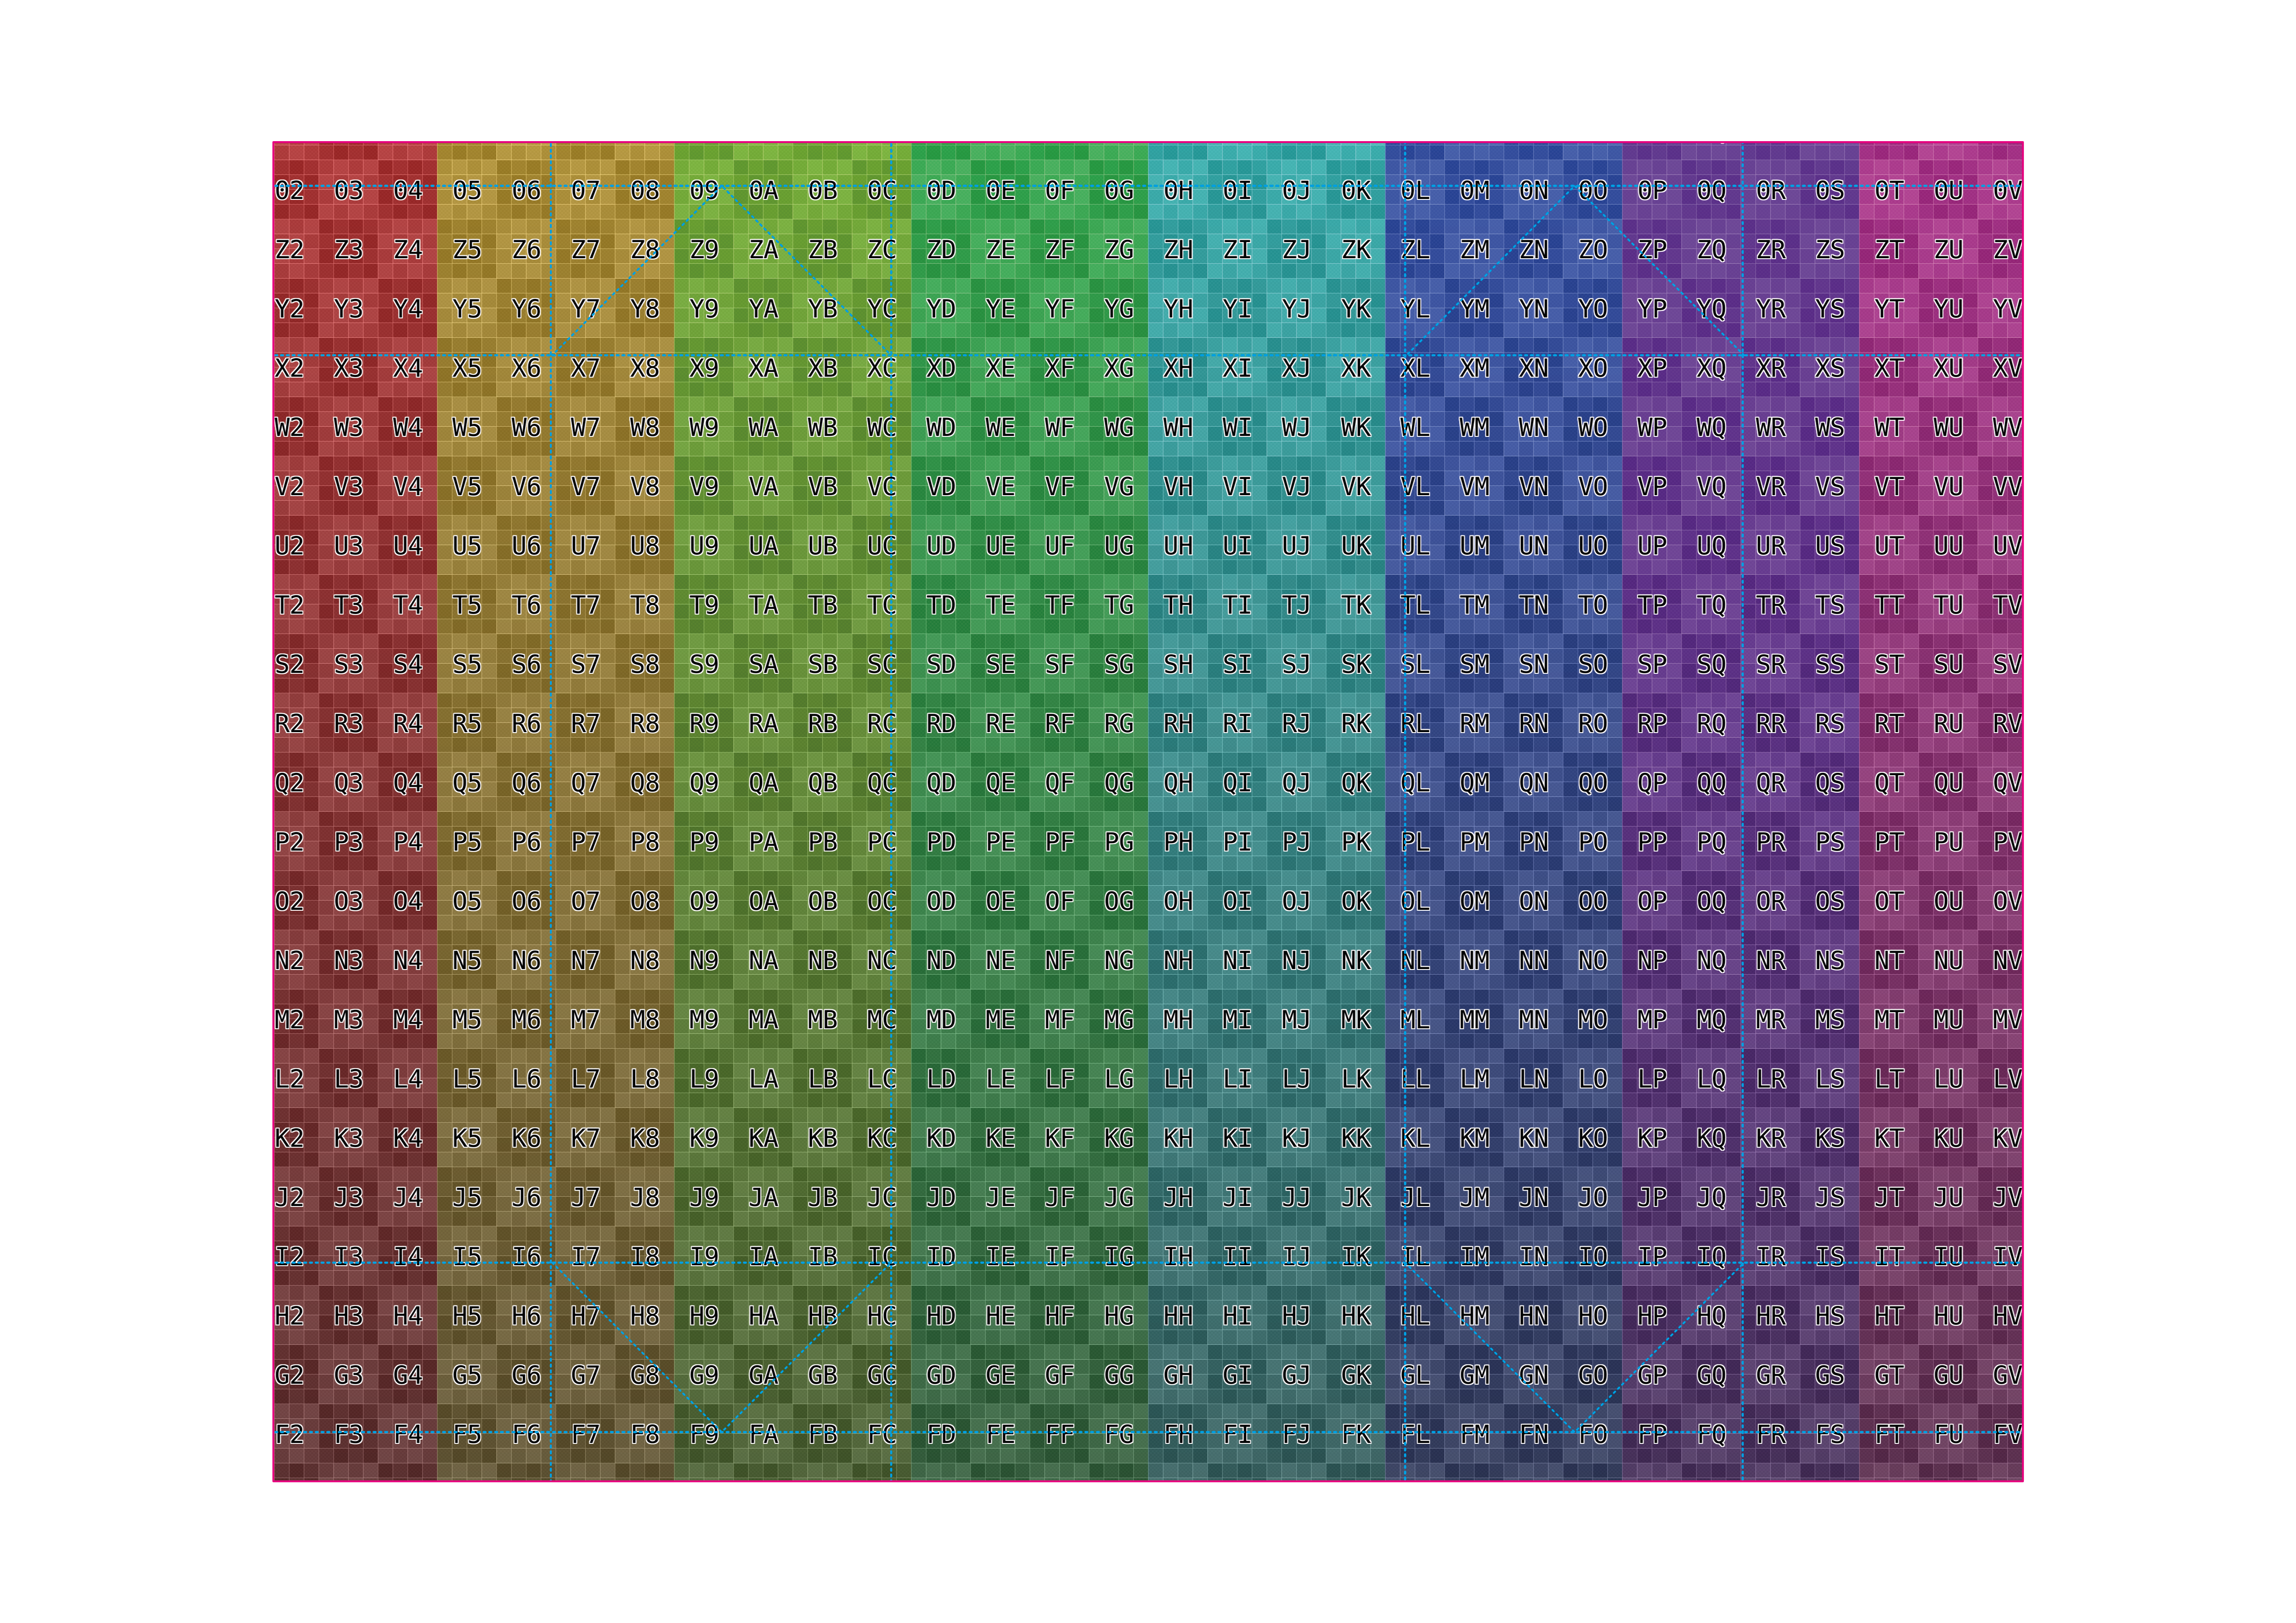
There should be a black outline on these indicators, otherwise you can't see them on white swatches. See the attached image, and the name of the swatches. The only one you can see is overprint, the others are invisible on white. Thanks!
-
I'm bumping this to add a detail. When editing the global colours, the popup should always be above or below to the swatch. This is what's already happening on the desktop. Like this: If instead it goes out to the side instead, like shown below, you'll be covering too much of the canvas, and it will be very hard to see the colour changes in the artwork. Thanks!
-
Symbols loose connection to global colors
LCamachoDesign replied to LCamachoDesign's topic in V1 Bugs found on Windows
@Sean P Hi! Same as the other thread I bumped a few minutes ago, this is still happening, and now it also happens on the iPad. Thanks!- 4 replies
-
- 1
-
-
- symbols
- global colors
- (and 1 more)
-
Global colors do not alter all appearance fills
LCamachoDesign replied to LCamachoDesign's topic in V1 Bugs found on Windows
@Sean P Bumping this thread to let you know this issue still happens in 1.9 and now that global colours exist on the iPad it also happens there. Thanks! -
Not really. Imagine a mockup file with 4 artboards, showing the front, back and 2 side of a box all at the same time. Each of these mockups is populated using the same embedded (now with 1.9 we can do linked) image file. If you want to see how a change will look like seen from all 4 sides of the box, you just update this one embedded file. If these were separate files, or multiple layers staked on top of each other, it would either not be possible to see all sides at one, or it would take longer to export each side and then reassemble the images elsewhere. Like this for example: Chocolate Bar Packaging Mockup by bangingjoints on Envato Elements In any case, that's not the point. The artboards feature works fine in Photo, you just need to hack it in. The bug I mentioned is new though, it wasn't there in 1.8 as far as I remember at least (I've updated everything to 1.9 already).
-
Hi both. Mockups mostly. It's easier for me to handle/manage multiple similar photos of the same packaging (a common example) in a single file.
-
Let me start off by saying that yes, I know Photo doesn't support artboards. And yes, getting artboards into Photo is kind of an hack, but still worth mentioning. Open a document with an artboard, in my case I used a template that has an artboard Without selecting anything, try to place an image using File > Place Notice you can only choose text files, no option for images Select the artboard, or an object inside it Go back to File > Place, now you can pick up images See the attached video for a visual representation. Also, how about starting supporting artboards in Photo? 😉 Thanks! InkedInkedrecordedVideo_Trim.mp4
-
The home screen menu close command.
-
Ahh... I see. I didn't realise that context menu entry existed at all. Yes, if I use that context menu then the function works as expected. I thought this referred to the button I highlighted in my attached screenshot. Well... I guess it kind of makes sense. The mouse hover help does say "Add current colour to palette as a global colour" which is technically correct, the current colour is being added, and the current colour does not necessarily correlate to the currently selected object... I don't know how to feel about this. At least the hover help needs to be reworded so it's clear only the colour on the swatches panel will be added and that it's unrelated to the shape? Something like "Add active colour in this panel to palette as a global colour"? Or maybe add in front "(right click an object to add it's fill & stroke colour instead)"? I'm not a native speaker so I'll let that up to you guys. Thanks!
-
In part I have no doubt this is due to the sh*tty way Apple handles file management on iOS and iPadOS. But since this is a known issue, maybe work on something that's reliable and bypasses Apple? Removing the misleading Save option is one way, forcing a new file write every time to ensure data loss never happens. Another option would be a direct-to-cloud write. Many apps ask for your OneDrive / Dropbox / GDrive login and write their files directly to the services. This is very common and I use a couple of apps that do this across Windows / Android and iPadOS. EDIT: I have a word of advice to anyone browsing this topic. Unless something pretty nasty happens to the Designer app, your document will always stay available, with the latest changes included, so long as you don't close the document. The issues I'm experiencing happen when I hit the save menu, presume the document has been saved to the device, and proceed to close the document inside Designer before making sure it's saved. If you don't close the document, then it remains available for further attempts to save it. As such: DO NOT CLOSE YOUR DOCUMENTS Not until you're absolutely, completely, positively sure the current state has been saved. For me this would mean upload the file to OneDrive, open it on my Windows machine, and see all the latest changes there. If you don't have another machine, or you don't plan on taking the file outside your iPad? Make a copy of your document using the Files app. Open that copy and see if the latest changes are there. They are? Fine, go ahead and close the document inside Designer. The ARE NOT there? For the love of everything DO NOT close your document. Try to save it with another name, try save as, try exporting. Just do. not. close it.
-
This is actually still not happening. Thanks!
-
I had this issue just now with 1.9.0 I just lost hours of work... 😡
-
Not really a bug, just a source of potential confusion for people trying to report bugs accurately. See the attached screenshot.
-
Whenever I edit a global colour value I have a chance the popup will move around the screen after the edit. See the attached video, it makes more sense when you actually see it. I can’t find a way to consistently trigger it, but it feels like the closer the popup is to the bottom edge of the screen, the more likely it is to happen. But it’s not a certainty as you can see. I feel this might have something with the physical screen size of my device? It’s a 9.7” iPad Pro and the screen is getting cramped by today’s standards, maybe the low amount of space is making the popup be “unsure” of where to stay? I also feel like this is less likely to happen when the device is in portrait orientation, it still happens though, just less frequently. Thanks! IMG_0538.MP4
-
Affinity Designer for iPad - 1.9.0
LCamachoDesign replied to Patrick Connor's topic in News and Information
OH YEAH! FINALLY! I hope my feedback helped with the development of this. I'll be in touch if I spot additional bugs or improvements to do in the future. Many thanks!