Texel
-
Posts
12 -
Joined
-
Last visited
-
 debraspicher reacted to a post in a topic:
Layer - Exclude from Export
debraspicher reacted to a post in a topic:
Layer - Exclude from Export
-
Layer - Exclude from Export
Texel replied to RussellBWilson's topic in Feedback for Affinity Designer V1 on Desktop
I'd like this also. I often use a temporary background image or pattern for transparent shapes in designer. I'd like to automatically exclude that layer from export. EDIT: I take that back. New to Affinity, I just found I could do achieve exactly this with the Export Persona, excluding specific layers from export only. Also need to check box to honor export exclusions on export. -
jbikeler reacted to a post in a topic:
Anti aliased edges when filling a selection?
-
Thanks for all your replies. I realize my work flow is a little unusual and stems from using features that existed in Paint.Net. I was kind-of using the selection tool as a poor man's boolean shape operator over a raster grid. I still hope that Affinity will add antialiasing (or equivalent) as an option to all related tools. Lacerto's Photoshop demo suggests it is a reasonable feature. I now understand more about how Affinity's layer system works. I'm not sure if it makes AA harder or easier to implement. Perhaps it's merely omitted as infrequently requested by the target market. I really wanted just one affordable commercial tool to step up from Paint.Net for a few features that bug me. However, since Affinity has a sale on, I'm going to try Designer as that may meet some of my needs better.
-
Took a few tries but I was able to get an antialiased subtraction effect following your instruction.
-
Texel reacted to a post in a topic:
Anti aliased edges when filling a selection?
-
 Texel reacted to a post in a topic:
Anti aliased edges when filling a selection?
Texel reacted to a post in a topic:
Anti aliased edges when filling a selection?
-
Texel reacted to a post in a topic:
Anti aliased edges when filling a selection?
-
Texel reacted to a post in a topic:
Anti aliased edges when filling a selection?
-
I also use selection boundaries the opposite way... I cut them out. Eg. Here's a shape where I want to create an AA cut in the shape. I can get the desired effect using the Erase brush and holding Shift, however, I can't preview the erase line or precisely align it like I can with selections.

-
Trying your steps, the fill step still produced no AA, however if I move your fill step before rotate, then it does have some equivalent desired result. As you say, rotating on its own layer (everything on it's own layer = an Affinity thing) does apply AA or at least a sampling filter effect on the layer.
-
NotMyFault reacted to a post in a topic:
Anti aliased edges when filling a selection?
-
Tried your steps and observed the behavior. Typically selection has no AA and feathering does what feathering is described to do. However feathering is not the effect I need. It appears the current Affinity Paint behavior is by design. My expectation comes from 1) my need for such feature and 2) myself coming from Paint.Net which behaves the way I describe. However, I have not used Photoshop and could not repro this in Gimp to compare what is common behavior among paint programs. It's also possible there is another method to achieve what I want via a different interaction sequence. As it is, I sometimes draw arbitrary shapes then translate, scale and rotate them (in my case via the selection boundary). The anti aliased edges are important for the quality I need. I'm sure other people would use Designer (or equivalent) and create scalable shapes instead. I did find one workaround... If I create the shape at much higher resolution, then copy the shape as image layer, select -> rotate/scale. I can fill the high res boundary over a lower resolution pixel layer and it does anti alias the edges.
-
@JimmyJack Interesting, I hadn't isolated the issue. It does not occur with the circle selection, even though the circle selection shows a pixelated border rather than smooth as I'd expect. The anti alias checkbox works with the circle selection tool exactly as expected an desired. The issue does appear to relate to rotation of the selection. Steps: Draw a shape. (Eg. white on black, solid edges) Select shape (Eg. Flood select) Resize and rotate selection, not shape. (I'm using Quick Mask as I can't see another way) Flood fill or use Brush to fill in selection.
-
To clarify, this is not about the rectangle shape, or moving and selecting rectangles. That was just my simple repro steps. I'm talking about filling or painting inside a selection boundary. The is no coverage anti aliasing. A pixel is either colored or not.
-
Force Pixel alignment was on. I tried both on and off, which made no difference. I also tried both on and off before creating and rotating the selection for the test steps.
-
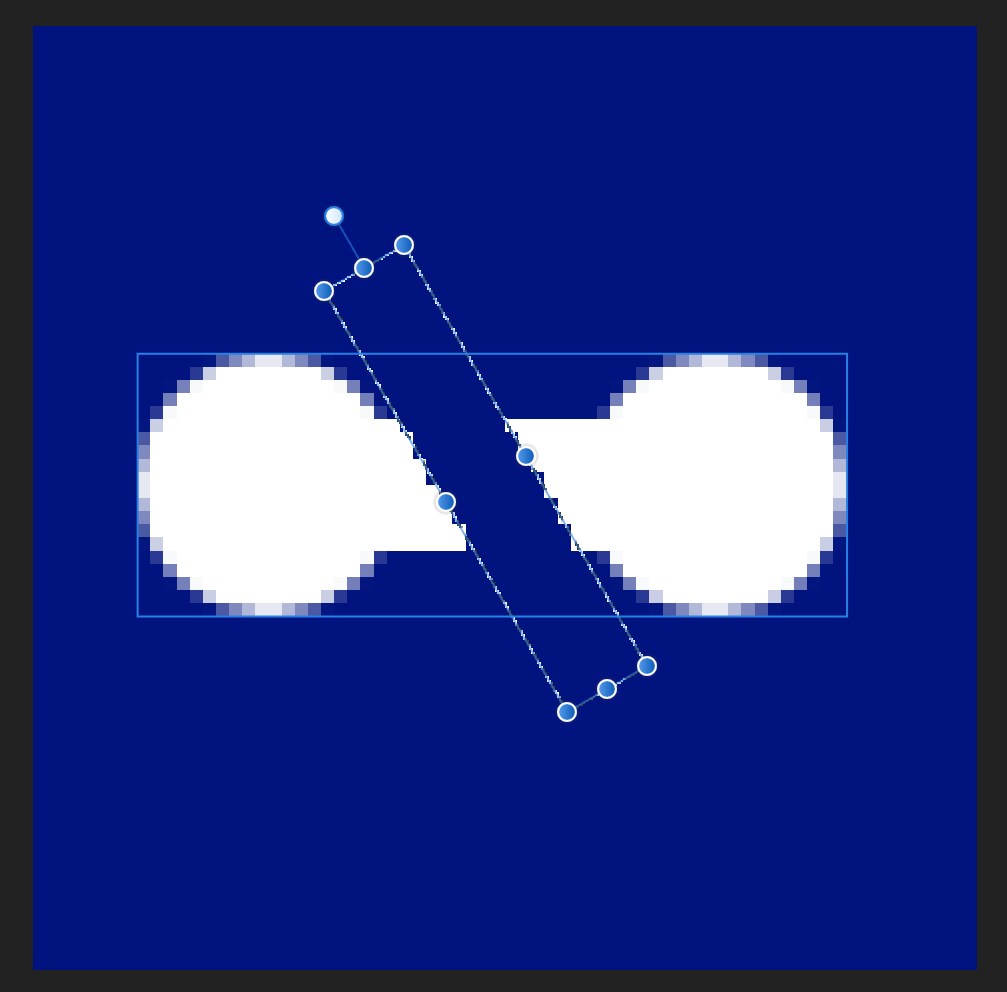
I'd like to fill a selection boundary and have the alpha channel set based on pixel coverage. I have tried the 'feather' option. That is not what I need. Steps: 1. Create a small pixel layer on empty RGBA8 image (eg. 64 or 128 pixels square) 2. Create selection rectangle 3. Rotate selection rectangle 45 deg eg. by Toggle Quick Mask and rotate handle. 4. Try fill selection via Fill & Paint Brush tools. I expect the result to look the same as if using the Rectangle shape tool and rotating it. Attached image shows rectangle shape tool result bottom left and filled selection result top right.
-
Texel reacted to a post in a topic:
How do I resize a selection marquee?
-
Texel reacted to a post in a topic:
How do I resize a selection marquee?
-
Texel reacted to a post in a topic:
How do I resize a selection marquee?
-
That is unfortunate. I am trialing Affinity Photo to find an affordable alternative to Photoshop. Independent editing of channels both color and alpha is critical, as is editing existing texture files.
-
Texel reacted to a post in a topic:
RGB channels changed upon load of RGBA PNG file
-
When I load a PNG or TGA texture image file that contains RGBA channels which are different, the RGB channels are modified, become black where alpha is zero. This is destructive and prevents me from working with such files. Is there a known work around for this? I've attached a example file (pngtest1.png) which has R,G,B,A channels which do not align perfectly. When loaded into a viewer such as XnView, extracting each channel independently will show squiggles in R,G,B but a box mask in A. EDIT: Uploading attachment fails with error -200. Searching the forum shows some mention of this issue and the reverse of it, creating images with independent R,G,B,A channels. One such forum thread is "How to Edit the Alpha Channel" https://forum.affinity.serif.com/index.php?/topic/76911-how-to-edit-the-alpha-channel/page/9/ Ideally I'd like to import and export RGBA images with independent channels and edit them by simply masking via the show/edit toggle buttons which almost work how I expect, but do not due to the alpha channel dependency.