

kamelus
-
Posts
57 -
Joined
-
Last visited
Posts posted by kamelus
-
-
9 hours ago, Oufti said:
Create a new topic in the appropriate bug section of the forums.
https://forum.affinity.serif.com/index.php?/forum/71-bug-reporting/
Follow the instructions.Thanks oufti i have posted now in the appropriate bug section
8 hours ago, PE1 said:Your welcome,
Yes, I agree I also feel this is a bug because there is incorrect information being shown under a certain condition. Your situation is a perfect example of how things can go wrong rather quickly working on incorrect feedback from the dialog box.
This was very confusing. I didn't want to upload until I felt that I found a common denominator on when and where it happens because results varied. It seems to me that it depends on the part of the Doucument View area in the applications interface. The first two place holders area for the facing pages? "region"? red area in my diagram in the Document View is where I see this happening.
I hope this will help narrow down where the issue is in their code. Its probably just a tiny little tweek that is needed.
Thanks a lot for your help and your time
-
Hi
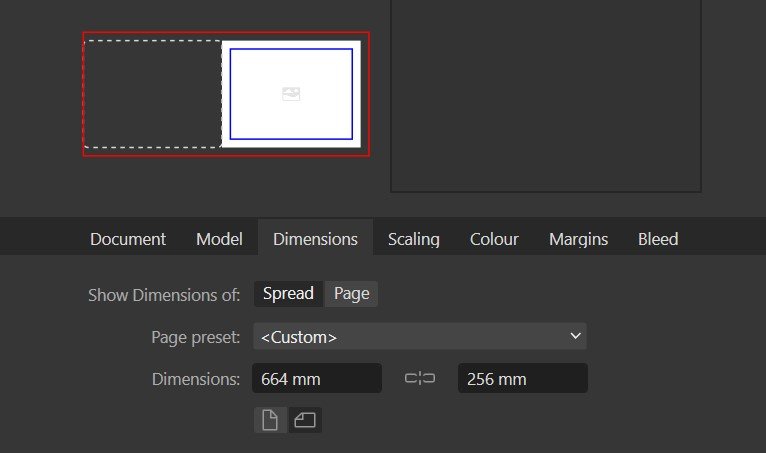
I have a document with this size the bleed is 20 mm

The document is like this we see the red Border of the bleed
I have tried toi change the width's document size from 664 mm to 657 mm
and as you see i have a curious bleed border and dosen't match with the size wanted
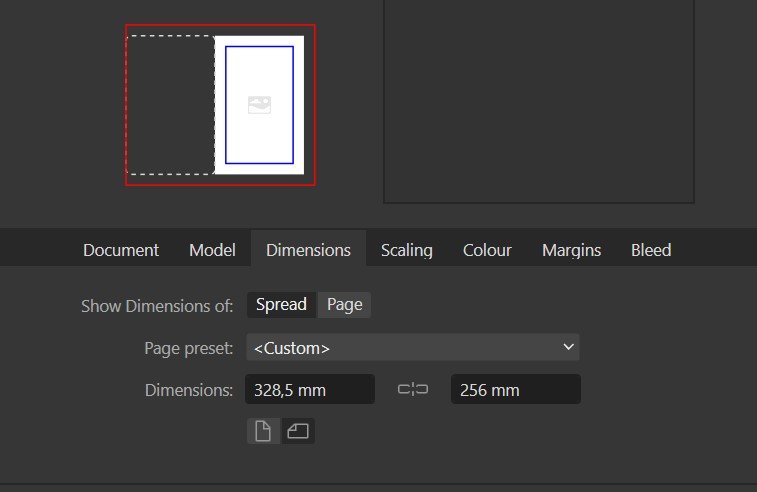
and if i come back to the document setup i have Width = 328,5 instead 657 mm and the document is in Portrait orientation instead landscape
I tried many times but still same
the problem has been posted and other users tried and could reproduce this bug
Original thread here : Oiriginal thread
The only way i had to have a correct new size was to create a new document with the new size and copy paste the layers from the old file
hope the technical team will find the solution
Thanks
-
4 hours ago, PE1 said:
J'ai pu recréer le problème, révélant ce qui me semble être un bug dans certaines conditions spécifiques. J'utilise Windows 10 Affinity V 2.3.0
Le problème se produit lorsqu'un utilisateur ouvre les paramètres du document pour apporter une modification ou vérifier l'état de la configuration du document lorsqu'il travaille dans une configuration (pages en regard) dans des conditions spécifiques que je démontre avec une photo superposée en couleur et une courte vidéo de moi en cliquant sur le bouton rouge. et les espaces verts.
Lorsqu'un document est créé à l'aide de pages en vis-à-vis, dans certaines conditions, les valeurs de dimension de page et la vignette s'affichent à la place des valeurs de répartition même si vous voyez le bouton Répartir dans un état sélectionné. Vous remarquerez immédiatement une inadéquation entre le document réel et la boîte de dialogue. Voir la vidéo.
Vous pouvez temporairement résoudre ce problème en appuyant sur le bouton Page, puis en appuyant sur le bouton Spread avant d'apporter des modifications, ce que je démontre également dans la vidéo. Lorsque vous faites cela, vous verrez une vignette mise à jour de la planche et de ses valeurs représentant le véritable état du document.
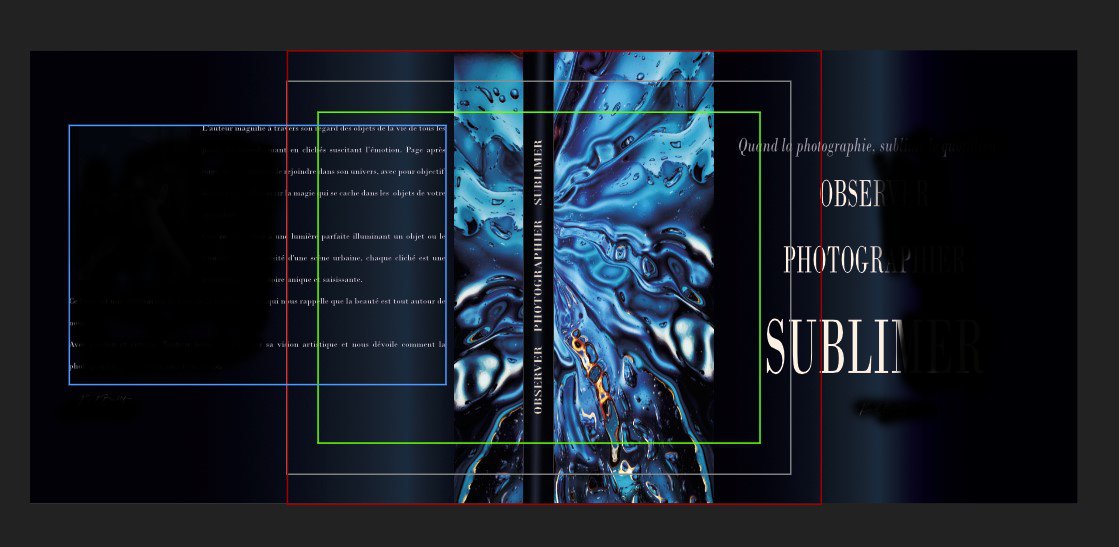
Pour mieux illustrer certaines conditions spécifiques que j'ai observées, j'ai créé une superposition rouge et verte de la zone d'affichage du document. Cela représente un document de quatre pages avec les pages en regard activées.
Vous trouverez ci-dessous une démonstration de ce qui se produit lorsque vous cliquez sur les zones colorées et ouvrez les paramètres de diffusion.
Si je clique gauche n'importe où dans la zone rouge de l'interface utilisateur et que j'ouvre les paramètres du document, vous remarquerez un bouton de diffusion enfoncé affichant les valeurs L x H et une vignette qui appartient en fait aux dimensions de la page qui représentent la moitié de la diffusion. Une méthode pour le mettre à jour consiste à cliquer sur le bouton Page, puis à cliquer à nouveau sur le bouton Spread. Je pense que les développeurs disposent d'un certain nombre de méthodes pour que les valeurs de propagation s'affichent correctement la première fois lorsque cette zone rouge est mise au point (cliquée/active) et que les paramètres du document sont ouverts.
Si je clique gauche dans la zone verte et que je rouvre les paramètres du document, je vois les valeurs de répartition correctes telles qu'affichées dans le document réel. Aucun problème ici. La vignette de la planche correspond à la planche des pages 2 et 3, les valeurs L x H correspondant aux dimensions de la planche comme on le voit dans le document réel.
Cela nécessite une enquête plus approfondie, mais il me semble qu'avec une configuration de pages en vis-à-vis, quelque chose doit être fait lorsque le focus est sur (zone rouge) afin que les valeurs de répartition du document soient présentées correctement lorsque l'utilisateur ouvre les paramètres du document > Onglet Dimensions tout comme la zone verte. C'est du moins comme ça que je le vois à ce stade.
Après avoir exécuté une simulation avec le résultat exact du message d'origine, je crois que le document a commencé comme une planche de 1328 mm x 256 mm. Largeur de page 664 mm et hauteur de page 256 mm avec pages en regard = 1328 pages. N'oubliez pas qu'une largeur de page n'est pas la même chose qu'une planche. Si un utilisateur n'avait généré qu'une seule page lors de la phase de création, l'utilisateur aurait pu penser qu'il était dans une page, surtout lorsque le bug affichait des valeurs incorrectes de ce qui était réellement une bonne page lors de l'ouverture de l'onglet Dimensions dans les paramètres du document (voir deuxième photo). à partir du message original qui est en fait la première page de droite.) La première photo publiée par l'utilisateur montre en fait les valeurs de la page et non une page. Lorsque la valeur de 657 a été saisie, ce qui s'est réellement passé, c'est que la largeur de propagation modifiée est passée de 1 328 mm (la taille réelle du document) à 657, coupant le document en deux moins l'ajustement de 7 mm que l'utilisateur souhaitait effectuer, ce qui donne une largeur de propagation de 657 mm et 328,5. page de droite comme indiqué sur la quatrième photo. Il est important de noter que les champs Largeur de répartition et Hauteur fonctionnent toujours comme valeurs de répartition lorsque vous saisissez les ajustements et appuyez sur OK.
Le bug des données Spread n'affiche pas les valeurs correctes lors de l'ouverture des paramètres du document et semble se produire lorsque la zone (rouge) est mise au point (cliquée/active).
Je devrai peut-être remettre en ligne la vidéo. Il s'agit en fait d'une vidéo convertie en gif. Je ne sais pas si vous pouvez le voir. Puisque j'ai eu du mal à télécharger l'original. Je reviendrai bientôt pour voir si c'est le cas.
First Thanks you so much for all the detail you shared on this message , your vido is very helpful i think for better view of this bug displaying the margins on the document like in my screen capture i have shared will show the gap between the value and what we really see in the document after. but n my opinion it's cleau that is a Bug and i don't know how to submit it to the technical team
Thanks PE1 for your Help -
5 hours ago, PE1 said:
One possible solution for your cover is to create a brand new document from scratch with facing pages unchecked including the page and bleed dimensions required by the printer before placing your artwork.
Hi PE1 thanks for the idea i had the same yesterday and it's worked but for me it's a bug and have to be resolved by the Seriff team
-
4 hours ago, Oufti said:
Click on Page, and then back to Spread, to try to reset page setup to something logical.
May be you will have then to specify again the correct size.There is a bug that sometimes divides pages instead of the spread. I see that quite often but it does not resist a long time when I change from one setting to the other.
Thanks oufti for the idea but it didn' work unfortunately
-
am i the only one with this problem ?
-
16 hours ago, thomaso said:
Yes, while the numerical values for 'Dimension' indicate a portrait format. This is the mentioned conflict … and apparently (part of) a bug.
16 hours ago, thomaso said:Yes, while the numerical values for 'Dimension' indicate a portrait format. This is the mentioned conflict … and apparently (part of) a bug.
Hope the Technical team will find a solution soon if not the only solution for me is to change the soft
-
4 hours ago, thomaso said:
… and, while there might be an issue with the Spread vs. Page option, oddly, the orientation icon still shows landscape as being set, which results in a conflict that doesn't make it possible to check the actually used setting: landscape or portrait?
Hi Thomaso thanks for your quick reply , am sure that the landscape icon is hilighted
1 hour ago, MikeTO said:I think I've previously reported that the orientation icon gets confused after using Spread vs. Page but I can't find it right now. There are some issues still lurking in the v2 doc setup dialog.
My undestanding is that tihis issue is a Bug , i think that id didn't have this issue with the version bedore 2.2
Really it's a big problem for me i can't reduce the size of document and than i can't Go forward in my editing Book
-
Hi
I have a document with this size the bleed is 20 mm
The document is like this we see the red Border of the bleed
I have tried toi change the width's document size from 664 mm to 657 mm
and as you see i have a curious bleed border and dosen't match with the size wanted
and if i come back to the document setup i have Width = 328,5 instead 657 mm and the document is in Portrait orientation instead landscape
I tried many times but still same result
Any idea ?
Thanks a lot for your Help
-
Hi Callum
I know what happened you were right , Affinity photo was opened and i launched external filter ( Nik Collection ) when i tried to launch Publisher
I closed the Nik Colelction filter and tried to launch Publisher , it's worked
Thanks for your reactivity and your Help
-
Hi
I have upgraded Affinity Photo to 2.2 : no problem detected
After upgrading Affinity publisher to 2.2 : impossible to launch the application here is the error
I don't have any firewall working
Any idea ?
Thanks for the Help
-
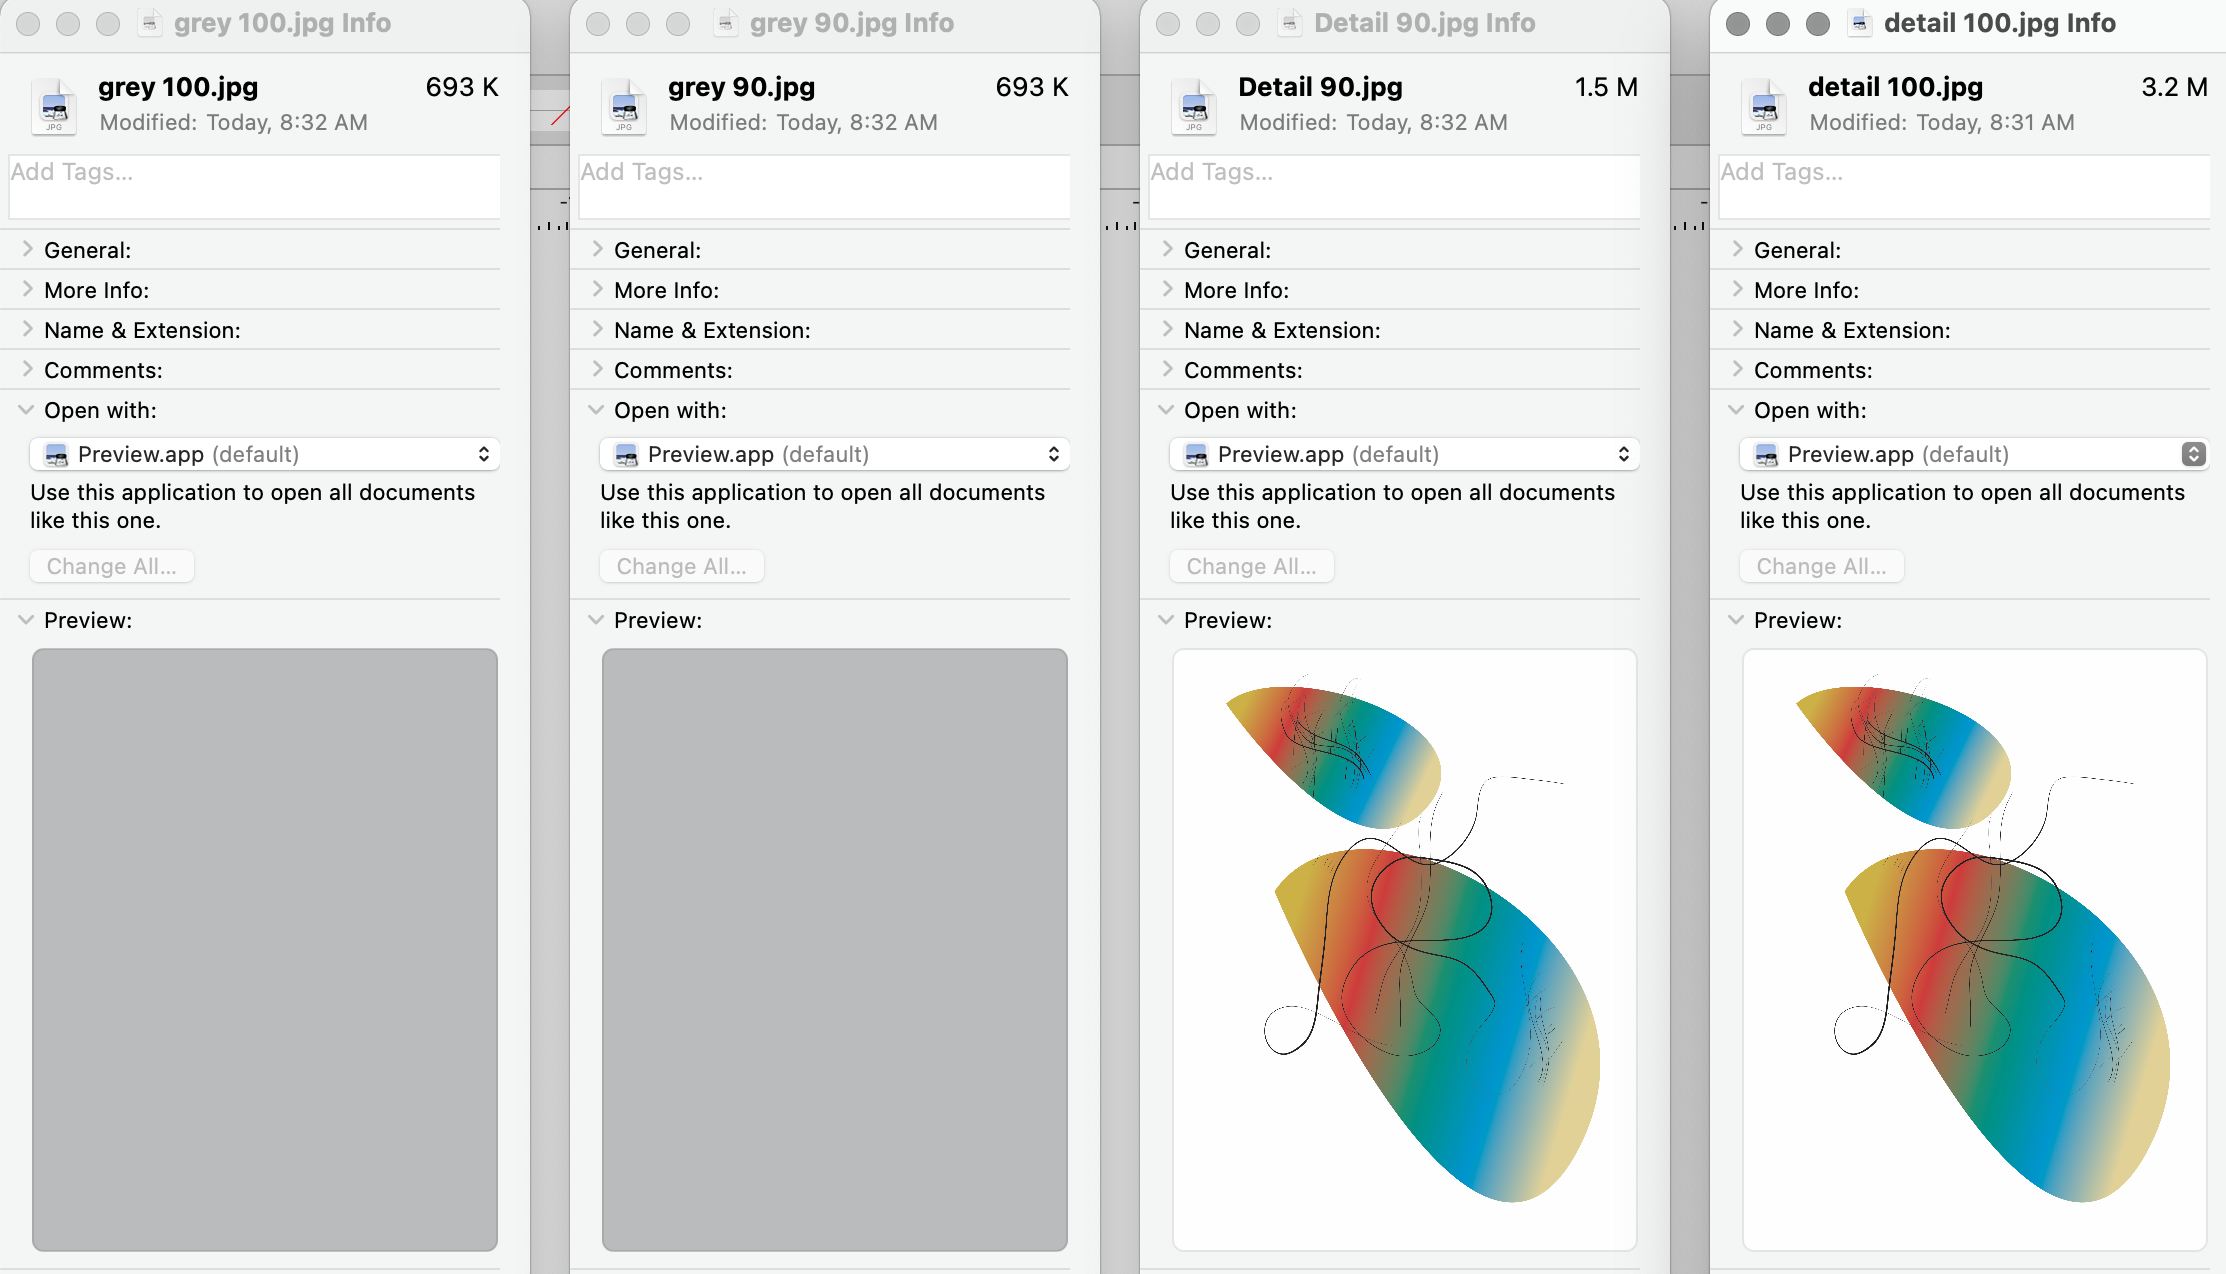
21 hours ago, R C-R said:
Fondamentalement, c'est parce qu'au niveau 100, presque tous les détails fins sont préservés pendant la compression, même ceux qui sont effectivement invisibles à l'œil, tandis qu'aux niveaux inférieurs, de plus en plus de détails sont supprimés. Il existe de nombreuses références expliquant le fonctionnement des compressions JPEG, par exemple celle-ci sur https://genome.cshlp.org/site/misc/tsg_JPEG_instructions.pdf , ou la section compression de l'article de Wikipedia sur https://en.wikipedia. org/wiki/JPEG#JPEG_compression .
Thanks RCR
39 minutes ago, Old Bruce said:Cela dépend vraiment de la quantité de détails dans l'image. Beaucoup de détails fins signifient une taille de fichier énorme à 100 % et une taille beaucoup plus petite à 90 %, peu de détails signifie que les tailles de fichier seront similaires, voire identiques pour les exemples extrêmes. Ce sont tous les mêmes RVB de taille 8 1/2 x 11 pouces. Notez que le fichier de détails à 90 % fait moins de la moitié de la taille du fichier de détails à 100 %.
Thanks Bruce
-
1 hour ago, thomaso said:
The option "embed profile" concerns the PDF (its output intent for PDF/X), not the single images.
CMYK for the images is no profile but their colour space. If the images have a different profile than the document or its export it can result in extra profiles (for every image). The fact that you have set for export "CMYK" plus a specific profile indicates that your document doesn't have this setting, which could mean an extra colour conversion + embedded image profiles. – If your document is set to CMYK and this Fogra39 profile there is no need to choose this once more on export but you rather keep both "as document", especially if the images were saved with this profile, too. – If the images have a different profile saved than the export profile then activating the export option "convert images" may reduce the file size by the sum of the otherwise embedded profiles of the images.
Nevertheless, if the images all together have 950 MB on disk + are used in about 100% size + you prefer to maintain 0% compression then 800 MB for the PDF appears like a required consequence … that could get reduced by more compression to result in a smaller file size.
I still wonder what compression you get when printing to PDF with the resulting "45 MB without loss of quality". The fact that this is no PDF/X doesn't influence the PDF size remarkable in this case.
Hi Thomaso
All the images have been treated with Affinity photo and the same Color Profil CMYK
I tried this now : Export With 90% Quality PRofil color same as document the result : PDF size generated 300 Mo
Export With 100% Quality PRofil color same as document the result : PDF size generated 800 Mo
For me i don't understand why the size difference between 90% quality and 100% is so big
I forgot , concerning the images i don't use them at 100%size when i exported them with Affinity photo i exported the with this resolution 1200X800Thanks for your Help Thomas
-
1 hour ago, PaoloT said:
90 is nearly indistinguishable from 100. It might be a viable compromise.
Paolo
Thanks Paolo
1 hour ago, thomaso said:Sure? – If you print to PDF you quite likely don't get a PDF/X … and I wonder what JPG compression rate gets used. If it results in 45 MB where you don't notice a loss of quality: What makes you think you would have to keep the quality at 100% ?
You mentioned 200 pages but for an estimation of PDF file size the page respectively the image dimensions / the number of images would be required. What is the file type and total size on disk of all used images? Do they all together come close to 800 MB or rather to 45 MB? Did you edit the images within APub, e.g. by adjustments, filters, blend modes?
What colour profiles are applied to the images on disk? If you don't convert them on export (as shown in your settings) Affinity might embed their profiles in the exported PDF, in worst case for every single image, separately even for identical profiles.
Hi thomaso
The file type is Jpeg treated with Affinity Photo the color profil is the CMYK the total size on disk is 950 Mo , when i xhoos PDF/X the embed profil color can't be desatviated
And you are right if i choose to export the pdf using the print option instead the export i don't get the PDF/X
Really i don't know if there is a solution or not
-
15 hours ago, R C-R said:
What do you get if you lower the JPEG compression below the maximum of 100, say to 85 or a bit less?
Hi RCR thanks for your answer
if i choose lower compression to 85 the size of genereted file is 240 Mo it's less than the initial file but i have to keep the quality at 100% because it's for a photobook impression
-
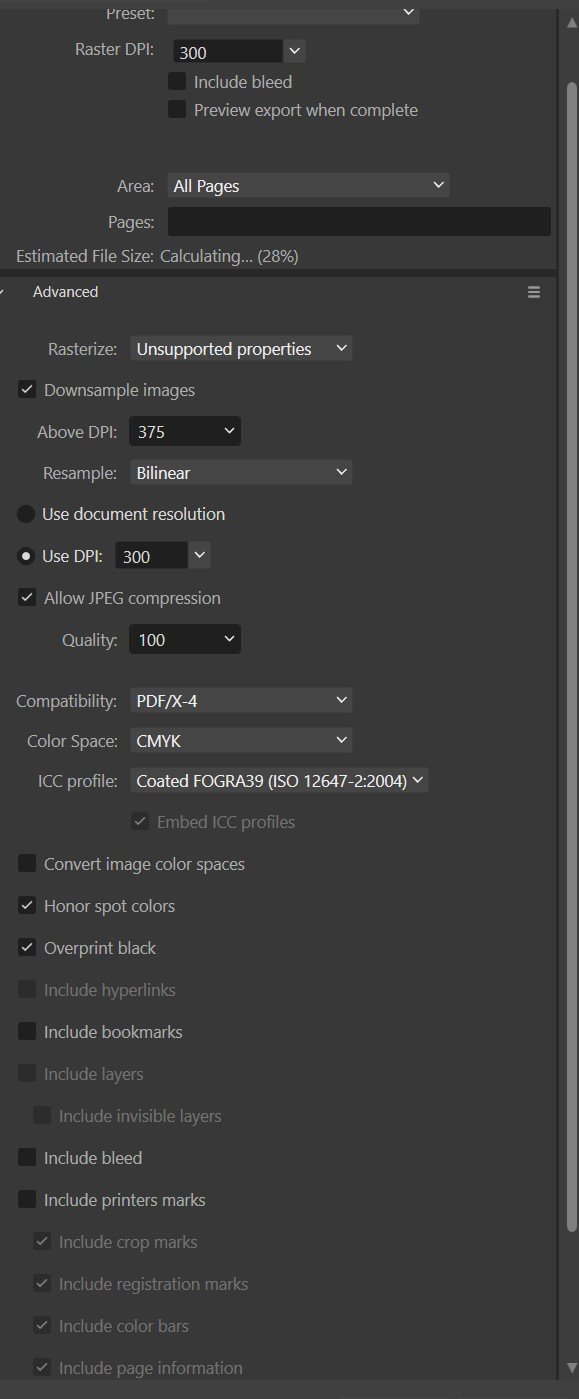
25 minutes ago, R C-R said:
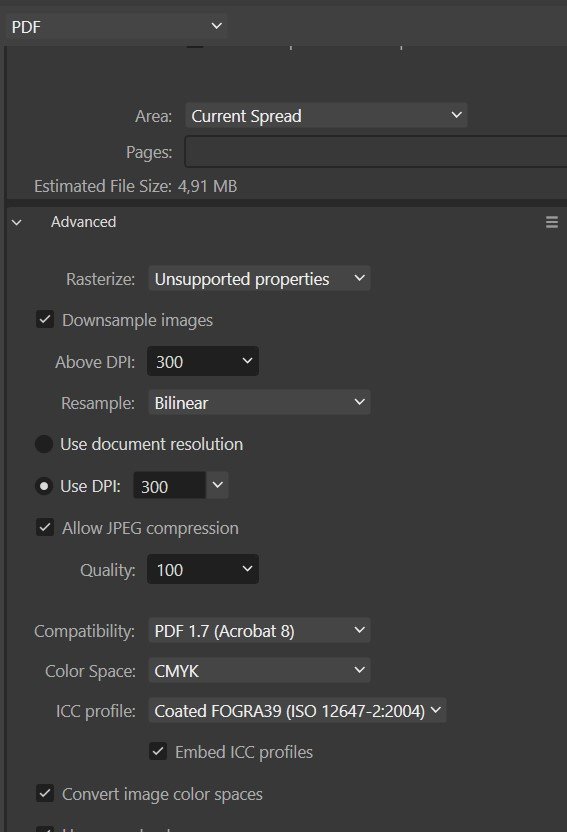
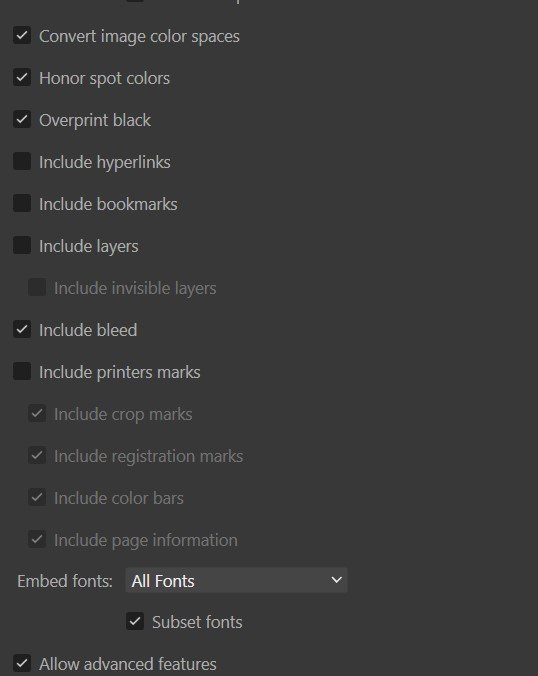
What settings are you using in the PDF Export window, particularly in the Advanced section, like for allowing JPEG compression?
Here is th export options
Thanks
-
Hi all
I gave created a photo book of 200 pages, when I export the document in PDF format, the file size is 800 MB which I consider too large. when instead of exporting I use the print to PDF functionality, the generated file is 45 MB without loss of quality. could you please tell me why the export generates such large files? Is there a solution to export smaller PDF files?Thanks for your help
-
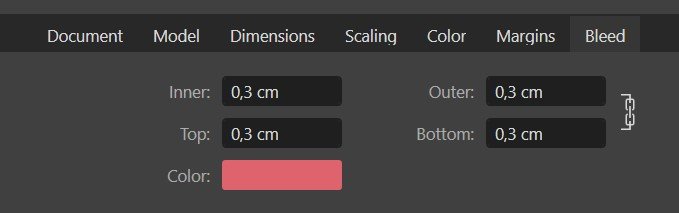
Hi
First my apologizes
it was not a bug , i found the problem
The Inner value must be 0
Thanks a lot
-
Hi
Am triying to export a file to PDF ( 100 Pages )
here are the parameters of the document
When i export the the current spreed the result is correct
When i export all the pages with same parameters i have a page overlap
here is the spreed
and the export parameters
Any idea ? i have to export all the pages to make a book
Thanks a lot for your help
-
-
Hi
Thank you for your answers which are perfect for this specific case, I am still looking for a more general solution to treat the high light areas
-
Good morning
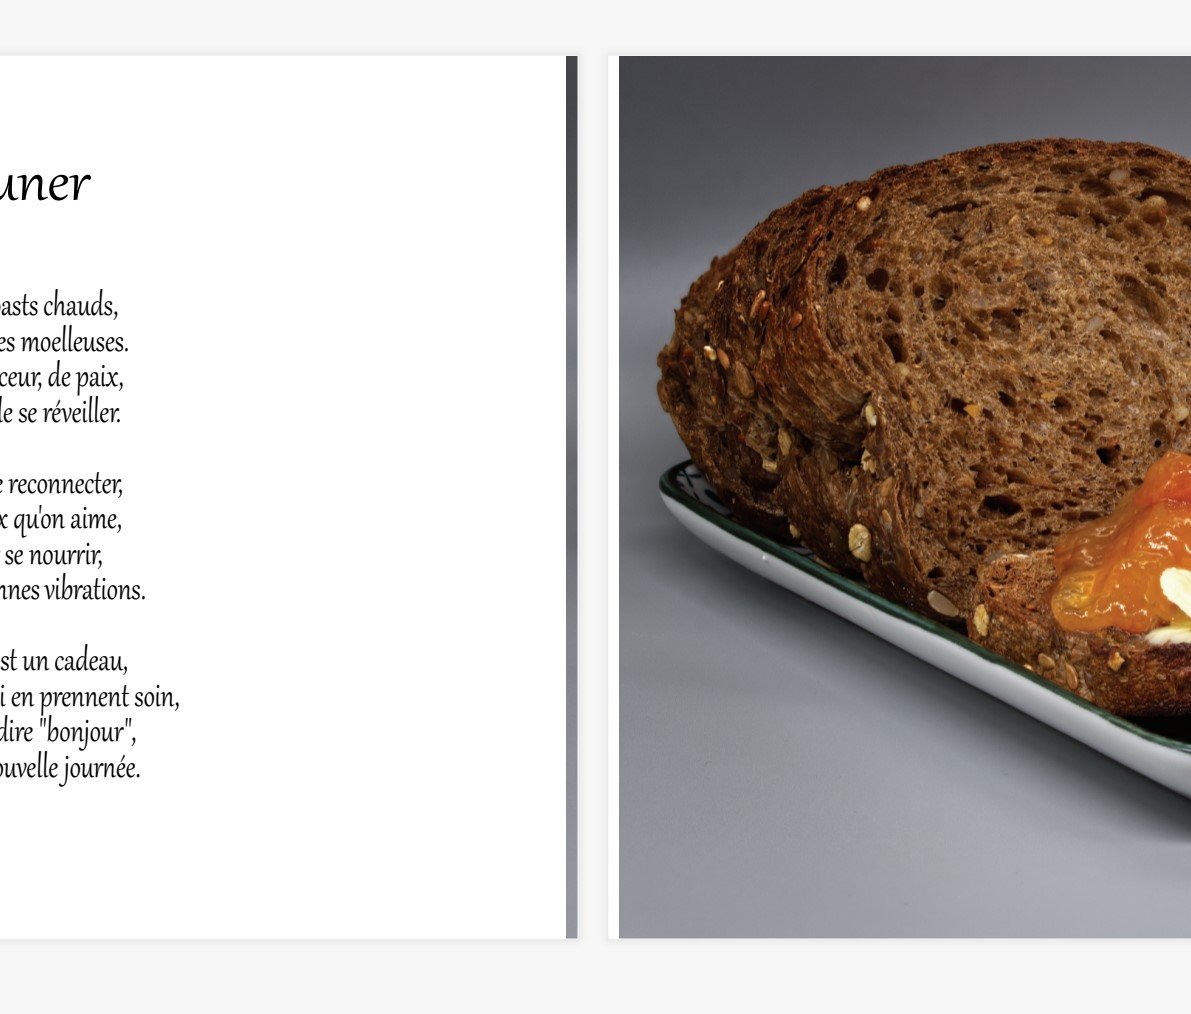
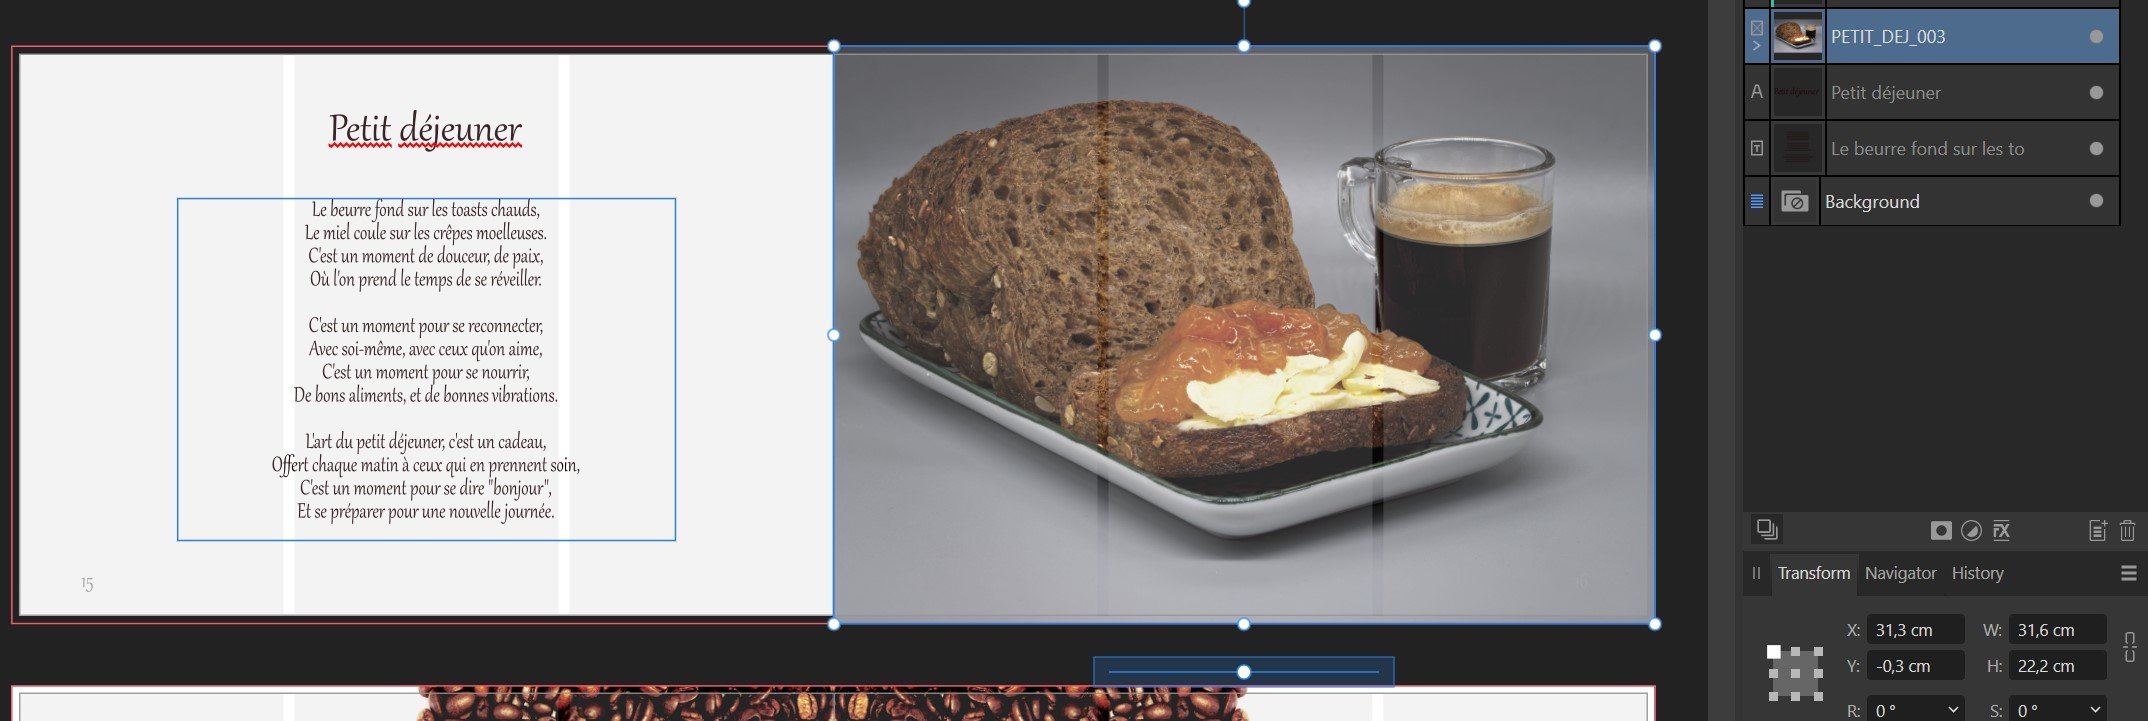
I have a problem to solve a high light problem as you can see in the photo, do you know a technique to solve this kind of problem?
am working with Affinity 2.04
Thanks a lot

-
il y a 31 minutes, thomaso a dit :
OUI ! C'est une utilisation parfaite du fond perdu. Et aussi la largeur du texte semble plus sûre avec sa plus grande marge au centre de la page.
Pour l' impression finale du PDF , vous devez demander à votre fournisseur d'impression les paramètres d'exportation requis, respectivement avec ou sans hirondelles, comme recommandé par@Vieux Bruce.
[ Si vous n'avez pas encore effectué les ajustements de fond perdu du cadre d'image sur les 200 pages :
vous pouvez également essayer d'augmenter tout le contenu de la taille de fond perdu via la "Configuration de la diffusion" en deux étapes :1. Réduisez les tailles de page de la largeur du fond perdu sans mise à l'échelle.
2. Redimensionnez les pages à leur taille initiale (et souhaitée), mais maintenant avec la mise à l'échelle activée.Cela réduira la quantité d'ajustements individuels pour les cadres d'image. Mais notez qu'il augmente également à l'étape 2. tous les autres objets des spreads. ]
Thanks Thomaso for your precious Help
But i Think that i will correct manually the adjustment to be sure to have the control of each page it's a lot of work but no matter hoping that the result will be here
will let you know
-
14 hours ago, thomaso said:
It depends what look you want to achieve. It is a little guessing with your screenshots only (I can't open Affinity V2) without seeing page vs bleed edges. Thus it gets more clear if you export with crop marks since they will indicate page vs bleed areas. (compare the PDF exported by @Old Bruce)
On the left page the gray gradient appears not to cover the bleed though the layout implies it should. If it should then increase this frame on its 3 outer edges.
The right brownish image looks smaller than the right 3-clock image, I assume they both shall be full page images. If yes, they both also should cover the bleed on their outer edges. If they don't (as e.g. the gray gradient currently) than the printed result might show a thin paper white border if the cutting machine doesn't cut 100 % perfectly. (By the way, this is what bleed was invented for: to avoid visible 'flickering' of full page images or background colours caused by imperfect cutting. Thus you print more of your full page image to have some* printed / inked area to cut. This *some is the width of the bleed.)
The spine (= inner page edges) appear to be okay in your last screenshots: they show a full page image + the part of the opposite page which represents the bleed. Again, the bleed will be cut + the spine will be bound and thus slightly hide eventually imperfection.
If you want to (or currently have) the full page images in your layout partially placed on the opposite page then you can do that of course, too. The printed result will show it accordingly. (like in your screenshot with text and image overlapping).
There is one design aspect I would call "wrong": the small distance between the text and the spine. Depending on the bind technique it may make it hard to see the full text in the printed result because it slightly "disappears" in the possibly curved page centres of the final bound result (or may require to press the medium to make it fully flat).
Yes, I agree, if your initial (or current) layout has the full page images placed to the page edge only then you should (or will even have to, if your printer complains / demands) increase the frames so the images cover the bleed at their three outer edges, too. And yes, at 200 pages this is an unpleasant work (but, you may admit, it could have been avoided from the beginning / will not happen to you again).
Hi Thomaso
i did what you said ( i have to confess except removing the picture frames )
here is the result with the quotes mark
and the PDF generated with the printing marks
what do you thing ?


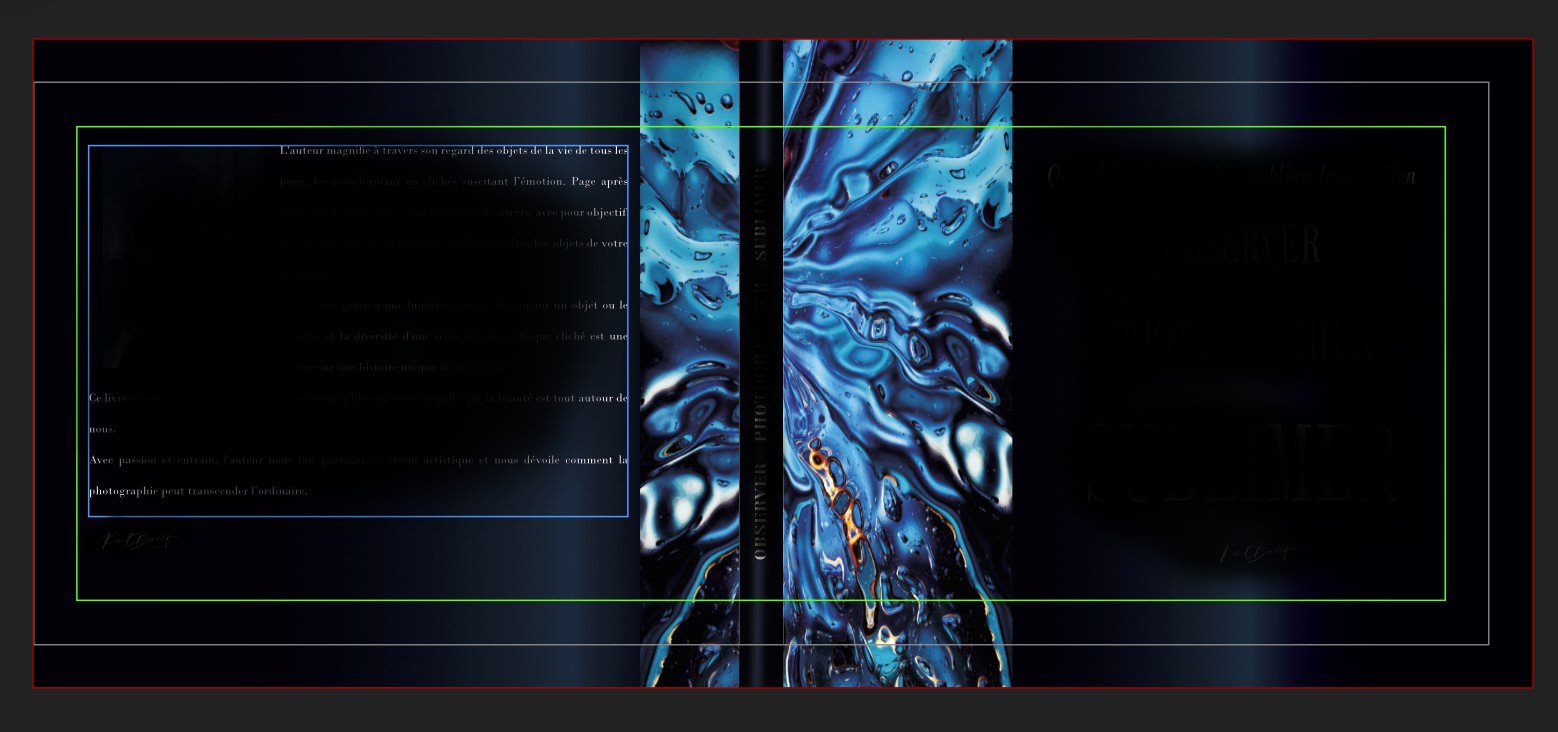


Affinity Publisher 2.3 Document size problem
in V2 Bugs found on Windows
Posted
Hi Callum
here is the file requested
initial size
T
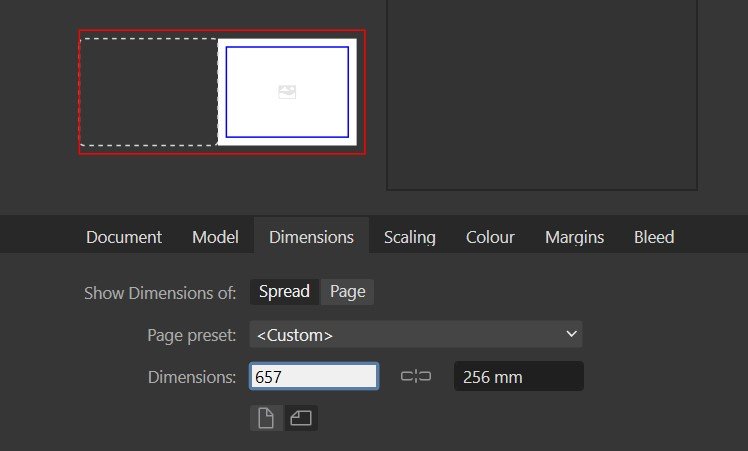
Trying to change only the width from 664 to 657 mm
the result
If i open the document size window i see that the width is the half of what i have filled before
DEBUG_150P_KBFOTOART_LIVRE_29x21_COUVERTURE_FR_V2.afpub