PixelEngineer
-
Posts
116 -
Joined
-
Last visited
Everything posted by PixelEngineer
-
Hi still having this same issue . . . Hello, I am currently working in v 2.0.4 and am still having the same issue with the Color space info description in Resource Manager not updating properly when converting a graphics color space using a particular method. When using Affinity "StudioLink" as a method in editing a linked image in Affinity Photo and converting the image to another color space using Affinity Photo, the saved image's actual color space does actually change but the description is not updated properly in the Resource Manager dialog revealing a mismatch between the "ICC profile:" description and its "Color space:" description which is incorrect. See image posted on December 26, 2022. There appears to be something wrong in the code that is causing the "Color space" description in the Resource Manager not to update. It is still working in Affinity v 1.06.1665 but not working properly in Affinity v2.0.4. This needs to be updated to give the users proper info and would be great if this can be fixed in a near future update. Thanks.
-
Hi, I just wanted to share article in case you haven't seen it. Perhaps it may be of some help. Display Colour Management in the Affinity apps - Affinity Spotlight
-
The reason why I was posting this because I didn't see any problems working in Affinity v2 natively and was thinking that the title descriptions of bug in v2 was not accurate. I thought it was working but was thinking that it was designed based on a different orientation. Sometimes there can be misunderstanding of the actual problem. However, now I see that this had to be fixed and that update will not impacting my work in anyway. Serif has great product and I really appreciate the work that your team does. Looking forwarded to the updates.
-
Yes thanks I understand now. I was posting exactly the same time you responded.
-
Hello @Pyanepsion, in regards to the question I was wondering if this occurred when opening the document from within v2 or if copy and paste was used. I decided to run more tests and now see a clearer picture of what is going on. So the question is irrelevant now. I have moved on to using Affinity v2 for my production workflows and didn't understand why there was a bug being reported in the decorations since the values looked normal working natively within the application. Edit: I just saw the moderator post as I wrote this. So that answers my question. Thanks.
-
Text Decoration bug with V2.0.3.
PixelEngineer replied to Nora GJH's topic in V2 Bugs found on Windows
Hi, @MikeTO thanks for pointing this out. Ironically, as you saw in my post, the values that I used had no effect. After applying changes based on your description I now see it. So it seems that this issue occurs only when opening v1 files into the major upgraded v2. Is that correct? In my experience, Affinity Publisher v2 decoration Edit: seemed to work correctly when designing files natively from scratch in version 2 while showing the correct numerical values. Opening a copy of a design in a new document within the same version of the application will not present any problems in both version 1 and version 2. This seemed to contradict the title description. In any case I did see the problem now. Thanks again for point that out I wasn't aware of that. -
What is the workflow that you are using?
-
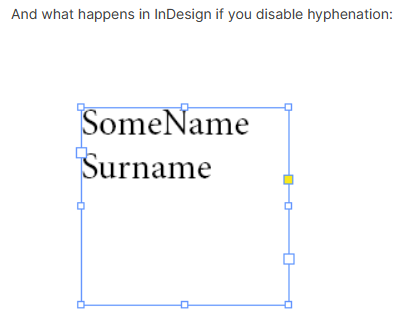
If you squish that InDesign text frame you will get the exact same result as you got with the Affinity text frame in your examples, its no different. if you drop a 30 character word in that same InDesign text box words will get broken in InDesign. As you see here there are no issues. Affinity Publisher gives the designer total control in this regard.

-
Text Decoration bug with V2.0.3.
PixelEngineer replied to Nora GJH's topic in V2 Bugs found on Windows
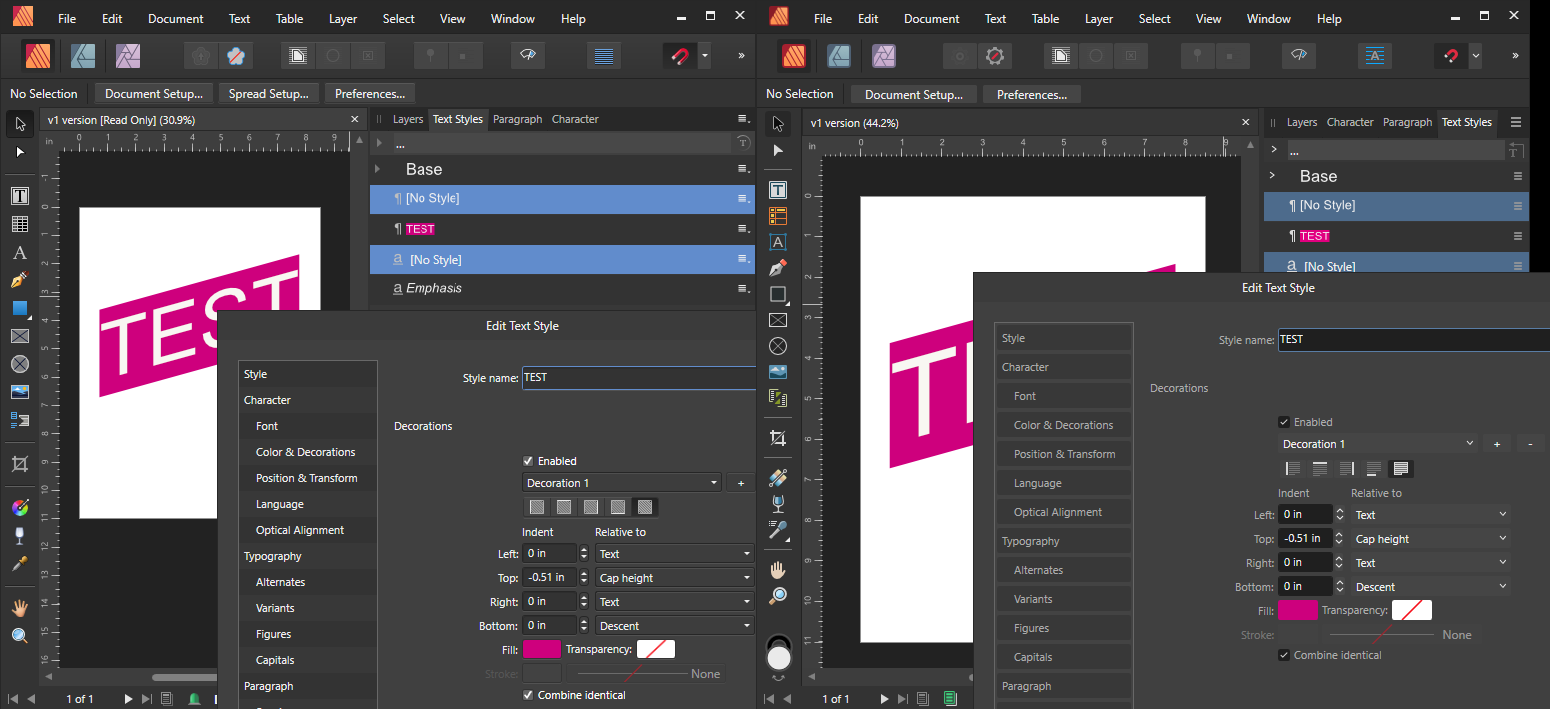
I am not able to duplicate this problem on my end. Hard to tell what is happening without looking at the original file. I did create my own test document in Affinity v1 and I opened that same file in Affinity V2 which gave the normal warning about opening legacy files. Despite the warning, the appearance of the graphic looked identical to its original form with the decoration values matching. I was also able to save the file as a v2 version with no problem. Affinity v1 and v2 with the same file open (notice read only ). This particular file imported with no surprises in v2 other than a warning of opening legacy files.
-
I am not having any problems with this in v2.0.3 Edit: I just noticed also that in your snapshot that the application is in Beta. I am working with final v1 and v2 versions.
-
I agree.
-
When you design your text box to fit Donotbreakthis the word will be pushed to the next line. It will not break unless you break that rule.
-
It will not extend horizontally because you planned your design.
-
The word will break up when it does not fit the maximum character length design of the given text box. Design the text box width to accommodate the word that contains the most characters in the database for that field. When this is done, your words will not break unless you break this rule. To accomplish this you will need to go into your database and find the largest word that exist in that field and then plan your design. I ran some simulations and the words did not break when following this method. Preflight will also notify you if the text extends below the base of your text frame. You can check 'preview with record' and look on the bottom left of your screen to see if there are any errors before compiling.
-
Yes it appears when the word is truncated on my Windows machine. And also appears past the edge of a page.
-
In my merge tests preflight shows me text overflow warnings before and after completing the merge even when it falls past the edge of the document.
-
Yes this is an interesting discovery. However, I do have a question. Is the "Paste Without Format" being used correctly in this example? The help file only mentions using copied text not a copied text frame. "Paste Without Format" of an entire text frame does not seem to match the use case. The way I understand using the "Paste Without Format" feature is that text is copied from within your source frame and pasted to take on the formatting anywhere you choose within the target frame. Using this feature according to the description in the help file works. Source: Affinity Publisher V2 help It talks about copied text not a copied text frame. If you want to copy the text frame to another page of your choice, using regular paste works and is predictable. It would seem to me that "Paste Without Format" was never intended to work with an entire text frame.
-
Was able to get it working on my Windows machine. Had it replace formatting only for styles that I told it to search. Affinity 2.0.3
-
Hi, I was able to do this also. This seems to occur after creating a new style before inserting a note. To fix this: Place the cursor in the footnote that you want to fix then go to the (burger) menu of the "Bas de page" style and select You can also single click the style before typing the footnote as an option. The formatting in the footnotes section will go back to the custom style from then on until you create another new style in the document. This will enable you to keep your custom style for that footnote.
-
Printer profiles missing in new affinity apps
PixelEngineer replied to Bmongo's topic in V2 Bugs found on Windows
When printing from Affinity I would try turning color management handling off in the printer's options. Then set Affinity print dialog to Color Handling: Performed by App. Print a test page from within Affinity to see if the colors look close to what is showing on your monitor. It is possible that when you are printing from the PDF application that the color management settings in the printer is turned off. I think that this will reduce the oversaturated and brightening of colors. I suppose you can try this out on a test page. I don't have access to this type of printer to try it out. -
Hi thanks @MikeTO for taking a look at this. Yes it didn't seem to work as expected but I am now able to work with this since I know what to do now. Thanks for your observations. I understood what you meant regarding presets saved in other parts of the program. When closing a dialog with an X , a program would usually ask if you want to save the settings or not. So yes it looks as if it is by design. The way I am working with it now is that whatever preset I want to edit, I select the preset in question and make adjustments. Any adjustments made will put those changes into a "<custom>" mode phase (no longer the named preset with settings as before), where I will then be able to make a decision to "create preset..." to save as a new preset name or override the existing preset using the same name. Thanks
-
Footnote number style in note body
PixelEngineer replied to crdasneves's topic in V2 Bugs found on Windows
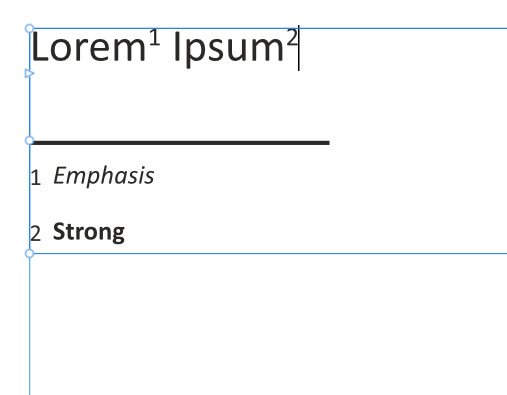
EDIT: Here is a result after importing from MS Word with no modifications. This is the actual representation of importing into Affinity Publisher with no edit. Please disregard the earlier posted quote of my previous upload. I was still able to adjust first words character style without affecting the number importing from MS Word.
-
What you mentioned is what I thought I was doing. It's working. Thanks you!
-
The "Cear Recent Finds" functionality not working for me in both V1 and V2. V2.0.03 and V1 1.10.1665 Open Affinity Publisher Search for a word that can be found in your document Click on the icon (magnify search icon) that is below word Find to access the Clear Recent Finds button Click the button . . . Nothing happens. Just in case I rebooted my computer before posting this. If not working, it would be great if it could be fixed. Thanks
-
Wrong setting in "PDF (for print)" Export preset
PixelEngineer replied to Blake_S's topic in V2 Bugs found on Windows
Save your own custom preset. Check the bleed option Click on the "hamburger" menu to the right next to Advanced Select Create Preset Give it whatever name you want You can go back the that same menu later to rename or delete it.