MikeTO
-
Posts
9,258 -
Joined
-
Last visited
Everything posted by MikeTO
-
 Oh my mistake, I misunderstood the purpose of that pattern. Sorry. I could swear I was seeing the reverse yesterday, that those with UK English couldn't get BST, but I can't duplicate it now so I must have been confused. Sorry. At least I got one right. I thought that's what it should do and I've now figured out the steps. If you insert the current date & time field into a text frame on a document page it will update correctly but if the same field is inserted into a frame from a master layer it won't update - you can customize the formatting but not update the value. Thanks, Mike
 -
Custom text variables
MikeTO replied to Ash's topic in [ARCHIVE] 2.5, 2.4, 2.3, 2.2 & 2.1 Features and Improvements
I must have missed that you could copy/paste a frame with a custom variable. That's great, thanks for pointing that out to me! Cheers -
@NathanC Thanks and sorry to have caused so much work for such a minor thing. I wouldn't normally pay attention to this field except I was testing custom date formatting yesterday and used Created as my test field until I realized there was an issue with it. Cheers
-
Thanks @Hangman for clarifying the conditions. Do you have it now @Sean P? My gut feeling is that these issues and the stuck issue (https://forum.affinity.serif.com/index.php?/topic/190960-publisher-wont-change-to-text-frame-tool-stuck-on-move/) I reported are all linked. In addition to these issues, there is a stuck mouse pointer issue I haven't reported because it's just the pointer, clears up easily, and I haven't figured out the steps yet, but all of these seem to have started at about the same time. Thanks
-
Hi, I'm late to the date formatting party but I tried all the formats today in English US, UK, Canada, and Australia and found a few small issues. I can't get k/K to work in any language. If it's 6 pm and I enter "h H k K" I get "6 18 18 6". Should it give me "6 18 19 7"? For "z" (lowercase) and language set to English UK I get GMT+1 instead of BST and GMT-4 instead of EDT. For English US or Canada it gives me BST or EDT as stated in the help file. Is UK English supposed to work that way? The formatting window for date & time (the general one, not the created, saved, or printed ones) has an Update button when opened in a dialog from the context menu but for me it does nothing. Also, should the button be included in the popup version opened from the panel? The help page for "B" states" Possible values are in the morning, noon, in the afternoon and at night." The list is missing "in the evening". The help page for "x" states that x will result in +01, -0930 but it actually results in just +01. I don't think that the code is wrong, but the unicode and iso documentation is confusing. It might be worth noting in the help page that non-alpha characters don't need to be enclosed in apostrophes. I believe this (k) is for referring to 00:30 as the 1st hour of the day and 11:30pm as the 24th hour. Cheers
-
Custom text variables
MikeTO replied to Ash's topic in [ARCHIVE] 2.5, 2.4, 2.3, 2.2 & 2.1 Features and Improvements
In the meantime it might be nice if custom variables were imported with Add Pages from File. I sort of assumed that if I used a custom variable on a page and then imported that page into another document then the custom variable would come with it. I can see that a variable did get imported because the character count went up by one but it's not associated with a variable defined in the document. This would be a useful workaround for Books because variables aren't synced across chapters. Thanks -
@Sean P This is unrelated to fields but there's a more common scenario in the beta that can lead to a non-blinking cursor and result in the loss of the entire frame when you press delete. Perhaps they have the same cause or can be fixed together. Create a doc and draw a text frame Type some text - the cursor is blinking Save the doc - the cursor will no longer be blinking Press Delete - the text frame will be deleted This is a regression from 2.1.
-
Cross References
MikeTO replied to Ash's topic in [ARCHIVE] 2.5, 2.4, 2.3, 2.2 & 2.1 Features and Improvements
It happens with unlinked frames for me. Screen Recording 2023-09-03 at 10.45.28 AM.mov IMO it's an oversight. I can expand a field in a frame on a master layer, I just can't edit it. I can edit a date field on a master page layer, just not a cross-reference field. -
The Created date for one of my projects is stuck and refuses to change when I use Save As. It changes for all of my other documents. The Saved date and Save Count do change correctly. Here's a test file saved from 2.1.1. test.afpub Here are before and after screenshots of using Save As in 2.1.1 on my oldest backup. Saved and Save Count are reset but not Created. Here are screenshots of using Save As in 2.2 beta 1971 on the latest version of this project. Same as above. Here are screenshots of a working project for comparison, using Save As in 2.2 beta 1971 which resets the Created date to today's date.

-
Cross References
MikeTO replied to Ash's topic in [ARCHIVE] 2.5, 2.4, 2.3, 2.2 & 2.1 Features and Improvements
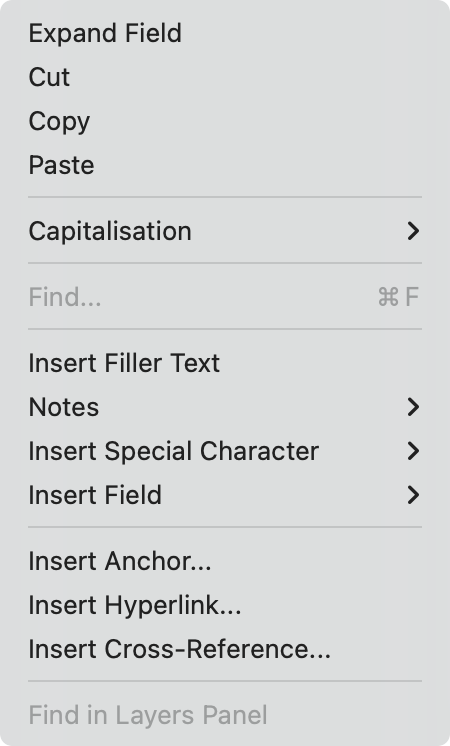
I found a repeatable crash with cross-references, although it's not something people will do often. Create a new doc, draw two frames on page 1, type Apples in the first frame, and cross reference the Apples paragraph in the second frame. Cut the second frame. Paste the frame onto a master page. After a moment Publisher will crash. Affinity Publisher 2 Beta-2023-09-03-090225.ips @Hangman Ah, the missing Edit Cross-Reference context menu command is a bug. If the cross-reference is in a text frame on a master page layer you'll get the context menu shown below on the left, if it's in a frame on a document page you'll get the context menu shown below on the right. Find in Layers Panel is also disabled for master layer cross-references. I've attached a test document to illustrate the problem. xref test.afpub
-
How to set background color of a text frame on Affinity Photo v2 on iPad?
MikeTO replied to dirtcat's topic in iPad Questions
Thanks, I didn't read the title -
How to set background color of a text frame on Affinity Photo v2 on iPad?
MikeTO replied to dirtcat's topic in iPad Questions
I haven't tried it recently but I believe you use the Text panel > Text Frame https://affinity.help/publisher2ipad/English.lproj/contents.xml?page=pages/Panels/textPanel.html?title=Text panel -
FYI this is a known issue. There's another command like this, too, Window > Toggle Full Screen. These are OS commands and something goes a bit haywire with them when editing shortcuts. The good news is this is mostly cosmetic, you can just ignore it.
-
If you don't finalize your headings before generating the TOC you will have duplicate anchors which will clutter up your PDF bookmarks. Deleting them can be difficult without breaking your cross-references. For example: Create a heading named Eating Apples and generate the TOC. Publisher creates an anchor named Eating Apples You then add a cross-reference to Eating Apples (using 2.2 but this isn't a beta issue, I'm just illustrating a point) Then you decide it would be better as just Apples so you rename it. Generate the TOC and now you have two anchors, Eating Apples and Apples. The cross-reference will be out of date but Preflight helps you fix that. Then you realize it was better before so you change it back to Eating Apples. Generate the TOC and now you have three anchors, Eating Apples, Apples, and Eating Apples. Now you don't want the Apples or that extra Eating Apples anchors in your document because they will clutter up the PDF bookmarks, but how do you know which Eating Apples anchor it's safe to delete? There's no indication of which anchor is tied to the TOC. I had this issue today after I renamed a bunch of headings and then renamed them back. I deleted all of the anchors since there was no easy way to do it and then fixed up my cross-references. It would be great if the TOC could rename its anchors rather than creating new ones after each edit. Thanks
-
- 1
-

-
Hi @knl and welcome to the forums. Do you have screen magnification turned on? There are buttons at the bottom of the window but it's cut off on your screen so I think you'll need to review your display settings. Cheers
-
Cross References
MikeTO replied to Ash's topic in [ARCHIVE] 2.5, 2.4, 2.3, 2.2 & 2.1 Features and Improvements
Maybe it depends on the style's attributes? I did two tests, one with just strong and emphasis. Apply one via the text styles panel and one via cross-reference. Here's a test doc showing this. The text style panel shows it's just emphasis but the cross-reference also applies strong. test.afpub I also tried it with my book project in which I want to apply two character styles to all of the dates. It worked fine but I'd never do it myself, I'd have hundreds of extra cross-references cluttering up the CR panel and I'd have to type all the dates into the CR dialog rather than typing them directly. It would be too confusing in practice but it worked when I tried it. Cheers -
Cross References
MikeTO replied to Ash's topic in [ARCHIVE] 2.5, 2.4, 2.3, 2.2 & 2.1 Features and Improvements
Here's a crazy tip using cross-references for those times when you really want to apply two character styles to the same words which of course you can't normally do. Copy the text to the clipboard Create a cross-reference The target can be anything, it's irrelevant Clear the text from the Text field and paste in the copied text - there will be no page number or paragraph body, just the static text you wanted to apply two styles to Choose one of the character styles from Style Override Turn off Generate Hyperlinks and Limit Subfields. Click OK Apply the other character style to the inserted field - now there are two character styles applied to it -
Fair point
-
Cross References
MikeTO replied to Ash's topic in [ARCHIVE] 2.5, 2.4, 2.3, 2.2 & 2.1 Features and Improvements
One more note on this part of cross-references that isn't working. When a cross-reference is out of date it will be listed in Preflight. Double-clicking will take me to the cross-reference in the document but it doesn't select the cross-reference in the panel. I assume the selected cross-reference is supposed to be listed in the panel. It might also be good if we could right-click the cross-reference and choose Edit because if you see one on the page it can be difficult to find it in the panel, especially if page numbering restarts after front matter and the page numbers don't match what is displayed on the page. Thanks -
That would be dangerous but each book had its own chapters. I had the book in a folder and to make backups I duplicated the entire folder.
-
One more item to add to the light mode issue list - the scrollbar box is pure white and has no edge so the page and scrollbar box just bleed together. Contrast this with Apple Pages which has a light grey background and a medium gray edge so it's apparent where the scrollbar is.
-
I encountered a repeatable crash when trying to open two Books with the same filename but stored in different directories. They were versions of the same Book but it's easy to repeat this with a blank Book. This isn't really that obscure of bug, I often open older versions of my documents to compare them and that's what I tried to do with this Book. Create a Book and choose Save Book from the panel menu, there's no need to add chapters for this test Choose Save Book As and save it somewhere else under the same filename Choose Open Book and open the first one you saved. It will result in this repeatable crash. Affinity Publisher 2 Beta-2023-09-01-202312.ips
-
If you split that last table into two it should import perfectly into the 2.2 beta. I got poor results importing it into 2.1.1 so perhaps something was changed in this regard. As Walt said, the problem with that last table is that it's too large to fit into a text frame on a single letter/A4 page. This isn't a bug with importing from Word, it's because the object, the table, is too large to fit into the frame and Publisher can't split tables across pages automatically. Here's a second option if you don't want to split the table in Word before importing. After pasting the text into the first frame it will be overflowed, there won't be room for all three tables in this document. Shift+click the Text Flow Out control's red triangle to AutoFlow the content to a second frame. That will leave you with a nice page 1 with the first two tables but the third table will still be too large to fit into the next frame. Now click the Text Flow Out control's "eye" icon on the overflowed last frame in the series. That will show the overflowed table. Now you can select it and resize it so that it fits into the frame. I tried this and it worked fine. Good luck
-
I have a repeatable crash with a Book. I open the Book file, open the first Chapter, and see the Preflight warning that the TOC needs to be updated. Clicking the Fix button in Preflight crashes. This is a test Book I've used for playing with the Books feature, there's no actual content in it. This Book was created in 2.1 but saved from the 2.2 beta. I don't think this is a 2.2 beta issue so I'm reporting it here. Affinity Publisher 2 Beta-2023-09-01-174635.ips Book Test.zip
-
That looks right. I don't have any other ideas but hopefully somebody else or Serif will have something more concrete. Good luck