.jpg.3a17d7081cd0e34b0fe9b8353f1349c2.jpg)
weegiegrum
-
Posts
65 -
Joined
-
Last visited
Everything posted by weegiegrum
-
.thumb.jpg.a29ef32a92c9b769eea70410dd872021.jpg) Looks pretty good. If I was being uber-critical, I'd maybe suggest making the names font a couple of points larger as it's getting a little lost in amongst the other text.
Looks pretty good. If I was being uber-critical, I'd maybe suggest making the names font a couple of points larger as it's getting a little lost in amongst the other text. -
I found that you need to have the chapter that you're cross-referencing to open when you're inserting the CR in the source chapter. Then search by word or page number to find the point where you want to insert the CR.
-
I agree. The whole colour panel remains a bit mysterious to me.
-
I've recently had just this issue with a book containing several pages of tables. What I ended up doing was formatting pages in Word to match the AFPub pages as far as possible (page size, margins, fonts etc.), then created the tables in Word, exported the document as PDF, then imported the PDF to AFPub using 'Document/ Add Pages from File...' menu command. That worked pretty well, and you can resize the table or individual elements easily using the Move tool. See attached. tabless.afpub
-
Publisher's master pages aren't syncing on a book.
weegiegrum replied to biguprush's topic in V2 Bugs found on Windows
I've read this several times and I still can't see why that's something that you would want to happen? Having just done a book with several chapters, I found it extremely tedious to have to go through each individual chapter and adjust the master pages in each one whenever I had to make a simple change. Why can't a master page be synced across all chapters of a book? -
TOC indent level resets on export
weegiegrum replied to weegiegrum's topic in Desktop Questions (macOS and Windows)
Finally - it works! 🦾🎆 -
TOC indent level resets on export
weegiegrum replied to weegiegrum's topic in Desktop Questions (macOS and Windows)
The problem in my case is that I am using a custom 'chapter start' text style throughout the document but in some cases I want it to appear as different TOC styles. For example, I've created a 'chapter start' text style in the book that places the title in Heading 1 with 65 point space above, and on the recto pages. In most cases I want this to be TOC heading 1, but there are some that I want to show as TOC heading 2 with an indent. I can select as those as TOC heading 2 in the TOC panel and adjust that style in the Text Styles panel, but it doesn't hold when the TOC updates. What I'm after is this: CHAPTER START (TOC Heading 1) Chapter start (TOC heading 2) Intuitively, I would expect the format applied in the TOC panel to override the document settings, but it reverts to: CHAPTER START Chapter start If you can't alter the look of the TOC from the TOC table, it seems pointless to have that ability if it's not going to stick when you export. Anyway, I *think* (correct me if I'm wrong) it looks like I need to go through the whole book and create a new style based on CHAPTER START for the secondary 'chapter start' headings that I want indented as TOC heading 2. Then I can tell the TOC to treat them as separate styles. Does that sound right? -
TOC indent level resets on export
weegiegrum replied to weegiegrum's topic in Desktop Questions (macOS and Windows)
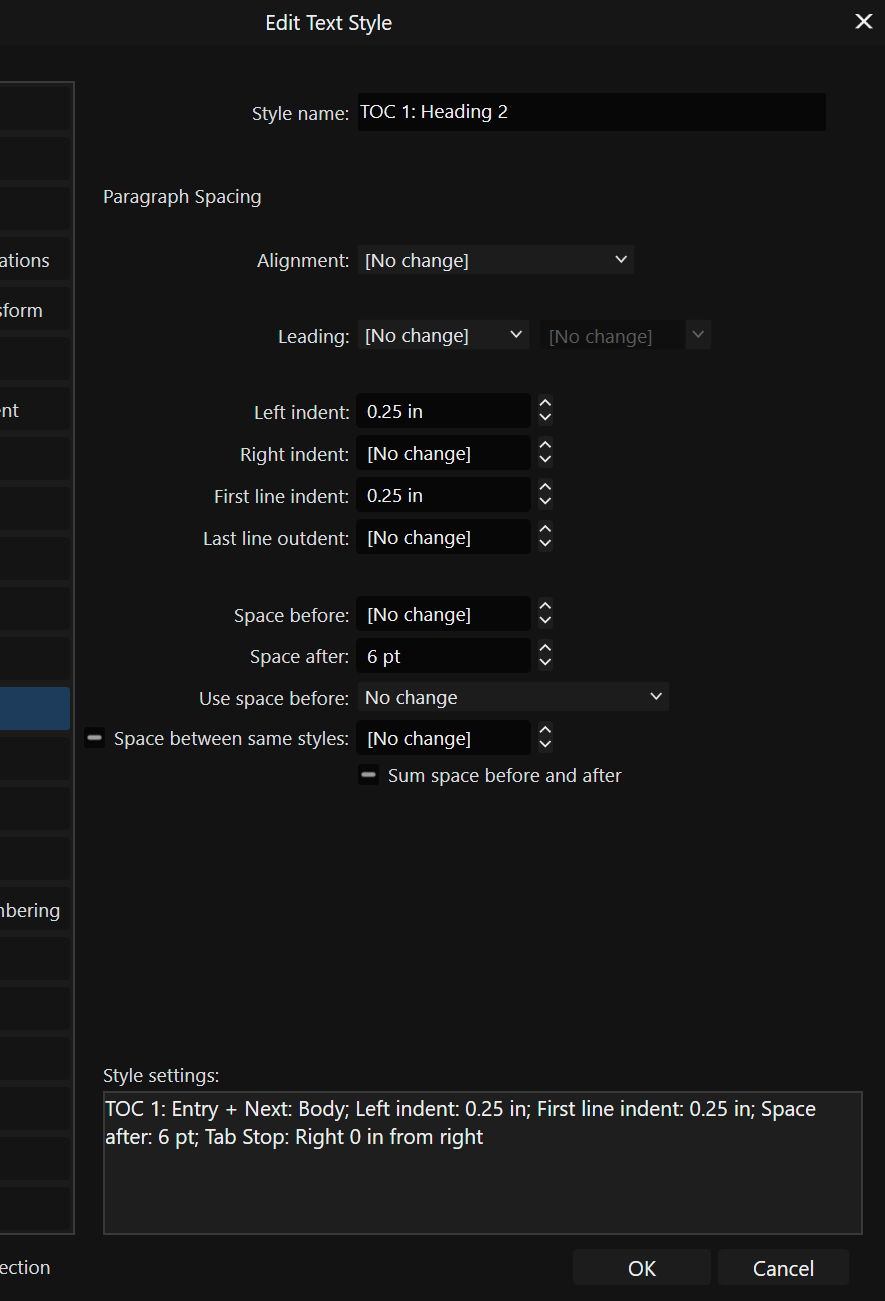
Hand on heart, that was the first place I looked, but I was in the TOC tab so it did not show that option. I didn't realise you had to be in the Books tab. Yes, that's what I'm trying to do. I've edited the TOC1: Heading 2 entry in the Text Styles panel (see attachment) to include the indent, but it doesn't seem to retain that when I export. There's some mixture of styles going on that's throwing things out, but I think I know what it is. I've managed to sort out a couple of problems there, but I still have a few headings that are coming up wrong. I can update the relevant styles in the contents table, and I can turn off 'update numbers' on export, but I can't seem to turn off 'update table of contents before output', which would solve the problem. Thanks for your help on this, much appreciated.
-
TOC indent level resets on export
weegiegrum posted a topic in Desktop Questions (macOS and Windows)
I'm having trouble getting the TOC of a multi-chapter book to format indents properly. Setting an indent level in the TOC panel when selecting text styles to include seems to have no effect. I can select the entries in the TOC and select the proper indented TOC style in the text styles panel, but whenever I hit 'export' the whole TOC will revert to default no indent setting. How do I turn this of? In Mike's PDF guide, when talking about the TOC panel (p 146), it says: Which implies that there is an option to turn this off - where is that 'update numbers' command located? It would be so much easier if I could format things on the TOC page and then stop it updating before export. The whole act of creating and formatting a TOC is still hugely cumbersome and confusing. I judge these things against the amount of time it would take me just to write it out by hand, and this has gone way past that. I may actually end up doing that, as I've now spend most of the afternoon trying to get this to work... 😬 -
Odd section manager numbering in book
weegiegrum replied to weegiegrum's topic in Desktop Questions (macOS and Windows)
D'oh! I should have thought of that. 🙄 Still a bit of a learning curve for me with the Books thing... all sorted now. Thanks Mike! -
This has me scratching my head a bit and I can't find a way to resolve it... I'm putting together a book, and I'm having trouble with the page numbering in one of the chapters. For some reason, this particular chapter insists on numbering it with an even number despite it being the recto page. The number matches the last page (verso) of the previous chapter. (In this instance, both are numbering as page 150). Section manager won't allow me to change the start number of the first page, so I'm a bit stuck. Can anyone shed light on this issue?
-
Resurrecting this topic to report that I am experiencing the same problem in 2.3.0. Clearing and reapplying the master seems to fix it.
-
That's a good tip - I'll try playing around with that and see if I can get it working. Thanks both!
-
I'm not sure how to explain this properly, but what I'm trying to do is create a separator between paragraphs or sections, like: + + + or *** but using a simple line-art image of my choice. I want to be able to create a style that will automatically insert it with correct sizing, leading, etc., without having to manually add a picture frame, insert the image, set the frame wrapping etc., as they tend to drift around when the text is formatted, even when an anchor is attached to the nearest bit of text. I know how to do this with Wingdings, webings and so on, but is it possible to use an image?
-
Yeah, that's not going to work in this case, the table rows all contain multiple lines of text so are different heights. I'm going to have to leave it for now as I'm away next week. But thanks for the tips, all very helpful.
-
OK, that sort of works, but seems to lose my template and master pages of the document I'm trying to add the table to. How can I restore those?
-
I was afraid that was the case. That's going to be rather tedious... 🤔 Ah well, thanks for the confirmation, Walt.
-
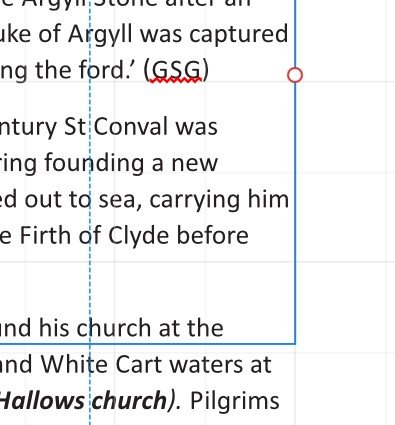
I'm trying to place a rather lengthy 3-column table from a Word document, but I can't get it to autoflow across multiple pages. Each time I try Shift-click on the text flow arrow, it jumps the whole table down onto the page directly below, leaving blank pages above, and the text flow arrow then becomes a red circle that I can't do anything with (see pic). I also tried creating a matching table in Publisher and placed into the first cell of that, but the same thing happened and I was unable to flow into subsequent pages. I'm using a double-spread Master page with correctly-linked text frames - am I going wrong somewhere, or is this still something that's not possible in V2, as discussed in this thread?
-
2.2.0 prompt still appearing
weegiegrum replied to weegiegrum's topic in Desktop Questions (macOS and Windows)
That might be it. I did install the msix versions originally, but subsequently I always update from the prompt on program startup. -
I'm a little confused by the update prompt on all packages today (19 September), as I thought I'd already updated everything to 2.2.0, yet now I'm being offered an update.... to 2.2.0! What's going on? Should it be 2.2.1? 🙂
-
Change size of note marks?
weegiegrum replied to weegiegrum's topic in Desktop Questions (macOS and Windows)
Just to close this off, I managed to get the notes formatted as described except for the note brackets, which were still appearing at a ridiculously large size. I couldn't get to the bottom of this, but I wondered if it had anything to do with me working from a template created in Publisher v1? Anyway, I gave up and decided it would be quicker just to start from scratch with a new document, which I did, and endnotes are now working as they should. -
Change size of note marks?
weegiegrum replied to weegiegrum's topic in Desktop Questions (macOS and Windows)
Hi Mike, I can see how that's supposed to work, but that's not what's happening. I now seem to have two endnote layers, and the original one now doesn't have any numbers at all. The second layer is what's in the earlier screenshot, it has note marks but no note text. I'm guessing that got created when I tried adding a fresh endnote in the text. I can't delete that second layer, nor can I move either layer to the top of the stack. I've wasted so much time on this, I think I'm just going to delete the lot and start from scratch. -
Change size of note marks?
weegiegrum replied to weegiegrum's topic in Desktop Questions (macOS and Windows)
Sorry, I'm still having problems with endnotes... all my endnote numbers have changed to zero in the endnotes page. They're still correct in the text though. I've tried restarting numbering in whole document, which didn't seem to do anything. When I try and insert a new endnote in the text, I get a new page with a bunch of endnotes (still all numbered 0), and I'm back to the large note marks again. I really could do with a custom tutorial on this... 😒
-
Change size of note marks?
weegiegrum replied to weegiegrum's topic in Desktop Questions (macOS and Windows)
Brilliant! That seems to be doing the trick. I got confused with the text/paragraph/character settings. Thanks! -
Change size of note marks?
weegiegrum replied to weegiegrum's topic in Desktop Questions (macOS and Windows)
Hi Mike. Up to now, I have been having to format each endnote manually. I've been trying to change things in the note body dialogue without much success. Whenever I changed the note body style, the numbers would revert to the huge size. However, I seem to have regained some control by selecting 'footnotes' as the note body style. That has reduced the brackets to normal size. I'll persevere. I do love this program, but it can be very counter-intuitive at times!