Ducati
-
Posts
25 -
Joined
-
Last visited
-
Designing art for print
Ducati replied to Ducati's topic in Pre-V2 Archive of Desktop Questions (macOS and Windows)
Thank you - NotMyFault. I sell printable products online, so I have no way of knowing where or how they will be printed. It may be on a crappy home computer, uploaded to an online printing co or taken to a specialised printer. Any of my work that is in colour, I choose CMYK colours and create both an RGB version exported as a JPG and a CMYK version exported as a PDF (for Print selected at export). I do also have SVGs in my shop, but these are always 100% vector with no effects. Thank you - I'm reassured -
Hello experts! Does anyone have any recommendations &/or resources that I could consult for designing in Affinity Designer for printed artwork? I have asked over in the Facebook group, but only got one piece of advice ("Rasterize gradients, transparency, and complex shapes and you should be fine. Leave text and logos.") but would like to ensure this advice is factually accurate and find out more detail. If I should be avoiding specific tools (eg. Gaussian Blur) and doing things like rasterizing, I would think these should be specified somewhere. Many thanks
-
 Ducati reacted to a post in a topic:
Tutorial - Create your own brush - "grass" example
Ducati reacted to a post in a topic:
Tutorial - Create your own brush - "grass" example
-
2989 reacted to a post in a topic:
Export SVGs from AD to Cricut
-
Export SVGs from AD to Cricut
Ducati replied to Ducati's topic in Pre-V2 Archive of Desktop Questions (macOS and Windows)
Thanks Patrick. Yes, I saw this a while back when I was just starting out. -
Export SVGs from AD to Cricut
Ducati replied to Ducati's topic in Pre-V2 Archive of Desktop Questions (macOS and Windows)
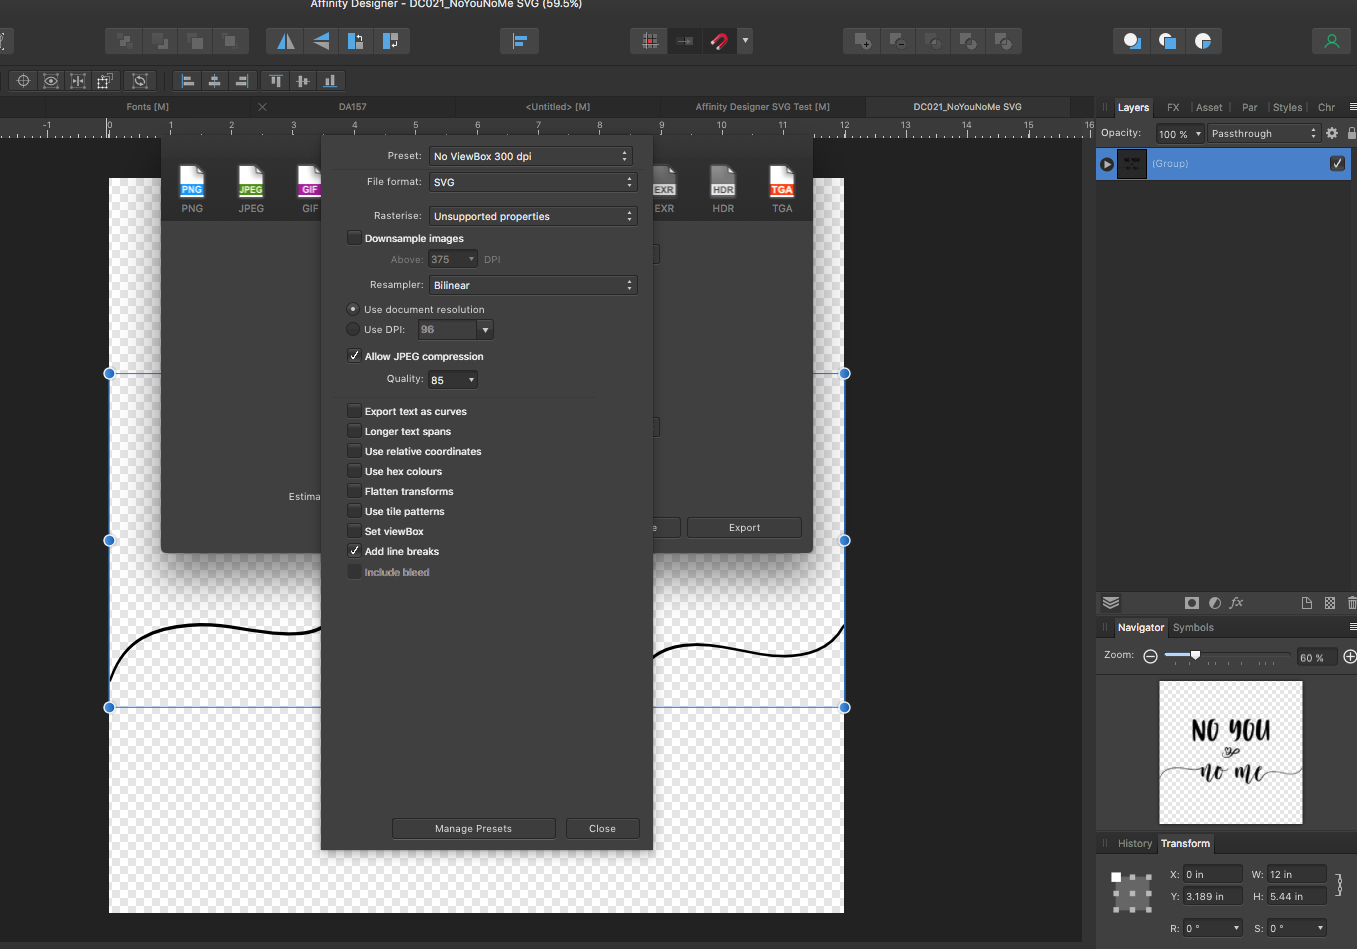
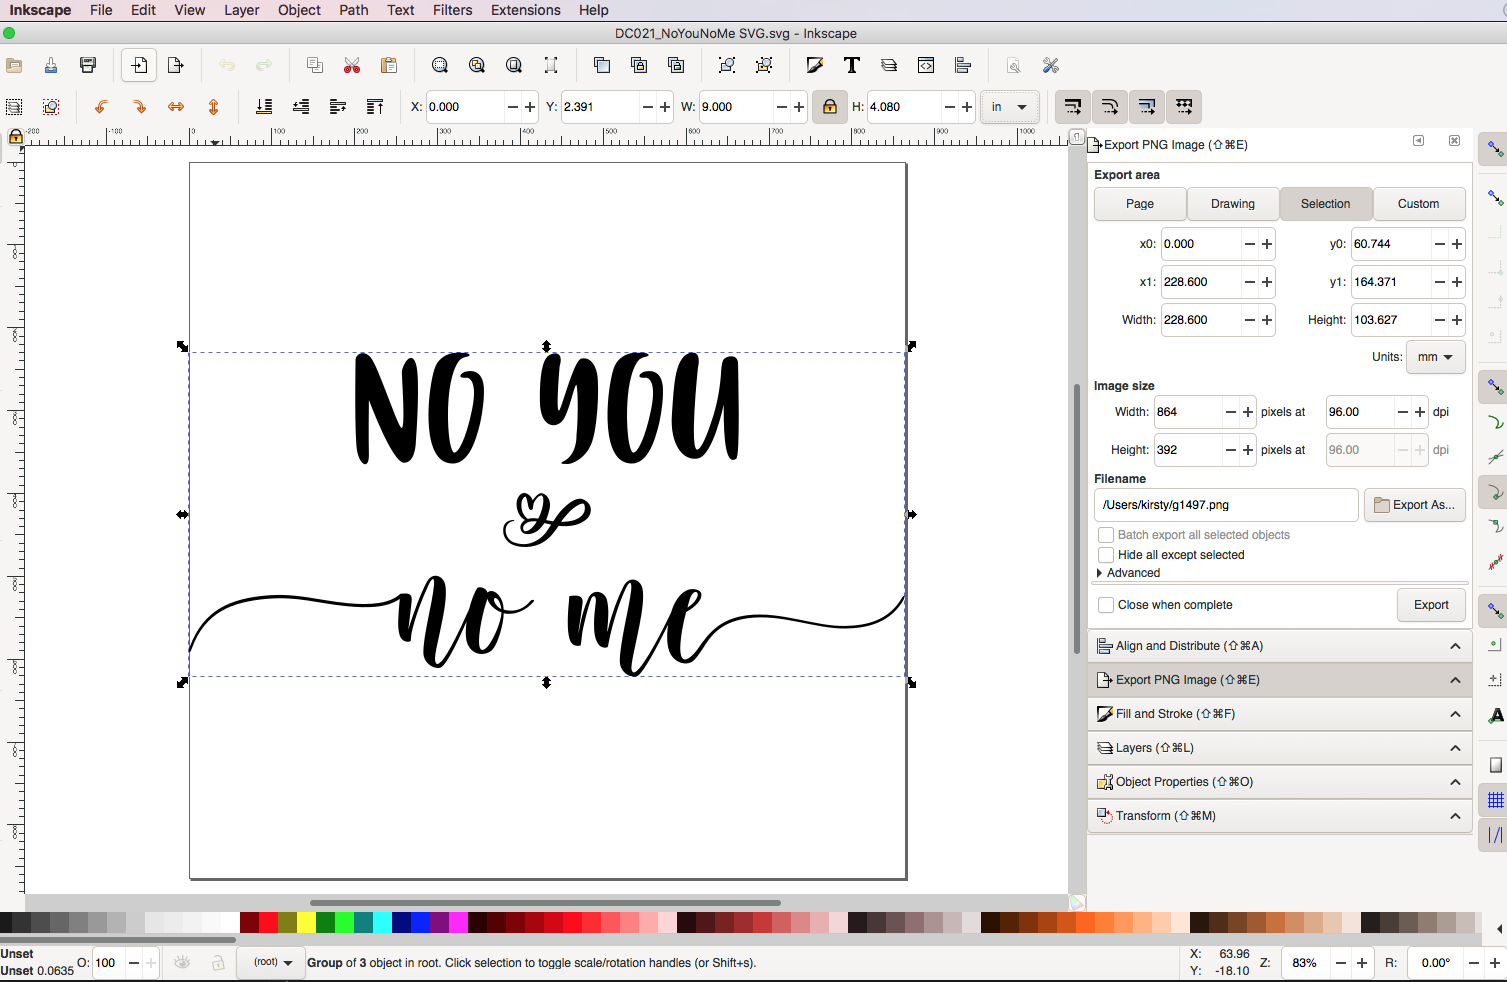
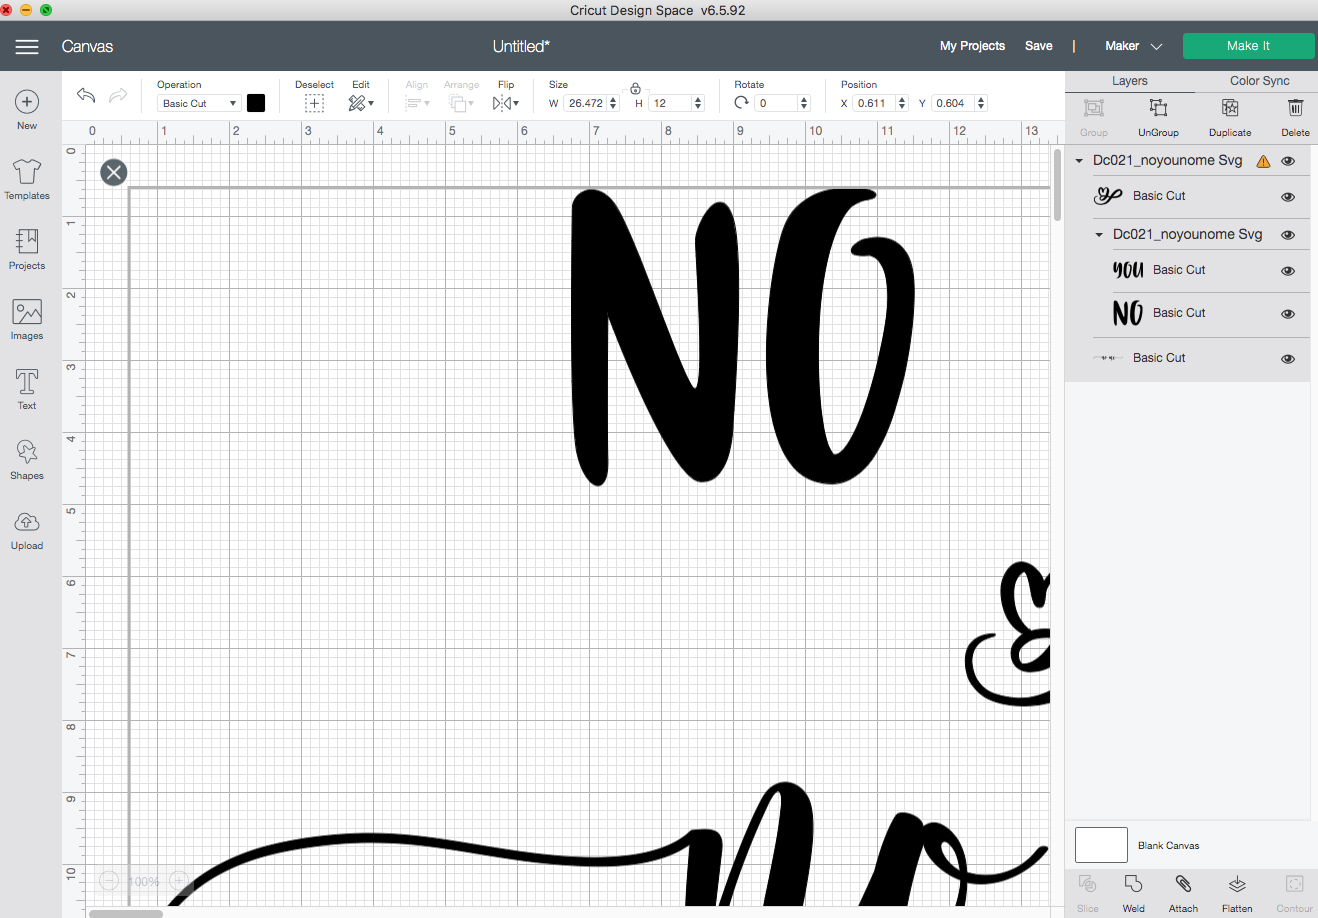
Hi Patrick! Thanks for responding! Many crafters seem to have issues between AD & Cricut. I had found that setting DPI to 72 and exporting (Selection without Background) without Viewbox means that the resulting SVG is the same size when uploaded to Cricut. Until recently. I cannot 100% say when the change occurred. An SVG I made on 20 Feb was fine. One I made on 28 Feb - and all since - had this issue. It is worth also noting the Cricut has had 2 updates in the last month, so it may be that something they changed just doesn't like something in Designer. Attached is one of my problem files. I made it on a 12x12" canvas in Designer Persona - the image itself is 12"x5.44". Settings as above (screen shot attached). After saving the file, I export as described above. If I open the resulting SVG (also attached) in Inkspace, it says the image file is now 9" (screen shot attached). When I open it in Cricut (screen shot attached), it says the image is 26". On the Facebook Group I belong to, the moderator had posted a workaround for Windows users (I'm on Mac). This involves opening the SVG in Notepad (it opens with text/metadata) changing the sizing manually there and resaving the file. Not ideal, but seemed to work for Windows users. She posted a PDF which I would be happy to send to you, but don't want to attach it here as she put a copyright on it. Would appreciate your feedback! Here for any other info you need. Thanks! DC021_NoYouNoMe SVG.afdesign C021_NoYouNoMe SVG.svg
-
Export SVGs from AD to Cricut
Ducati replied to Ducati's topic in Pre-V2 Archive of Desktop Questions (macOS and Windows)
OK...not the response I was hoping for! Anyone know how I can escalate this to get it fixed...? I'm a member of Affinity Designer for Crafters forum and many people are suffering from this issue. It's actually holding up my business. Thanks -
Hi. Until the update 1.9 I was able to export SVGs from Affinity Designer to Cricut Design Space at actual size - meaning if I design something that is 30x30cm, it opens in CDS at the same size. DPI needed to be set to 72 to achieve this. Since 1.9, the resulting SVG now opens in CDS a lot larger than the size it was created at. Fine for me, but not for my customers who buy the SVG. The 1.9.1 release does not fix this. Any reason why this is now happening, and is there a work around? Thanks.
- 8 replies
-
- 1
-
-
- affinity designer
- svgs
- (and 2 more)
-
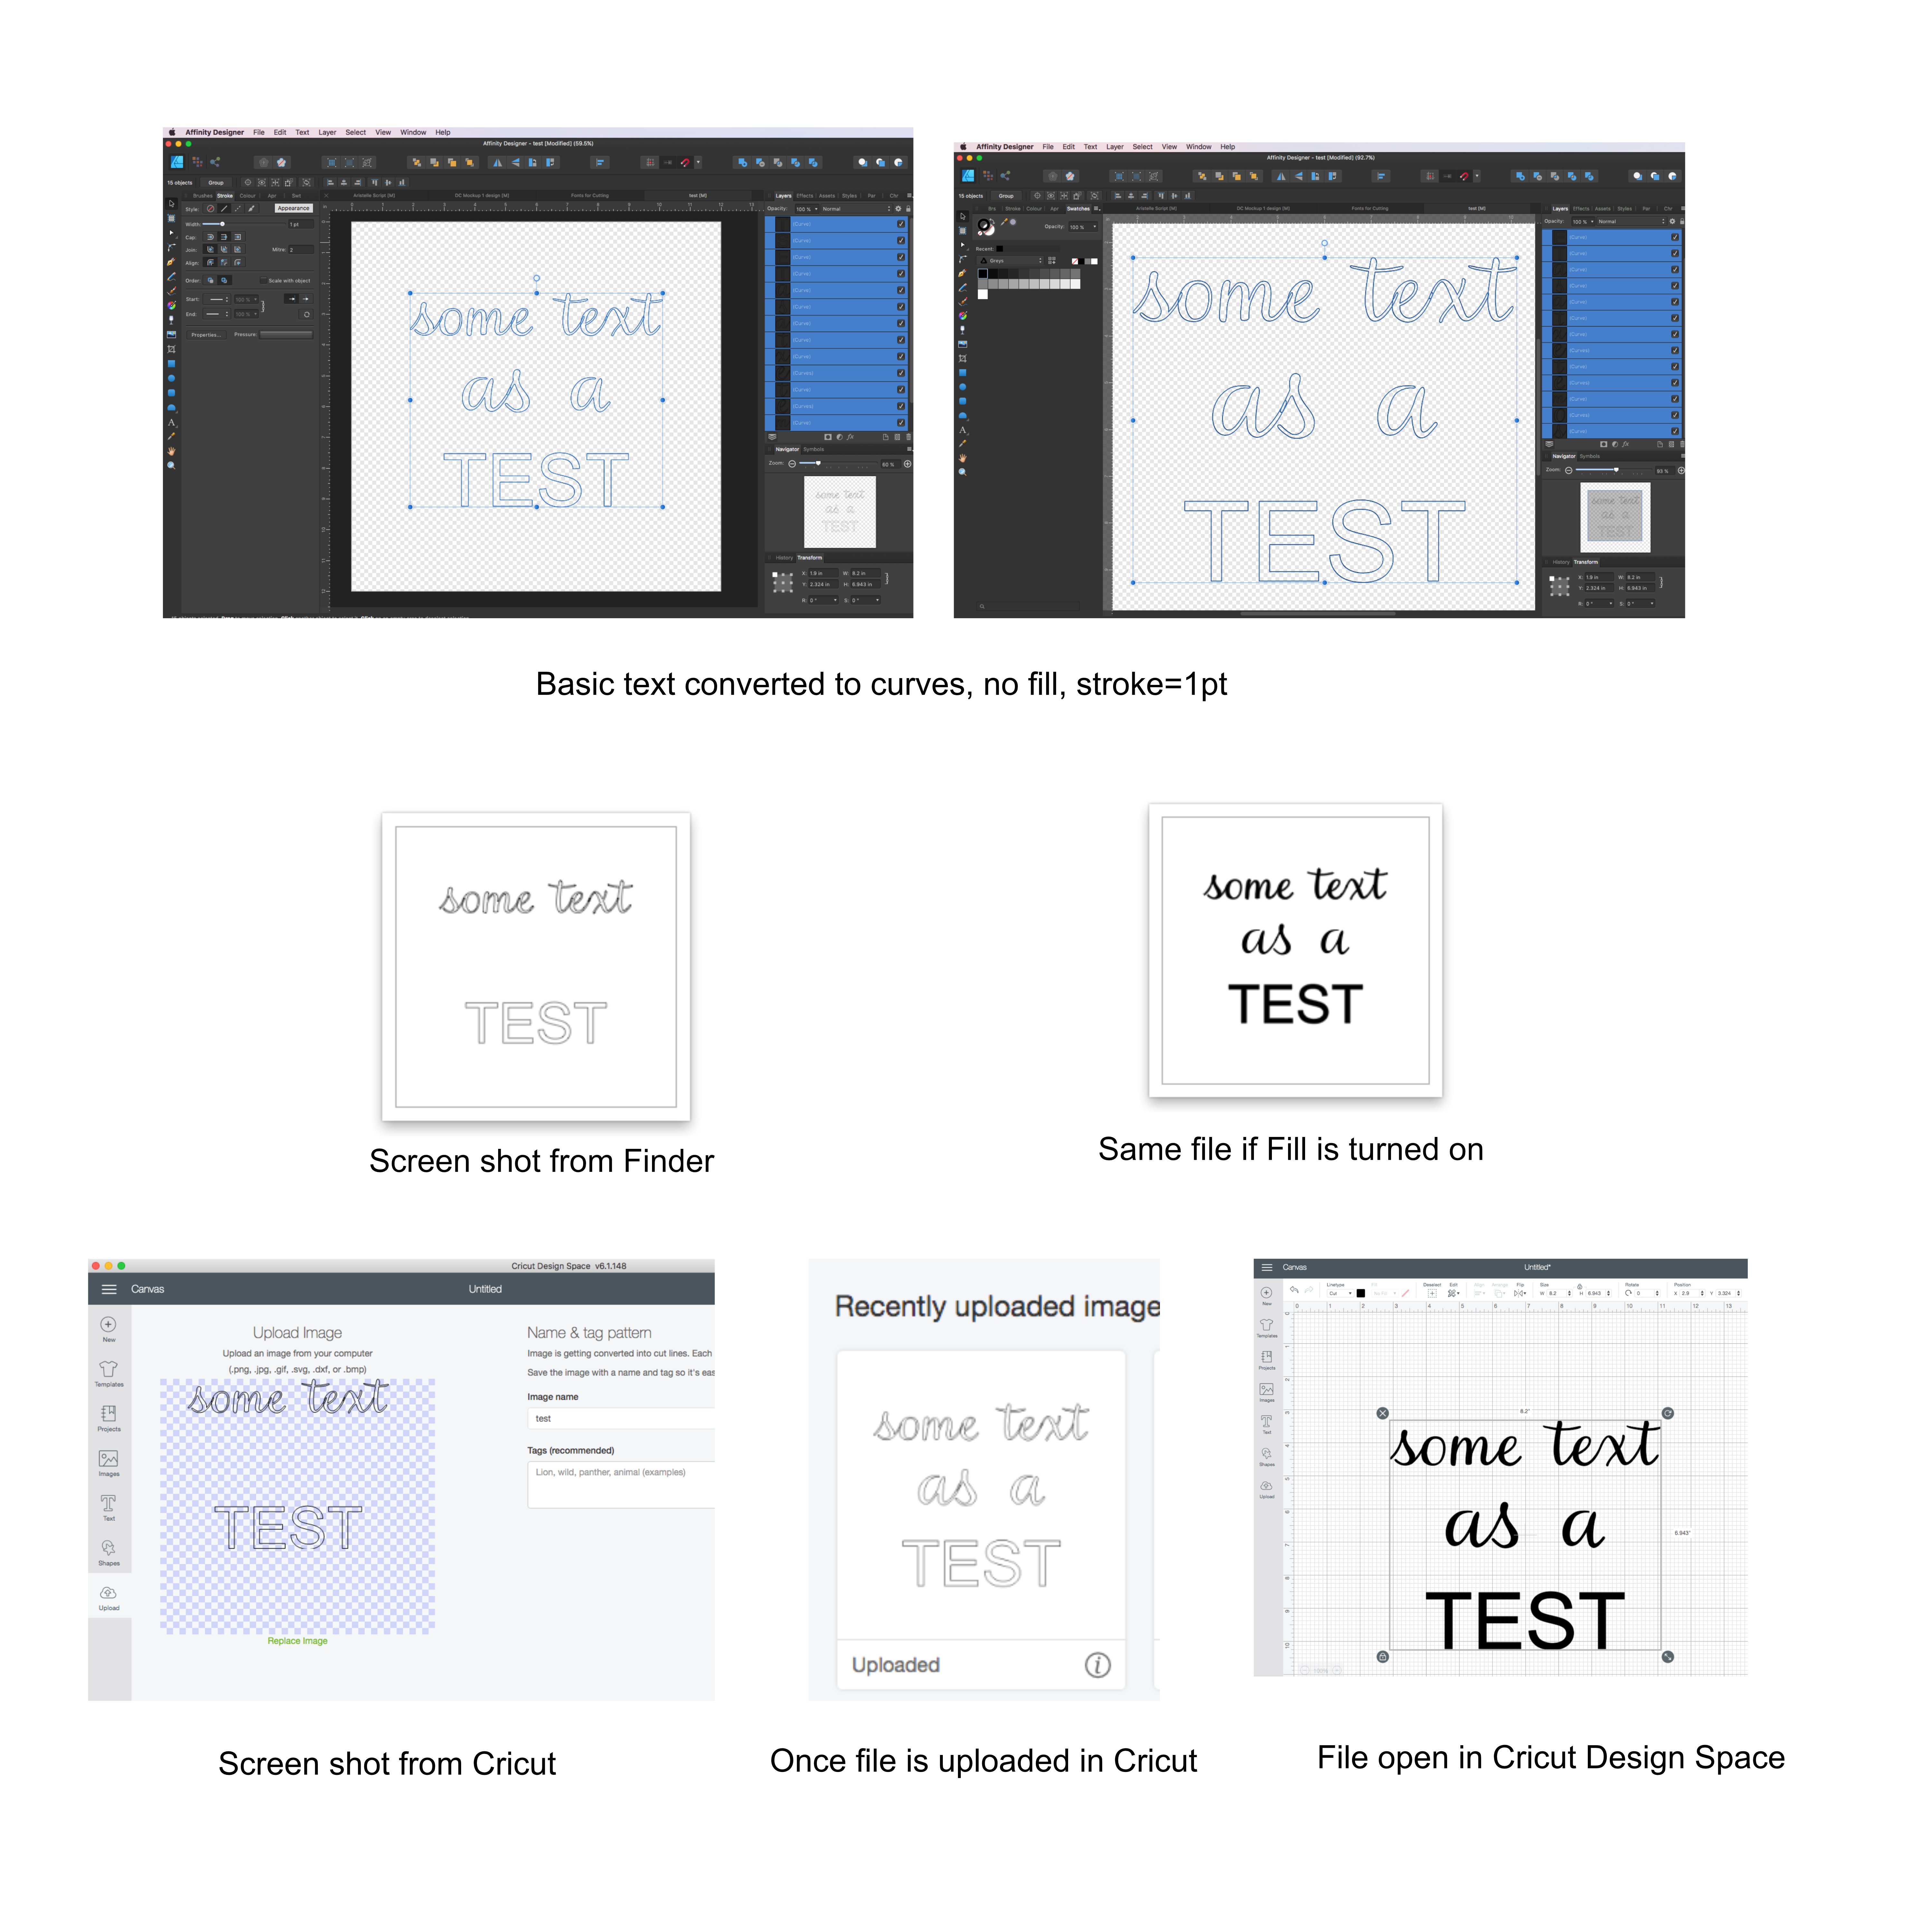
Hi. Sorry I'm a bit late into this conversation. I actually came here looking for help with SVGs for cut files, but feel I can add a little bit of additional information. Firstly David is right, you deffo need to deactivate the View Box as this will impact the size of the final SVG. Also, make sure your dpi is set to 72. I make my SVGs on a 12x12 inch file with dpi at 72 and this opens at the same size in Cricut. I also convert all text to curves, clean up the nodes if necessary, and then 'Create Compound' with any joined up text. Also grouping your text helps preserve the layout for when it is opened in Cricut. Hope that helps a bit. I am having a bit of a strange issue in that when my SVG is saved, the thumbnail only shows certain parts of the text. I've gone right back to basics to try to understand this. In the attached, I have written some text and converted it to curves. The Fill is turned off and the stroke is set to 1. If I export the file at this stage (Export settings with Viewbox disabled), you can see that without making any other changes to any of the 'text' the middle 2 words are missing. The thumbnail in Cricut shows the same thing, although once uploaded it understands all the text. Once fully opened in Cricut, the text is showing as filled instead of stroke only. Last time I posted a request for help on SVGs, I didn't get any, so I'm not expecting much, but if anyone has any pointers for resolving this, I would be grateful. The reason it is an issue, apart from being annoying, is that these files will be sold, and many purchasers will not look past the fact that the thumbnail is missing parts of the image. Many thanks
-
 h_d reacted to a post in a topic:
Creating Compound with padding
h_d reacted to a post in a topic:
Creating Compound with padding
-
Creating Compound with padding
Ducati replied to Ducati's topic in Pre-V2 Archive of Desktop Questions (macOS and Windows)
Nope, sorry, didn't help.- 4 replies
-
- 1
-
-
- affinity designer
- create compound
- (and 1 more)
-
Creating Compound with padding
Ducati replied to Ducati's topic in Pre-V2 Archive of Desktop Questions (macOS and Windows)
Hi Callum (Thanks 😊 ). Yes. It's to do with the file being used by a cutting machine. If you don't create a compound then when the file is opened in the cutting machine software you basically get a pile of individual letters all stacked one on top of the other - you lose the outline of your word effectively. -
Hi I want to create an SVG for a cutting machine. The file contains text (which has been converted to curves for exporting) and, to make the cutting easier, it is recommended to add a little 'padding' around the text area. The Affinity Help pages actually cover this: The Cricut Design Space app will push all layers within your document to the edge of the material when cutting. Again, this is to prevent material wastage. If you would like to add padding around your document, you can add a Rectangle Layer around your Curve Layers before merging all Curves into one layer Sadly, I cannot work out how to actually do it. I have managed to put some padding around the text by making a rectangle and dragging the text into it on the layers panel (presumably this is the rectangle layer). If I click on the rectangle, Create Compound is not selectable. If I Create Compound using only the letters (now curves), then the padding from the rectangle is ignored. I could do with a helping hand please.
-
Even better. Thanks for your help!
-
Works for me! Thanks Walt
-
Can you have a mixture of artboards but only one with a transparent background? I have 2 artboards, one to export as jpg, eps & svg (with bg) and the other to export as png, without bg. Is this possible? Thx
-
Ducati reacted to a post in a topic:
How do I scale vector strokes proportionally?
-
Brush stroke turns swirl
Ducati replied to Ducati's topic in Pre-V2 Archive of Desktop Questions (macOS and Windows)
Hi Honestly, I can't remember the specific brush I used in this example, but it doesn't matter so much, because I get this behaviour with 'all' of them. Just to be sure, I just tried - a brush from all the following categories: Ink, Watercolours, Oils, Pencil, Basic and (one I imported,) inkBrush Vector - Render. As far as I can tell, it doesn't matter the brush, or the corner setting, they all do this. -
Hello This seems like such a basic problem, I'm a bit embarrassed I can't work it out myself, but here I am. I'm using Designer on a Mac desktop. I'm trying to 'paint' a mountain scene and I want to not use pixel persona. I have drawn a basic mountain skyline using the pen tool. I want to add some highlights and shadows. I was going to select a brush with some texture and add strokes that made a sort of upside down V shape - or perhaps more a ✓shape. The problem is that all brushes add this loop when I try to make the turn. I've tried looking at the brush properties, and can see the corner options, but they don't actually seem to do anything. I had to go into Krita to show you what I mean. They have a knife tool (like an oil painters palette knife) that works really well. So this is what I am trying to achieve: I can't find anything similar to the palette knife in AD, but with a and this is what I get in AD (the 3 images are with the corners set to fold - overlap - pull): Can anyone please advise how I can stop this swirling? Occasionally the 'overlap option creates a flat top but it's such a strange shape it doesn't help with what I'm trying to acheive. Many thanks!