zynexis
-
Posts
33 -
Joined
-
Last visited
Everything posted by zynexis
-
Layer Blend dropdown mousewheel scroll
zynexis replied to zynexis's topic in V2 Bugs found on Windows
hey @MEB, your're welcome and yea i also seem to remember it worked previously (on windows) -
Layer Blend dropdown mousewheel scroll
zynexis replied to zynexis's topic in V2 Bugs found on Windows
The font selection dropdown has a similar issue also only the font selection maybe even worse, because you cannot click it twice, it will start selecting the font name for search
- 7 replies
-
- 1
-

-
- mousewheel
- layers
- (and 2 more)
-
Layer Blend dropdown mousewheel scroll
zynexis replied to zynexis's topic in V2 Bugs found on Windows
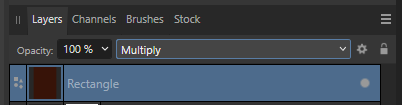
it's not about opening and selecting things in the dropdown list, that works. if you want to see what i mean do the following: click the blendmode dropdown select an option (like Multiply) now try scroll the mousewheel the blendmode element has lost focus so you cannot flip through them with mousewheel click the blendmode dropdown again click the blendmode dropdown second time (closing the droplist) now you can flip through with the mousewheel and the element has focus it's not a big deal to always double click (open/close) the dropdown to get focus back, but it's one of those muscle memory things from photoshop that trips you up quite often- 7 replies
-
- 1
-

-
- mousewheel
- layers
- (and 2 more)
-
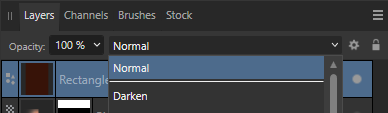
A small but frequently encountered issue that is quite annoying: A very common way to try various blend options (in both photoshop and Affinity) is to click the dropdown, select an option (so the dropdown menu becomes the active element in focus) and then use the mousewheel to flick through the options while looking at the results Quite often in affinity Photo (i think after an update) the dropdown box looses focus after selecting a mode in the dropdown list and you can no longer use the mousewheel to flip through the layer blend options. the dropdown element simply looses focus after an option is selected to get the dropdown to be active again, you have to click the dropdown box, then click the dropdown box again (open and close it, not selecting any of the options in the menu), then you can see the element gets a blue outline, and the mousewheel works again to flip through
- 7 replies
-
- 1
-
-
- mousewheel
- layers
- (and 2 more)
-
Bumping this thread, It is an extremely common operation especially for many game developers that work with many image, textures and spritesheets It should not be a convoluted batch process, or a multistep export / cutout / canvas clipping / macro / layer rasterization procedure in Affinity, sure maybe you could have it be under batch, but i'd say it's so common it should be a regular menu option, it should really be a 1-2 click operation It has been in photoshop for many years and have been used since the dawn of time ------ Just to add an extra note, In Affinity Photo, there are some menu options: Layer -> Rasterize... and Layer -> Rasterize & Trim... the ... in UI terminology means: There will be more options coming, usually an popup window but in Affinity photo, the ... means nothing and the operation just runs, without further options Please try to stick to common UI practices and keep things consistent Now do this 821 times x) this seems to be a multiuse trick, whenever dealing with exporting x) We need exactly this, no more no less
-
i can confirm this produces an identical result, so makes sense the transparency offset is having an impact Nice find the workaround is not that 'easy' when working with batch and got over 100 sprites that needs this weird workaround output from batch and resize doc to png should be the same optimally, or batch is kind of useless for the (quite common) tasks
-
Hey Callum, Sure, i recorded a short video to show the issue the problem seems to be that batch processing uses the png exporter resizing, which in this case is different (on my pc at least) than the Affinity doc resize, making the batch resize invalid to use for these pixel sprites (i included the original image.png) I'm on Windows 10, Affinity Photo ver 2.2.0 Affinity Photo Neareset Neighbor Export vs Resize Doc.mp4
-
when you open a PNG in Affinity Photo, it opens as a pixel layer (rasterized) not as an image layer like when you drag in an image into a doc this is something you keep mentioning, even when i already explain that it is a pixel layer and that the problem is not with Resize Document That's why i' saying you are confusing things and not reading what i'm actually saying saying there is no difference for you, i have no way to verify unless you upload your results, clearly there is a difference as i have shown you then post about my screenshots, which were showing the scaled down versions, not the 500px original, further confusing things like i said, i appreciate the help, just please read and understand the actual issue first anyways, good bye then
-
i'm glad that you try to help, but the issue is pretty straight forward, i think you are confusing things a bit the source image is an output by an ai image model in 500x500 (with background removed) and is not pixel precise in any way - that's why it needs to rescaled down to 96x96, where it will become pixel exact you talk about image layers etc, i don't see any relevance at all, we are talking about rescaling an opened png image, it makes 0 difference if the background is rasterized or not in this case, it is a pixel layer, and Resize Document will make it exactly as expected with nearest neighbor resampling 1) open the 500 pixel original and do Export as PNG, set width/height to 96x96, set nearest neighbor 2) now go back to the 500 pixel original, resize document to 96x96 with nearest neighbor resampling, then export as PNG like normal 3) compare the 2 outputs, you can see the aliasing difference (on my windows 10 desktop version at least) you can compare by dragging the 2 96x96 into doc as layers
-
the image is rasterized, and the issue is not with Resize Document (it does it correctly) the problem is with the png exporter and batch, it is using a different method to resize/resample, even if both are set to use nearest neighbor the difference is visible with the naked eye, the difference blend image is just to make it obvious, no need to compare each channel
-
Hi, I was trying to do a batch resize of a collection of transparent png sprites and noticed that even with Nearest neighbor enabled in the batch, it still causes anti aliasing This does not happen when using the regular Resize Document with nearest neighbor function When using Export function to save as png with Nearest Neighbor, we also get anti aliasing (I assume batch resize is using this, since they are both not equal to Resize Document) reproduce: 1. use batch resize on the attached original image, resize to 96x96, nearest neighbor 2. resize original image using resize document with nearest neighbor 3. observe the difference in the outputs 4. compare result to the correct output image
-
Hey, thanks yes, this was what i ended up using, someone else had also suggested using macros in another post as well, record select next layer + rasterize trim in the end, turned out there was no other way around that sit and click 821 times on the macro play button (i had 821 layers, yes) i really don't like having to resort to this kind of 'work arounds', because it isn't really automated also there are some problems with this method, you basically need to do this in another save file, since rasterize and trim is destructive, in case you need to do adjustment you have to do things over again. Even after doing the trim, there are still things to watch out for, since you still need to go to export persona, do the slices (which still seemed to not be aligned for some reason even after doing 512x512 trim, and in case there is some empty space in a layer, this gets exported incorrectly, so have to enable the 'Include bleed' option to make sure it is output correctly (i think) I would like to strongly request a baseline feature to Export layers to Images function, this should be a single action a Rasterize/Rasterize and Trim function that works on multi selections would also be great, the way it works now seem like a slight bug
-
Hello! Been trying to figure out how to do this fairly basic operation in Affinity Photo, but no luck - is this not possible? I have multiple sets of 100-300 layers which varying sized images and need to export all to canvas size (512x512) for AI training set (each layer needs to be placed differently, zoomed in scaled, rotated etc) I tried using the 'Export persona' but it doesn't seem to export things like i need, it is also a bit unintuitive way to go start creating slices and then it exports things in all different sizes, not what i would expect at all when you do a regular PNG export, it clips the canvas like you'd expect, why is it different and seemingly not obvious how to do it in the 'Export persona'? I'd think it would have even more advanced options I'm glad i have beefy cpu, since selecting slices this way is pretty intense and the ui looks a bit nuts with hundreds slices, i don't think this is the best experience for doing things like this, there should be a simple save to png with canvas clipping, it is commonly used I read about some Clip/Unclip canvas, but when i try that option it seem to undo all the work of doing placement adjustment, and just frames the content inside canvas in some way..how do i cut away all the stuff outside the canvas (which sounds like 'Clip canvas' to me but it's not) at this stage, all the layers are images, not rasterized - if i try multi select all the layers and select Rasterize, it only affects first layer selected, rest are deselected/ignored (why can't we multi-rasterize wonder?) Hope someone can help, Affinity is great, but i run into problems that is needed for working with things at scale such as this Cheers!
-
Batch and Crop
zynexis replied to Toback's topic in Pre-V2 Archive of Affinity on Desktop Questions (macOS and Windows)
right ok, i can see it crops on pixel layers yes i'm uncertain if you have a layer that is smaller than the canvas, if the macro solution in batch will save the layer at canvas size, since you are inputting a smaller image size maybe i'll try when i get time, but in any case, having an export layers to images simple function would be massively helpful, since it's a common operation and thank you, enjoy your bacon breakfast ^-^ bye -
Batch and Crop
zynexis replied to Toback's topic in Pre-V2 Archive of Affinity on Desktop Questions (macOS and Windows)
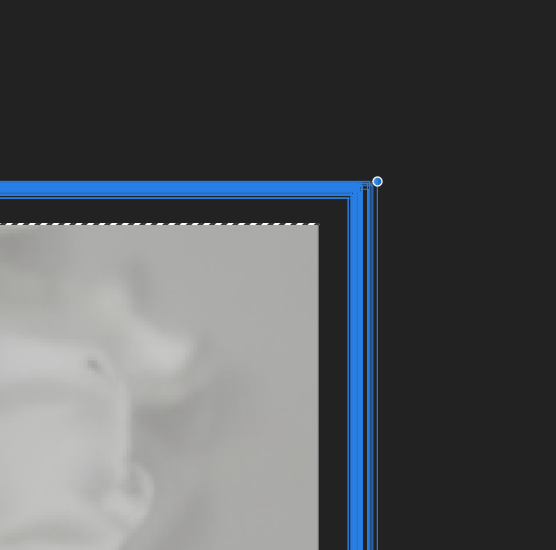
i see a difference, but i think the images are not actually cropped, but rather resized to fit inside the canvas these are the layers after new from clipboard, they are not equal and second image shows how they are positioned to be cropped in the main document (cutting off the darker borders)
-
Batch and Crop
zynexis replied to Toback's topic in Pre-V2 Archive of Affinity on Desktop Questions (macOS and Windows)
this is a terrible workflow, and you still need to go into export persona and assign slicing (which essentially is pointless then) might as well just run the batch directly on source images with some magic macro that doesn't exist btw until you install or create it (i assume you mean they also get automatically centered in the batch before clipping?) i'm not really looking for workarounds, i'm trying to push for something super basic that is used all the time in image workflows -
Batch and Crop
zynexis replied to Toback's topic in Pre-V2 Archive of Affinity on Desktop Questions (macOS and Windows)
when i do this, the layers in the new doc are not cropped (ctrl + c) ctrl + a (full canvas selection) select all layers ctrl + c new from clipboard layers are not cropped -
the general workflow problem is this: you have a bunch of images, with various sizes, and you want to crop off the edges to make them all uniform you drop in the stack into affinity photo -> it doesn't center them, you have to manually align them using select all layers and Arrange (center, middle) you then resize all layers together so the varying edges are outside the canvas (could be smaller as well) you then want to save each layer to file, letting the save crop to canvas size -> not possible in affinity studio ok, then you try go to export persona -> it expects you to manually resize the slice for each layer -> no go with 50-100 layers you go to new batch job -> no crop option, no export pr layer this is an extremely common thing when dealing with multiple images and photos, and should be efficient to do in photo edit app
-
Batch and Crop
zynexis replied to Toback's topic in Pre-V2 Archive of Affinity on Desktop Questions (macOS and Windows)
so based on these explanations, it seems there is no way to batch crop in affinity photo this batch method works on already separate and adjusted image files, which is what we want to actually do using layers en masse this batch workflow simple resizes the images, not cropping them the general workflow problem is this: you have a bunch of images, with various sizes, and you want to crop off the edges to make them all uniform you drop in the stack into affinity photo -> it doesn't center them, you have to manually align them using select all layers and Arrange (center, middle) you then resize all layers together so the varying edges are outside the canvas (could be smaller as well) you then want to save each layer to file, letting the save crop to canvas size -> not possible in affinity studio ok, then you try go to export persona -> it expects you to manually resize the slice for each layer -> no go with 50-100 layers you go to new batch job -> no crop option, no export pr layer this is an extremely common thing when dealing with multiple images and photos, and should be efficient to do in photo edit app -
not having batch export layers with canvas size crop is crazy have 200+ layers, all different sizes, need to export each layer to cropped image the export slicing expects me to manually adjust 200+ or more layers one by one? that's just never going to fly please, focus some dev time on efficient workflows, or this can never replace photoshop (which is what most are trying to escape from) cheers
-
Export layers to multiple files
zynexis replied to johs's topic in Feedback for Affinity Photo V1 on Desktop
bump, please this is needed hit 2 of these limits often, center on layer import and export each layer to files (canvas cropped) -
none of these solutions are really useful for the task, it's a quite common thing to drop in several images at once i work with game textures and screenshots, and often drop in a stack of 50+ images, to mass crop/scale etc it would be terribly nice to have a setting to set imported images to centered - and maybe even an option like PS which both center and scale imported layer to canvas size (both would be really helpful) it's workflow problems like this that can make a break if the program is usable in a pipeline having to manually move or click macros and other quirky things is not efficient in some scenarios (see img) the best solution i found is to select all the layers, and hit arrange center then arrange middle, then drag them to snap center..
-
Simple, quick Desaturate layer function?
zynexis replied to zynexis's topic in Feedback for Affinity Photo V1 on Desktop
thank you for the macros..how do I keybind this? it's a workaround, i'm still petitioning for a simple default solution. because i'm not editing 100 layers simultaneously (described my usecase in a previous post), but i use it intensely so it adds up to many many layers before collapsing down. essentially I cut out a small section of the whole image (multilayer cut) and paste it, desaturate, set the blending/levels and mask/erase..this process is repeated many times over, so you end up with a lot of tiny enhancement layers, which you then collapse down at some point. Yes, the whacky shortcut for the BW adjustment layer was already mentioned, i suppose i have to get used to using that one - the good news is that AP goes back into the Layers tab after clicking Merge when using the shortcut. -
Simple, quick Desaturate layer function?
zynexis replied to zynexis's topic in Feedback for Affinity Photo V1 on Desktop
this is what i'm currently doing, but it's still more than 2 actions..cause you are usually on the Layer panel, so you need to: go Adjustments Panel, (scroll to BW if you used a different adjustment last) click BW click Default click merge go back to Layers panel this is not counting the mouse movement at all if you need to desaturate a lot/often, you will notice this..imagine if there was no ctrl+c, ctrl+v..and you had to navigate to edit menu constantly, and that is just 4-6 actions for both -
Simple, quick Desaturate layer function?
zynexis replied to zynexis's topic in Feedback for Affinity Photo V1 on Desktop
in this case batch cannot really help, it's more of a 'on the fly' thing when working on an image/texture... what happens is I cut out a small section of the whole image (multilayer cut) and paste it, desaturate, set the blending/levels and mask/erase..this process is repeated many times over, so you end up with a lot of tiny enhancement layers, which you then collapse down at some point. So it's more about the expediency of the process


.png.489ecbe30ae191138742ee0a6740b496.png)
.png.3e0ab03147fb331fd350f891789eb84e.png)