Xzenor
-
Posts
319 -
Joined
-
Last visited
Everything posted by Xzenor
-
 1.8.3.641
 -
Sure, System Type : x64-based PC Processor : Intel(R) Core(TM) i7-4770 CPU @ 3.40GHz, 3401 Mhz, 4 Core(s), 8 Logical Processor(s) OS Name : Microsoft Windows 10 Pro Version : 10.0.19041 Build 19041 RAM: 16GB GPU: NVIDIA GeForce GTX 980 Knock yourself out Untitled_(93).afphoto
-
So, check the video. It's crystal clear. Denoise as a live filter does near to nothing compared to the 'normal' filter. Is this normal? Should I use this in a different way, or did I just run into a bug? 2020-07-09_20-39-58.mkv
-
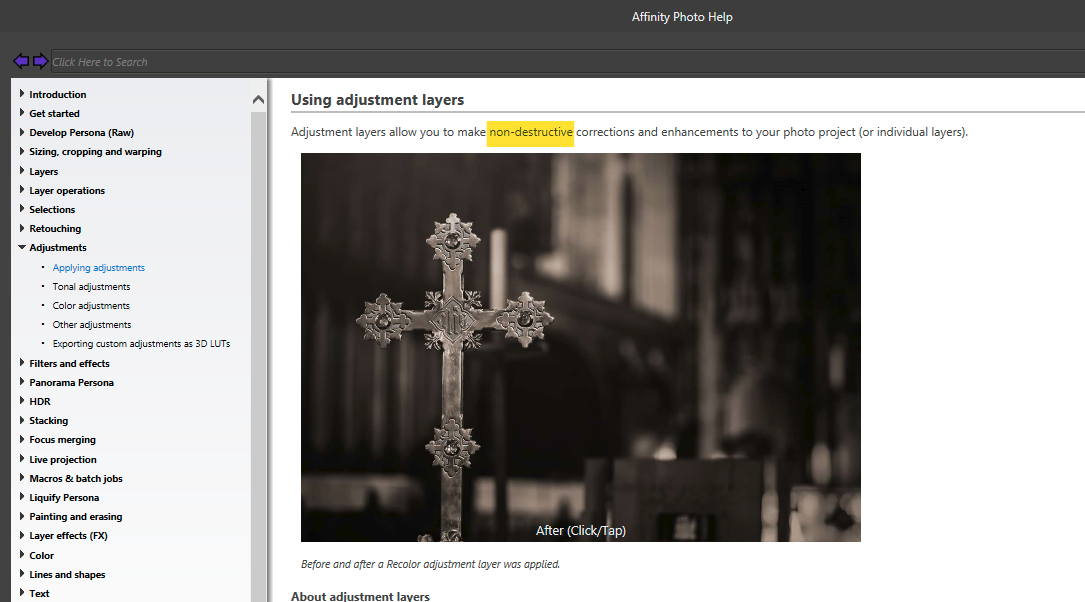
Well, that's the way everyone else means it. Including the Affinity Photo Help. You may want to adjust your own definition of "non-destructive", or a lot of help-pages and tutorials are gonna be quite confusing.

-
Almost a year late to the party but since there's still no answer I like to bring back some attention to this.. Why not just skip the develop persona and do everything non-destructive in the photo persona? There seems to be nothing to gain from using the develop persona. It appears to be even worse because all adjustments are destructive. Yet nobody seems to be able to answer that question.
-
Resizing Layer
Xzenor replied to PreacherofDoom's topic in Pre-V2 Archive of Desktop Questions (macOS and Windows)
Your image is only X pixels bij Y pixels. Like a grid. If you resize a layer then you either have to (shrink) remove pixels from the layer to make it all fit in the smaller amount of pixels or (enlarge) add pixels to the layer to fill in the gaps. It all hasd to fit in the grid. you can't fit a square of 9 pixels in a 4 pixel grid. If you start with a High DPI canvas and place your pictures on there then they'll probably already be smaller (to fit the dpi) and you'll lose less pixels in the resize. It looks like information is not really deleted from the layer during resize though. I can enlarge and shrink layers to my heart's content but once I resize to it's original size then it doesn't look like the quality has decreased. Someone else might be able to confirm this (or not).. -
Hey all, So I'm a bit confused about the Develop and Tone Mapping personas. I don't really have a lot of raw images. It's mostly jpg or png from scans or just pictures from the internet (I'm not a professional). Will the develop and tone mapping personas be of any use? I've played with them and while it seems like I can do the exact same adjustments in the photo persona the result seems to be different but maybe that's just my lack of understanding them. I don't tend to use them because they seem to be destructive changes and I try to do as much non-destructive as possible. Can someone enlighten me a bit on the use of those 2 personas for non-raw pics? Are they even useful?
-
I initially thought that didn't work.. I got just one entirely black pic. But once I disabled some fill here and there it seems to all be separated. Thank you!
-
Right, I know the title is crap but I don't know how else to explain it in a short sentence.. Here's my issue. I have a curve layer. Just one. And I want to move stuff from that layer to a separate layer for easier editing, different color, I don't know yet.. How? Is it even possible? I tried selecting with the node tool. No luck, just copy/pastes the entire curve. the divide button was a big mess either.. and well, I'm already out of ideas. It was a stupid mistake to make it all one curve in the first place but that's noob-mode for ya... Can I reverse that mistake? No I didn't save history. Yes I learned a lesson from this..
-
We're not.
-
I'm curious if the developers even watch the feature requests here.. they're not joining the conversation, that's for sure.
-
I honestly don't get why it's missing.. this should have been on the list when they were listing basic necessary features during the design phase.
-
This is really basic functionality. I'm completely amazed that this does not exist in AD.
-
I'm sorry but it looks like your all complaining that AD is missing CAD functionality. It's like complaining how your fridge lacks air-conditioning functionality. "It makes stuff cold so why don't they just add the blower in there to get the cold air out?! Unbelievable! It's such a quick win!"... I can understand how it could be convenient but it's not a CAD tool. Don't expect it to be what it's not.
-
I just tested this again.. CTRL-Z works. And if you close the curves dialog or skip to a different layer then it creates a snapshot in the history panel so you can revert it there as well if you want that Either I don't understand the problem or I don't understand what you're complaining about. Here, see for yourself.
-
If you can't get a decent answer here you could try contacting the directly through email. Affinity@serif.com
-
CTRL+Z seems to work just fine for me
-
Rotate view Tool
Xzenor replied to Ruddi Hansen's topic in Feedback for the Affinity V2 Suite of Products
I can see how my comment can be understood in that way. My apologies, I never meant to imply that you shouldn't express your opinion. Just that you seemed to be the odd one out, although the other comment already pointed out that you're not the only one with that opinion, so I stand corrected on that part too. -
Rotate view Tool
Xzenor replied to Ruddi Hansen's topic in Feedback for the Affinity V2 Suite of Products
No offense but this entire thread is about begging to Serif to 'do it like Photoshop'. You seem to be the only one having an issue with the way Photoshop handles it. -
unexpected behaviour in LAB mode.
Xzenor replied to Xzenor's topic in Pre-V2 Archive of Desktop Questions (macOS and Windows)
omg.. I never even noticed that option.. I never imagined it would be this. But why is there a difference? 50% gray is 50% gray. if the scale is -100 to +100 or -500 to +500, the middle is still zero. What's happening? -
Have you reported it as a bug? It won't be fixed if they're not aware that it's an issue.
-
I envy you for being unaware of the amount of garbage some computer stores still sell as "new". 🙂 A "new" machine with 3GB ram and a 32 Bit OS to have 'some' performance is still being sold in places.. So I wouldn't expect it either, but I also wouldn't rule it out. You do make a very strong point about the installer probably giving an error message about it. I didn't think of that.
-
Only reason I can think of without a decent error message is that you're running windows 10 32Bit instead of 64Bit.
-
Hi, so I ran into something I didn't expect. Ever since I discovered that you can adjust luminosity without changing the color in LAB mode, I've been in love with it. Today though I ran into a weird thing. For small Dodging and Burning changes I like to make a 50% gray layer, set blending mode to overlay or soft light and then D&B on that layer. Works like a charm, in RGB. However, in LAB mode the 50% gray layer in overlay or soft light visibly increases the luminosity of the entire picture. Why is that? I know I can use 2 curves layers for D&B but that's not the point here. I'm trying to understand why this works differently in LAB than in RGB. Does anyone here know why this happens?
-
*sigh*.. i could have thought of that myself.. why didn't I think of that myself? I don't know.. that would suit me. thank you. I've just been watching some tutorials, if I really need two sharp matching edges I can start with your solution, divide them and then add the pieces that should be 1 color together again to make them a single curve.