
AllAppsUser
-
Posts
364 -
Joined
-
Last visited
Everything posted by AllAppsUser
-
Altering sewing patterns
AllAppsUser replied to Sew Sassy's topic in Pre-V2 Archive of iPad Questions
You'll need to select (or create) a node using the node tool for the break function to become available. -
Surprisingly few. Set the overides up initially, then forget about them. It's always worked. I know, I suspect you won't believe me, but it's true. Plus signs against the Paragraph styles don't have to be removed.
-
On January 29, I said: "Thanks everyone for your input. Really good.". All done as far as I was concerned. ------------------------------------------------- Since then @kevinslimp's continued it with questions. It's now @kevin's thread, and @kevin's questions you're answering. Apologies, I suppose I should have suggested starting a new topic. I didn't think it would spring back into life like it has, tbh.
-
Ah yes, good thinking! Of course!! Just so used to having used inset for the job. This would work in Designer iPad, too. 👍 Thanks @Old Bruce
-
While I've worked with a lot of high pagination documents, and in Newspaper and Magazine environments on occasion, I'm not sure I'd class myself as having expertise in the "publishing world". So, sadly, I don't know what the practice is and can't help you.
-
Not always... that's what the little plus sign "+" is that appears next to the Paragraph Style, yeah? When first importing and laying-out text I assign the Paragraph Style, noting if there's a plus sign. I investigate this to see if it's just some bold or itallic words that have prompted it, or some other reason for it. Then, if it's just a bolded word within the paragraph I'll leave it with the plus sign (no reset of characters), or I reapply the Paragraph Style, then re-bold the text (and the plus sign reappears. I leave it in place then). If the Paragraph style is changed by the client, I can amend it knowing it changes everything, leaving bold and itallic in place anyway. There's no right or wrong way to work here of course. I just find spending time setting up and applying Character Styles doesn't feel like it pays off in the work I do. I could be wrong and missing something of course. A Character Style is still reset if the plus sign is addressed isn't it? I can't remember, tbh, it's that long since I've bothered with them. I thought Character style (local styling) took priority, hence the plus sign.
-
I've always worked with Paragraph Styles only. (I choose font style and size, and that sits in the Paragraph style definition). I ignore Character styles. This is because I've always understood Character styles are something separate, with a narrower scope. They have little to no relation to Paragraph styles in truth (though you can link one within the other just to confuse yourself). Put simply: Paragraph styles apply to whole paragraphs. Character styles apply to little random and adhoc strings of characters. Example: So a character style might be Bold Red. And the "Bold Red" Character Style could occur within text of any Paragraph style. Character Styles are like a local over-ride for a word or phrase. Character Styles are used for emphasis essentially. Generally, I've found the need for Character Styles is extremely rare, because I only work with imported text. Nowadays export/import maintains bold and itallic by default (wasn't always the case in the early days). So emphasis has already been assigned at source., and it's rarely changed - and never wholesale. Hence I don't really use Character Styles. This is my understanding of text Styles. Others might have a different view. So... my own answer to your question above , @kevinslimp, is: I've never encountered the issue, sorry. However..... Is the clue in how you're trying to use them?
-
No worries @IsabelAracama. I think there's something about how the forum stores or links to mp4's. So it's not you. Hope you have success.
-
Admittedly I've not been able to access your mp4, so I hesitate to try to help, but here goes with some general advice. I've extensively used what Affinity are calling a contour tool in the past, and these things below can cause issues - speaking generally. Basically - complexity in the paths: Path where there's nodes sitting on top of each other, duplicated (and worse, when they only overlap slightly). Booleaning often adds these. Too many nodes. There'll be a crash threshold where there's just too many that'll depend on the memory of your kit and how big the file size is in other respects. There is a simplify path feature, though I've found it rather crude compared to other apps. Sections of paths with lots of nodes clustered closely together (kind of the same as above, but only sections of the path involved) Paths that loop back on themselves too (difficult to describe, but you'll know if you inspect close-up and see a teeny-tiny loop or three.). Reversing the direction of the path sometimes helps too (I believe you can do that - in Designer - think I saw it in passing.. might be wrong) Also, your settings can be an issue (too big a jump, or too many jumps). You might have to do it in stages.. but the above should sort most things out. All the above can take some hunting down. You need to zoom-in. If you've drawn your path, then it should be fairly clean, depending on how much booleaning (add, subtract etc.) you've done. I'd counsel you to still check it over. If it's imported... hum, beware = Messy complex paths R Us. If it's a traced path = same as above. Zoom-in, have a really good inspect, simplify and clean-up. Be nit-picky and pedantic about having really clean paths is my counsel -> "Craft your path"! Also, last, if you're doing it in what's already a complex file... perhaps copy and paste it outside, do the contour operation in a new document, and then paste it back in. Hope I've helped. Apologies if the mp4 shows something I've not covered and I'm wide of the mark.
-
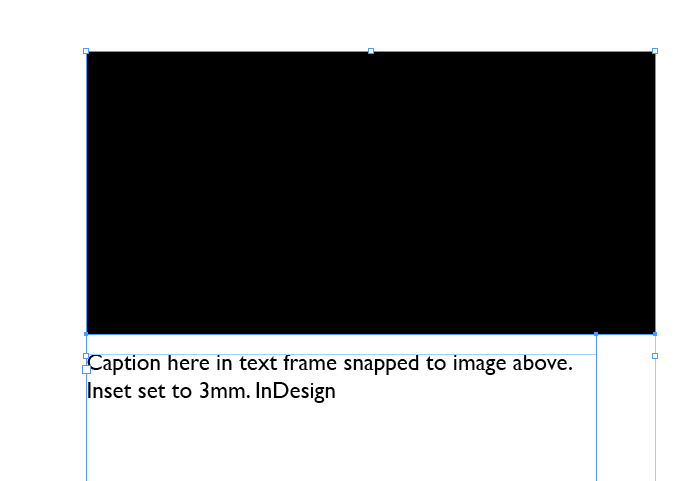
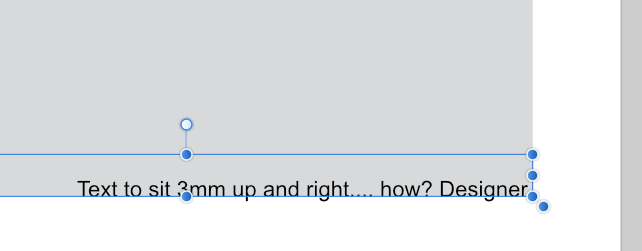
Just adding to an olde thread - incase someone picks this up. I use text frame insets as an easy way to position text elements using snap.. a lot. You set up an inset of say 3mm, then snap the text frame to the edge of the page or image confident the text is 3mm away from it. I'm not sure how many people are advance [cough] enough to have figured out how much of a boon this is. See attached illustations (from Adobe InDesign and Designer). (I'm in here searching for how to specify an inset and don't believe I've found the answer yet.). Really hoping being able to inset the text frame is possible in Designer (as well as all the others).. or it'll be glum face time. EDIT: Found answer. Currenlty (as at 4 Mar 2021), you pop into publisher. Set up a text frame with an inset. The copy the text frame into Designer. The inset is then fixed, but you can clone the text box and use... not the most sophisticated caper, but workable. Fingers crossed this is introduced into Designer where text is often labelling something.

-
Continues Vector brush from a shape segment
AllAppsUser replied to Estalfos's topic in Pre-V2 Archive of iPad Questions
Hello @Estalfos I'm going to disappoint you on this one I'm afraid. I've not really spent any time at all constucting custom brushes in Designer, thus far. Hopefully someone else has, and will pop along here out of curiosity soon. I suggest you add some more tags such as "custom brushes", "brushes" to this thread, as it might increase the chances of them landing here,.... possibly. I've not put much time into searching the forums, or read the below, so don't know if it helps. It links to another thread as well so hopefully one of the two will answer your question. Perhaps it's a place to start (You may have already checked it out of course). A quick scan suggests it's no good for creating objects which need a fill, but I don't think you need to do that. I've looked at the help, briefly and nothing jumps out though I have a couple of thoughts if the above isn't what you need. I've followed this thread and will observe with interest. I'll offer anything I can if it's any chance of being valuable. Best of luck with it @Estalfos, hope you have success here. Sorry I can't offer more right now.- 2 replies
-
- 1
-

-
- affinity designer
- brush
- (and 2 more)
-
AffinityDesigner antialiasing fails on iPad
AllAppsUser replied to Bradly's topic in Pre-V2 Archive of iPad Questions
Forgive the silly questions, but I’m trying to eliminate the obvious. When you exported it from the Windows version, what was the pixel by pixel dimensions of the png? I assume you’ve checked the version exported from the iPad is the same pixel by pixel dimensions? And to follow-up on @Bradly’s post. Why are you exporting to png out of interest? Why is pdf not allowed here? Pdf is the more usual file format for print graphics.. which the size of what you’ve posted here suggests it’s for. -
Snap guides to ruler?
AllAppsUser replied to AllAppsUser's topic in Pre-V2 Archive of Desktop Questions (macOS and Windows)
Thank you everyone for contributing. Really interesting. I'm learning all the way. Basically, from what I've read here, and with my own experimenting informed by what I've read here, the rulers (as @GarryP indicated) only labels the grid (when they happen to align). The rulers do not contribute to snapping at all. @h_d's key suggestion of Unticking "Only snap to visible" led me to gain an insight to this. Even then you need 'Snap to Grid' on because that what it's doing. Basically there are too many levers to pull here in my view: Screen tolerance Grid divisions (settings) Zoom Plus.. an ever present danger of misaligned rulers and grid, even by a fraction of a millimetre which could be dangerous for precise work (if rarely). Good heads-up there by @Old Bruce on ways to sort it. I've mucked about with it all, and sort-of achieved what I needed. Here's my recipe: Small enough grid divisions (20) + minimum screen tolerance (3) + grid & ruler aligned = workable ruler-esque snapping zoomed out. Doesn't feel very satisfactory to me. I agree with @loukash, this is definitely a feature request. For quick and accurate guide placement, why the heck ignore the snapping possibilities of the ruler? Thank you everyone - great team effort! Really helpful of you all, thanks for taking the time. Appreciated. ---------------- Fascinating creative thinking by @v_kyr, btw... Serif should check out the ruler Apple have introduced to Mark-up, because this is what @v_kyr has pointed the way to. What a useful on-the-fly tool. I recommend Serif look at it as a built-in feature. -
I'm trying to snap a guide to exactly 30 cm using the ruler. Looking in the snap settings, nothing suggests itself as a means to do so Q: Is it possible to set snap settings so placing guides will snap to the ruler when visible? Q: If not, how do you approach it?
-
Glad you've found it @azaazelus, that's what matters. I did say it takes time to understand it. ---------------------------------------------------------------- For clarification for anyone else reading this thread: Myself and @DM1, are referring to the same thing with "App's Sandbox" and "App's Space/memory".
- 5 replies
-
- 1
-

-
- bug
- affinity designer
- (and 1 more)
-
Swatch import on iOS apps!
AllAppsUser replied to postmadesign's topic in Feedback for Affinity Designer V1 on iPad
Just adding these for reference... -
Hello @azaazelus I can't access your mp4, so big apologies if this is not helpful. First: you've checked your App preferences and Default Save Location? This might shine a light? --------------------------------------------- An exercise that might help you. Work through every step carefully, because this does take a bit of absorbing. Part One: Open a Designer file Document (three dots) > Save A Copy Save A Copy screen -> touch Save This should* then let you choose the Files app (You're calling it the Folder app and I assume you mean what I understand to be Files) Choose On My iPad > Affinity Designer folder (should be listed). You're now manually telling Designer where to save the file to. Having chosen the Designer folder, then Save Go into Files > On My ipad > Affinity Designer and check the file is there >>> Important: Now, because you've used Save A Copy.. the art you see in the Home screen of Affinity Designer is the original and the one in Files is another one (a copy). They are not the same. You now have two files. If you touch the file in the Files app, the one you've created using Save A Copy, do you end up with two on the home screen? Yes, should be the answer. There should be two artworks that look the same side by side. The one on the left is the copy, the one on the right is the original in the app space/memory (possibly cloud). Part Two: Rename the original one (using the menu on the home screen thumbnail) Leave it where it is until you're confident you understand what's happening and where things are stored. Work with the 'copy'. When you save this one (the copy) from either the home screen or the document menu, it will update the Files app file (You can bob out and look at the file thumbnail in Files anytime to check. You'll see the file thumbnail updates with the time it saved - if in list view) When you're confident it's all fine, Close the original (menu on home screen thumbanil) - it's then gone (unless you've a random file sitting in Cloud or wherever that you're unaware of) I then suggest, once you've got confidence with all this, you then revisit the Default Save Location setting in the app preferences if you need to. Mine is set to 'On my ipad' meaning it saves to the Files app. Save A Copy should by-pass any settings you have that are throwing you off. This whole saving files thing takes a bit of understanding. I struggled with it when I first started out. Most people I suspect just rely on default settings. ------------------------------------------- - - EDIT: I'm refering here to what's technically called the "App's Sandbox" with the phrase "App's space/memory". (I tend to stick with non-tech language, not sure it's always helpful). - - My understanding is that the iPad Affinity Apps keep the art in the App space/memory unless you choose 'Save' from the home screen or the open document (and then it uses the default location setting). The App space/memory is only visible via the Home button/screen. ------------------------------------------ A note about Cloud! *should -> The saving behaviour of Affinity Apps seems to depends on what your cloud settings are to some extent.
- 5 replies
-
- 1
-
-
- bug
- affinity designer
- (and 1 more)
-
You understand and register the little plus sign that appears against the style (in the same way it does with InDesign), I take it @kevinslimp? I know changing app environment can disorientate you, so for a time you forget things you know, if you follow -> I did!! There's that much that's new to learn. Edit for anyone trying to follow this thread: Above the question you'll see I say "Thanks everyone" which closed off my initial question as far as I was concerned. From this point, the discussion becomes about others and different questions. I found myself changing from 'asker' to 'answerer'. Nothing wrong, just confusing. The nature of forums, that's all.
-
Moving guides Designer iPad - tap troubles.
AllAppsUser replied to AllAppsUser's topic in Pre-V2 Archive of iPad Questions
Ha-ha-ha, I don’t feel such a chump now. I think Guides must have been a ‘Friday afternoon coding’ exercise. That or they decided to see who could sneak the most random bit of user experience into the finished app and get away with it. The folks who did the guides won 🙃- 3 replies
-
- 1
-

-
- affinity designer
- ipad
- (and 1 more)
-
Moving guides Designer iPad - tap troubles.
AllAppsUser replied to AllAppsUser's topic in Pre-V2 Archive of iPad Questions
O-ooooooh for flipping ek!! The lock guides needs to be active (have a blue line round it). Confusing or wat!! Just totally wrong way round surely???? -
According to the help you activate guides (context menu pops up ✅)... Then tap the guide... 🤔 .... should it change to a dotted red line? Can’t seem to drag it at all. The Lock Guides is not active. I’ve tried a tap-drag, a tap then drag, a long tap, a double tap... nothing. No visual feedback, no response at all. Can’t see anything in the Layers studio (I’ve unlocked them all to cover that off). What am I missing, thanks?
-
Problem Adding ABR brushes into Procreate
AllAppsUser replied to Strawberry930's topic in Pre-V2 Archive of iPad Questions
That’s great. I should have thought of the software update possibility too., but hey, we got there. Happy creating. You’ll love vector illustration. It’s totally different to raster work, and a joy because it’s totally different. I can’t get enough of both, hence I’m here late at night (searching for how to move guides in Designer). -
Problem Adding ABR brushes into Procreate
AllAppsUser replied to Strawberry930's topic in Pre-V2 Archive of iPad Questions
Ok really easy. What I’ve just done: My test .abr file was in the Downloads folder within the Files app (I’ve observed location of files often seems to influence things on the iPad - might not matter here). Long press the .abr file to get the pop-up menu with Share on it. Choose share to bring up dialogue (illustrated) You’ll see ProCreate listed, like in my image attached below? Choose ProCreate - boom - imports brush. ....or it did for me. How about you?
-
Problem Adding ABR brushes into Procreate
AllAppsUser replied to Strawberry930's topic in Pre-V2 Archive of iPad Questions
Ok, I’ll just test something out (I have both apps too, ProCreate is my all-time favourite app and has been since I got it). These are .abr files, not .brush files, so I’ve a hunch here. Back soon. -
Export or Save ipad file for desktop
AllAppsUser replied to saltysailor's topic in Pre-V2 Archive of iPad Questions
Oohhh, apologies @saltysailor, didn’t spot the windows tag.