Pensketch
-
Posts
10 -
Joined
-
Last visited
-
Hiding Artboard name
Pensketch replied to wvanderzee's topic in Pre-V2 Archive of Desktop Questions (macOS and Windows)
Our designer asked me about how to do this today, and my searching led me here. So there isn't a built-in solution for this, even after 4 years. We also use artboards with export, so the naming of the artboards is important. I saw someone who just didn't get the problem in earlier comments, however just because it's not their problem doesn't mean it's not a problem. Those of us have it, and understand the issue. I devised a workaround that takes more time than clicking a button would, and is possibly more annoying than it is worth. Step 1: create an empty layer and put it above the artboard. You could also put it inside the artboard, but I find it helpful to have it outside. Step 2: Copy the name of your artboard, and rename the empty layer with that name. Step 3: Change your artboard's name to a space. If you just leave it empty, it will still be "Artboard" and will be in the way. This will still have a little block of the artboard background where the name used to be, but it won't be as intrusive as an entire name. Step 4: When you are ready to export, copy the name from your blank layer and paste it back as the artboard name. I recommend keeping the blank layer with the artboard name, in case you need to work on it more later. --- As I said, a lot of work that could be fixed with a simple "Hide Artboard Names" option in the "View" section, but apparently this is not something that is considered a problem if it has gone this long without being addressed. -
 Pensketch reacted to a post in a topic:
Trouble printing in Affinity Publisher 2.3.1
Pensketch reacted to a post in a topic:
Trouble printing in Affinity Publisher 2.3.1
-
Trouble printing in Affinity Publisher 2.3.1
Pensketch replied to Pensketch's topic in Desktop Questions (macOS and Windows)
So to be clear, you are saying to print more than a single page, I would have to select an item on the other page(s) before choosing to print? If so, that is bizarre. A 50-page document would take ages to print. I must be misunderstanding you. I will try, the next time I see this is happening. I needed this files printed for a meeting that I am having tonight, and it will be a day or two before I need to print anything else. -
Trouble printing in Affinity Publisher 2.3.1
Pensketch replied to Pensketch's topic in Desktop Questions (macOS and Windows)
Restarting my Mac made the problem go away for a while, but then it came back. Then I restarted just the application, and once again it has fixed it for now. This doesn't make sense to me: "Setting the Range to Selection requires an object to be selected on page for the Print preview to show what's selected." Mainly because it starts as "Entire Document" and the pages after the first one are still grayed out and can't be selected. If I go to "Selection" I can pick the pages in the print preview window, but nothing appears on them when I do, and the content on page 1 disappears. And I tried exporting it as a PDF both through "File > Export" and through "PDF" at the bottom of the print preview window. I don't imagine a copy of my .afpub file will help since it is happening to any file that I have that is more than a single page. I just made a new 10-page file and the same thing happened - every page after the first wouldn't print and wouldn't save to a PDF. That's when I tried to quit and restart, and then I was able to get it to print. If it were a document problem, I don't see how restarting Publisher 2 would make the problem go away. But there you go. Please delete it if you can once you've downloaded it. -
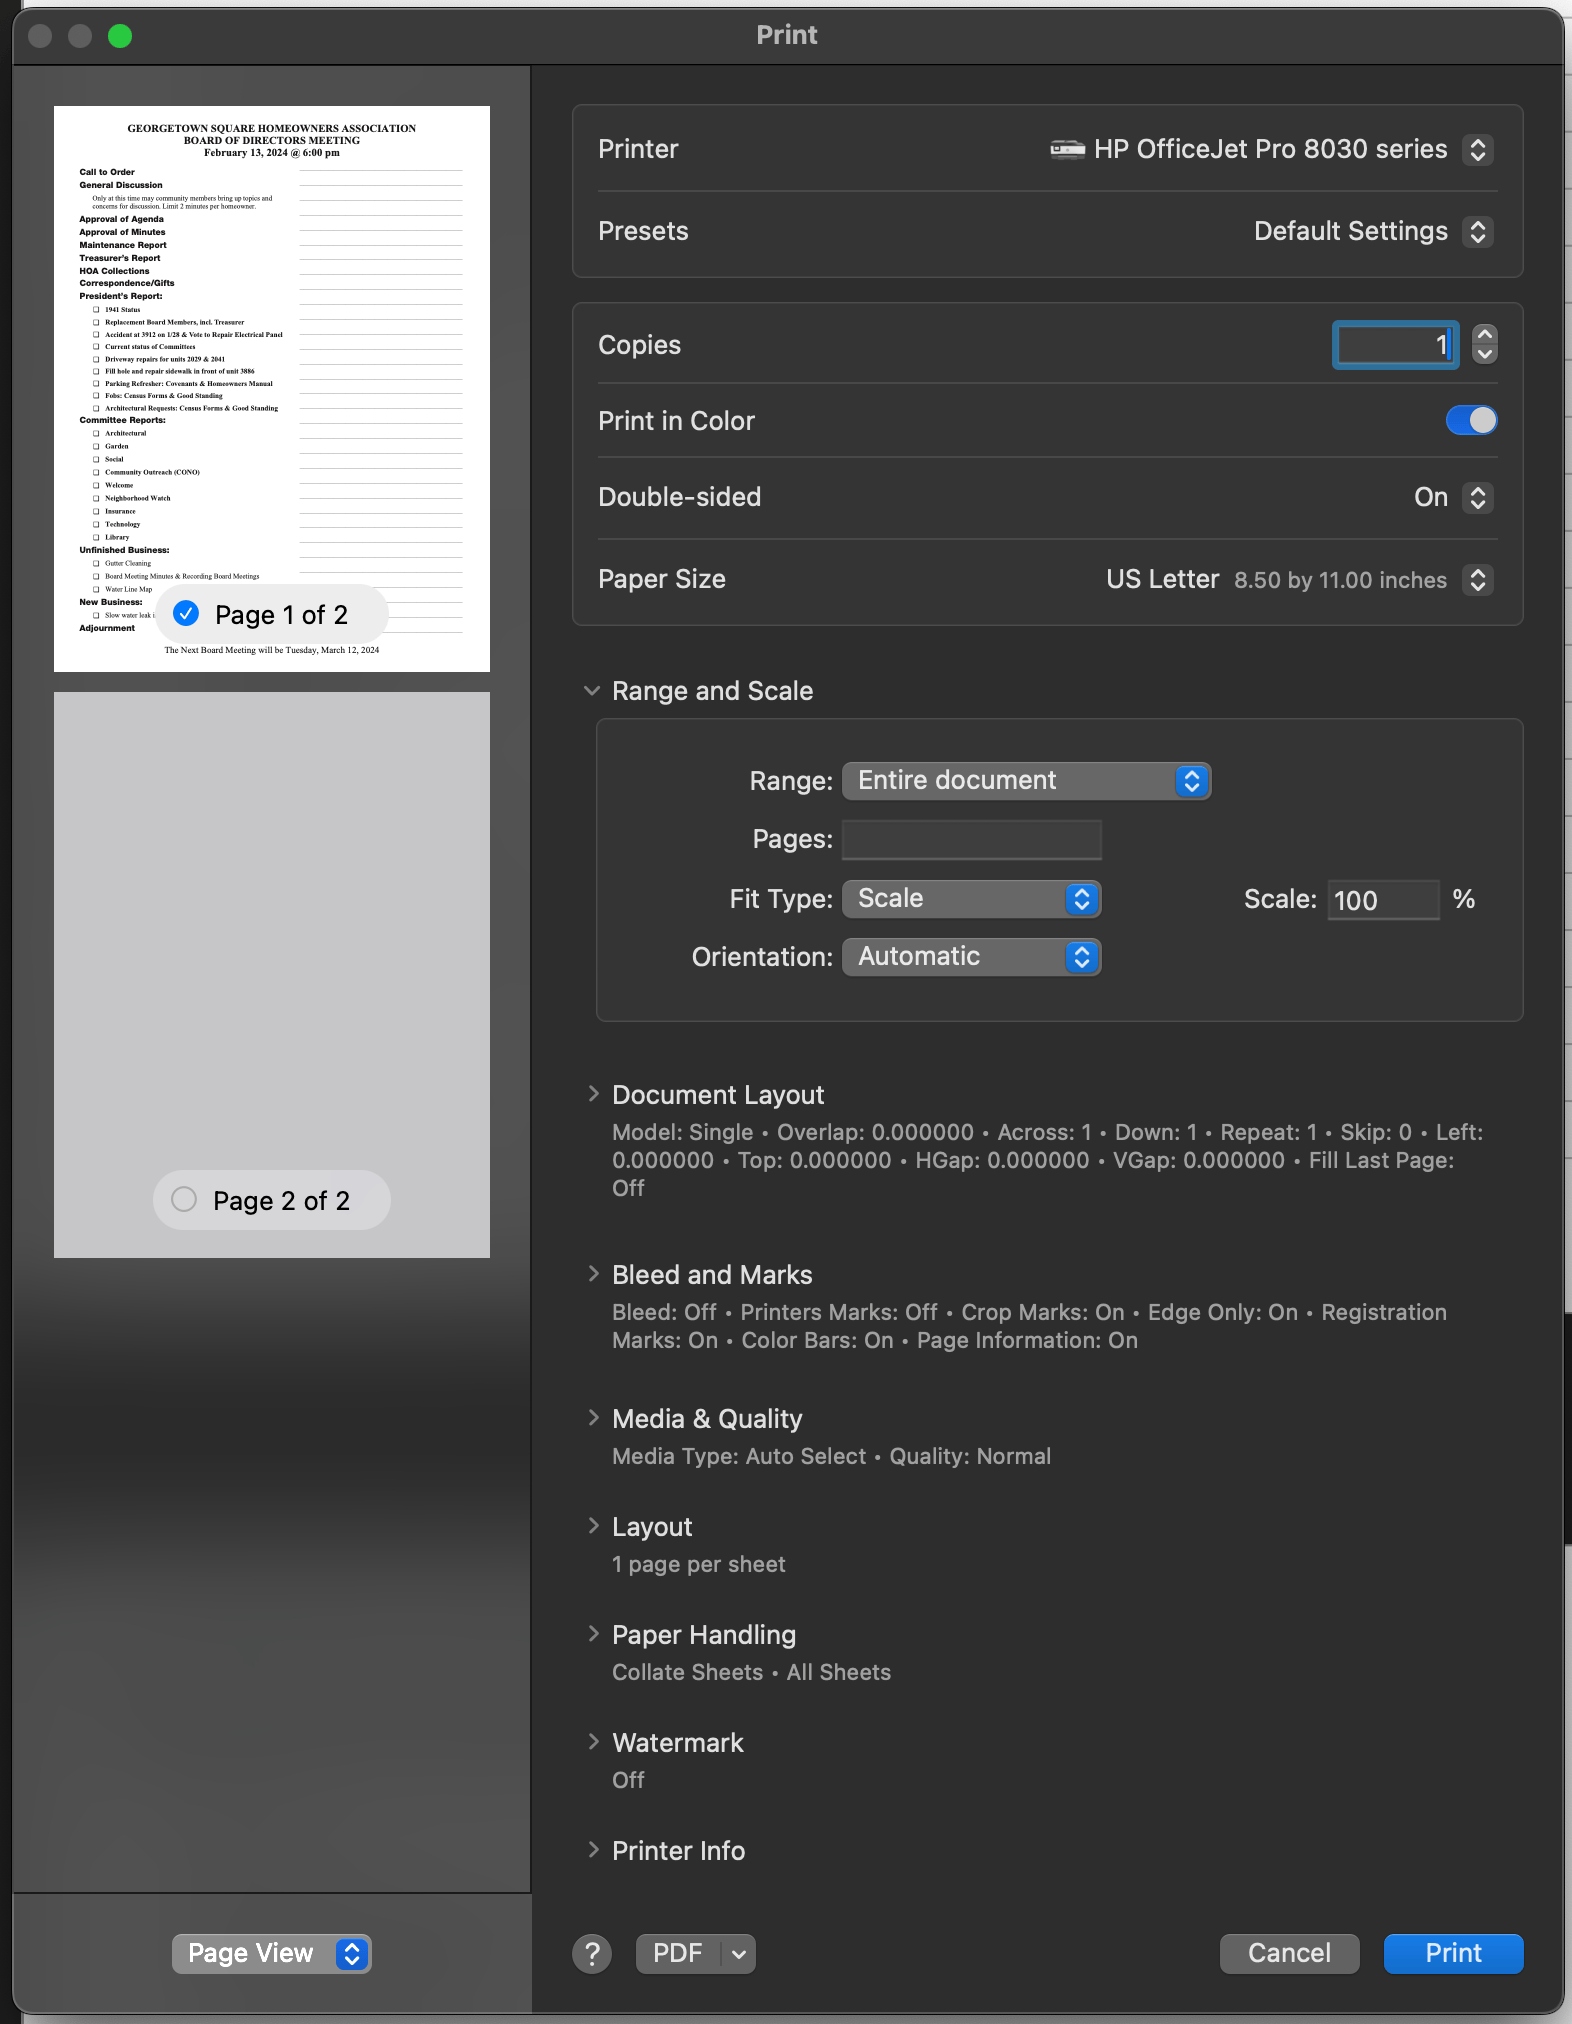
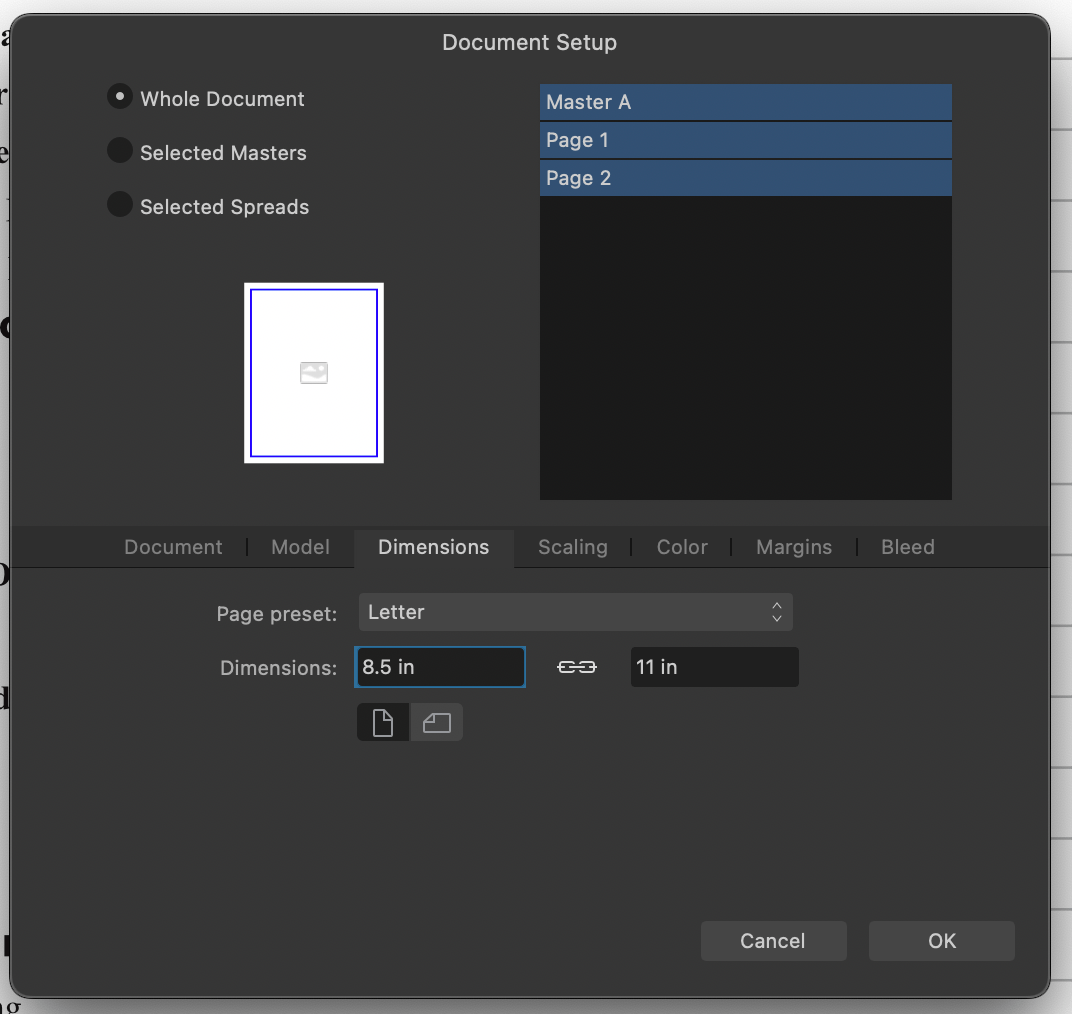
I have a document that I created with two pages. I have content on both pages. When i try to print it, the preview shows no content on the 2nd page, and it's not selected. (see 1st screenshot) If I set the "Range" to Selection" and force it to choose the 2nd page, it blanks out the first page and then nothing at all will print. (see 2nd screenshot) The 3rd screenshot shows that there is information on the 2nd page and the 4th shows my document settings, This problem also happens if I try to export it as a PDF with the default settings.

-
Pensketch reacted to a post in a topic:
Designer crashing whenever I Use export persona
-
FWIW I just got a client who needs me to create custom screen graphics for their Genmega ATMs, and they require 256-color BMPs. Nothing else will work. Here it is, 4 years after you asked, and this still isn't available in Affinity Designer. I guess it really ISN'T a priority. Funny though. I can export them in GIMP, the free image program. Luckily for me. It makes my process more convoluted and dependent on multiple programs, but I guess that's just the way it is.
-
walt.farrell reacted to a post in a topic:
Adding stroke to artboard doesn't work
-
Adding stroke to artboard doesn't work
Pensketch replied to Malauch's topic in V1 Bugs found on macOS
Yes I would, because the boundaries of the artboard clip it, so it doesn't cause problems. The purpose is that I don't need to set up a mask to trim the object/symbol, and can easily reposition it if needed. Also, if the stroke (1px solid black border) is added to a rectangle at the bottom of the stack, even if I trim the object with a mask so that it doesn't extend past the edges of the artboard it will still obscure the 1px border, like in the examples I attached earlier. I could spend time fiddling with the masks so the border isn't obscured, but it would take more time than I want to spend on this single problem, and I would have to do it to any element that went right up to – or past – the border. It's especially frustrating when I know the one-step solution is supposed to be possible – adding a stroke to the artboard – it just still isn't working a year after it was added to the development queue; unless I use your tip of adding another stroke through the Appearance panel, I'm very happy that's working. By design and according to the help file, a stroke on the artboard is above everything contained on the artboard. From the help file (https://affinity.help/designer/en-US.lproj/index.html?page=pages/SymbolsAssets/symbols.html?title=Symbols): --- If a color is applied to the artboard's stroke, it will appear over any objects placed on the artboard—therefore acting as an overlay. To take full advantage of an artboard's stroke appearing in front of artboard content, you may wish to set the line to Align Stroke to Inside on the Stroke panel. --- You can see from the template file that I've made and attached how it works. When you go to the Export Persona and export the 160x600 and 300x250 ad sizes, the resulting png files have the background clipped, and the 1px black border is where it needs to be. My first version of this template was so convoluted with groups in order to get the border to work that it was a pain to deal with, and cluttered. With the strokes on the artboards, this one is much easier. I'm still learning my way around Affinity's products after 20+ years of designing in Photoshop, Illustrator, and InDesign, and I keep having to puzzle out how to do things that had become second nature for me with Adobe's products. This is one of them. But there are so many good things Affinity Designer is bringing to my workflow that I feel like the time and frustration will pay off eventually. Thank you again for your tip though. It's working perfectly. dealer-display_ads-template_general.afdesign- 7 replies
-
- 1
-
-
- affinity designer
- artboard
- (and 1 more)
-
Adding stroke to artboard doesn't work
Pensketch replied to Malauch's topic in V1 Bugs found on macOS
I tried that as well. The problem is if there's anything larger than the artboard – like an image – that extends past the edge of the bottom rectangle, it obscures the border (1). I can set the bottommost layer to multiply, as long as the background rectangle is white (2) but any layers above that still obscure the border, and they can't be set to multiply if they are overlapping any other elements (3). I suppose I could work it out so there's a mask on a container for all of the elements that has a width and height 2px smaller than the artboard and is centered, but honestly it would be much easier if a stroke on the artboard worked the way it was supposed to. (edit) I was focused on what you said first. I'll look into the two strokes using the Appearance panel. Thank you for that tip. (edi2) Weird that doing that works, but it does. I also notice when it does, the other stroke that wasn't working disappears from the Appearance panel. This is a great tip to know. I really appreciate it. 3 example images.zip -
Adding stroke to artboard doesn't work
Pensketch replied to Malauch's topic in V1 Bugs found on macOS
It's now over a year later, and this hasn't been fixed on Mac? Or at least it doesn't seem to have been fixed. I've been beating my head against the wall for the last hour trying to get it to work. I'm using the AppStore Affinity Designer version 1.7.2, MAC OS 10.14.6. I need a 1px border for some static display ads. I can make a rectangle set to the top layer have a 1px stroke, and set color opacity to 0%, however then it works like a shield and I can't manipulate the stuff below it without turning it off. And if I turn it off, there's a chance I'll forget to turn it back on, and then my ads become noncompliant. Is there a workaround for this? Or is it still just "logged with development" and it'll get fixed when it gets fixed? (edit) Locking the "border" layer stops it from acting like a shield. I would prefer to be able to add a stroke to the artboard, but at least I have a solution for the problem I'm having currently. -
Disappearing groups in the Layers panel
Pensketch replied to Pensketch's topic in V1 Bugs found on macOS
@Hangman Yes, thank you! I had no idea how to consistently get it to happen or take a video of it. I really appreciate it. -
Pensketch reacted to a post in a topic:
Disappearing groups in the Layers panel
-
Pensketch reacted to a post in a topic:
Disappearing groups in the Layers panel
-
Mac OS 10.14, Affinity Designer 1.7.2, Mac App Store version. This is tough to explain, and is only repeatable in that it keeps happening. I'm working in files that have a large number of groups and sub-groups. Randomly when I am working in a group, other groups below the one I'm working in will disappear from the Layers panel; blank spaces are in their place. I'll ry to get a screenshot of it the next time it happens. It's usually possible to fix if I resize the Layers panel, and doesn't seem to be causing any bigger problems. It's just disconcerting.