G13RL
-
Posts
717 -
Joined
-
Last visited
Everything posted by G13RL
-
 @dominik I wouldn't know exactly, maybe with version 1.7. I discovered this by chance on the forum while browsing it. Someone had posted a message explaining this feature, unfortunately I forgot who it was (I should have noted it somewhere). If he recognizes himself he will be able to enlighten us precisely.
 -
For a freehand curve, draw the objects to be placed on the curve. Draw the curve, "Convert to Text Path". Select the objects, "Ctrl + X". Select the curve, take "Text Tool", "Ctrl/Cmd + V". Select the objects with "Text Tool" and set the spacing with "Tracking".

-
Convert to curves
G13RL replied to Eddy-2's topic in Pre-V2 Archive of Affinity on Desktop Questions (macOS and Windows)
Thanks for the feedback, I'm not used to Pixel Persona, but when you import a photo it's an "Image" you can't work on. To make a selection you have to "Rasterize" this image. In the layers it changes from "Image" to "Pixel". Other people would explain this much better than me. -
Convert to curves
G13RL replied to Eddy-2's topic in Pre-V2 Archive of Affinity on Desktop Questions (macOS and Windows)
Hello, Eddy-2, Create a rectangle, make two copies. Select the set, align them horizontally without spaces, put the desired colors. Export the set (always selected): "File", "Export", choose PNG (selection without background). Then import the PNG you just created: "File", "Place". Once imported, "Layer", "Convert to Curves". You can then manipulate your shape. -
Thank you GarryP for these links, very interesting.
-
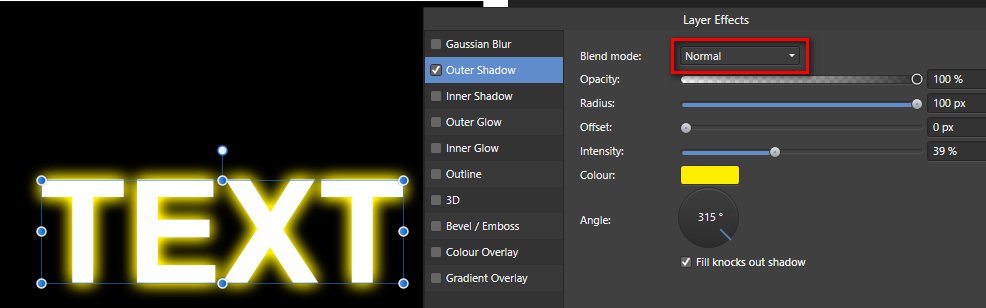
Hello, Razta, Expand the "Outer Shadow" tab of the studio (by clicking on the cog to the right of its name) and change the Shadow Blend from "Multiply" to "Normal".
-
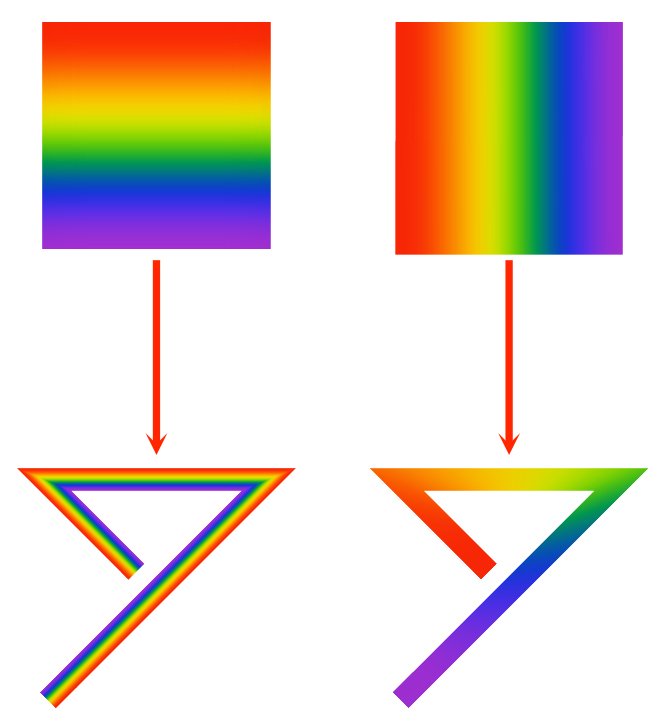
Starting from the same thing but oriented differently, the gradient is placed differently on the line.
-
To my knowledge no, I thought I had found a solution: "Layer," "Geometry," "Separate Curves." Invert the colors (set the fill to "None" and the contour to black). Set the line thickness to 0. Reverse the colors again (set the fill to "Black"). But the result is the same, the outline is simply hidden.
- 10 replies
-
- 1
-

-
- affinity designer
- masking
- (and 1 more)
-
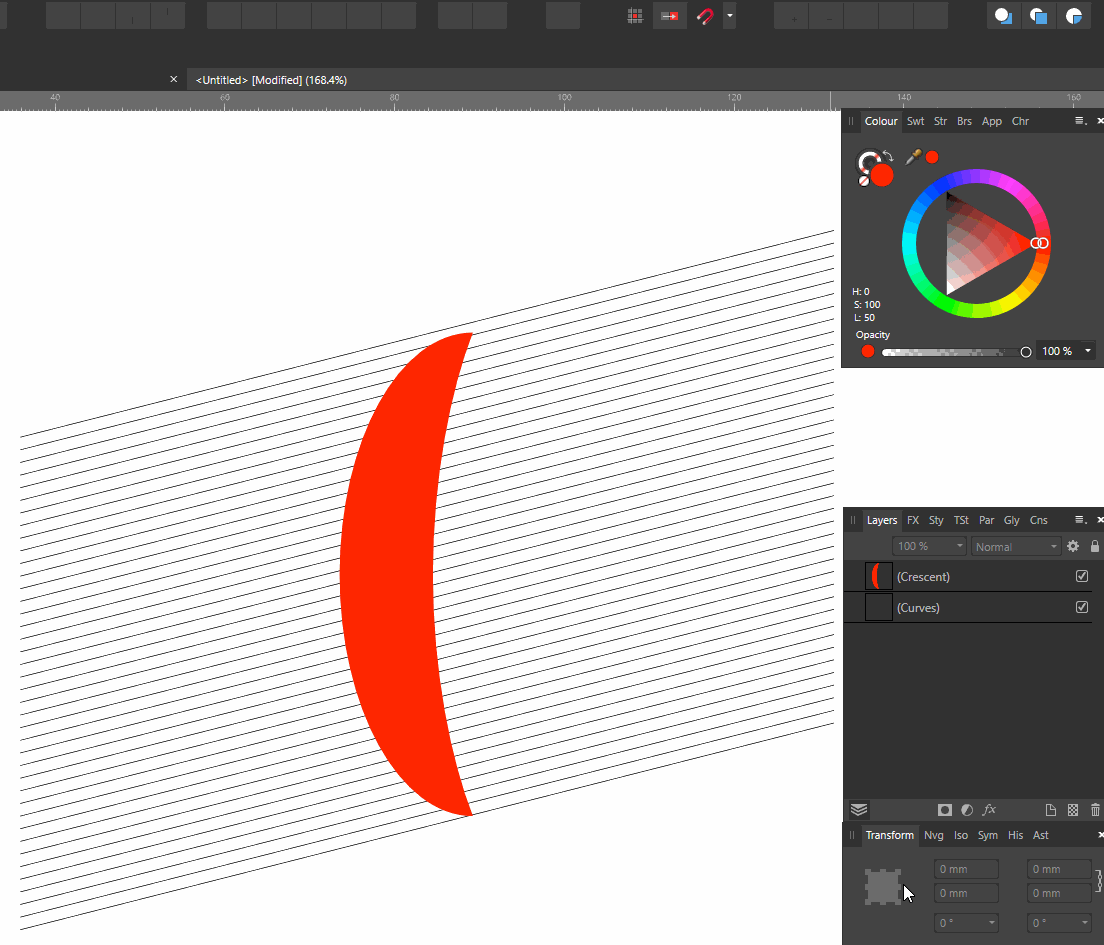
Hello, jiminyfickett, Try this: Select lines, "Expand Stroke", "Add". Select the set (rows and crescent), "Intersect".
- 10 replies
-
- 1
-
-
- affinity designer
- masking
- (and 1 more)
-
Hello Callum, thank you for your answer. After launching AD following your instructions I can create styles again but everything is pixelated: for example if I draw a vector pattern that I export as png and then import this png to create a style, everything is pixelated, the png and the style. I didn't have this problem before and I can't find where the problem comes from. EDIT It seems that the problem has solved itself? I just did several tests, still with the same settings I used before my problem, and the pixelization has disappeared (except in case of excessive zoom, which is normal), the results are now as expected. Another computer mystery! All I have to do is reinstall my brushes, styles and assets backups. Thank you again Callum for your answer.
-
Hello, I've never had problems creating styles before but when I tried to do it with version 1.7.1.404, AD gets stuck and sometimes blocks the whole computer. I have two versions of ADs on the same computer, one purchased directly from SERIF and the second one from the Microsoft Store. The problem only exists with the version purchased directly from SERIF, the Microsoft Store version works normally. I reset the studio to zero, uninstalled and reinstalled AD, I tried to repair it and last I downloaded again and reinstalled but the problem is still there. I can send you the discharge file if you provide me a link, thank you.