hokic
-
Posts
33 -
Joined
-
Last visited
Everything posted by hokic
-
I have just realized I was following the wrong OS topic about this since I work on Win. So just to let you know: I have same issue with outline stroke as described in theme linked above And I have just created logo with variable stroke width and some of the lines disappear once I try to expand them to curves I gotta tell this is one of the basic operations in vector design and I feel solving that should be one of the top priorities.
-

Affinity Photo: Can I disable 'Set line fill'
hokic replied to tkserie's topic in Desktop Questions (macOS and Windows)
This is very frustrating. And it happens over and over to me. Usual scenario: I have a lot of groups of layers. Mostly when I design a logo etc. and I need to test variants and also keep previous versions. I combine vector, bitmap graphic At some moment, I try to recolor something, but because of auto select etc. I am not aware I have deselected the current object "Nothing" happens, because in fact with auto select I have selected something hidden deep in hierarchy meanwhile - and I color this one, yet do not know, since the visibility is off Few days later I realize my hidden group of earlier sketches was damaged this very way and they are gone forever This is one of the worst bugs in Affinity since it damages previous work forever. -
Run once again into this today... as did several times this week. Open file from "Client folder" (a leaflet) > Working > Opening several images / logos for use in the files like "Client folder/documents or Client folder/images or "Client folder/logo"> Work finished, export PDF for print > Wanting to send exported PDF to client from the root "Client folder", but having no idea where it is located since it is not there> having to try to export again and find it is located in the "Client folder/logo/RGB/" since it was the last one opened any file from. Its getting almost funny
-
I have run into similar issue several times. As it was discussed few years ago in here. I consider a visible edge of the shape through stroke not an antialiasing issue, but a bug. I can avoid it by expand stroke and Boolean operations when I export graphic, but I do not feel this should be the way. Once you have a inside stroke, you expect the clean stroke color on the edge.
-
Affinity Photo 2.0 Crashing/Closing all the time
hokic replied to Raphael Bonelli's topic in V2 Bugs found on Windows
I have just run into crashing too. Situation: Painting, using Wacom tablet with predefined keys (brush, eraser, spacebar, undo, redo). When changing toys, crash. I use Photo rarely, so not able to report in more details. After crashing multiple times, I gotta export do .PSD and finish elsewhere. Sorry for not giving more info, I am at work. Win 10, acceleration off (being on made brushes laggy), latest version of the Photo. -
Curiously enough, I have a feeling that the digital painters are not the target group too Nevertheless, though I miss some other features too, to me this is not a deal breaker. But it spoils every day workflow, especially if you work with different projects, folders. And from the users point of view, change this setting should be easier then to break .psd file format architecture.
-
Thank you for this topic, same opinion here. Not a deal breaker for me, but definitely damages user experience.
-
THAT is what I needed! Thank you very much. And it works with "groups" of shapes, except for those must be two compounds of multiple shapes, not the real groups (in such case it does not work for me). Like it is explained in 11th minute. I have tested that, but had no idea Alt key makes the magic. This is very helpful, thank you
-
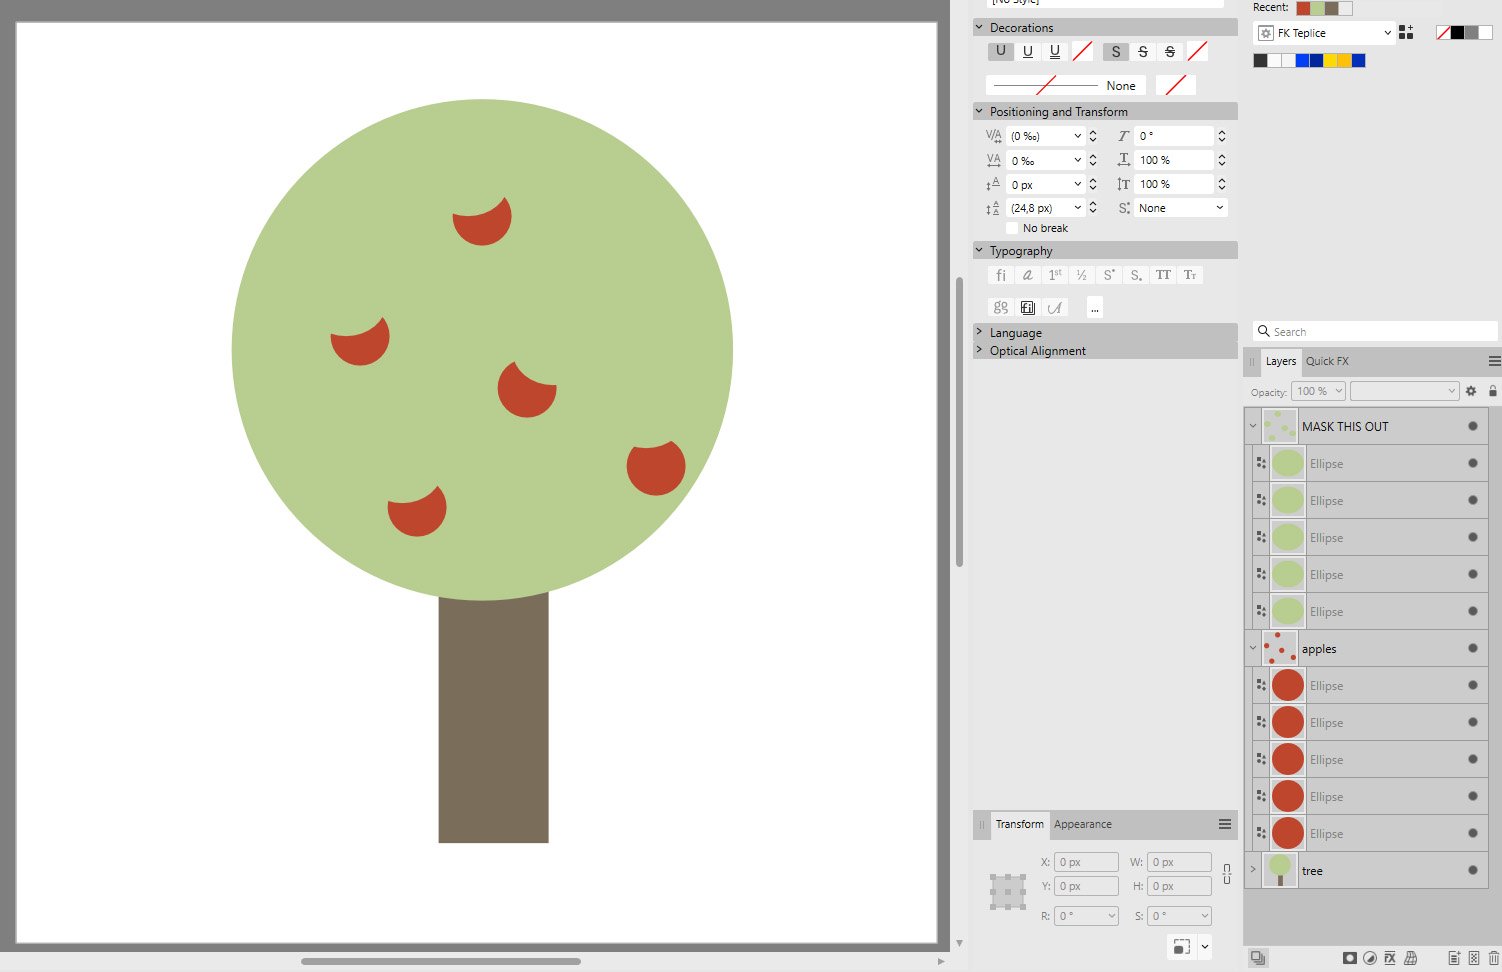
I try to explain a bit more. I am working on tree painting. Much more complex then the one I have created for this thread. And the tree itself has more layers to look natural. Some background leafs, dark, some branches, foreground brighter leafs etc. etc. Branches are fine to paint as curves with variable width stroke. But bunches of leafs, those are better as shapes. But the thing is - to make it look naturally, I need to see through, there are some holes in such shapes. You can see through them, darker leafs and branches bellow, sky, etc. I also need the apples not to be on the top, perfect circles, but their parts are hidden, mostly the top ones. For all of this, this type of "hide" masking would be best solution for two reasons It is non-destructive the workarounds like "duplicate sky color layer and create the holes in the different layer above" etc. do not work clever in complex composition Anyway, thanks for help, really.
-
If I hide the group > the apples are fully visible. In other words - what I need is non destructive masking alternative for boolean geometry - subtract operation. But the only one what we can get is intersect (mask shows those parts of layer/group that intersect with mask layer/group shapes)
-
Thank you, but this does the opposite. It shows the intersecting parts of both layer groups. I need to hide them. Just to make clear in case I did not explained it right. What I have about is a good visual outcome that I need. The process is not right Imagine the tree crown having texture - in such case green circles from MASK THIS OUT group would not work.
-
I have a simple question. Is there any way how mask out with vector / group of vectors? Similar to what black color does in bitmap mask? Did not find the way so far. The same thing what Adobe etc. uses for years in Add vector mask - show / hide. To my knowing I am able use only "show" version in Designer. Example - I have a tree with apples and I want to hide them under leafs. To get visual result like in the image. So I would like to draw a bunch of curves (MASK THIS OUT group) and use it like "hide" mask to get the result. I know there is a workaround - like duplicate green crown circle, move it above the apples, and use the mask to SHOW. I do not ask for this, in many cases this is not suitable. I ask - is there a simple way how to achieve this simple way? This is something I use absolutely naturaly in my work proces while I do vector drawing and I struggle in Designer to get it. I feel like this is absolute basic to me. Am I missing something here? Thank you

-
Spacing between bullets
hokic replied to bio's topic in Pre-V2 Archive of Desktop Questions (macOS and Windows)
Hi, I have just run into the same topics. As I have a Czech typography handbook by my hand, I see that different bullets levels are treated like the same paragraph. So with no space before and after when hit the Tab and move to second level. When I google a bit, it seems to me the same in English language (may be wrong). So my question is - should not be the right default setting in Publisher, that all the levels are considered part of the same paragraph somehow? I do not say it fits the current logic of settings, I just ask. From my point of view it should follow the right typography rules by default. Cheers. -
Hand tool does not work reliably
hokic replied to hokic's topic in Feedback for the Affinity V2 Suite of Products
Hi, Walt, thank you, this particular setting helped to solve the color problem. Btw. is there a proper place in here where to ask multiple questions at once? Btw. to hand tool bug continues. I thought it occurs sometimes when I use deselect all command, but I have to confirm yet. -
To me hand tool does not work reliably too. I mostly use Designer, I feel like that starts to happen when I work with pen, colors (Wacom device). For this type of usage (which is mostly digital illustration) Designer is very frustrating for me. For other types (mostly design like business cards etc with mouse only usually) I am fine. I'll try to observe, but to me this is something I cannot get used to, a circle of death. Pardon me if I add a bit of context (feel free to send me to another topic): I do illustration, so I need draw many layers, very like of same color like the one before (like ten layers of skin color) I get lost because I am not able to add another shape of same color, stroke with my pen tool above ta actual one (which is usually mostly what I need) So I have to use more tools or cliks then I would like to (because pen tool behaves to previous layers differently then rectangle tool) Many times I realize I this is happening instead: I start edit previous layer with pen instead of adding new one (so I have to deselect, but that moves me in hierarchy) Or I start new layer above the previous but with no color Or I start new layer somewhere on the top of everything (because of deselect earlier) Recoloring everything with the selected color At such moment, I need to go back in history or layer order - pick color from another layer, move layer in hierarchy to place I need it etc. And very likely at such moment, so moving layer down, using eye dropper tool etc. - Spacebar stops working for me as Hand tool To me there is something weird I cannot describe in the way Affinity works. I feel there is a lack of intuitiveness of my work proces. And spacebar not beeing a hand tool at very moment is one of most frustrating things. Anyway, I am Windows user, I should add. Cheers.
-
Thank you for answers. At the moment I do not see the "highlighted even after changing size" being solved, at least in my Win Aff Photo 2.0.4. Though the brush history icon is a improvement of such in other way.
-
Well, after a few years of using I finally understand this "bug" is not a bug, but a "app design" thing 🙈. And honestly, I find this not to be the most cleverly solved one. Mostly for this reasons: I think wet edges brushes (means water color ones) are minority of brushes generally speaking from my experience most brushes in my app have ability to be used in both states - but they are not meant to be the wet ones, it just “possibility” so minority type of brushes affects behavior of the next selected majority of brushes I do not say it has no sense, but I do not feel this is well designed in UX way. Not sure there is a way back though. Speaking for myself, I would welcome ability to turn this heredity on/off. Generally speaking, brushes are one of the most reason I am not using Affinity for painting (and keep combo of Photoshop and Clip Studio). Though I use the Affinity apps more and more for logos, print, etc., they are my everyday apps now. And the feeling I have is that I have no control about what I use. Similar reason, no highlight because "not brush, but the preset" as discussed in Brush isn't highlighted in Photo thread. Minor change everyone makes in the first seconds of usage (size) leads to loosing visual control about what tool I use. I do not mean to discuss another theme in here, but please, pay some more attention to brushes in sort of simplifying everyday use, visual control (eg names in list), feedback, management, real vector brushes etc.
-
Hey, same experience here. Though there is an option "Don't export layers hidden by export persona", it mirrors the visible/hidden settings in layers palette. So to export everything, you got to open all the groups, all the layers and manually set them visible.
-
@JimmyJack Well, that works You loos the layer name, but at least it works. Thanks @R C-R I have used the "connect" work to avoid "merge" since it is the name of the function itself. In this particular case I have a canvas = viewport of the app UX. And I sketch a student room that is approximately twice larger then the canvas (it will be used in multiple screens, always different part of the room). During sketching it is helpful to copy some objects like pictures on the wall, chairs etc. to sketch faster - and then merge them again with the original layer.
-
Hey, @R C-R, thank you, but would Merge Visible help? Please correct me if I am wrong, but I would have to hide all the other layers just to connect those two (or more) I need Use Merge Visible Then again switch all the others on, which is even less fun since you got to remember which ones were on and it could be plenty And then I still end with a layer that is not only merged, but cropped too As I have been thinking about this, as far I know, there is no way how to connect two layers larger then canvas without them being cropped (without changing the canvas size as Walt suggests).
-
Hello, @walt.farrell, I am using Affinity Photo. You are right, I do not see the outside canvas. Unfortunately I am not sure I can post the graphic itself, since I have not permission. So just in words, I have a students room with usual equipment and it will be used on three consecutive app screens. On each one it is slightly moved, so it is aprox. twice the width of the screen. And I just continue drawing and moving to the side, so the hidden part is not visible, but I am able to draw things continuously. In a sort of way you are right, wider canvas would sort it (yet this is the only screen that is wide, others are small, so I did not made) in this particular scenario. But I was surprised by the behaviour of merge command itself. @Ron P. Well what to say. I feel it this way - there are things in which different SWs are not the same. Like, lets say - in one SW you apply masking by different shades of white/grey/black. In other SW you apply masking by erasing/painting on the mask, so more like working with transparency of the mask itself. Different approach, one has to adapt, that is right, but thinking is lets say common and makes sence. On the other hand, a year or so ago, I have realized, that "vector brushes" are in real "high-res bitmap brushes" in AffD. Realized in moment I tried to export. Full day work in trash. That is the moment, when I feel user is surprised beyond his common knowledge. Those are things I call not intuitive. As a fan of Affinity and a buyer of the apps, I feel really sorry to be surprised in this way. And I try to explain the work process and why I feel this is not different, but wrong decision or behaviour of the app.
-
Hi, guys. Thank you for the answer. I understand the workaround you suggest and the explanation how AP works. Thats very kind of you. But is this a good solution? Intuitive? Generally speaking in the way AP works. For example, the document boundaries are important thing for me. It keeps me connected with the final look, size, proportions, with the setup of final page, ux, etc. Yes, it can be solved via masking for example, but - is this the right way? Not to mention things like align to the document, columns etc would become useless or much more complicated, once you are working in a bigger canvas then the final is. Another thing, merging layers is a way how to keep layer simple and even prevent mistakes, when moving around the document (otherwise you got to select multiple layers, group them, inevitably it leads to mistakes since you have to keep in mind what layer you paint in right now etc.). I am not talking about my particular job now, but playing with composition when sketching, moving layers, that is very common part of process to me. So if I decide not to have larger canvas, I am done using this. I find this as a very large obstacle for the flow of the process. I doubt I am the only one. I got to say, I try to move from Photoshop, tried several times, I use Affinity more and more, especially Designer, yet I always hit some invisible wall in the place I would never expect it. Despite a lot of things I love. Maybe the thing is Photo is still more for design rather then painting (the long time "please disable auto select" thread suggests), so not many users complain. But I would really welcome crop only when I use crop. And merge when I use merge. Not together at once. I still cannot understand the logic of such settings. Cheers
-
Hi, I have discovered a behaviour of the, that seems to me not intuitive. Am I doing something wrong, or does the app wrong in the way I would not expect? I am sketching an image that will be later used in online app with paralax scrolling (room interior). I have document size the same as the app size, but I need wider layer to be able scroll it later. So while I draw I move the layer to the side several times and continue sketching. I duplicate some parts that will be the same (eg. photos on wall, books, whatever), so I make selection of such thing, copy, paste, move it a bit. Then I merge it down to the original sketch layer to keep things simple. But the bellow layer crops at the same time to the width of the document. All my previous - hidden - work lost, yet I have no idea, so I close the file and realize later. I don't feel this to be proper behaviour. I do not expect out of the boundaries parts to be cropped when I merge layers. Are two layers wider then the document boundaries? They should keep wider even after merging - as default.
-
Oh. You gotta be kidding me. The thing is - who zooms brushes to 3000% to realize those are probably high-res bitmaps? After he uses for a tool called Vector Brush and it even works in normal zoom ratios. I have been working on a client design, everything is done and suddenly I realize those files cannot be exported as vectors, because all the formats contain brutal pixelation. Honestly this is a big disappointment. And not a first one. I have been trying several times to switch to Affinity. But I have to keep taking it as the secondary option only, because I cannot rely on the product yet. I am very sorry.
-
Well that is exactly what made me confused. Even the 100% (or higher) zoom does not show the accurate state of the file. Exactly as there is to be seen in the attached screenshot above. At one point I get it, it makes the performance smoother (my preferences are set to best). At the other, it makes the user uncertain about the final outcome. And feeling of having things under control is one of the most important UX aspects. And one other thing. Once I rasterize such layer (been experimenting), for example some layer that has been pasted from another texture file and transformed (eg to 700% of previous size), there is no way to get the rid of such pixelation even in export.