lacerto
-
Posts
5,800 -
Joined
Everything posted by lacerto
-
Page numbers in pdf
lacerto replied to ms.fuentecilla's topic in Affinity on Desktop Questions (macOS and Windows)
If you mean custom page numbering and its transportation to a PDF, this is not supported in Affinity apps. You need to use Adobe Acrobat Pro or similar utility to apply custom page numbering onto a PDF. -
If your workflow is importing a Word document that is basically more or less fully style tagged, I would import that file in a Publisher document that has all default styles (not used) deleted. That would avoid having multiple styles with identical or nearly identical style names cluttered in the layout and confusing formatting of the document. Publisher does not have a capability to signal conflicting styles and let the user design at import time, whether to use Publisher-defined styles with the (matched/similar) style names, mapping the imported and existing styles, or overwriting Publisher styles with imported style definitions, and avoid what you describe as "style nightmare". So if you have a good arrangement in Word already, I would recommend importing into a document that is as much as possible cleared of in-built styles. EDIT: This would be a workable solution even if not having Word styles well-defined. Just having source text tagged with paragraph and character style names and finalizing the actual style definitions in Publisher, should work well. It is the style name conflicts that are probably the biggest nuisance in preparation of layout.
-
Basically something similar though the overlap is much bigger of course and there are no things like overprinting etc. happening. It should be done now.
-
I am not sure that I understand what you mean? It is noticeable whenever this kind of design is exported using certain apps, but as mentioned it does not necessarily show in print. It is much a question precisely about that: needing to work around, in lack of a feature. Some are easy, some less easy. Sometimes using an outer stroke is more convenient, I guess that's why strokes have three alignment types. Illustrator, e.g., does it both when exporting to vectors (e.g. PDF, SVG), and when exporting to raster formats (e.g. PNG): a) PDF and SVG (Illustrator vs. Affinity Designer): outerstroke_ai.pdf outerstroke_ai.svg outerstroke_ad.pdf outerstroke_ad.svg b) PNG (Illustrator vs. Affinity Designer): For vector graphics, Illustrator expands the outline and then overlaps the "stroke" and "fill" parts. For raster graphics, it uses supersampling to cover the antialiasing artifacts. Typically native objects need to be more or less modified when exporting to different vector formats, so it is not so much a question of "fidelity" but of compatibility, effectivity and usability (optionally embedding the native format or PDF stream additionally offers at least limited shareability). And users normally have several choices (in most apps). I cannot see "philosophy" here; something like that gets offered every now and then on this forum as a kind of an excuse for needing to do things "differently", which often just means using a workaround as long as a proper feature has not yet been developed.

-
Farbabweichung beim Import
lacerto replied to zuiui's topic in Affinity on Desktop Questions (macOS and Windows)
Yes, I made a wrong conclusion, it is not the transparency (A-channel) that confuses Firefox, but it seems somehow having information only in R channel (G and B being all 255), so when having a P3 profile embedded, Firefox macOS (but not Windows) version fails to recognize the difference in red in all cases. P3_pngs.zip -
Farbabweichung beim Import
lacerto replied to zuiui's topic in Affinity on Desktop Questions (macOS and Windows)
I think I might finally have (some kind of) and explanation. The Firefox gfx.color_management settings are not properly documented, but it seems that on macOS the setting gfx.color_management.native_srgb, which by default has the value true (turned on), overrides the gfx.color_management.mode setting, and means that color management is handed over to the system: The setting has possibly been added later for macOS, which means that users who have had Firefox installed for a long time, might not have this setting turned on (especially if the app has not been regularly updated). Anyway, when the value of this setting is true, Firefox on macOS behaves similarly as other browsers, meaning that unmanaged images will be rendered as sRGB. On Windows, this setting has no meaning and its default is false, so on Windows the same effect is achieved by setting the value of gfx.color_management.mode to 1 (which is NOT the default). On macOS this setting has no meaning if gfx.color_management.native_srgb is true. It should be noted that if the setting is changed, the system needs to be rebooted before it takes effect. I do not think that this is what OP experienced, because macOS screenshots have embedded profiles. But when using Firefox, not having ICC profile support turned on, or having color management completely turned off (old defaults in Firefox), might -- depending on what kind of display is attached to the computer (internal or external, hw calibrated or not), and whether the profile embedded in screenshots accurately describes the display color gamut.
-
Farbabweichung beim Import
lacerto replied to zuiui's topic in Affinity on Desktop Questions (macOS and Windows)
Yes. What can I say: I just once again uninstalled macOS Firefox (and before that manually cleared the cache), reinstalled it, rebooted the computer, and now the default color management settings (mode = 2) work similarly for unmanaged images so revert to sRGB similarly as other browsers, so I no longer can reproduce the oversaturated images (with exactly same images) that I experienced yesterday (and demonstrated in one of my posts above). So unreliable, to say the least. I do no longer wonder that OP managed to fix the issue by rebooting the computer! Anyway, I am pretty sure that this was a Firefox issue, and nothing to do with Affinity apps. UPDATE: On Windows, at least, I can consistently switch the color mode between 1 and 2 and get the behavior described in Mozilla documentation (1 = color management on, revert unmanaged to sRGB; 2 = only manage tagged images) so that I know I have not just dreamt. -
Farbabweichung beim Import
lacerto replied to zuiui's topic in Affinity on Desktop Questions (macOS and Windows)
It was fixed by setting the color mode to 1 (= general color management turned on; 2 = only manage tagged objects, which is the current default). This was specific to the situation of having unmanaged image (which OP probably did not initially have because the original image was a macOS screenshot). The OP might have ICC v4 support off (or even all color management off), which would mean that screenshots with embedded profiles would not be color managed (but would show at full display gamut). Firefox has been and is still in many ways a bit tricky with color management. Proof: https://webkit.org/blog-files/color-gamut/ Especially check the webkit red logo. I still cannot get any difference with Firefox, even after having made the setting changes but if the embedded profiles are v2, that might explain it (perhaps they are not supported in Firefox, at all so embedded profiles need to be v4). But all other browsers that I have tested work fine, both on macOS and Windows. EDIT: This does work on Windows Firefox (with identical settings), but my Windows laptop is also ~Adobe RGB (has clearly wider gamut than my supposedly Display P3 MacBook Air display). But I will boot my mac and confirm. UPDATE: Now booted and retested, no difference whatsoever. But I took the image webkit logo PNG (a 16-bit image) in Photoshop 2024 and saved it from there again to 8-bit and 16-bit images (Large file size) and both show in Firefox fine, so this might have something to do with image compression: Firefox does not seem to support certain PNG compression methods. UPDATE: This was wrong assumption, too. Photoshop saved versions were significantly smaller in size than the original version. Embedded color profiles are both by Apple so no difference there, either. EDIT2: Finally resolved: Firefox macOS version cannot read profile tagged images that are 32- or 64-bit (PNGA images), so these two fail, but work without problems with other browsers (and all apps that I have tested): pnga.zip and when saved without transparency, work just well also on macOS Firefox: png.zip -
Affinity Designer, vector flood fill causing crashes
lacerto replied to Shane111's topic in V2 Bugs found on macOS
Yes, on macOS there is an immediate crash already when selecting multiple layers (and having Vector Flood Fill Tool active). On Windows there does not seem to be problems (which is good news, since there is probably just some blunder that messes this up on macOS): vectorflood.mp4 -
Affinity Designer, vector flood fill causing crashes
lacerto replied to Shane111's topic in V2 Bugs found on macOS
Is there a specific setting you are using when applying the Flood Fill tool? I have been experimenting on these designs on a Windows computer and have not experienced any crash so far, but perhaps I am doing something differently. I have just randomly filled in shapes while having all layers selected, switching isertion and fill modes, clicking one shape at a time, or holding down for tens of seconds and filling continuously.
-
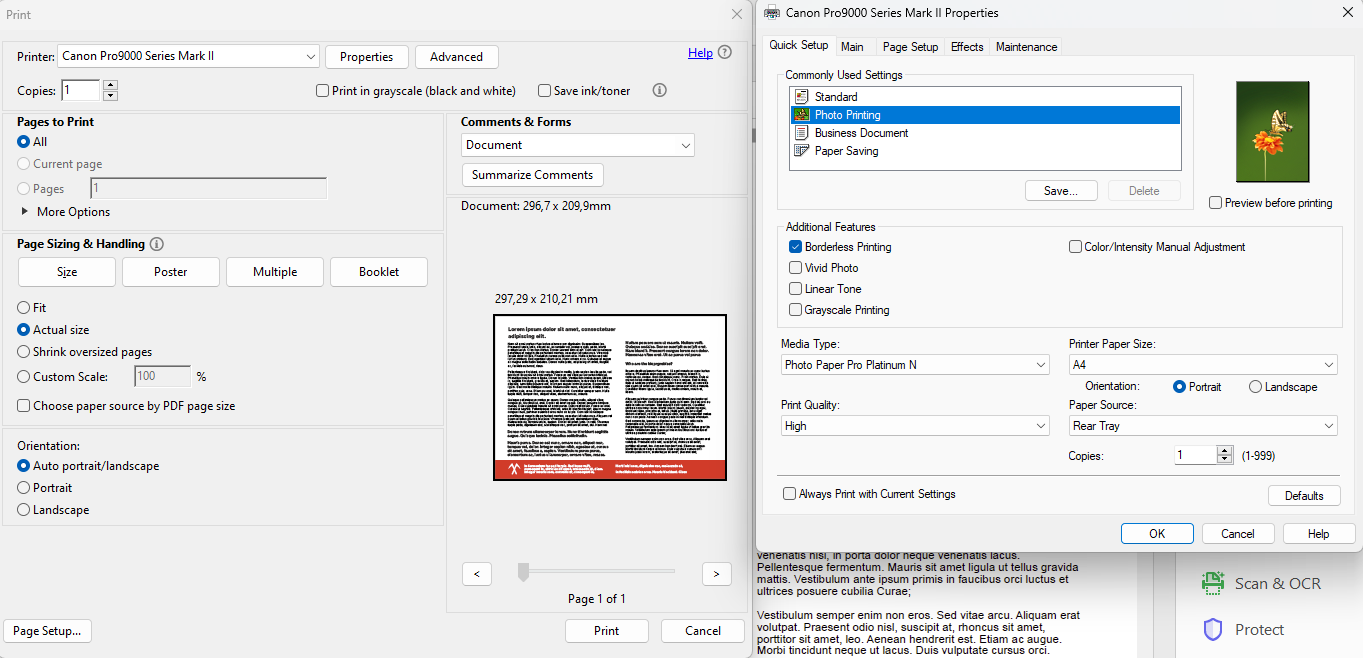
Possibly. If borderless printing succeeded from within Publisher, then the same interface should be available also when printing from PDF (Adobe apps probably excluded). If nothing else works than at least creating an A4 sheet in Publisher (or whatever size is appropriate) and placing the produced PDF on the canvas to be passed through and print from within Publisher should work (as it did before).
-
Sorry, I was inaccurate. I meant the preview within Adobe Reader (and Acrobat Pro) -- I do not seem to be able to even access the Preview app from within these apps. I have no experience of modern printers supporting borderless printing and whether this feature could be accessed from generic printer UI (e.g. the renewed UI of latest Windows and macOS operating systems) but as far as Acrobat apps goes I suppose they communicate with printers more directly (but still might need access to printer driver to get specific information even if warn against this).
-
It is probably dependent on the printer, but it is possible (or even likely) that you need to access printer specific settings that enable borderless printing: While I can still access these kinds of old printers even from within macOS Sonoma 14.2.1 (because they are attached to NAS), I cannot access printer driver specific special features like borderless printing without driver access, and it is possible that they cannot be accessed from within apps like Adobe Reader (or Acrobat Pro) without driver access even if using a modern printer supporting e.g. AirPrint. The preview window however often gives a realistic hint on whether borderless printing can be done or not.
-
One further option that could be used in certain situations: temporarily hide the object(s) or object group(s) that you do not want to have effect on alignment: alignvisible.mp4 UPDATE: Also works for snapping!
-
Farbabweichung beim Import
lacerto replied to zuiui's topic in Affinity on Desktop Questions (macOS and Windows)
I had another look on this and did a fresh reinstallation of Firefox (which, as mentioned, nowadays has full color management by default enabled), and it seems that I was looking this from wrong angle: the app is color management wise simply just broken. When viewing the OP's sRGBunmanaged screenshot taken from Designer (with a bit desaturated colors), Firefox is the only app not showing colors expectedly, but instead, too saturated (top left: Safari, TR: Photoshop 2024, BR: Affinity Designer, BL: Firefox): I did not spend any more time with Firefox color management settings so they are what they are out of the box and appear to be as they should, ICC v4 profiles and color management mode 2 enabled. Perhaps someone knows if they should be something else but the ones used in latest Firefox version (121.0.1) and Sonoma 14.2.1 just do not work as they should. UPDATE: I now tested this on Windows Firefox and the same behavior occurs there; it now begins to seem that this is intentional, so Firefox does not revert to sRGB, as do other browsers, if the viewed image is not color managed. I have thought that this is a universal practice and recommendation. Comparable policy is probably available within Firefox color management, too, but needs to be turned on. UPDATE2: I could not get Firefox deal with unmanaged images getting them handled as sRGB (on neither platform) but it handles correctly images with embedded profiles. Setting the color mode to 1 resolves the issue (I earlier could make this mode operable only on Windows, but will check now its meaning and availability on macOS). UPDATE3: It seems that there has been change in policy (and not even recent one) so that the default value of gfx.color_management.mode is now 2, which means that only tagged images are color managed, so if non-colour managed images are wanted to be handled as sRGB, the value of this setting needs to be 1: This is how this Firefox setting is described (http://kb.mozillazine.org/Gfx.color_management.mode😞 I tried this already yesterday but was obviously fooled by some conflicting setting that made it impossible to apply this setting on macOS, but could now make it work. IMO it is odd that Firefox alone seems to have chosen this policy since probably most of images shown on the Internet are without profile, and widish-gamut displays (like macOS entry-level displays) get more and more common... [As an afterthought: perhaps this is reasonable, not just because of availability of low-cost >sRGB hardware, but because apps typically embed the profile in web images like .png and .jgb, and also because (over)bright displays are so common, so that one could say that aesthetic preferences and expectations have also changed...]
-
Farbabweichung beim Import
lacerto replied to zuiui's topic in Affinity on Desktop Questions (macOS and Windows)
Ok, so this, too: should really have translated the whole thread. But at least I myself learned a couple of useful (changed) things on macOS... and strangely, did not manage to get the macOS Firefox work in expected way as regards color management, so uninstalled it already... -
Farbabweichung beim Import
lacerto replied to zuiui's topic in Affinity on Desktop Questions (macOS and Windows)
I am not sure, I think the setting was just emboldened because it was selected but I did not consciously change anything. I also later noticed that it seems that it is not even possible to have macOS based (latest) Safari Firefox to simulate legacy colour management modes, e.g. 1 or 0, similarly as it still is on Windows), so my notes are probably out of place on macOS (at least on Sonoma). When using macOS based screenshots that are saved as PNG files with embedded display profiles, it seems that the only way to get a conflicting colors (especially as regards saturation) when viewing in a browser and taking screenshots, and then opening in Affinity apps, is having the app color setting that forces conversion to default working color space (sRGB) and opening a file with highly vivid colors and a conflicting color profile embedded -- which is not the default setting. On Windows it is a different story. -
Farbabweichung beim Import
lacerto replied to zuiui's topic in Affinity on Desktop Questions (macOS and Windows)
I checked this now and the color gamut on my MacBook Air is slightly wider than sRGB. I had not noticed that because by Windows laptop has a wider color gamut and I had just assumed sRGB on my mac, which is also not hw color calibrated. Anyway, the embedded color profile used to be called just "Display" in earlier systems but I never examined it closer and now do not seem to have a profile with that name on Sonoma any longer. As for Firefox, I now downloaded it on my macOS Sonoma and it seems that nowadays (at least on macOS) the default in FIrefox, too, is, similarly as on other browsers on macOs (Safari, Chrome) a fully ICC enabled color management. But depending on user's setting, I think that what I described above is something worth a check, and is a fully reproducible recipe for getting this discrepancy when using non (or partially) color managed apps on a > sRGB capable display, taking screenshots, and pasting/opening them in fully color managed apps (like Affinity apps). -
Farbabweichung beim Import
lacerto replied to zuiui's topic in Affinity on Desktop Questions (macOS and Windows)
I have not followed the full discussion but only part (and using Google translate as my command of German is at level of my high school days several decades back), but because Firefox and Display P3 were mentioned, want to point the following. [Sorry for not Google translating this in German, but it is complex enough for someone not speaking native English to write about these kinds of things in English.] As long as I know Firefox does not have by default have full color management turned on so it is possible that it shows full display color gamut for images not color managed, while e.g. Chrome would force sRGB for these kinds of images. When full color management in Firefox is turned on, the settings look something like this: If color management is not turned on, Firefox would show RGB images more saturated on a wide-gamut display (like Display P3, Adobe RGB or displays with yet more wider color spaces) than viewers that would force sRGB for non-color managed files (meaning that sRGB color profile is simply just assigned). On macOS screenshots are typically saved in a .PNG file and the system display color profile is embedded. I am not fully aware of recent development on macOS platform but on my MacBook Air M1 the display color profile is currently Display P3 and this is what also gets embedded in screenshots. Display P3 is a wider color space than sRGB while I think that the display in my mac model is not capable of showing more than (approximately) sRGB color space, and I recall that originally (using previous operating system versions, like Big Sur that initially came with the computer), the embedded color profile used to be called just "Display". Because I cannot test this on my mac, I cannot say whether macOS actually converts a wider than Display P3 color space to Display P3, if necessary, or if it simply just assigns the profile (would assume so), but in both cases, it is possible that a non-color managed RGB image shows more saturated colors on a wider than Display P3 color gamut display when viewing it in a non-color managed Firefox (or any other non-color managed app), than what happens when a screenshot of the same image saved by embedding Display P3 profile in it shows when opening it in a color managed app like Affinity apps. Having a wide gamut profile embedded in a screenshot is somewhat confusing since it is of course clear that just embedding a Display P3 profile in an image does not make it wide-gamut (> sRGB) on a system where display is limited to sRGB or lower (like my MacBook Air M1), and I do not know why this now happens -- perhaps all modern macs now come with displays that are capable of showing full Display P3 gamut (and if there are wider-gamut displays, they by default are configured to be limited to P3)? On the other hand, this is basically in line with what Adobe has done for years when using Adobe RGB as the default RGB profile within Adobe ecosystem. On Windows making a screenshot normally captures raw image color values (the full display color gamut) so the typical workflow on a wide-gamut display on Windows is to paste a screenshot by using the monitor color profile assigned to the captured image (when pasting it) and then converting it to some generic color space (like sRGB, Adobe RGB, Display P3, etc.) to be more generally communicable. Color managed apps typically have a user-definable behavior for dealing with non-color managed images so e.g. in Adobe apps non-color managed images would by default have Adobe RGB color profile assigned to them, while in Affinity apps the default working RGB color profile is by sRGB, meaning that the same non-color managed image pasted in a system capable of showing wide-gamut color could in Adobe apps show more saturated than in Affinity apps. On Windows, to have matching colors (raw display color values) on a non-color managed Firefox (or any other non-color managed app, since Windows OS itself is not color managed), and in a color managed app like Photoshop or Affinity Photo, would require that the pasted image is assigned with the monitor color profile (e.g. a calibrated profile used as the system display color profile). On macOS, where the operating system GUI itself is color managed, this might actually be still more complicated (and apparently simpler), so with hardware that I have available on macOS, I am not too sure that what I have explained above is accurate, at all 🙂 But it does explain what I can experience on non-color managed Windows GUI (Pro 11) with non-color managed and color-managed Firefox on a wide-gamut display hardware assigned with hardware calibrated system color profile.
-
You're welcome. I later printed this from Adobe Acrobat Pro onto my local printer on an A4 sheet, and the distances remained at 5mm throughout (180mm total from first to last point) so there is nothing wrong with the PDF. I would check two things: that you do not accidentally have scaling down to paper size other than Letter on the second tab of your Brother driver, and that if you have multiple trays, there is no setting that forces feed from a wrong tray (automatic selection might also fail sometimes so forcing paper feed manually from the right tray might be worth a try). It might also be useful to check that you do not have wrong default paper size set in the printer's own control panel (which you should be able to access also via browser). I have noticed that sometimes paper size selections made via driver or manufacturer's own printer app do not "take" (I am not sure if this is something that is related to ongoing changes in Windows 11 OS -- I have recently had all kinds of minor issues with my newish Xerox color laser printer which make me wonder if this company really has what it takes to get ink (toner) on paper, somehow I have assumed so...). Anyway, these kinds of errors can often be fixed by restarting the computer, or unlnstalling and reinstalling the printer driver and the app (I have done this a few times already).
-
Could it be that you are printing a letter size (8.5in = 215,9mm) document on an A4 sheet (=210mm) so what happens is that the printer software fits (scales down) the document on the physical page? I do not have letter size paper to test this on a printer, but used Adobe Print virtual printer to do the job, and the distances are kept: distances_kept.mp4
-
Double-Sided Printing Question
lacerto replied to DianeF's topic in Affinity on Desktop Questions (macOS and Windows)
In a way it is possibly clearer and hopefully unifies printer interface so that it is pretty much similar to choose options for different printers in different apps. But changes of course require also new learning, and having minimalist scrollable options seemingly grayed out does not necessarily make learning easier! Also, the option for double-sided printing is not available unless you have at least 2 pages (which is of course logical but also might fool a user to think that the option is grayed out for the active printer in general). -
Double-Sided Printing Question
lacerto replied to DianeF's topic in Affinity on Desktop Questions (macOS and Windows)
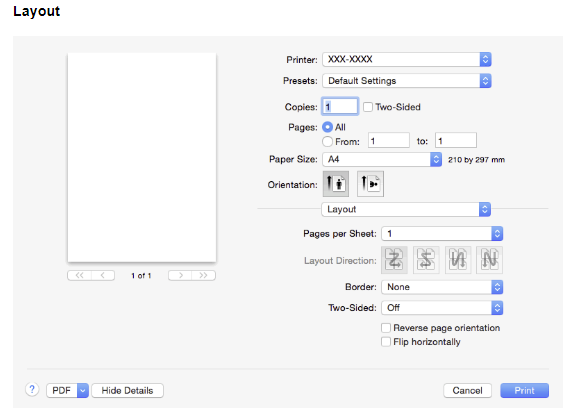
As AirPrint and Sonoma are specifically mentioned, and the mentioned printer is also listed as one of the officially supported [AirPrint] printers, there might be point in consulting https://support.apple.com/guide/mac-help/print-documents-mh35838/mac ....which basically shows the UI shown in my first post. But perhaps there is some printer-specific that causes that the option for double-sided printing is not available. -
Double-Sided Printing Question
lacerto replied to DianeF's topic in Affinity on Desktop Questions (macOS and Windows)
According to the HTML manual specific to your printer (and many other Brother printers), duplex feature should be available under the Layout options (Two-Sided), as follows (twice, first as a check box and then lower with additional options): ...but it might well be different under Sonoma.
-
I am not sure if I have done something to enable the feature, but whenever I select the Gradient Tool and start dragging within a selected object, the result is a linear gradient with start and end stops at ends of the dragged line (I tried to make elliptical, radial, or conical gradient as the default, but could not, so the app just seems to remember the last used setting document-wise).