Search the Community
Showing results for tags 'flatten transparency'.
Found 6 results
-
 Could you add a flatten transparency command like Adobe Illustrator's? The way it works is that it converts the vector object with transparancy to a non-transparent vector with a colour that matches the one it had when opacity was applied. For more info see this thread: https://forum.affinity.serif.com/index.php?/topic/175099-flatten-transparency-set-opacity-to-100-and-use-the-colour-closest-to-the-transparant-colour/
- 14 replies
-
- 4
-

-
- flatten transparency
- opacity
- (and 2 more)
-
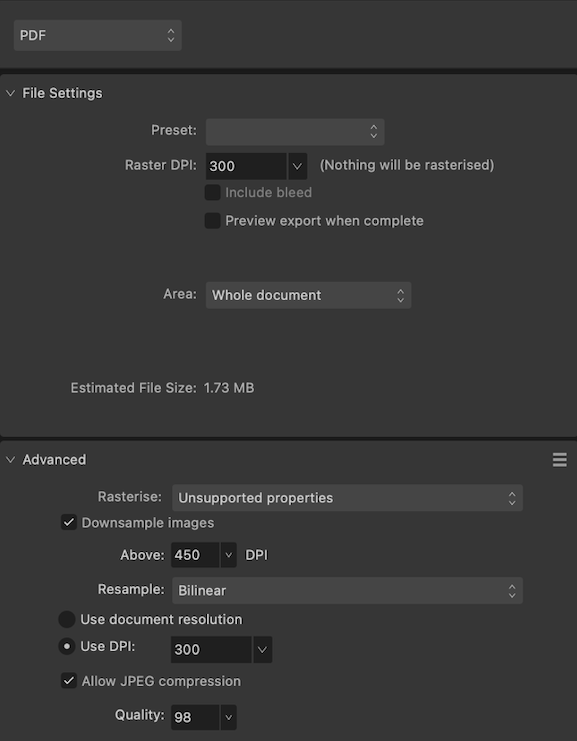
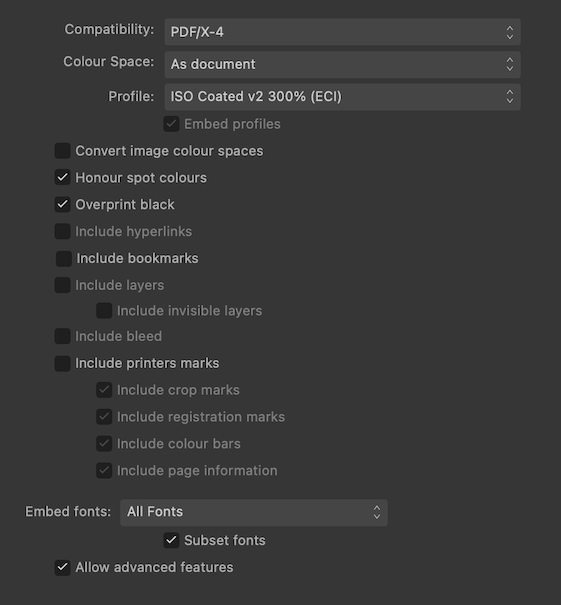
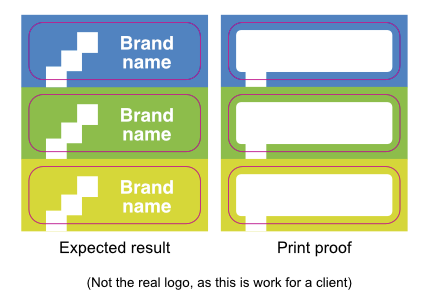
 I’m having trouble exporting a PDF because following the instructions from Flyeralarm led to a misprint. Here’s what happened: Last week, I ordered proof prints for contour cut stickers from Flyeralarm. Unfortunately, each sticker on that proof shows a white, rounded rectangle that shouldn’t be there. This rectangle is on all sides approx. 2mm smaller than the cut contour shape (magenta). [EDIT: I corrected the diagram. Now, it shows the cut contour line on top, as it should.] The sticker design is 100% vector and consists of coloured backgrounds with a white logo on top. All magenta lines form a single path; this is the cut contour for the stickers. I contacted Flyeralarm, and they informed me that something went wrong during flattening and advised me to do the following: Save my document as one layer. Add the cutting contour paths. Export as PDF/X-4:2010. When I asked what they meant with the first instruction, they wrote I should either rasterise my document as a high-quality JPEG or make a ‘PDF with a single layer’. Then, continue with steps 2 and 3. Fair enough, let’s try them both. I’m going to order two additional proof prints. Here's what I have in mind (I really hope there is a better solution): Proof print A: Rasterise the entire design (except the cut contour path) Choose the export preset PDF(flatten) with PDF/X-4 compatibility. Rasterise everything with an exceptionally high resolution to retain the crispness of the fine print (7pt). Flyeralarm agreed with using a high resolution, but didn’t specify the optimal ppi for tiny print. I intend to use at least 1200 ppi.* Place the rasterised pdf into a new file. Add the cut contours. Export as PDF/X-4, as required by Flyeralarm. * Because of this high resolution, I can’t rasterise the images directly from the layers panel or through the Photo persona, as 400 ppi is the maximum setting in the Document Setup panel. Proof print B: Flatten the design while retaining vector shapes. Publisher 2.2.1 doesn’t seem to have an option to flatten a design while preserving vector shapes. Manually flattening the design is also tricky. For instance, I can’t join all logos into a single path with Boolean operations (or using Layer > Geometry > Merge Curves). These tools grey out when you select two placed .afdesign files. So here’s what I think would be feasible: Option 1: Use Designer to flatten the logo + brand name (letter contours) into a single path using Boolean add operations to reduce complexity. Back in Publisher, update the layout from the Resource Manager panel. Export the vector graphics as PDF/X-3 because this standard supposedly doesn’t support transparencies (is that correct?). Note: I got a warning about transparencies when uploading the document (see below under Additional Information). Create a new file. Place the PDF in passthrough mode (does Publisher retain the PDF/X-3 standard during export, or re-render the placed PDF as PDF/X-4 ?) Add the cut contour path. Export the whole as PDF/X-4. Option B: Instead of placing the logo in Publisher, I could copy/paste it in. Then, I can use a Boolean divide operation to cut out each logo from its coloured background. That way, I’ll end up with a single, coloured path (the negative shape of the logo). Take the same steps (c–g) from option A. That’s the plan, but I don’t know if it makes sense. Again, I’m trying to jump through all these hoops because following FlyerAlarm’s instructions led to a misprint. I sincerely hope there's a simple solution that I completely overlooked. Any help is appreciated! Additional information These are the export settings I used for the misprint: And here are Flyeralarm's general instructions for exporting a PDF (These are in German): https://www.flyeralarm.com/blog/de/affinity-publisher-tutorial-druckfaehige-pdfs-erstellen The last time I sent a Publisher-generated PDF to Flyeralarm with these settings, it went smoothly. And it contained more complex shapes, such as an image clipped by a path. So, I guess the problem concerns PDF/X-4 or the transparency warning (see below). This is the instruction sheet for the contour-cut stickers, they require PDF/X-4: https://www.flyeralarm.com/sheets/en/etikett_bogen_cut.pdf I used Flyeralarm’s automated premium file check service to check my PDF. It generated a JPEG preview that looked immaculate, but the checker also warned me about transparencies: Note: transparencies are used We automatically convert transparencies for you. Under certain circumstances, conversion can lead to undesirable effects. Please use PDF/X-3:2002. Flyeralarm assured me the PDF was okay and that I shouldn’t worry about this. I could ignore the PDF/X-3 suggestion. So, the PDF went in print production without any changes. Also, all paths and shapes in my document are fully opaque. So I don't quite understand why I got that warning. The unwanted rectangles are approximately 2 mm smaller (on all sides) than the contour paths and have rounded corners. These rounded corners gave me the idea that a shape somewhere in my design causes trouble. So I’ve checked my files three times over, but I can assure you, that shape is not there. Note that a small part of the logo is visible on each sticker. Possibly, the logo renders correctly under the white rectangle. Flyeralarm mentioned that my file contains layers, but whether they meant layers in the document or PDF layers (Optional Content Group or OCG) is unclear. My .afpub file contains no actual layer (the kind you'll get when you click ‘Add Layer’ in the layers panel). Instead, it's just paths and (nested) groups. When I open the exported PDF in the latest version of Acrobat Reader, it doesn’t show any layers. However, when I add an actual layer, it does. That’s why I think the exported PDF doesn’t contain OCG layers. Then, there’s a suggestion from forum user @lacerto in a different thread: during export, you can select PDF/X-4 and then change the PDF version to 1.6. That way, you can turn off the Layers option in the export panel. But as I said above, I haven’t used any ‘real’ layers in this design, only groups. So, I'm not sure if this is relevant: The cut contour path is a spot colour with overprint (CMYK 0 100 0 0). I'm using version 2.2.1 of all apps on macOS 13.6.1
-
Is there a way to flatten transparency from within Designer? I know you can do this on export, but what about modifying your current document? E: For the feature request refer to:
-
 I am not up on all the designer lingo, but I do know I have to flatten any transparency in my cover designs before uploading the 300dpi PDF to my book printer. When I was working with Illustrator, to get the work to look right, I had to untick the default setting for flattening transparency and enable "preserve alpha channel," I think it was called. I can't find a way to flatten transparencies in Affinity Designer. Maybe I just don't understand the terms used (rasterizing, etc.). Can somebody please tell me how I can flatten all the transparencies in an afdesign document? And if it can't be done, what are my options? Is there an export feature that will allow me to accomplish this, as there is with converting to curves on PDF output? TIA, Diane
 -
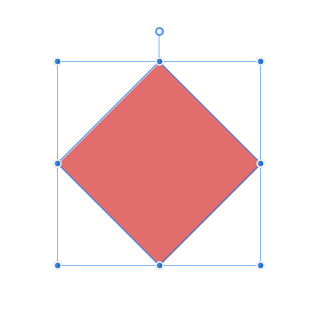
 How to change the object frame from this: To this: I did it by placing another object over it and then "Add". I guess that was called Flatten Transparency in Adobe illustrator.
-
 Hi, First of all I'd like to thank you for the really great software. I am currently using Affinity Designer for UI projects / icons and it improved my skills undoubtly. I could write an essay about how you made my designer life better (and I am sure that many others said it before) so I will go straight to the point: 1. Expand stroke I am making some vector graphic and I am using pressure panel to make the stroke look more handwritten and after that I was using expand stroke command and it goes pretty well with simple curves, but with more complex ones it gives me wrongly converted objects is there any solution for this? Maybe, am I doing something wrong? 2. Flatten transparency Are there some tools for print preparation as flatten transparency tool which would make me sure that in print everything would look good? Every advice would be helpful :)