SpotColour
-
Posts
24 -
Joined
-
Last visited
-
 lacerto reacted to a post in a topic:
Publisher 2: Misprinted proof from Flyeralarm due to a flattening issue
lacerto reacted to a post in a topic:
Publisher 2: Misprinted proof from Flyeralarm due to a flattening issue
-
Oufti reacted to a post in a topic:
Publisher 2: Misprinted proof from Flyeralarm due to a flattening issue
-
SpotColour reacted to a post in a topic:
Publisher 2: Misprinted proof from Flyeralarm due to a flattening issue
-
SpotColour reacted to a post in a topic:
Publisher 2: Misprinted proof from Flyeralarm due to a flattening issue
-
It would never have occurred to me that this was an issue, but you're right. The tests show that importing a .afdesign file is enough to trigger the transparency warning—with PDF/X-4. It's most inconvenient, as updating images is much harder with pasted graphics, but alas. However, placing TIFFs is no problem, so placed .eps or .svg files might still work. I forgot to test that. Flyeralarm's instructions can be confusing indeed, sometimes even contradicting.* But you mentioned two interesting things here: They might use PDF/X-3 internally, and the transparency groups vanish when exporting to PDF/X-3. So, I repeated the yellow-circle test, this time with PDF/X-3 files. Lo and behold, that didn't trigger Flyeralarm's transparency warning! Therefore, I ordered the following three print proofs: 1. The document as it was, but exported as PDF/X-3. To keep this test as close to the original as possible, I deliberately left the .afdesign imports in and didn't merge the logo's elements into a single path. That is, except for one placed logo, which is a .afdesign document which has the logo merged into a path. That way, I can test two ideas at once. 2. The document rasterised to 600 ppi, except the cut contour. To be safe, I intended to export at 1200 ppi as the document contains tiny letters. However, exporting resolutions above 600 ppi in Publisher leads to another curious effect; the placed TIFF file no longer exports as a single image. Instead, Publisher exports it as 'scan lines' like an old-fashioned TV, with one image for every horizontal line. I noticed this odd behaviour in Acrobat Reader, where you can select a single line of the graphic and copy/paste it elsewhere. As I didn't feel like opening yet another can of worms, I decided to settle with a resolution of 600 ppi. 3. The document with the logos pasted in instead of imported. This test is the most interesting, as it will hopefully solve the main issue! Here's how I created the entire design: I drew these contours in Publisher. They started out as rounded rectangles (using an absolute corner radius of 3mm). They have no fill. I set the stroke to use the spot colour, with a thickness of 0.28pt and aligned to the centre (see screenshots in one of my previous replies). To make sure their laser cutter would detect all cut contours, not just one, I joined these into a single path using the Layer > Geometry > Merge Curves command. I hope that clarifies! All three proofs are in print production right now, this time hopefully with better results. Of course, I will tell you the outcome when they come in. But for now, thank you for all your help and insights, I learned a lot! * Here's a tip: switch to another language. For instance, the Dutch product information sheet for these stickers says the press-ready PDF may only contain a single (closed) cut contour, even though the image clearly shows multiple contours. However, the English information sheet gives the correct information: you can only use a single spot colour.

- 18 replies
-
- 2
-
-
- publisher v2
- (and 2 more)
-
To rule out any side effects, I created a new .afdesign and .afpub document containing as few elements as possible and ran the following tests: Test 1 (Fail) Place the test .afdesign document (see below) into the Publisher layout, add the cut contour path, export as PDF/X-4, and upload to Flyeralarm: Translation: Note: transparencies are used We automatically convert transparencies for you. Under certain circumstances, conversion can lead to undesirable effects. Please use PDF/X-3:2002. (Please not that Flyeralarm requires the use of PDF/X-4 for this print job, they told me to ignore the instruction to use PDF/X-3) Test 2 (Success) Copy and paste the yellow circle from the same .afdesign document (see below) into the Publisher layout, add the cut contour path, export as PDF/X-4, and upload to Flyeralarm: Could you please have a look at these two PDFs @lacerto? I noticed in your video that you used Acrobat Pro to inspect an element in the design. I would love to know if the yellow circles in these PDFs differ. If they do, we found the root of the problem. Conclusion Placing a .afdesign document triggers the transparency warning, whereas copying and pasting the contents of that document does not. I also ran these tests without the cut contour path. Leaving out the path triggered some expected warnings, but other than that, the results were the same. So, the contour path is not causing the transparency warning. About the Designer document The test .afdesign document is CMYK and contains a single yellow ellipse with 100% opacity. It doesn't matter whether or not the option 'Transparent background' is active in the Document Setup panel. Both settings trigger the transparency warning. About the Publisher document The test .afpub document is CMYK and contains three elements: A dummy cut contour path (although later I found out that this path is not relevant for the transparency warning issue; see conclusion) The placed .afdesign document. The copied and pasted yellow circle from the same .afdesign document. To create the PDFs, I hid one yellow circle, exported the document, and did the same with the other circle hidden. The PDFs are exported using the PDF/X-4 preset in Publisher 2.2.1 (without changing these default settings). Workaround I will redesign my original document so that it doesn't contain any imported graphics. Instead, I will copy/paste the logo from Designer. Then, send it off to Flyeralarm as soon as possible. Hopefully, that resolves the issue with the unwanted white rectangles. Further action If @lacerto finds a difference between the two PDFs, I'll file a bug report. I don't know if Flyeralarm's raster image processor or Affinity's PDF/X-4 export is at fault here, but being unable to place .afdesign documents in Publisher when working with Flyeralarm is a big issue for European designers. Test with copied-pasted circle.pdf Test with placed circle.pdf
-
Thanks for all the feedback! I haven’t had time yet to test every suggestion, but here’s the story so far: None of these. The logo is a .afdesign document which only contains vectors. I placed it in the Publisher layout (not copied/pasted). But today, I discovered that including a .afdesign or .pdf file in the Publisher layout triggers Flyeralarm’s transparency warning (see below). These are the settings I used, which came from Flyeralarm’s info sheet. I also named the path ‘Cutkontur’, although not required. No, I’m pretty sure this shape is non-existent. I also don’t think there’s a ‘special effect’ somewhere, as I never really use these. The logo should consist of paths in solid CMYK 0 0 0 0. But I will check all the files to make sure. No, it was a physical proof. I received the actual stickers in the post. Flyeralarm's automated check Today, I’ve been running tests with the exported PDF/X-4 against Flyeralarm’s automated check. Here’s what I found so far: All tests include the cut contour path: A solid yellow background: Valid PDF, no warning Placed TIFF graphic: Valid PDF, no warning The sticker design copy/pasted in from Designer: Valid PDF, no warning The sticker design placed from Designer: Valid PDF, but transparency warning A placed PDF/X-4, which was fully rasterised using the flatten(PDF) export preset with PDF/X-4 compatibility: Valid PDF, but transparency warning A placed PDF/X-4 flattened as above, but with a solid colour: Valid PDF, but transparency warning So, as soon as I place a .afpub or .pdf file, Flyeralarm issues a transparency warning. That’s most peculiar. But this might explain why the last print job I sent to Flyeralarm went through without hiccups. It had the vectors pasted in, not placed. For that job, I had to deliver a PDF/X-3 file. I’ll be running some more tests to see if I can find out why placing these file types triggers a warning. I’ll keep you posted!
-
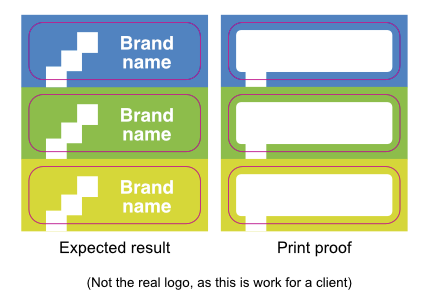
Sorry @thomaso and @lacerto, my head was full after typing this post, so I overlooked a mistake. Here’s the correct diagram: The cut contour worked like a charm. I merged all these contours into a single path to ensure Flyeralarm’s laser cutter would find them all. That went fine, so that's not the problem. @thomaso mentioned that the white rectangle’s corner radius differs from the cut contour line radius. That is correct, and I have been looking for a stray element in my design, but it’s not there. Even in Wireframe modus, there’s nothing like it. The graphic designer at Flyeralarm also didn't find this shape in the PDF. I’m going to try your other suggestions and report back! Thank you!
-
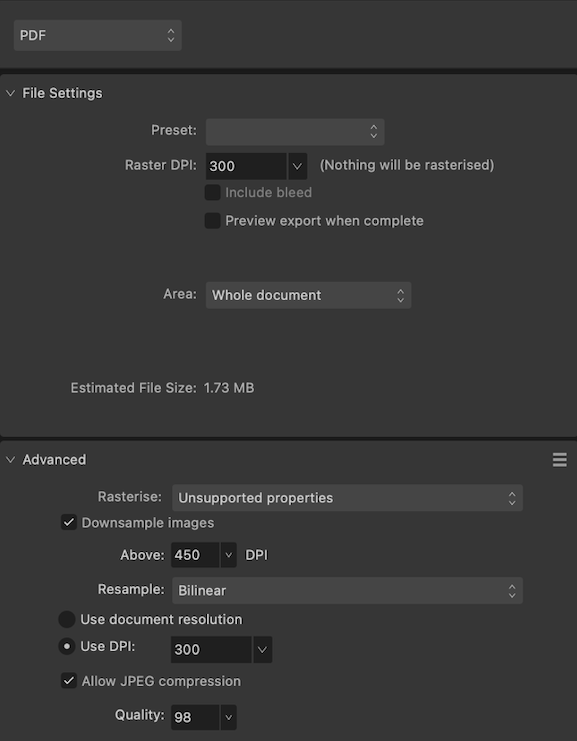
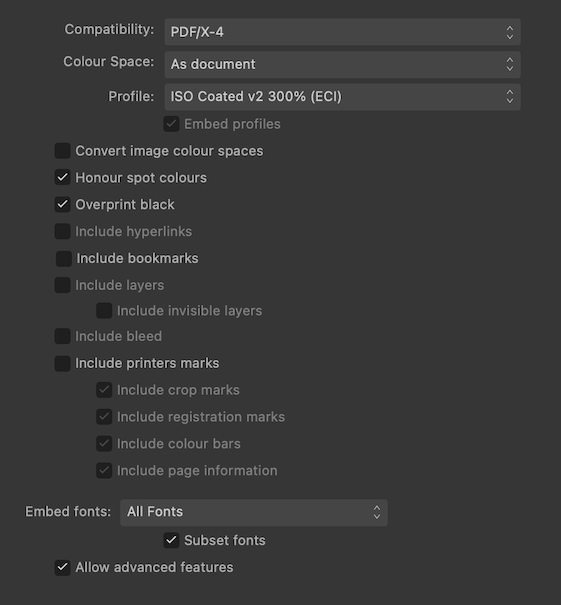
I’m having trouble exporting a PDF because following the instructions from Flyeralarm led to a misprint. Here’s what happened: Last week, I ordered proof prints for contour cut stickers from Flyeralarm. Unfortunately, each sticker on that proof shows a white, rounded rectangle that shouldn’t be there. This rectangle is on all sides approx. 2mm smaller than the cut contour shape (magenta). [EDIT: I corrected the diagram. Now, it shows the cut contour line on top, as it should.] The sticker design is 100% vector and consists of coloured backgrounds with a white logo on top. All magenta lines form a single path; this is the cut contour for the stickers. I contacted Flyeralarm, and they informed me that something went wrong during flattening and advised me to do the following: Save my document as one layer. Add the cutting contour paths. Export as PDF/X-4:2010. When I asked what they meant with the first instruction, they wrote I should either rasterise my document as a high-quality JPEG or make a ‘PDF with a single layer’. Then, continue with steps 2 and 3. Fair enough, let’s try them both. I’m going to order two additional proof prints. Here's what I have in mind (I really hope there is a better solution): Proof print A: Rasterise the entire design (except the cut contour path) Choose the export preset PDF(flatten) with PDF/X-4 compatibility. Rasterise everything with an exceptionally high resolution to retain the crispness of the fine print (7pt). Flyeralarm agreed with using a high resolution, but didn’t specify the optimal ppi for tiny print. I intend to use at least 1200 ppi.* Place the rasterised pdf into a new file. Add the cut contours. Export as PDF/X-4, as required by Flyeralarm. * Because of this high resolution, I can’t rasterise the images directly from the layers panel or through the Photo persona, as 400 ppi is the maximum setting in the Document Setup panel. Proof print B: Flatten the design while retaining vector shapes. Publisher 2.2.1 doesn’t seem to have an option to flatten a design while preserving vector shapes. Manually flattening the design is also tricky. For instance, I can’t join all logos into a single path with Boolean operations (or using Layer > Geometry > Merge Curves). These tools grey out when you select two placed .afdesign files. So here’s what I think would be feasible: Option 1: Use Designer to flatten the logo + brand name (letter contours) into a single path using Boolean add operations to reduce complexity. Back in Publisher, update the layout from the Resource Manager panel. Export the vector graphics as PDF/X-3 because this standard supposedly doesn’t support transparencies (is that correct?). Note: I got a warning about transparencies when uploading the document (see below under Additional Information). Create a new file. Place the PDF in passthrough mode (does Publisher retain the PDF/X-3 standard during export, or re-render the placed PDF as PDF/X-4 ?) Add the cut contour path. Export the whole as PDF/X-4. Option B: Instead of placing the logo in Publisher, I could copy/paste it in. Then, I can use a Boolean divide operation to cut out each logo from its coloured background. That way, I’ll end up with a single, coloured path (the negative shape of the logo). Take the same steps (c–g) from option A. That’s the plan, but I don’t know if it makes sense. Again, I’m trying to jump through all these hoops because following FlyerAlarm’s instructions led to a misprint. I sincerely hope there's a simple solution that I completely overlooked. Any help is appreciated! Additional information These are the export settings I used for the misprint: And here are Flyeralarm's general instructions for exporting a PDF (These are in German): https://www.flyeralarm.com/blog/de/affinity-publisher-tutorial-druckfaehige-pdfs-erstellen The last time I sent a Publisher-generated PDF to Flyeralarm with these settings, it went smoothly. And it contained more complex shapes, such as an image clipped by a path. So, I guess the problem concerns PDF/X-4 or the transparency warning (see below). This is the instruction sheet for the contour-cut stickers, they require PDF/X-4: https://www.flyeralarm.com/sheets/en/etikett_bogen_cut.pdf I used Flyeralarm’s automated premium file check service to check my PDF. It generated a JPEG preview that looked immaculate, but the checker also warned me about transparencies: Note: transparencies are used We automatically convert transparencies for you. Under certain circumstances, conversion can lead to undesirable effects. Please use PDF/X-3:2002. Flyeralarm assured me the PDF was okay and that I shouldn’t worry about this. I could ignore the PDF/X-3 suggestion. So, the PDF went in print production without any changes. Also, all paths and shapes in my document are fully opaque. So I don't quite understand why I got that warning. The unwanted rectangles are approximately 2 mm smaller (on all sides) than the contour paths and have rounded corners. These rounded corners gave me the idea that a shape somewhere in my design causes trouble. So I’ve checked my files three times over, but I can assure you, that shape is not there. Note that a small part of the logo is visible on each sticker. Possibly, the logo renders correctly under the white rectangle. Flyeralarm mentioned that my file contains layers, but whether they meant layers in the document or PDF layers (Optional Content Group or OCG) is unclear. My .afpub file contains no actual layer (the kind you'll get when you click ‘Add Layer’ in the layers panel). Instead, it's just paths and (nested) groups. When I open the exported PDF in the latest version of Acrobat Reader, it doesn’t show any layers. However, when I add an actual layer, it does. That’s why I think the exported PDF doesn’t contain OCG layers. Then, there’s a suggestion from forum user @lacerto in a different thread: during export, you can select PDF/X-4 and then change the PDF version to 1.6. That way, you can turn off the Layers option in the export panel. But as I said above, I haven’t used any ‘real’ layers in this design, only groups. So, I'm not sure if this is relevant: The cut contour path is a spot colour with overprint (CMYK 0 100 0 0). I'm using version 2.2.1 of all apps on macOS 13.6.1
-
lacerto reacted to a post in a topic:
Publisher 2.2.1 on a new Mac already lists the colour profile I need, but where does it come from?
-
Sorry, I meant undefined behaviour, not undocumented behaviour.
-
SpotColour reacted to a post in a topic:
Publisher 2.2.1 on a new Mac already lists the colour profile I need, but where does it come from?
-
It’s either that or Publisher renders a PDF with a fallback profile, like websites render text using a default font if they can’t find the intended one. Who knows? It could even be possible that Publisher skips the entire conversion step (in the colour management section, the documentation mentions that it can do unprofiled exports). Your suggestion is probably more likely though. But that’s why I said earlier I don’t have Acrobat Pro to test my theory. Yes, but if you send a project to a third party, you should create a package (File > Save As Package…). Next to the fonts and images folders, there could be a third one for the colour profile. In my opinion, that makes more sense than embedding the .icc file in every single file. So, there might be other reasons to embed profiles. But if it’s true that .afpub files (and .afdesign) files have embedded .icc files—which appears to be the case—that would solve the mystery of the missing .icc file! It would be great if a Serif engineer could confirm this and explain the reasoning behind this design choice. With all this in mind, I still think there’s a bug. Let’s assume that Publisher caches the embedded .icc profile of an open document, which is fine, but then it offers this profile as an option in the New Document panel. That’s odd. Maybe @lacerto is right, and this is a cleverly designed feature, but in that case, Serif should properly document it because colour management is a crucial part of the design process. Otherwise, it’s undocumented behaviour (aka a bug). On a more practical note, I need to get this print job sent to Flyeralarm. So, I will set the colour profile of my .afpub document and all the embedded .afdesign files to a different profile and restart Publisher and Designer to ensure there’s no cache. Then, I’ll download and install the ISO Coated v2 300% (ECI) profile so I can be sure Publisher uses the proper one. Thank you all for your feedback! I learned a lot from this thread! 😃
- 22 replies
-
- 1
-
-
- affinity publisher
- colour profile
- (and 2 more)
-
SpotColour reacted to a post in a topic:
Index keeps updating with excessive spacing, not solved with styles!
-
I think the .icc file is missing for these reasons: Affinity doesn’t ship this profile as part of their suite. Apple also doesn’t preinstall this profile. I haven’t downloaded it myself yet; I’m working on a brand-new Mac. I didn’t install any other software yet that could have installed this profile on my computer. An extensive search, including system and hidden files, didn’t reveal this profile. That leaves one possibility: associated .icc profiles might get copied into .afpub documents. That seems unlikely to me, as it sounds inefficient. Even though the profile I need is only one or two megabytes in size, all my files would increase that much in size. It makes more sense to have a single .icc file in the system or user library. But even if that’s the case, it still makes no sense that Publisher offers such an embedded profile as a choice in the New Document panel (and later, in the Export panel of this new document). That means a client could inadvertently send you an .afpub document with a slightly different version or even a corrupt profile embedded, and Publisher would then happily let you copy that profile into a new .afpub document. This way, you can never be confident about colour profiles. You might think you’re using the correct one from your library, while you’re not. Therefore, I think this is a bug, not a feature (although I understand your reasoning, @lacerto). The export works without errors—that’s what worries me. Preflight also doesn’t issue a warning. I don’t know the nitty-gritty details of colour profiles. But I guess that during export, Publisher uses the .icc file of the selected profile as a look-up table to convert the document’s colours to match the calibrated profile of the printing press. You can see this when you export the same .afpub document twice but with different colour profiles. If you open these PDFs in the Preview app, they have noticeably different hues. So, in the PDF, the conversion is already done. I don’t know if this is the correct explanation, but this is how I always understood it. The point is that Publisher needs the .icc file to do this conversion. But then we’re full circle: where does this .icc file come from? As I think this is a bug, would it be possible to move this thread to the V2 bugs found on macOS list?
-
AnnPS reacted to a post in a topic:
Table of Contents update messes up the layout in Publisher v1 and v2 + workarounds
-
AnnPS reacted to a post in a topic:
Index keeps updating with excessive spacing, not solved with styles!
-
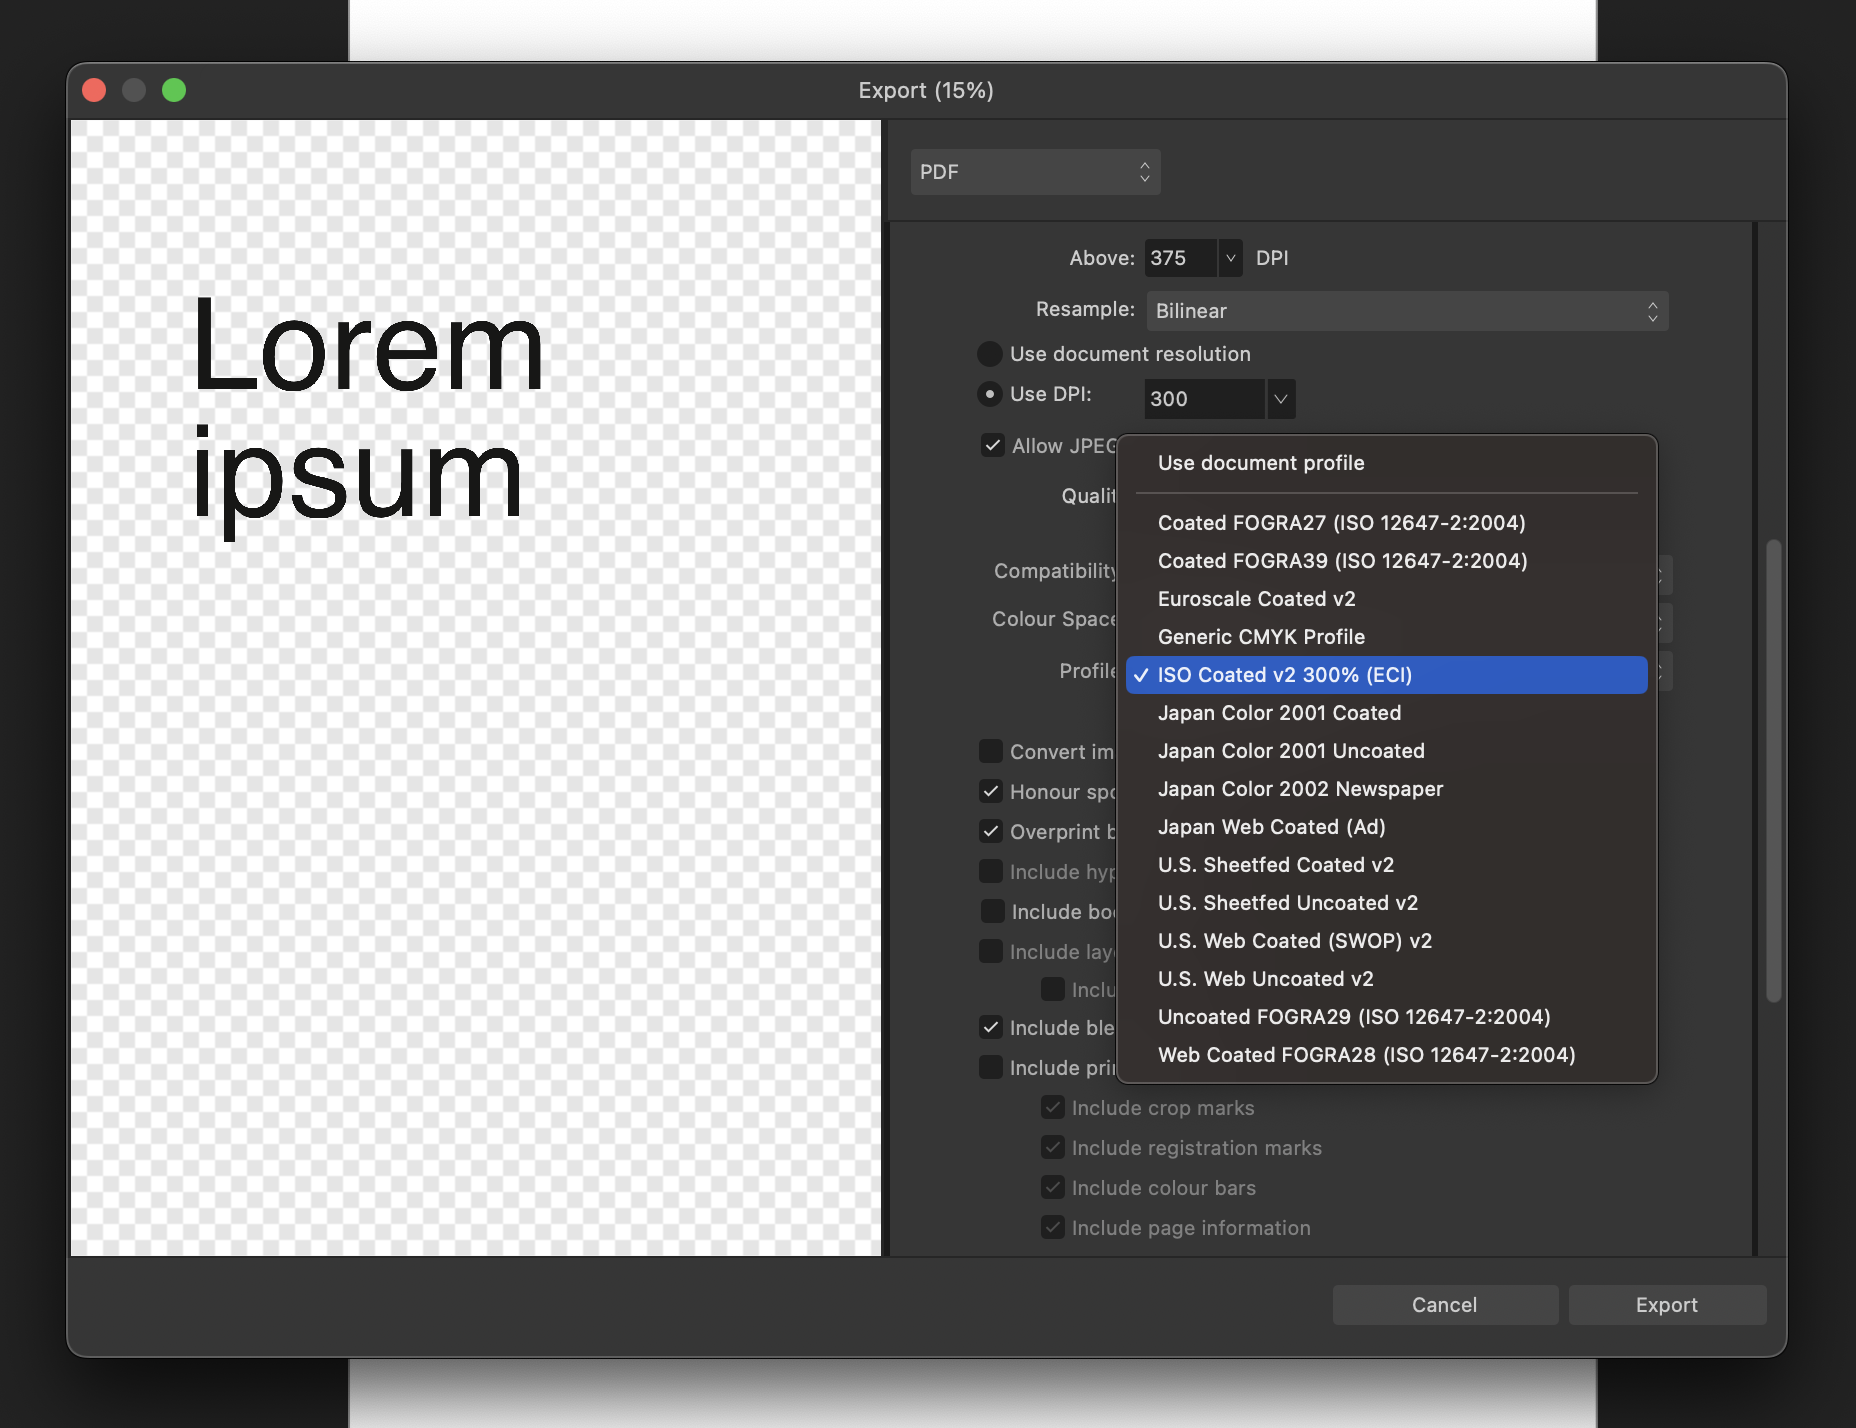
Alright, I found out what happened. I think it's a bug in Affinity Publisher, and perhaps also the other apps. Here’s the story: Today, I went to a friend’s place because he recently installed a trial version of Publisher. He never fiddles with colour profiles, so his Mac would be the ideal test device. The first thing I checked was his New Document panel. It does not list the ISO Coated v2 300% (ECI) profile. So, I can confirm that Serif doesn’t ship this profile with their suite. Thank you for pointing this out, @MikeTO. But then, things got interesting. I brought my two current projects on a USB stick to test a few theories. Here’s what happened: First, I opened an .afpub file created on my old Macintosh. Back then, I assigned the ISO Coated v2 300% (ECI) profile to it. A quick look in the Document Setup panel confirmed this. Then, with this document still open, I went to File > New… to create a new document. The ISO Coated v2 300% (ECI) profile was not listed. So, I tried to refresh the list of profiles in the New document panel by switching the Colour format to RGB and back to CMYK. And lo and behold, the ISO Coated v2 300% (ECI) profile popped up! When I quit Publisher and restarted it, the profile was gone from the list. I don't think this behaviour is correct. After a coffee, I went home and tried the same on my new Macintosh. And indeed, I could reproduce this behaviour. If a document with the ISO Coated v2 300% (ECI) profile assigned to it is open, you can select this profile in the New Document panel. Otherwise, the profile won’t appear in the list. The trouble is that Publisher will also offer this profile in the Export panel. And worse, if you export a PDF with this profile, it won’t complain about a missing .icc file. It will just render the PDF for you. So, it’s likely that the exported PDF hasn’t got the correct colour profile or possibly no profile at all. But I cannot confirm this theory, as I don’t have Acrobat Pro. I also can’t share the project files nor the exported PDF, as this is work for a client. My conclusion is that this odd behaviour must be a bug.
-
I can choose this profile when I create a new document or export a PDF file. For this reason, I suspect this profile is shipped with the Affinity suite nowadays.
-
Yesterday, @AnnPS experienced a similar issue when generating an index. And I’ve recently noticed that this bug also affects footnotes. Therefore, this bug is probably not specific to the Table of Contents. Instead, the bug seems to affect generated content in general. I haven’t had time to test all this, but this extra information will probably make it easier to pinpoint the cause of this problem.
- 12 replies
-
- 1
-
-
- table of contents
- paragraph style
- (and 5 more)
-
Nice one! 😃 And thank you for confirming this! First of all, the Affinity suite is only a few years old, and so you may run into some teething problems. But in my experience, Serif treats bug reports seriously. 😍 That alone convinced me to purchase a V1 license and later upgrade to V2. So, if you find a bug, please report it! That being said, it’s been a while since I reported that issue with the TOC. I’m not sure if there’s a way to bring this issue to attention again or to see its status. But in general, if you want a person’s attention on this forum, you can type the @-sign followed by the username. Then, they will receive a notification.
-
thomaso reacted to a post in a topic:
Index keeps updating with excessive spacing, not solved with styles!
-
AnnPS reacted to a post in a topic:
Index keeps updating with excessive spacing, not solved with styles!
-
Hi @AnnPS, A bug (AFB-7491) in Publisher v1 and v2 causes the TOC to go berserk in various ways, similar to what you’ve shown. I’ve recently noticed that it also affects footnotes, so it might cause trouble with other generated content, such as your index. I’m unsure if this bug caused the problem you’re describing, but my layouts were similarly distorted, so you might want to see if my workaround works for you. You can find it here:
-
It’s a brand new Mac, straight out of the box, so that’s not the case. The only things I did were installing the Affinity software and moving over two folders with my two current graphic design projects, but that’s it. I haven’t got around to copying any of my other files or installing any other apps yet. I’ve searched with separate queries for .icc, 300, iso, coated, and eci using the include system files filter and the (in)visible files filter. The .icc search returned 37 results, mostly from /Library and /System/Library/. Searching within the Publisher app bundle yielded another 47. But none of these is the one I was looking for. In the app bundle, there's a CoatedFOGRA39.icc profile, which I think is related to ISO Coated v2 300% (ECI). But that's the closest match I found. The ColorSync Utility lists 22 colour profiles, which you can see below:
-
SpotColour reacted to a post in a topic:
Publisher 2.2.1 on a new Mac already lists the colour profile I need, but where does it come from?
-
Ah, so you also think there might be multiple versions of the ISO Coated v2 300% (ECI) colour profile, @thomaso? That’s good to be aware of. And thanks for showing me how to compare two .icc files! As for the search, I already did a search that included the system files, but it didn’t reveal the profile. Adding the (in)visibility filter to the search query also didn’t help, but I wasn’t aware that this useful filter existed, so that’s already a win. What baffles me is that Affinity Publisher 2.2.1 shows me a profile that doesn’t seem to exist on my Mac. It shouldn’t, as I haven’t installed it yet. Most likely, Serif shipped it with the Affinity suite as a default profile. But if that’s the case, it should still show up somewhere. I’ll probably end up downloading the profile from Flyeralarm’s website and installing it manually, but I still like to know where this mysterious profile comes from. Otherwise, I can never be sure if the default (?) profile matches the Flyeralarm profile. Thank you for your advice, Thomaso!