

PaintNut
-
Posts
41 -
Joined
-
Last visited
Posts posted by PaintNut
-
-
When I make a selection from a shape and then invert the selection, the selection just disappears.
Here is a video I made showing what I am talking about.
-
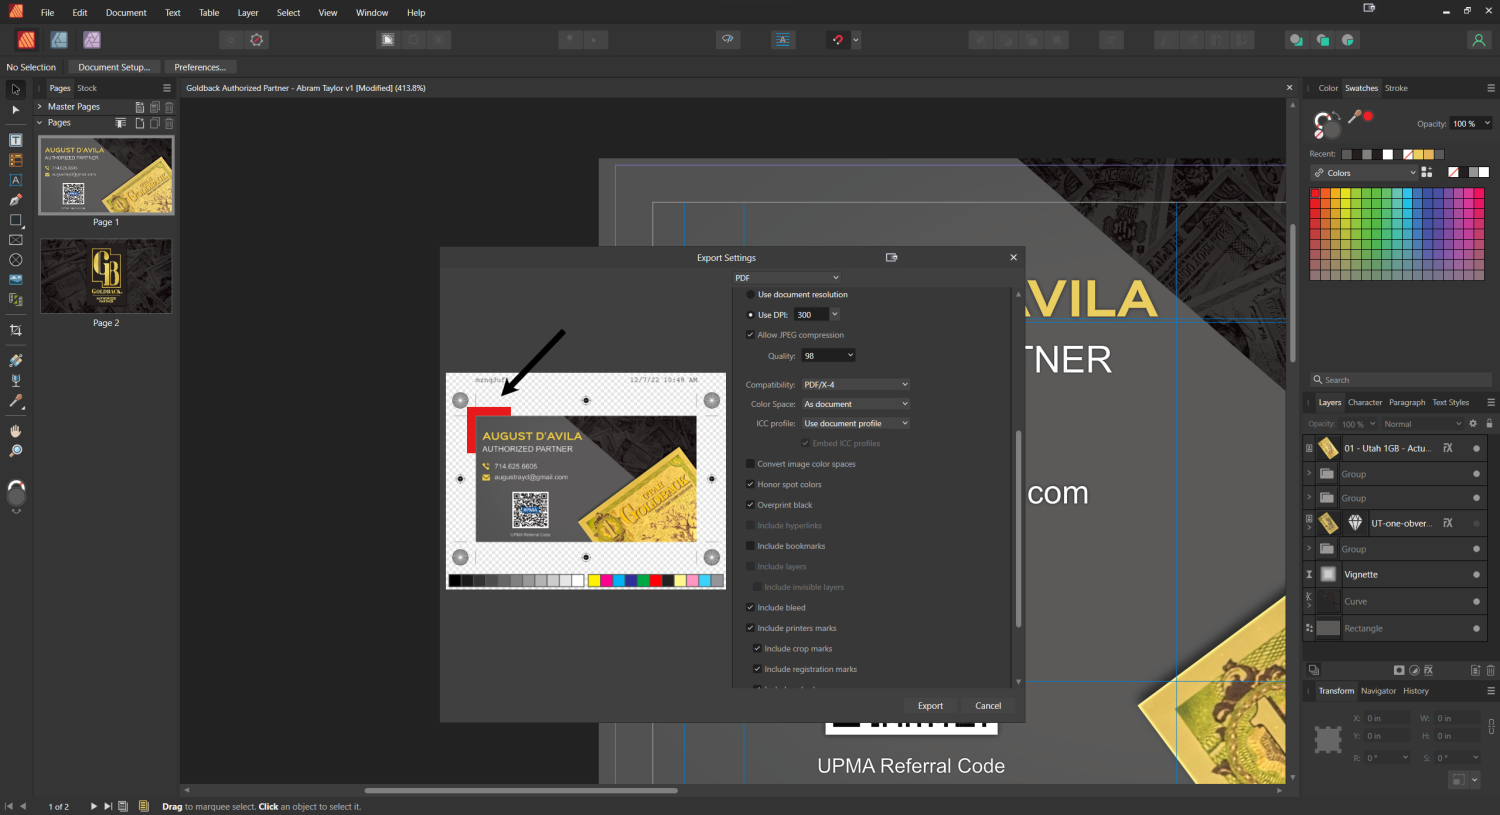
What my grunge overlay layer at 60% looks like in my design, is not what the output of the PDF export looks like. What you see is NOT what you get.

-
When I export to pdf, what I see is not what I get.

-
So long as I had a Live Vignette filter from the Photo Persona in publisher, when I would export, the bleed would be missing.
-
On my business cards, the layer that is causing the disappearing bleed is the Live Vignette filter layer from the Photo Persona. When I disable that, my bleeds show on export. My problem is NOT solved. I want that vignette to work.
So my workaround was to go into the Photo Persona and hide everything except for the background elements and the Live Vignette layers and then use Merge Visible. I was then able to get rid of the Live Vignette filter layer.
-
-
Thanks Brian. So, I am not using "Artboards". Is that what Publisher calls a document?
I will see if someone offers some helpful advice on that thread. One of the commenters said that they were NOT having issues when exporting to PDF. That certainly isn't my experience. I will have a look in there and see if I can find a work around for the business cards.
-
So my last 3 projects in the last 4 days have all been blocked by some kind of "What you see is NOT what you get" issue. I can't be the only one dealing with something like this.
-
Here is more client work that I alluded to, that gave me issues the other day. I have a grunge layer set to Overlay at 60%. It looks like I want it in the design, but you can clearly see that the actual pdf output on the left (and in the export preview) is NOT the way I designed it, but hey at least the bleed was working on this one!
-
Here is yet another problem that is blocking my work. The pdf for the business card doesn't export the bleed that is clearly there in the design.
-
This issue is blocking my professional work deadline. Is it true that no one has seen anything like this?
-
I have had two projects in two days with a similar issue. My project is exactly how I want it, but when I export to pdf, there are some kind of layer/color issues so that it doesn't look like it was designed. Has anyone seen anything like this?
-
-
Man, I need this functionality. Is this idea being considered?
-
I am having an issue where if I use the Engravers MT font, and I use the Contours Tool, I get a weird unexpected result.
-
-
Below are the a couple images showing a working object and a non-working object. Figuring it might be an issue because the contents of the groups differ, I opened the file back up to compare "apples to apples" and all the images loaded properly. You see what I am saying. There is no rhyme nor reason to why it works or doesn't work sometimes.
-
Oops, thanks for letting me know I made a mistake. Yes, I meant Publisher. No, I never get any kind of a warning or error, it just draws some properly and then others improperly.
-
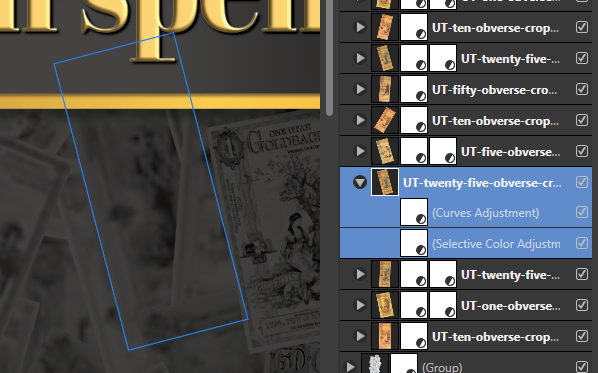
I have issues occasionally where I will open a project that was working fine, only to find that layer objects are blurry and pixelated and just aren't drawing in properly. Here is an example where I hand placed a large amount of Goldback images, and then when I opened up the project later, most all of the objects have issues. There is no rhyme or reason as to why some display properly and some don't. They should all be completely visible like the ones on the right side of the image. Now I have to go in and basically re-do all the work again because nothing works to get the images to draw properly, including restarting the PC and re-opening the file. If someone has a solution for this, please let me know.
Thanks,
Bryson
-
I just got a TourBox and I am unable to configure Opacity increase and decrease because there is no keyboard shortcut that I know of that specifically handles such a thing. Has there been any progress on this? I cannot get the TourBox to go find the Opacity section and click in it, so please don't recommend that or the numbered row.
-
Thanks. I guess it defaults to that if you drag in a sketch that is black and white? Now I know.
-
I am only seeing greyscale fill options in Designer, even when I go to the color swatches. What am I doing wrong? I have attached a video illustrating the problem.
Thanks in advance for any help you can offer.
-
On 8/17/2017 at 3:42 PM, toltec said:
In Affinity photo you can draw a shape, set rounded corners, change the radius, set different corner styles, rounded, angled, concave, even individually on each corner. Then make a selection or a mask.
You can apply a shadow, a fade, 3D edges too if you want.
I am trying to figure out how to do exactly what you describe. Would you mind explaining briefly how it is done since the solution isn't jumping out at me and most likely other's who are also new to the software?
Thanks in advance for the help.
-
Because I couldn't figure out how to do this, here is what I resorted to doing:
How to manually create rounded corners in Affinity Photo
-
On a new pixel layer, make your rectangular selection and then fill it
-
Select the Eliptical Marquee Tool
-
Set the cursor at the desired corner of the filled rectangular selection
-
Drag up a circle to the size (hold down Shift to constrain the selection to a circle) until you get a representation of the corner as you would like it
-
Select>Invert Pixel Selection (Ctrl+Shift+I)
-
Use the Erase Brush Tool (E) to erase out the corners
Even though I don't know the answer, I tried to post a helpful response, because that is what I would want others to do who have answers.
-


Publisher PDF Export Issue: What You See Is NOT What You Get.
in Affinity on Desktop Questions (macOS and Windows)
Posted
I am confused. The problem that I am having is in Publisher which IS a layout app. Are you saying that the Live Vignette Filter from the Photo Persona in Publisher shouldn't work or that it cuts off the bleed if used?