ladlon
-
Posts
146 -
Joined
-
Last visited
Everything posted by ladlon
-
I'm dealing with a real project (multiple layers, etc).... but, in trying out things to troubleshoot, I am simply applying a single adjustment layer (child) to a single pixel layer.
-
But, that functionally doesn't make sense. If you want to effect a specific layer (as opposed to a global effect), you would first select the layer, which then causes an adjustment selection to be (rightfully) parented to it (otherwise, it will effect ALL layers, making it impossible to compare the targeted layer to the layers you want to adjust it to (compare). To click on the Merge button in the adjustment window SHOULD merge (bake) the adjustment to the selected/targeted layer... as that's the entire point of it. Otherwise, again, if you have 8 layers, and you want to tone down the 3rd one (as, say, it's too saturated compared to the others), how WOULD you apply a desaturation to just that layer WHILE BEING ABLE TO LIVE MONITOR YOUR ADJUSTMENT while doing so, so you can set it to the right level (compared to the other layers). Putting the layer above the target layer will adjust ALL layers below it, making it impossible to set the adjustment of the target layer, since all the other (lower) layers that you are trying to compare it to are simultaneously (and wrongfully) getting adjusted as well, so you will never be able to get all their saturations balance, as the other layers will FURTHER desaturate as you lower the saturation of the target layer (and adjustment which won't bel applied, once you do the manual merge).
-
This is the button I'm referring to, which should merge the effect (of the open adjustment window) to the layer that it is targeting (the parent pixel layer)

-
The way it USED to work before (and the way I'd expect it) is this: You have several pixel layers. You want to adjust one of them (again, say, saturation) to match the others (...so, a targeted, layer specific saturation adjustment). Since AP doesn't seem to allow you to just do a direct/instant/destructive saturation adjustment, what you would have to do is select that target layer, select a (HSL) adjustment (which would then parent an HSL adjustment layer to the targeted pixel layer). You'd slide the sliders to your desired adjustment, and then would have TWO options: 1) Close the window, leaving a non-destructive adjustment (HSL adjustment layer parented (as child) to the target pixel layer).... which is a nice option, if you want to be able to make future adjustment and/or restore that layer later to its original state 2) OR.... you click the Merge button at the top of the adjustment window (rather than closing the window), and that would apply the adjustments destructively to the targeted layer, and remove the parented adjustment layer (...literally merging the layers). But, that no longer works, but instead (seemingly) merges the layers (as intended), but for some reason it also results in the resulting targeted layer to clear all of its contents (blank layer). This is new... and a bug.
-
@HuniSenpai: The latest video you made has you making an adjustment layer OUTSIDE (above) the target pixel layer... whereas what I am talking about is when you have the pixel layer selected, and then select/add an adjustment layer. As well, I am talking about a scenario where there is more layers below the target layer, which you do now want to effect. Regardless of whether your method works, it (initially) will affect ALL layers below it, which makes it impractical if you need to be able to compare the adjustment you are doing on the target layer to the layers below it. For example, if you have 9 layers, but the target one (say the first/top one) is too saturated compared to the others... so, if you do a 'global' saturation adjustment (even if you intend on merging it with JUST the target layer during a merge), all the layers below it are globally effected (live preview) as you adjust it, making it impossible to compare your adjustment (ex. match it) to that of the other layers, since they TOO are also changing from the very tone you are trying to match to. So, the only solution is to do a parented adjustment right away (select the layer, add an adjustment)...which is how you'd want to do it in this case, anyway... but, after making the adjustment (move sliders) the Merge button in the ADJUSTMENT WINDOW (not the layer context menu) does not work as intended... it does not bake the adjustment into the pixel layer.
-
On the latest Affinity Photo (v1.8.2.620) update (Windows), it seems the Merge button on adjustment windows no longer works properly. Instead, the resulting merged layer is empty. Steps to replicate: 1) Paint a pixel layer 2) Add an adjustment layer (ex. HSL), resulting in the adjustment layer being parented to the pixel layer 3) Make an adjustment in the settings (ex. lower the saturation) in the HSL window 4) Click the Merge button at the top right of the adjustment window (beside the Cancel and Delete buttons) 5) Rather than resulting in the Adjustment layer being merged/baked into the pixel layer (...desaturated pixel layer, and no more adjustment layer (now deleted) parented to it), you end up with only the pixel layer (adjustment layer disappears/merged, as expected), but the pixel layer ends up empty 6) Apparently, there is a related bug, where merging down layers now (since update) requires a specific selection order, otherwise the same issue occurs. However, in this (new) particular case (adjustment window Merge button bug), it's not possible to select the participating layers in a particular order, since selecting the pixel layer automatically selects BOTH that layer and the (child) adjustment layer. Windows7 Pro
-
Okay, this is messed up.... I have a (pixel) layer in Photo..... I add an HSL adjustment to just that layer (adjustment layer gets parented to the pixel layer).... I do the adjustment, and then click the Merge button in the HSL window (which SHOULD bake the adjustments into the pixel layer)... and the content of the newly merged layer disappears. I can't try any of the suggestions regarding selection order, since you can't separately select both layers (pixel and adjustment), since selecting the pixel layer will also select all the child layers anyway. What happened???! The merge doesn't appear to work at all now. BTW, for those of you struggling with this, there IS a workaround.... select the pixel (parent) layer (which then selects both layers), and hit Rasterize, which will bake the adjustment of the adjustment layer into the pixel layer, and merge the two. So, what exactly IS the point of the Merge button in the HSL window? (This most likely also applies to all adjustments) NOTE: I'm on Windows 7.
-
Hi, HuniSenpai. Thanks for that info and workaround. I'll try that out. Ya, I could have sworn it worked before, and perhaps is DID, but I am doing the selections in the reverse order that is required, and so now it 'suddenly' doesn't work. I suspected it had something to do with the latest update, for that reason. Seems odd/redundant that you need a specific selection order, when it just merges downwards anyway. A few of the design decisions in Affinity puzzle me, though. (...including why there ISN'T a destructive/instant layer adjustment in the first place!) Cheers!
-
So, I'm all fine with doing non-destructive adjustments (ex. levels, HSL, etc), as well as adjustments to a specific layer (as opposed to globally affecting all layers below it)... but I'm confused about something else, which I can't seem to find any documentation/videos on... If I want to do (say) a saturation adjustment to a single layer, but also make it permanent, I can't seem to find a (working) method. If I apply the adjustment the regular way (select the layer, select an adjustment, make the adjustment (move the sliders), I then have the usual two options.... Exit out of the adjustment window (resulting in a non-destructive adjustment layer parented to target layer... or hit merge, which NORMALLY bakes the adjustment into the target layer. But, instead, when I try and do the Merge (since I do not want the non-destructive adjustment layer parented 'under' the target layer), it ends up 'erasing' my target layer (becomes blank) for some reason. So, then I would think to try dragging the adjustment layer out for the parenting, and put it on top of the target layer (unparented) and do a Merge Down. But, that is ending up doing the same thing for some reason (blanking out the target layer). I always did find it weird you can't just do a destructive/immediate adjustment on a layer, if only just the basics (levels, saturation). Being able to do non-destructive adjustments to layers is great and all, but sometimes you want to bake it in, and not have all these 'adjustment patches' attached to each layer you tweek. But, I can't seem to find any way now of doing direct adjustments. If there is no means currently, it would be great if you could hold down a keyboard modifier (ex. SHIFT) when clicking on an adjustment/filter, to tell Affinity to make it a destructive/permanent adjustment. Again, it would seem that the Merge button on the adjustment's window should do that, but instead, it seems to just erase all the contents of the target layer during the merge. Using the current version of Affinity Photo (March 23/2020) on Win7 Pro on a PC.
-
Square bracket brush sizing hotkeys occassionally stop working
ladlon replied to ladlon's topic in V1 Bugs found on Windows
Weird! Mine didn't do that. My square brackets work for a while, and then something eventually causes them to not work (yet all other shortcuts, and the keyboard in general, work). I tried to 'break' Affinity in my latest session, but so far the glitch didn't occur. Once I spot it, I'm going to view the Command History, and see what actions (if any) might have triggered it. Maybe I'll also try stepping up through the history and seeing if the shortcut suddenly comes back again. Normally the glitch happens regularily (although the amount of time until it occurs seems random), but of course, now that I'm actively trying to spot it, it's suddenly behaving for now. -
Close All feature please!
ladlon replied to ladlon's topic in Feedback for Affinity Photo V1 on Desktop
As with many of my suggestions, workarounds exist, but why not just have the feature that makes it easy. I've had situations where I'd have 30+ images open, and even though it's certainly possible to individually close them, why not just click a button that closes them all at once? I can't speak for Mac (I"m on PC), but a Close All is quite common in other programs. -
True enough... although, why not also have the Revert menu item? It's weird how Affinity is leaving out things like this, seemingly for no reason or benefit. The history thing would work, but a Revert menu item (or button or whatever) would be even easier. Interesting idea you have about the 'marker' in the list, where the last save occurred. That actually would provide even more benefit than a Revert menu item, as it would show you what all changed since your last save. Good idea!
-
Fair enough, but why even need a double set? Are all the combos using just SHIFT, ADJ or CTRL + mouse used already? If so, why not allow the user to use those for brush hardness (or whatever the user wants) instead? Failing that, why not just allow mapping of ANY key to adjust brush hardness, without even needing the mouse buttons? Just seems so odd that an action SO frequently used (much like brush size and opacity) is completely left out of the hotkey options... yet I'm sure there are much more seldom-used, 'one time' commands that ARE allowed to be mapped. I ust don't get what is gained by excluding this (and other) commands from the keyboard shortcut mapping options.
-
Square bracket brush sizing hotkeys occassionally stop working
ladlon replied to ladlon's topic in V1 Bugs found on Windows
Hi, Chris. I believe the brush sizing hotkey fails with other tools, too, but I'll have to verify that. I would imagine that the regular paint brush is the tool I'm using when this occurs. Ya, it is very odd, especially considering all other hotkeys (and the overall fu nctioning of the program) continue to work fine. So far, it's specific to just the brush sizing. I'm going to continue to experiment and monitor it. I can usually work in AP for quite a while before it happens, and obviously it's not immediately apparent when it does trigger (but is only spotted the next time I try sizing the brush). I'll probably try and intentional test run, where I just quickly work with the usual tools, but continually check the brush sizing hotkeys to see if they have been triggered. Then, I'll at least have a history list which possibly contains the triggering action. I'm also going to try re-mapping the sizing function, just to see if it is specific to that mapping (square brackets)... just to eliminate that possibility. I'll keep you posted via this thread. -
Kind of a drag when you have many files open in an Affinity program, and want to close them all. It seems you have to close each one individually, one by one, rather than using the usual 'Close All' menu item you see in other programs. Why is that not in Affinity?
-
Is there any reason that Affinity software doesn't have the traditional Revert menu item (File)? I suspect somone will probably say 'Just use the Open Recent menu item', but that won't work, as it won't let you load something that is already loaded. So, at this point, you have to close the project and then load the most recent project file. Not a huge issue, but why not just have the Revert menu item like other programs?
-
Ya, any single 'mouse/pen' button system would work. I just don't get why they insisted on a double button system... especially for something that is used SO often during a session. I have a Wacom tablet, and the pen has a 'rocker' switch, so only one of the two states (button press) can be active at one time (...Pushing down forward makes the other half of the rocker switch go up), so it's impossible to push both 'buttons' simultaneously. Unless there are some other functions taking up the single button combos, I can't see why they don't do this. And, if they ARE all used up, maybe they should re-evaluate which functions should claim the easier (single) combos. Although your ALT+SHIFT suggestion would work, why not go a step further and just have SHIFT+LeftMouse, or CTRL+LeftMouse... or whatever may be available? As with all my suggestions on forums, I'd also request they be OPTIONAL and CUSTOM MAPPABLE, so everyone is happy. I'm sure there are other out there who may like the current system, so I don't want to rob them of it, either. So, that's why having all things customizable (key mapping, etc) is always the best way to go. Very puzzling that they limit the functions that can be mapped, rather than having every function available in the keyboard mapping window.
-
Yep, well that just points out my issue/complaint. I'm using a tablet (pen), and I have the rocker switch forward set to Right Click, and it seems there's no way to do a simultaneous left/right 'mouse' click with a pen. Even if the act of pressing the pen down on the tablet is considered a Left Click, then that is still clumbsy... both in that you have to do that while also pushing the pen's rocker switch forward, as well as the fact that pressing the pen on the tablet will often result in a paint stroke, rather than a hardness adjustment. Doesn't seem to work, regardless. Why they can't just have a keyboard shortcut mappable to the hardness function is a real frustration, considering how often that adjustment is made. Meanwhile, functions that you would use only once in a while seem to get their own hotkeys. Why are only SOME of the features mappable, anyway??? Why not all, like with other programs, and you pick and choose what you want to map (and to what)? Easily solved (for everyone, regardless of how they want to use it) by having it mappable, as with all the other functions.
-
The hardness of the brush edge (Harness control to the right of the Flow control). (Sorry, my mistake again, ...and once again, I update the original post!) Fair enough (about them using ALT for the colour picker), but I can't understand why they couldn't they use CTRL+leftmouse drag, or one of the other single mousebutton alternatives (CTRL+Right, SHIFT+Left, SHIFT+RIGHT, etc). A two-button method is not tablet friendly, as you usully have a rocker switch, which can only do one or the other, but not both depresses simultaneously. Just seems very clumbsy, when much simpler alternatives seem to be available.
-
Hi, Haakoo. Sorry, I meant brush sharpness (...my mistake, I fixed the original post now). But, since you mentioned it, I also wanted to say that the current brush size mouse control seems unnecessarily complicated. Why couldn't it just be something like ALT+Left drag (or right drag). Is something already using up every combo of Modifier Key+Single Button Drag? I never understood the need for the double button drag. I seem to remember it being a bit of a pain with a tablet pen, too.
-
I don't understand why some of the more frequent/useful funtions do not have the ability to have keyboard shortcuts defined for them. Please (for example) add the ability for brush hardness +/- to be defined.
-
Hi. Recently, I'm finding that Affinity Photo will suddenly stop recognizing the square bracket 'brush size +/-', after working fine for a long time during that session. I currently don't see any obvious trigger for the hotkey to stop working, and I'm hoping to spot it in the next few times it occurs. The keyboard itself continues to function, and all other hotkeys continue to work in AP. It's solely the brush size hotkeys. Nothing seems to restore it, other than restarting AP. Affinity Photo 1.8.2.620 Win7 Pro
-
I'm running the latest (1.7.3?) Designer, and am finding that today it seems to be freezing after I do about 10 paint strokes or so. Just stops, shows the hourglass (busy icon) and then will go faded white and show Not Responding if I click on the screen. Not using a complex scene at all (very simple, actually). 8.5x10 inch canvas at 400dpi. Just noticed this today. Nothing seems to be getting strained, other than (I think) Core5 showing an odd sudden spike (...see included image). That seems to settle out after a moment, and all cores are running normal after that (yet the freeze continues). Seems to definitely be triggered by doing several strokes, one after another (after about 10 or so?). Simple 'Basic' brush. Using a Wacom tablet. Win7Pro PC with 32gigs of RAM. No previous problem with Affinity Designer, really. Any theories? It's happend consistantly, 2-3 times today... always when I'm painting several strokes, one after another (not particularly quickly or anything).
-
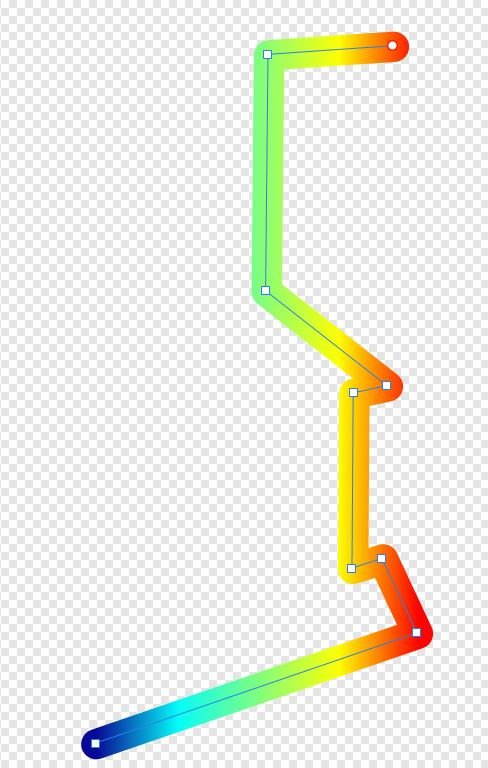
Hi. I have a vector line (with multiple points/elbows), and I want to run a multi-colour linear gradient along the length of it. So, I made my line, then created a linear stroke gradient (with 4 colours) for it. However, it applies the gradient for each section of the line (from point to point... or elbow to elbow), rather than applying the gradient ONCE across the entire length of the line. How do I apply a multi-colour gradient across the entire length of a multi-point line ONCE, without having it do the entire gradient range across EACH segment of the line? NOTE: I do not want it to apply a SINGLE colour on each segment (ex. First segement is blue, second segment is green, etc)... but, instead, just apply the entire gradient range over the entire length of the line based on DISTANCE, not segments. In the attached pic, you see the line I want to apply the gradient to... but, currently, the gradient is applied, in full, to each segment, rather than across the entire length (once) of the line. Also, why is it that the gradient isn't really oriented to the angle of the line, but rather always aligned to an either pure vertical or horizontal axis? (90 degrees) Any help? UPDATE: Okay, so I think I just discovered/realized one thing... The gradient doesn't follow the line/curve itself, but instead is a single line gradient that simply 'shows through' the overall shape of the entire shape... In the case of the attached sample image, that gradient is going left to right... which explains both why the transitions are not aligned to the lines, as well as why the gradient seems to go through random phases in the colours, rather than a predictable one (...until you realize the gradient is a single line going left to right, and that the colour is entirely dependent on the horizontal position of the current area of the line, not the distance through it). So, that explains that... but, I'm wondering if there IS a way to do what I'm trying to do... aside form making the curve using multiple, separate straight line segments, each with their own gradient.
-
Affinity Publisher (1.7) Launch Announcement
ladlon replied to Patrick Connor's topic in News and Information
The Vimeo link to the presentation works great. Thanks for that! Still can't get the vid to play on the Affinity site, but I can watch it fine on Vimeo. Congrats on the great releases!