Jaffa
-
Posts
220 -
Joined
-
Last visited
Everything posted by Jaffa
-
That's very handy thanks, Alfred! Initially, I thought that unless the canvas was in proportion then the image might end up distorted. However, I did an experiment, where I created a new blank document with the unlikely proportions of 10,000 pixels in height and 3,000 in width. I then pasted on a 900 x 900 pixel image. Then did Clip Canvas and it worked just great - all proportions correct.
-
James Ritson, does a great job and in some ways I would not have it otherwise. Nevertheless, he uses a Mac desktop, and I find that there are significant differences, appreciably past the -- substitute Cntrl for Cmd. It would only take him a day, or two, to re-record for Windows - how about it, Serif ??
-
Problem with using two monitors
Jaffa replied to Jaffa's topic in Feedback for the V1 Affinity Suite of Products
I do have them separately on the left screen for easier working. However, I will try what you suggest and merge them when I finish, Tourmaline! -
Just a final thought, not one you asked - but can be a trap. If you have your path, then use the node tool to make curves etc, then before you finalise your selection, you need to go back to the Pen Tool to find "selection" in the context bar.
-
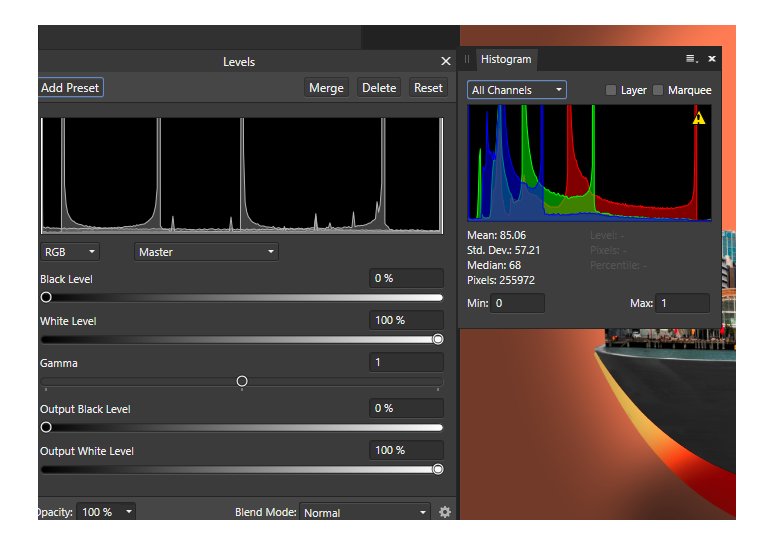
This is a workaround which might help, Sean. As an experiment I utilised the Levels adjustment and put the standard Histogram, side by side with it. When I adjusted the Levels, then the Histogram panel adjusted in concert with it. Would that help? (PS - I hear it even works in Ireland! )

-
Love all the options that Affinity offers - they are almost invariably great. My suggestion to improve even further is to be able to have a stroke through a layer icon that you know you will probably not use, but you keep - just for safety. I am aware that I can use the new colour identification of layers, but this is not as obvious as a stroke would be through the icon layer (fully reversible if things change). I am also aware of taking "snapshots" at various stages, to be able to go back to a point in time, or a version, etc. However, I think that what I am suggesting would be a further step forward. It would enable me to see at a glance not to choose that layer - unless I intend to!! At times, I may have twenty layers, or suchlike, amongst which are three that I probably will not use. This would enable me not to make errors by quickly reading a label, but misunderstanding what I am really doing.
-
Yes thanks, First Defence and James, this is great, I did not even know the possibility of dragging and dropping in that way existed. Have also watched James Ritson's new video on the topic
-
No, First Defence, I haven't tried dragging, but will try that. No, very used to the Place icon, so not that!
-
I have been editing all afternoon with great success, satisfied with the results on my composite. However, have now tried to add a helicopter, using "place". Although I have done many times before, the procedure did not happen. I restarted AP, then desperate also restarted my PC. I am on the correct layer (in fact a "Merge Visible" of the lower layers), however, nothing seems to work, it seems that somehow Affinity Photo, is disregarding, or unable to cope. Seems simple, but what can I try next please?
-
Yes, on my desktop PC (Windows 10), I have two monitors, the bigger for the image and Affinity Photo on the smaller. For the greater part of the time, all is fine and works well. However, although the main program and the most used panels, such as layers, history, colour, etc are there, quite often when I use something like a filter or the warp mesh tool it opens on the bigger monitor and behind the image. To fix this, I minimise the image and drag the panel over to the smaller monitor. It is a pain when I have to do this several times for each editing session. Is there any way to have all fresh panels open on the smaller monitor please?
-
Yes, on my desktop PC (Windows 10), I have two monitors, the bigger for the image and Affinity Photo on the smaller. For the greater part of the time, all is fine and works well. However, although the main program and the most used panels, such as layers, history, channels, colour, brushes colour etc are there, quite often when I use something like a filter or the warp mesh tool it opens on the bigger monitor and behind the image. To fix this, I minimise the image and drag the panel over to the smaller monitor. It is a pain when I have to do this several times for each editing session. Is there any way to have all fresh panels open on the smaller monitor please?
-
Much as I love Affinity Photo, I find it frustrating after having just saved to an Affinity File, then exported, to be asked whether I want to save my changes. If I export my changes, which almost invariably mean less pixels, then I do not want to lose resolution in the Affinity File. Over many saves, I find things not standard, sometimes I am told there have been changes and sometimes not. There seems no consistency.
- 1 reply
-
- 1
-

-
Much as I love Affinity Photo, I find it frustrating after having just saved to an Affinity File, then exported, to be asked whether I want to save my changes. If I export my changes, which almost invariably mean less pixels, then I do not want to lose resolution in the Affinity File. Over many saves, I find things not standard, sometimes I am told there have been changes and sometimes not. There seems no consistency. One of my two pet hates (but I still love you Affinity!)
-
Hi Fixx, just seen your post, somehow I managed to miss it up until now. Am still getting used to how this all works. However, from what you are saying it seems that in most situations it would be better to rasterize, then crop, rather than to use the "Rasterize and Trim"?? Is that correct?
-
Oops, Ron, you are right. James Ritson covered both Defringing and Chromatic Aberration in the same video and my memory failed me. https://player.vimeo.com/video/133350551/ Just re-watched and he makes the very useful observation that you can "pass", pass, and pass again with the Chromatic Aberration Filter until the effect disappears (in the rare situations this is necessary).
-
But the old one did have sliders and a colour range too, Bruce, so it was live. James Ritson showed how you could use it once for purplish aberration and do another layer in the same image for a blueish aberration.
-
I hear what you are saying Bruce, just never thought about the fact that it will not work on one layer. In the past I have just done it, and it has worked.
-
The title basically says it all. Chromatic Aberration used to be a Live Filter, now I can only find an 'ordinary' filter. This seems a backward step on the surface. Is there some logic please?
-
Maybe my memory is failing, could be. I thought that blend modes also worked with B&W? I was just trying to use a Multiply Blend Mode with a B&W image and the image did not change. So, to test I moved to other Blend Modes, still no effect. The image I was working on has many layers, so I exported to just try Blend Modes with a single layer, still no result. I then thought of shutting down Affinity and restarting - still no change. Tried Googling the situation, but could not find anything on that specific topic. Do Blend Layers work with B&W? .......... or is this a bug?
-
I had an image in the workspace. Did the usual Ctrl + 0 to give me the image at the size of the working area. Did not work, so next did a Ctrl + + to show the image bigger, then the same again to show bigger again. Assumed it was me not choosing the right keys etc, so tried again (and again), however, my results remained constant. A bug??
-
Many thanks, RC-R, it is great to get the answer! Doubly so, since you answered the actual question I was asking. Is there some way to give you double thanks?
-
Hi First Defence, have you taken any trouble at all to read my post? I have used the inpainting tool a hundred times and know what it can do. I highlighted my question, which is "what is the purpose of the Inpainting option in Fill"?
-
I was using the "Fill" option under Edit. It shows options down the left side, one of which is "Inpainting". Decided to experiment, thinking that it would be useful. Despite many experiments, I could not work out what it does. After all, for inpainting all you need is a new pixel layer and identify that effects are shown on the layer below. Then, I thought that I have the answer, you choose a colour and the inpainting uses that colour as a base, or influence. However, I chose a bright blue and it had no effect at all. Next, I tried to google an answer - but no result that I could find. So, I pronounce myself defeated - please what is the purpose of the Inpainting option in Fill??
-
Today I was making a very tricky selection and having lost some of it recently I tried to ensure that the same did not happen again. Therefore, I saved an early selection as a spare channel. As I progressed I saved again as a spare channel. When I had fully completed my selection then I went to save as a spare channel for the THIRD time. This time I saw that there was none available. I got around this by deleting my first save, which turned out to be a workaround. Have since learned that you can right-click in the channels panel and "Create Spare Channel". As you can see I should have no further problems having learnt the magic trick. Nevertheless, I want to understand what triggers spare channels being created? I have done experiments with creating a number of layers and also separately creating a number of selections. It appears that Spare Channels are created in line with the number of layers and is triggered by that, with the number of selections being irrelevant. Is that correct please?
-
I am running Windows 10 on an LG Desktop (LG =Life's Good). The desktop has an AMD processor 6 Core with 8 Mgs RAM. A number of days ago I, of course, updated to Version 1.7 of A.P. The update is great, however, I now find the desktop struggling at key points (eg Refine Edge). Today I launched the Task Manager window and watched. I had a RAW file (NEF) and made a couple of basic alterations, then I "developed" the file to edit in Photo Persona. At one point the CPU usage was right up to 100%, though only fairly briefly. The Memory usage kept in the high 70's, low 80% and peaked at about 84%. No doubt that whilst Affinity Photo has grown even more sophisticated, it is also more demanding in terms of digital resources.What message should I take from these readings please? What steps should I consider/not consider please? Should I even think of doing something at all? Because CPU use is only 100% briefly, then probably should not think of spending for a small gain?