
Affinity iPad Student
-
Posts
332 -
Joined
-
Last visited
Everything posted by Affinity iPad Student
-
 First 20 seconds of video shows this new 2.3 feature on PC. Where is this duplicate panel on the iPad and how do I enable it without keyboard? (In video, he shows how to activate it via keyboard) I don’t use keyboard, just Apple Pencil & gestures. I am aware I can also accomplish this via constantly tapping on duplicate (that’s insanely time consuming) the way shown in this video, is the most efficient way to go. Once again, how do I bring up this duplicate panel (without keyboard)? Thanks
 -
@Brian_J Much appreciated Thank you fellas! This solved it.
-
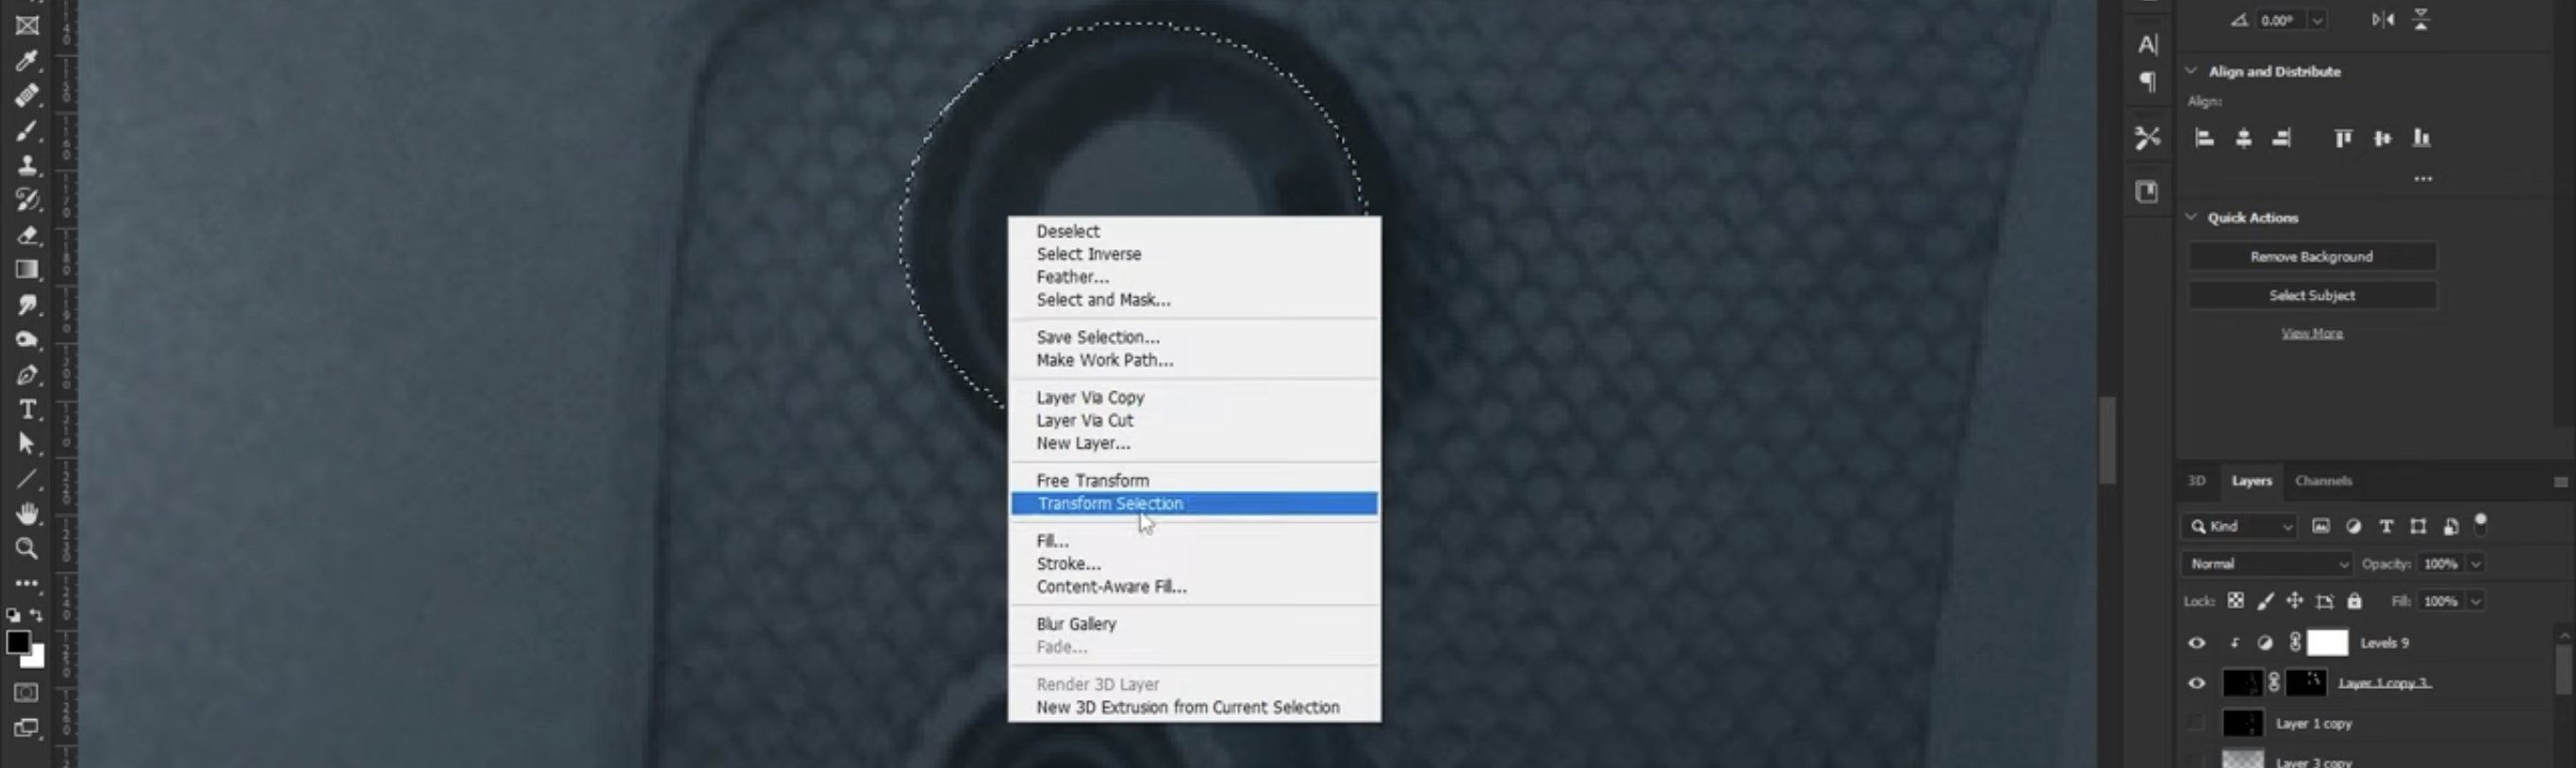
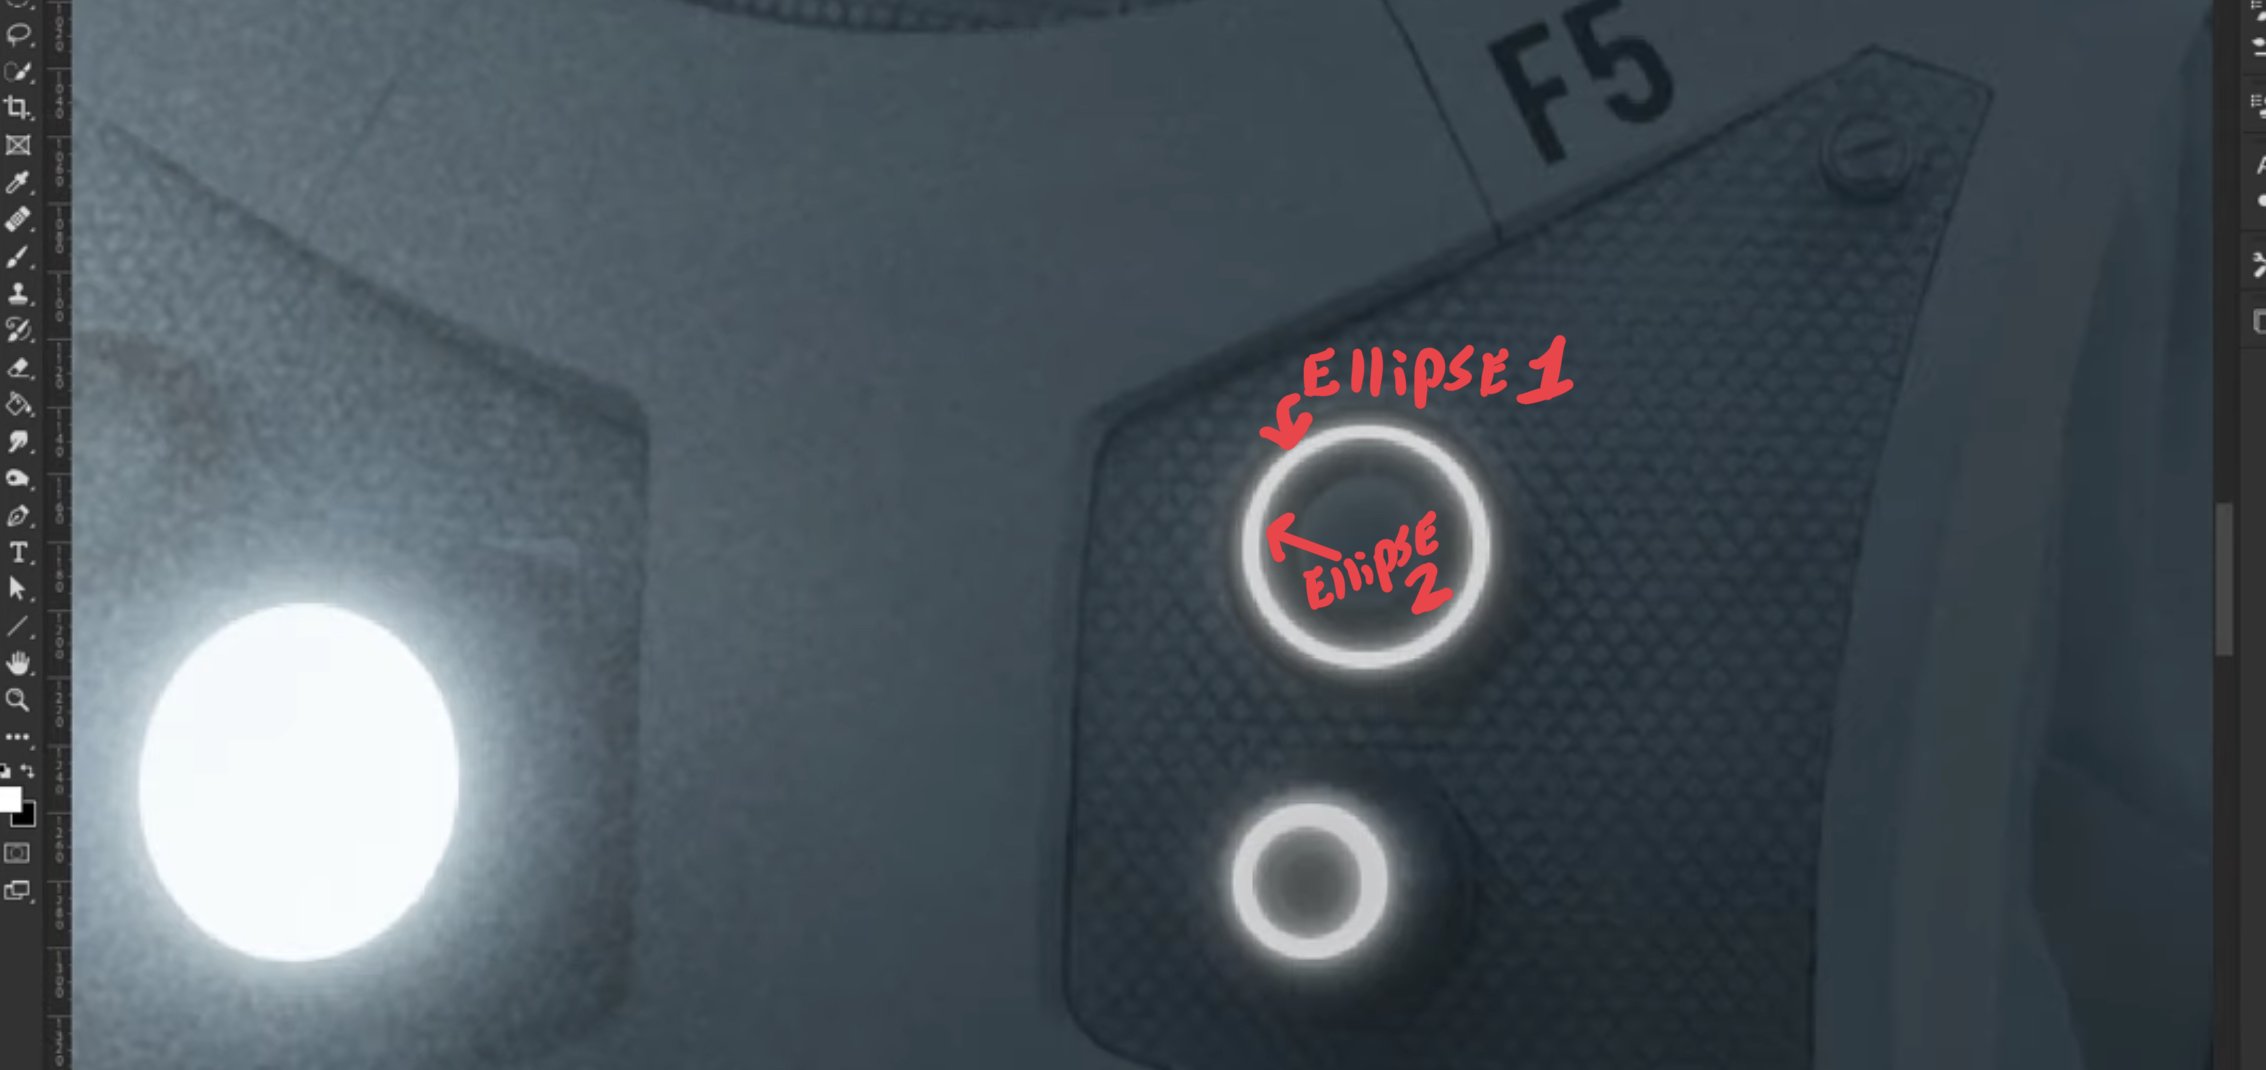
I am following a photoshop tutorial, he was able to go into selections, choose an ellipse selection, create a circle ⭕️ and then he brought up the ui, and chose *transform* selection, and then added another selection ellipse inside an existing selection ellipse. I want to do that as well. I can’t find a transform for affinity photo 2 selection. So i tried, creating an ellipse selection, inside an existing ellipse selection… not possible it will disappear.. (i used intersect, add, new) to no avail.. the goal is to have two selection ellipses like this: in the youtube tutorial I’m watching (for photoshop), he was able to achieve what I show above, by transforming one of the selection ellipses: The end result, I am trying to accomplish, is the same as he did in his video (with the glowing rings on a button).. except i’m trying to accomplish it on my sphere - this is what he accomplished by having two ellipse selections inside each other: I know there are other ways to go about this effect (creating border rings) but this technique of having two selection ellipses inside each other, has opened me up to other ideas that I could use it for… so I’m hoping there is way of achieving this. Does anybody know how? I vaguely recall, AP1 had an option to do this, after creating a selection, there was a drag slider option.. that allowed you to create a double of the selection (one inside the other) I can’t find it in AP2 (unless my mind is hallucinating) and no such thing existed in AP1.

-
I can’t find the grids & guides on AP 2. I can’t believe i’m on here asking where this is located, I feel embarrassed. I searched google, and I knew my mind wasn’t playing tricks on me… they moved it from where it use to be, nestled in the hamburger menu: I checked (…) as well:
-
I truly hope not. It seems from this new and way better video (if you scrub to 4:39) he opens his cut out, in its own window, I guess you can save or screen cap from there. I still haven’t tested, I’m working on concepts in mid journey, which I plan to take to segment anything, then manipulate in Affinity Photo. Sorry I haven’t been of further help here Paul.
-
@Paul Mudditt Updated with a guide of sorts. Hopefully this helps!
-
@Paul Mudditt I haven’t used it yet, Wish I had some input for you. when the YouTube tutorials start appearing, I’ll post here.
-
I’m just sharing the knowledge: Seems we can now be at superhuman speeds with what I consider the tedious, drudgery side of photo manipulation. (Selections, masking) Meta Releases open source Segment Anything Ai Tool, available to the public. Instantly make selections and Ai will even make several selections within that one subject: the human, their sunglasses, their shirt. All selections automatically made and layered. Better showcase in video, then website after video: Website: https://segment-anything.com/demo Gizmodo Article: https://gizmodo.com/meta-ai-sam-photo-segmentation-facebook-photoshop-1850304361
-
wet edge solved it. I somehow clicked on it without knowing. I’ve never used wet edge, in AP1, and I’m definitely not used to its new position out in the open - up top, I must be careful. Thanks @NotMyFault @DM1
-
Weird bug One: Masking now requires double effort: On a mask, I choose regular round brush, full opacity, full hardness, full flow. Black color As I’m brushing away at the areas I want concealed, it leaves behind a faded portion of what I’m trying conceal. Meaning, I have to go over it twice. (Double the effort) Weird Bug 2: Light round brush leaving huge wet edges on stroke: even though flow is down to 15 percent, hardness is 0% these same settings on photo v1, the light round brush would have a very soft airbrush ink to it, now it’s giving very strong wet edges. These strong wet edges, defeats the purpose of the light round brush which should ink like a soft mist onto the canvas. This has to be a bug! Or is there some kind of requirement now, where I have to go into the brush options and revert its current brush setting, back to Affinity Photo v1 —> light round brush setting? I apologize for not providing images, I just wanted to throw up this post before I had forgotten due to me, about to go to sleep. Any illumination on this, will be greatly appreciated. Thanks.
-
@DM1 As always, the champion of getting us back on track, comes through. Thank you! No way I would had noticed the dots - I would had been here sitting on infinity and probably would not had found it. I’ll have to download your Photo V2 help document. (saw it in your signature)
-
Following a photoshop tutorial, I have not had the chance to use photo v2 since update. I’m seeing things that alien to me, due to me being introduced to affinity photo with iPad (never used the pc version) though… I do recall reading, the new photo v2 is closer to the pc version in regards to ui. That said, I’m use to the older setup of brush UI: The new version, I can't find the opacity for the brush (did serif not make accessible) outside of my meus? must I dig through menus or something? (new brush UI): (now that I think about it, I don’t see hardness either what is accumulation? this was not part of the photo v1 brush UI. Thanks!
-
Long press… what the hell. 🤪 Wow, I don’t understand the UX reason on that one, first instinct is to tap screen not long press. I would had never guessed that one, thank you BIG TIME!
-
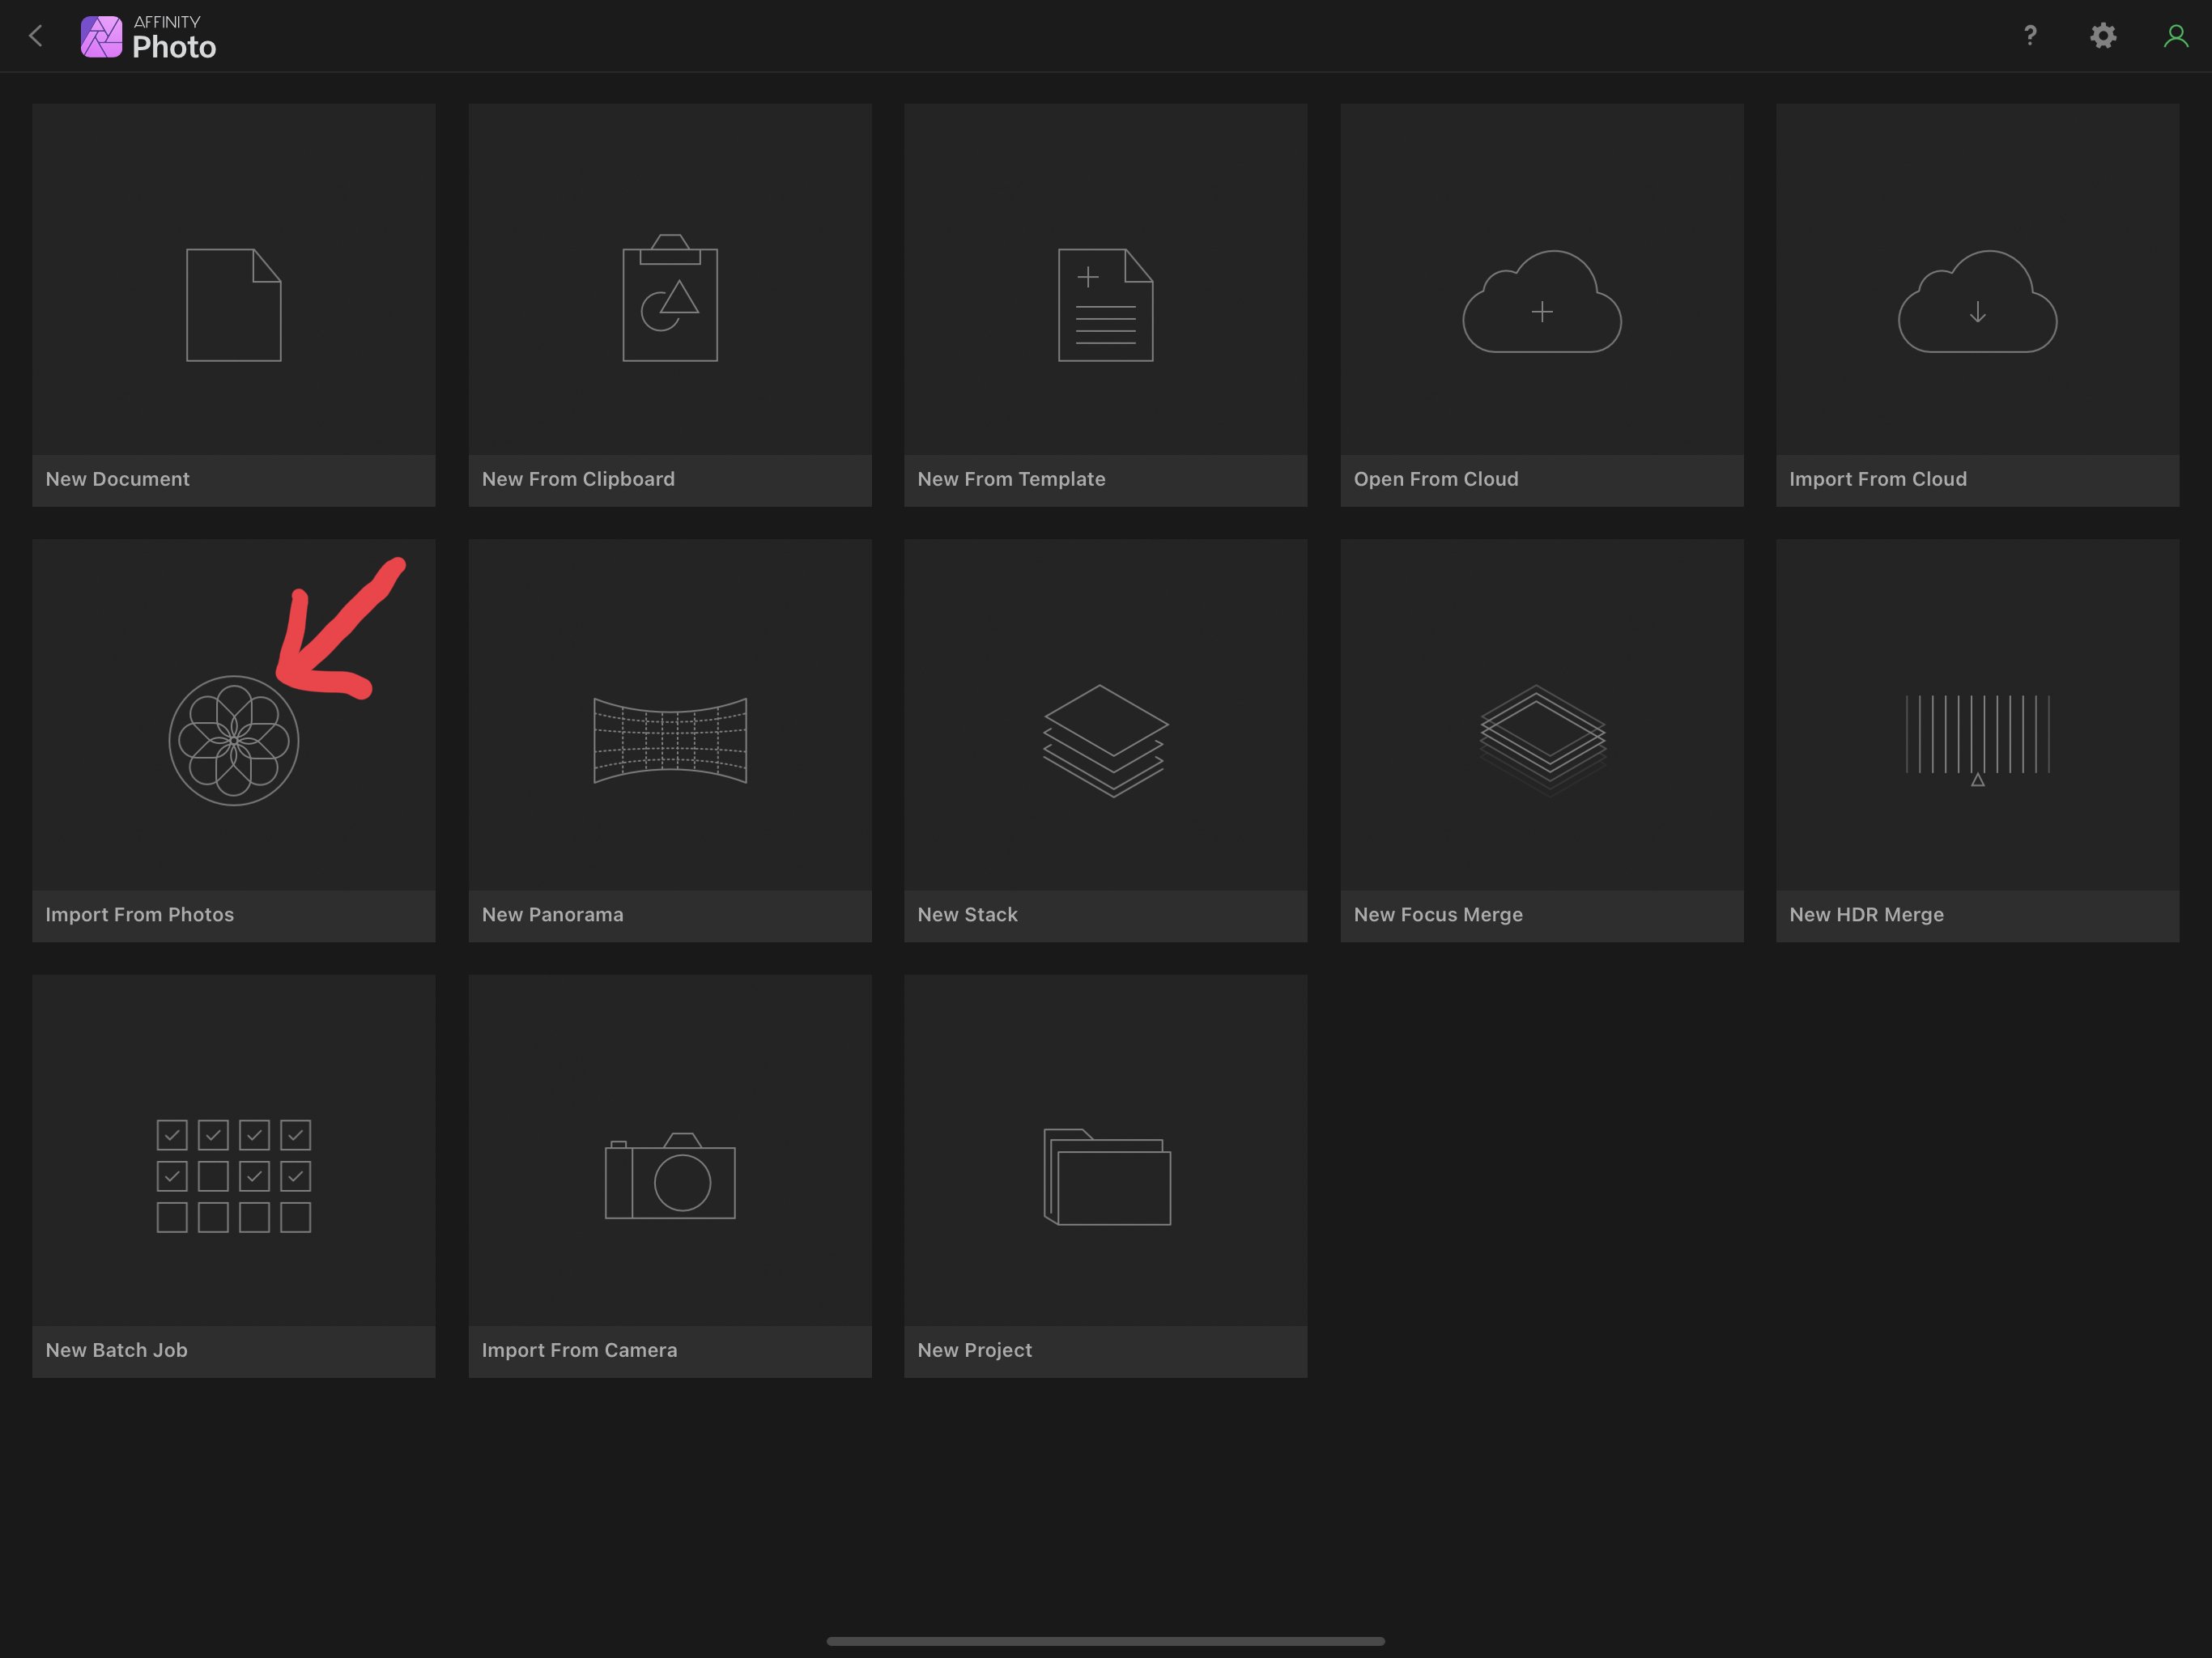
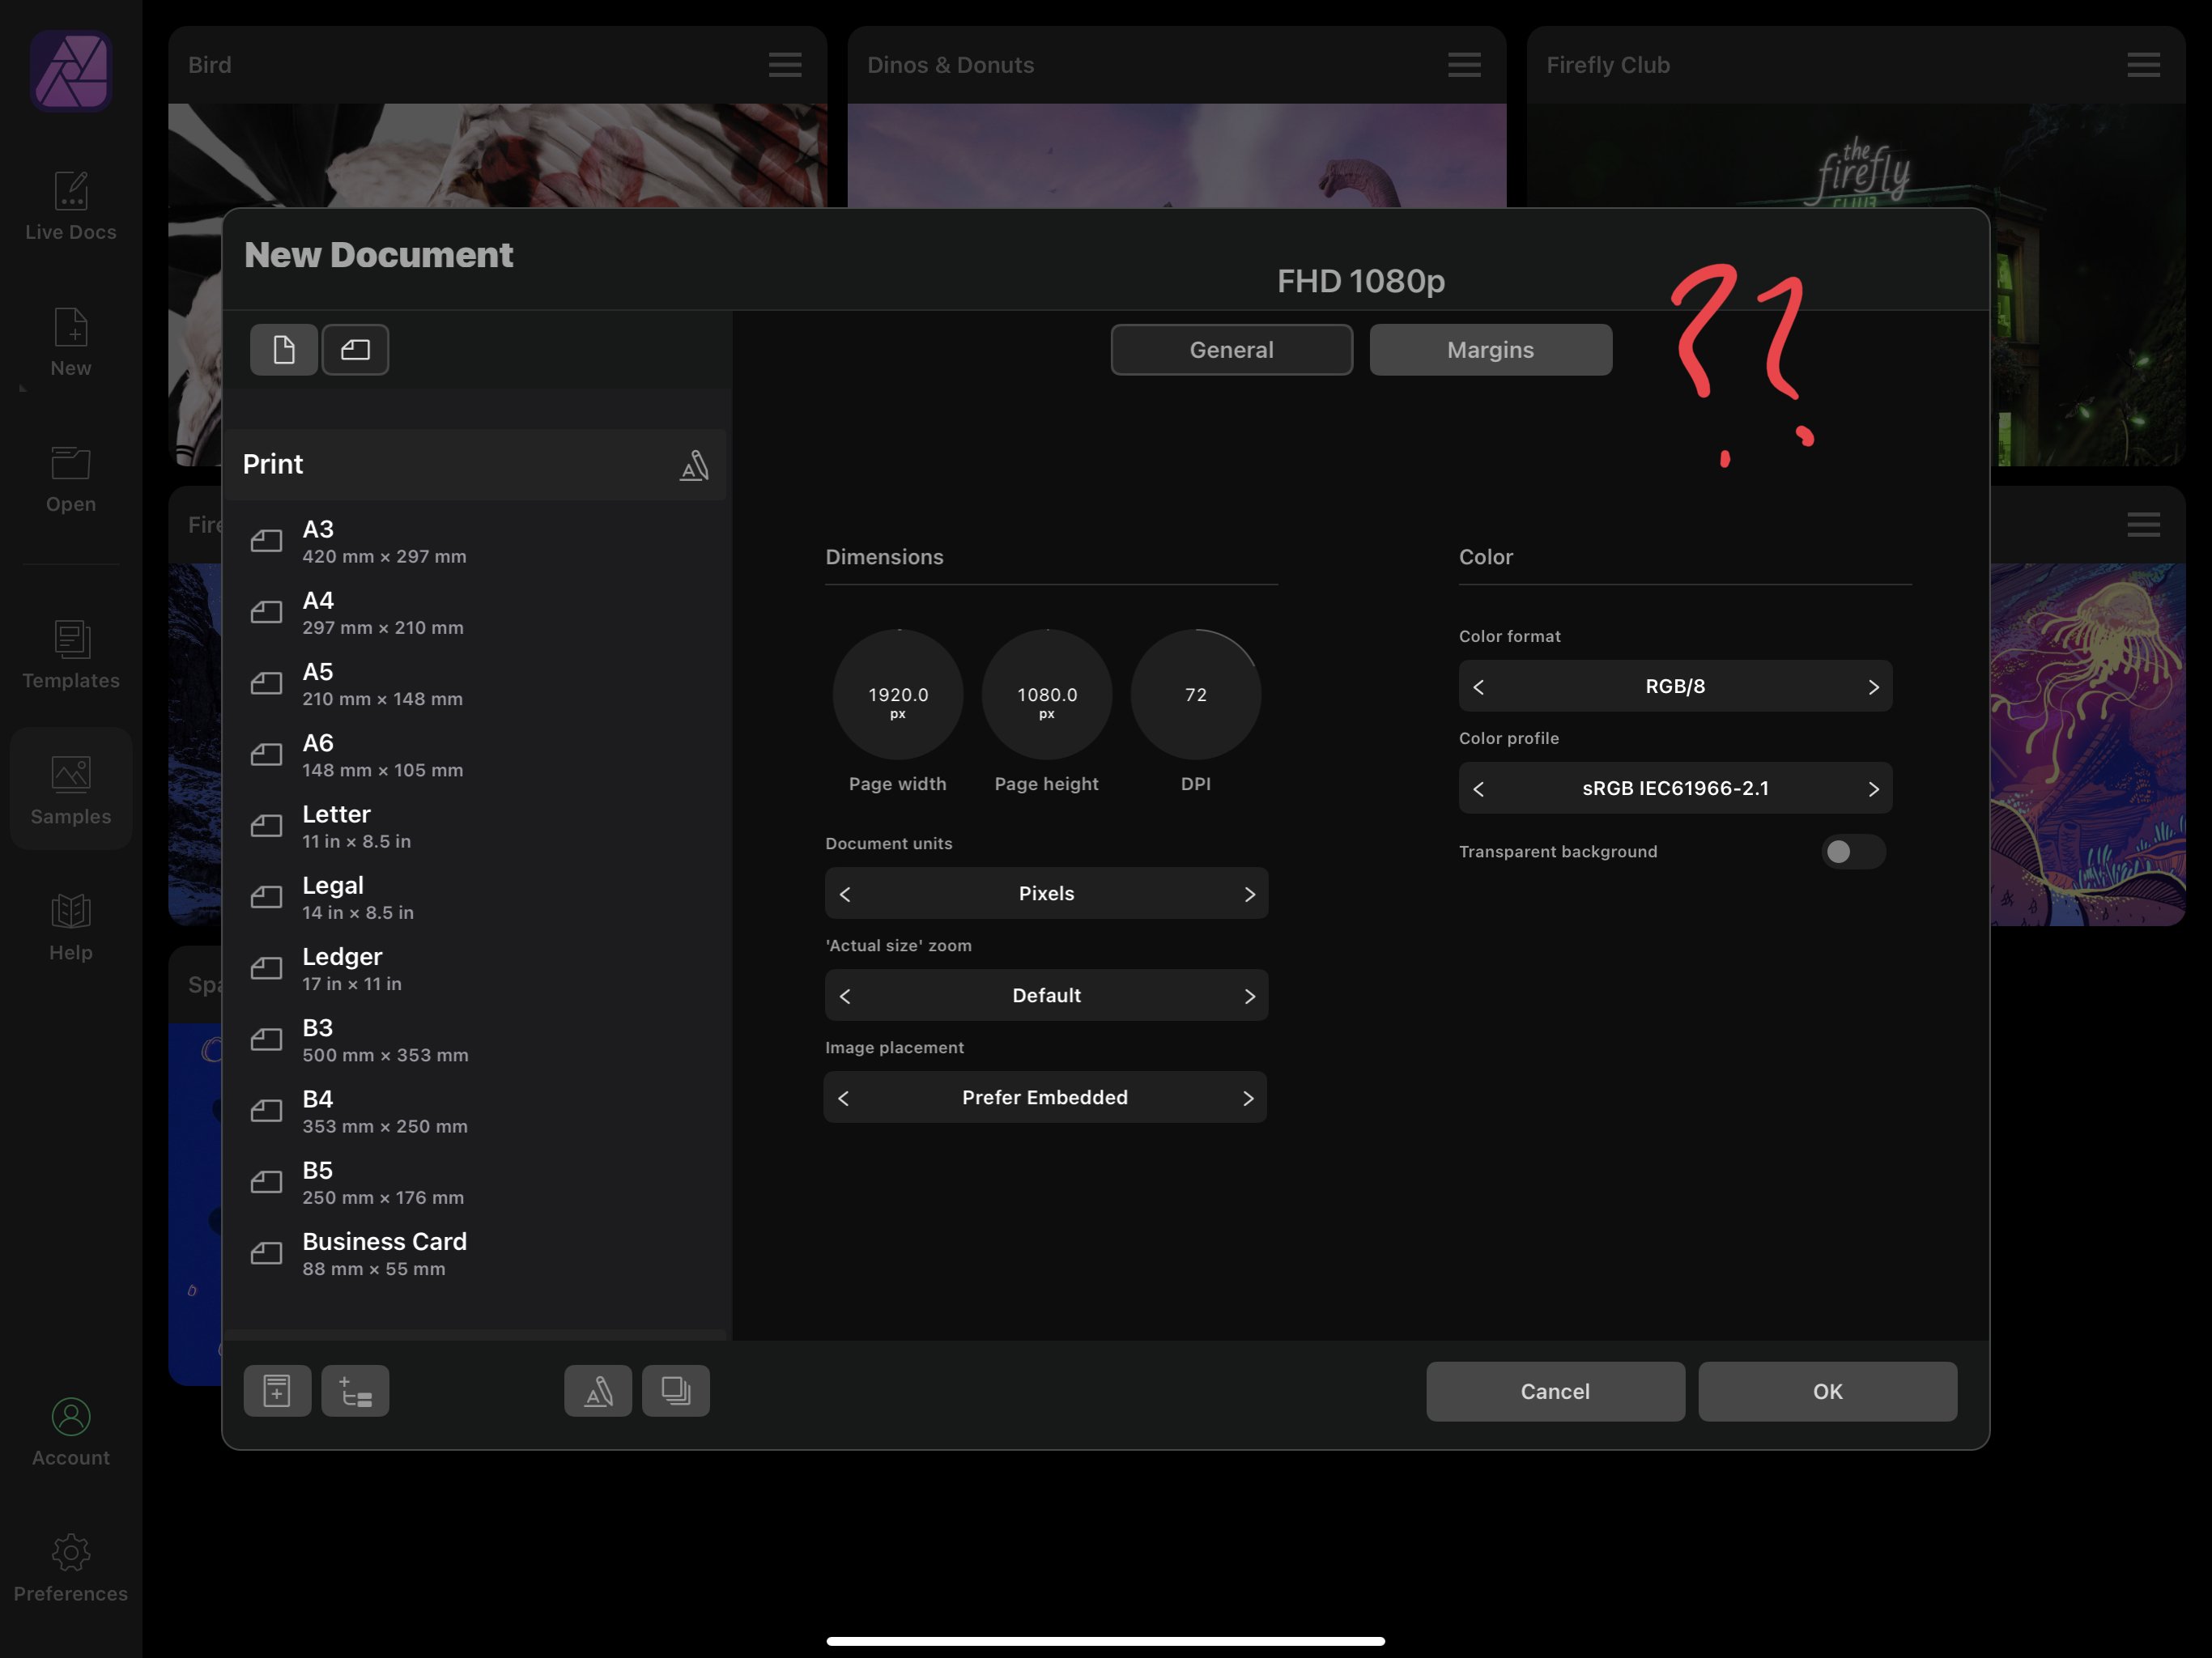
In the original affinity photo for iPad, no need for you to create a document, the app created one for you, dimensions based on the imported photo from your photo app gallery: In photo v2 for iPad, where is the import from photos option? I must be blind.. I can’t find it? It’s none of the menus you see: Any help appreciated, thanks.
-
@walt.farrell Thank you, any ideas for resolve? I updated my original post, by adding images, maybe this will help you see what’s going on.
-
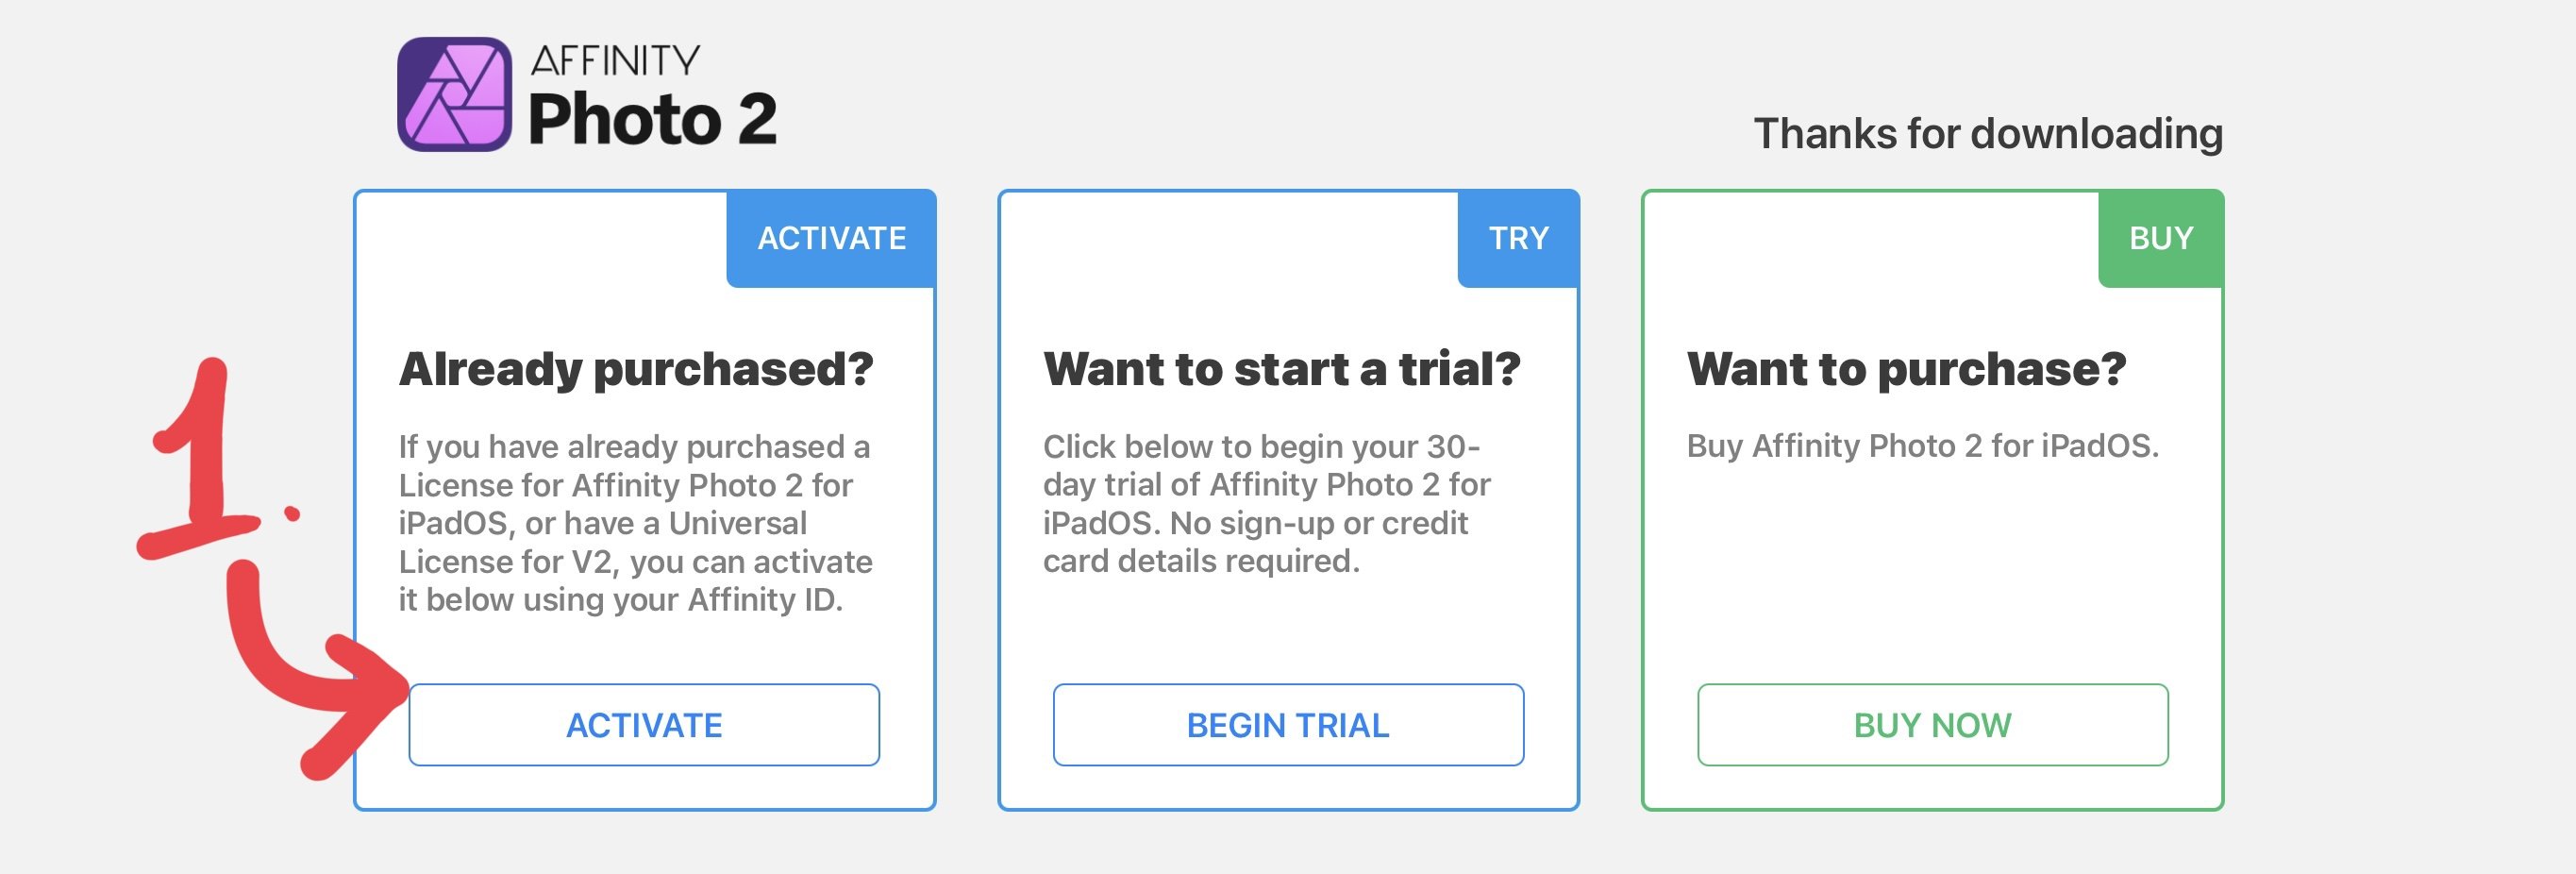
Thanks Walt this seems to clear things up. Now I am literally having an issue to where I can’t even access the v2 photo app. due to not having a license: which i posted here:
-
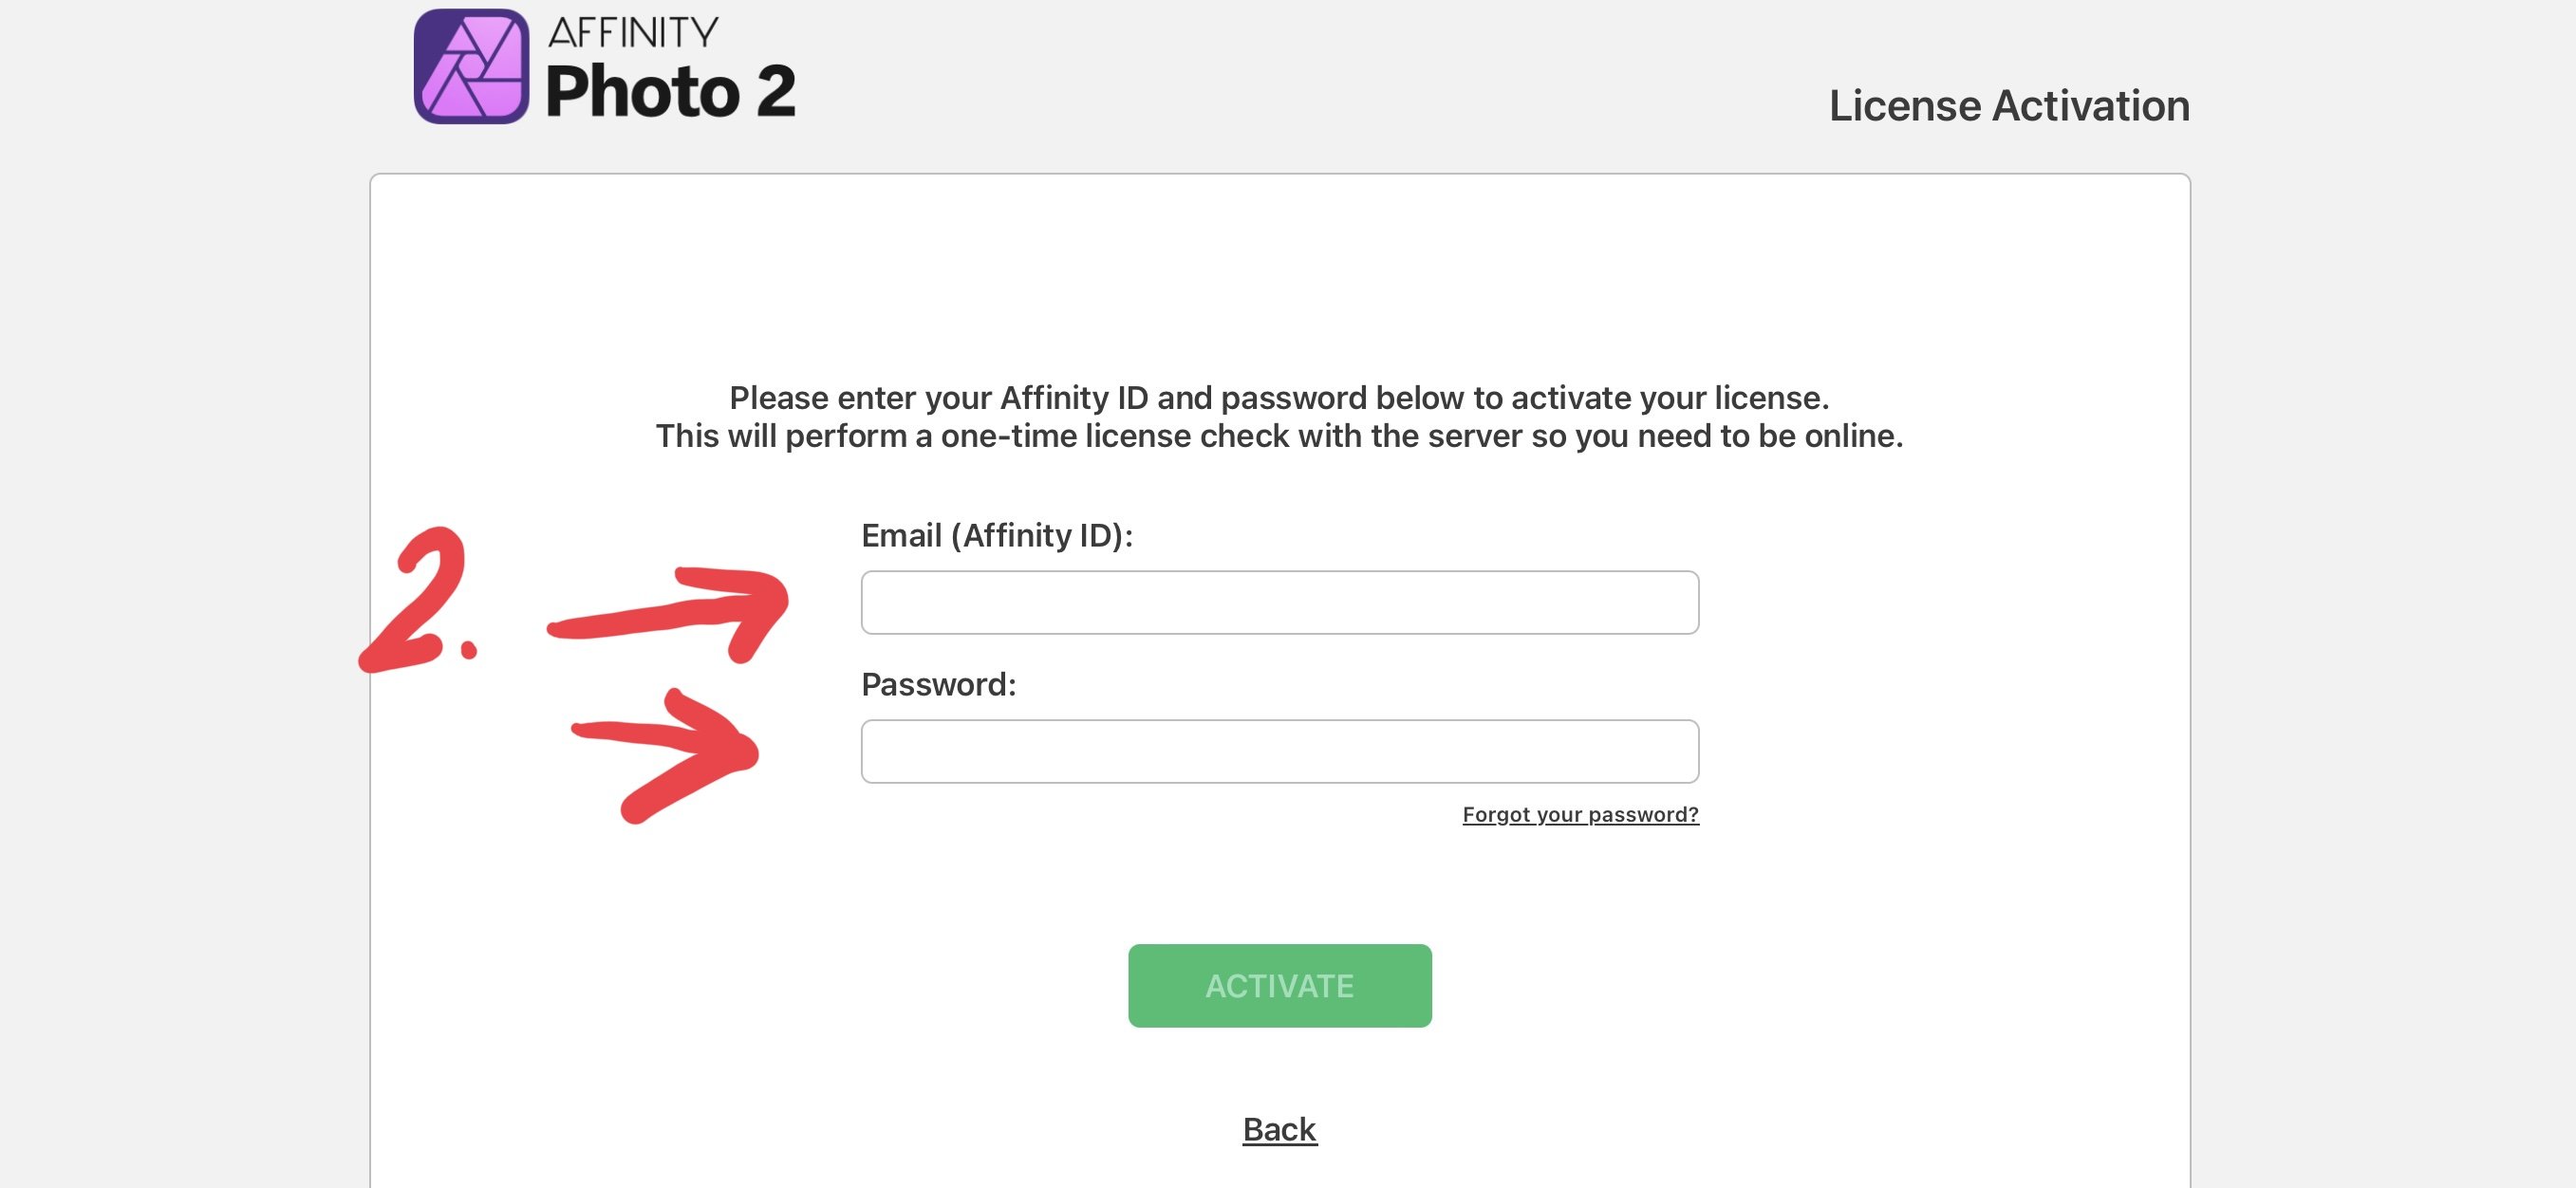
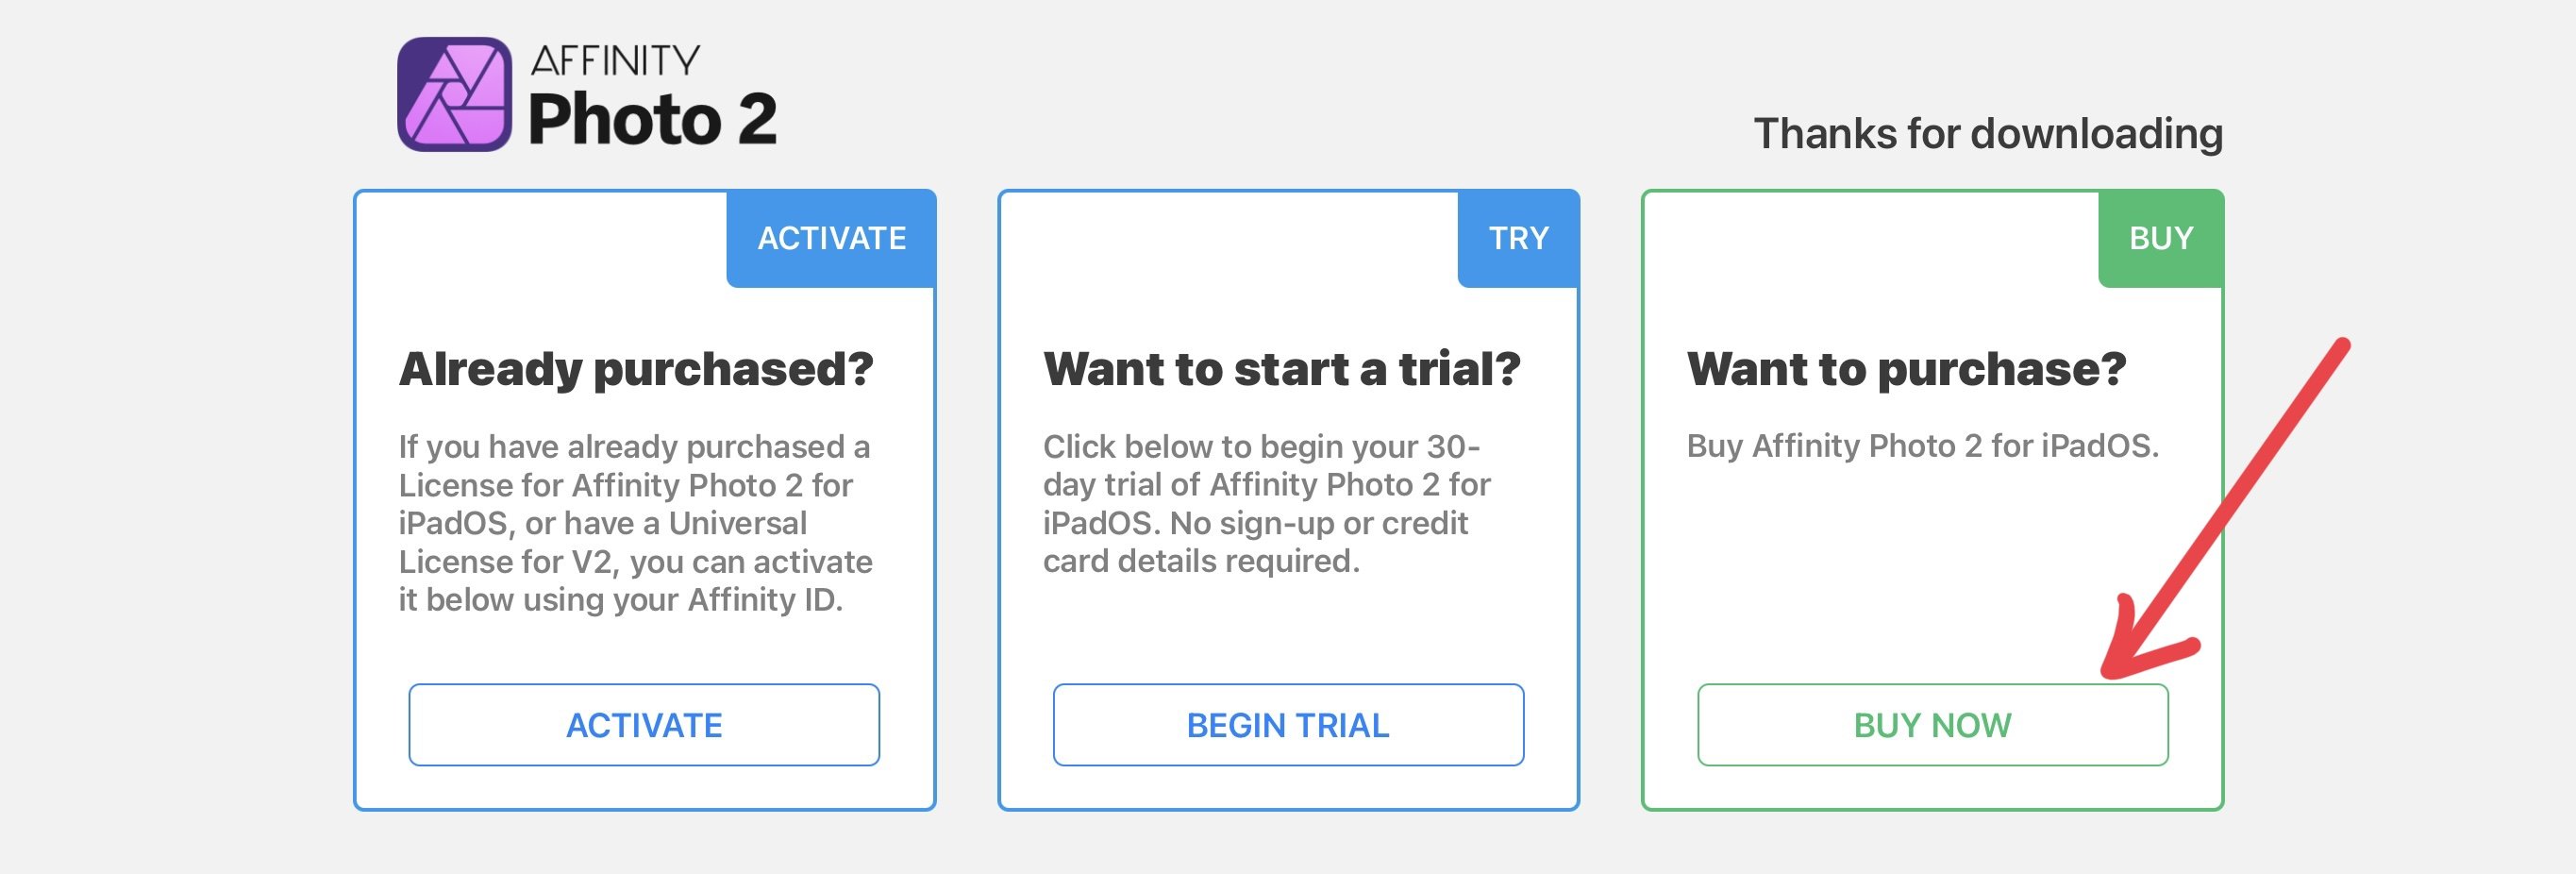
Resolution: (thank you @walt.farrell) you made think outside the box which is how I came to this resolve Hope this breakdown helps the devs if they also notice this issue. *Particularly logging in, after a purchase* When I initially purchased the V2 apps via the app store, I went through the standard app store procedure: where you double click the button on the side of your iPad when prompted, to confirm a purchase: Well.. I went through that whole step, it literally said $11.99 as I double clicked the iPad button to confirm the purchase. Somehow, the purchase was NOT transacted (I checked my bank account —> nothing there) I immediately felt this is the reason, the app is preventing me access, it assumes I didn’t pay. With that thought, I went ahead and decided to purchase photo 2, through the V2 photo app: I now have access to the app, but not before it slapped me with one more barrier: LOG IN BUG AFTER PURCHASE: after I made the purchase, all my log in credentials were automatically placed in the sign in fields, so all I had to, was tap the continue button to proceed and enter the app, well…..,,, my inputs in tapping the continue button were ignored. I had to reboot the app, and now it’s working. So yea, look out for that. The question that’s still in the air: will I be double charged? I know I mentioned there was nothing in my transaction vids the app store, but apple sometimes shuts reflect onto your bank account until days later. I guess I’ll find out, and if I am double charged, I’ll post it here. ———————————————————————————- Previous Issue Detailed Below, in case anybody experiences this: I’m confused. because if memory serves me correct, when I initially purchased affinity photo for iPad (when it first released), I don’t recall requiring to buy a license to use it. I don’t mind buying the license.. just let know if this is what I have to do. I just bought all three affinity apps in the app store for $11.99 each (photo, designer & publisher) Here’s my issue: 1. Launch photo v2 2. Sign in (I do enter the correct credentials) 3. No license prompt 4. Now I cannot access the app My mind is telling me, I have to purchase the $99 universal license to access the app? (is this correct?) If the $99 license is indeed required, will this one license apply for…. all of the affinity v2 apps I purchased? Thanks.
-
What is the purpose of Affinity V2 Universal License currently $99 in the app store? Is it some kind of feature that connects all the apps into one app? I have all of Affinity’s apps on my iPad, not on PC, so with that said.. will this license still useful for me as a Strictly iOS Affinity pro user?
-
@NotMyFault explained it thoroughly. I’ll add some simpleness here. when you first apply a mask, it’s “not” inverted, it’s just a regular mask. Inverting a mask is a different subject, look that up on its own, so you can understand that concept, because right now you *mashing up two separate concepts*. Regarding a regular mask…. there’s a simple phrase used by many pro’s that helps you remember how basic masking works: Black *conceals* White *reveals*
-
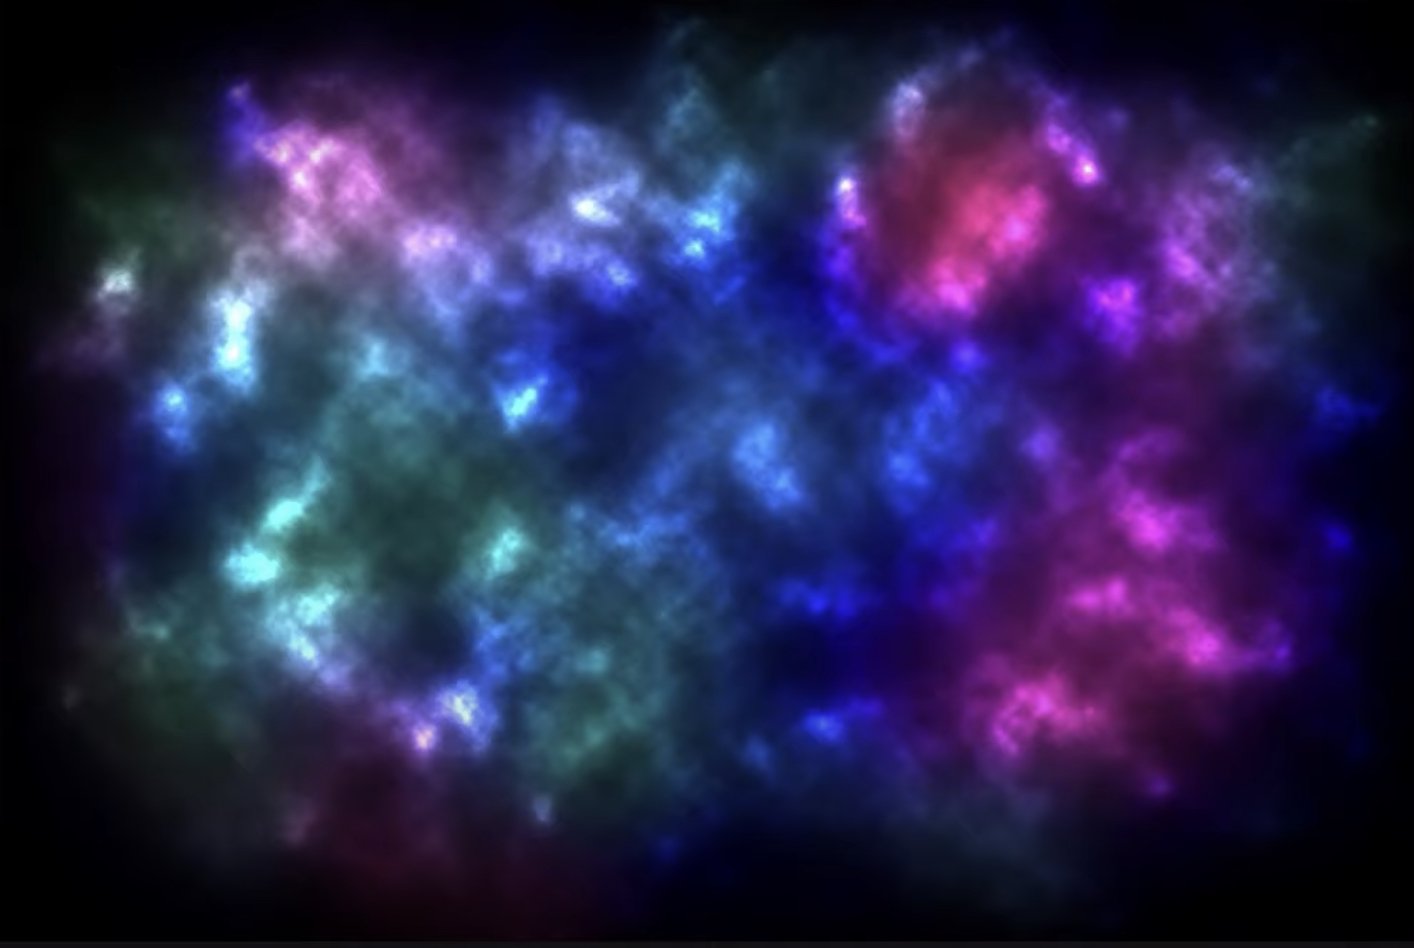
Thank you @LeeThorpe Perlin Noise was the answer, I did not achieve her look. Notice in the image below, she has some huge gaps of black in there, thus… achieving the look of a colorful space nebula: This is my result, notice the much tinier black gaps, making mine look like colorful sand grains: I tried playing with the octaves, zoom and persistence, but to no avail, that said, I’ll tinker around and hopefully come up with the space nebula. Consider this resolved! Thanks again @LeeThorpe
-
Unfortunately, the same issue, all my software is up to date: Troubleshooting I tried: • rebooting ipad • closed out affinity photo, then relaunched it • deleted the previous project started from scratch (twice already) • I have 2020 iPad Pro 12.9 with 14.32 gigs available iPad up to date: Affinity Photo up to date: How are you getting it done? on your iPad? The step in the tutorial where she asks: choose render clouds via photoshop affinity doesn’t have that, so I ignored that entire step and instead used my cloud brush on a new layer, and then put that layer on color dodge blend. Could it be my cloud brush preventing color dodge from doing it’s working? (I included brush file in this post) New file here: planet tutorial.afphoto brush I use for cloud (courtesy of Rikard Rodin’s, Nucly youtube channel): sample atmosphere brush.abr Hopefully we figure this out, I love this effect, and would love to replicate it.
-
Thank you @LeeThorpe I was confused at first your response, but I figured it out. THANK YOU very much!
-
I’m following this video, see how color dodge affected her clouds layer (timestamped video) and then see my horrendous result after: So why is my color dodge doing this? FullSizeRender.MOV Pretty much this ugly thing right here is what my color dodge is producing: The color dodge in the video produced this: Is this a bug? this is my file: space scene.afphoto
-
I’m following a photoshop tutorial, but 80% of what I know in Affinity Photo is from following Rikard’s photoshop tutorials on his Nucly youtube channel, been learning this way for over a year now. With that out of the way… here’s my issue: His gradient only fills up the x and y axis dimensions of the line he creates (this is what I am trying to accomplish): FullSizeRender.MOV My fill tool (gradient) is disrespectful… it takes up the ENTIRE screen, instead of just the x and y dimensions of my line, I’ve also tried linear, radial,.. etc. None of these help: FullSizeRender.MOV At first I thought this issue of the gradient filling up the entire screen was occurring, due to fill context option, selected on the lower left: So I then chose line context and nothing happens when I tap, long press or swipe my apple pencil along the screen to draw out a line, instead I’m greeted by a green line and a green dot. I even tried adding a pixel layer put a marquee rectangle on it, created the gradient within the marquee rectangle, and I’m greeted with a HARD EDGE (and it’s on soft light blend, it only gets worse on screen or overlay): Is it possible… to get the gradient to just fill up the x and y dimensions of my line… just like the first video in my thread? FYI: blend don’t work whether soft light, screen or overlay… does not help, because the gradient is still covering up my entire screen. I HOPE this is me lacking know how, instead of an app limitation. Any help appreciated, thanks. If needed, file to the project: Depth Tutorial.afphoto
-
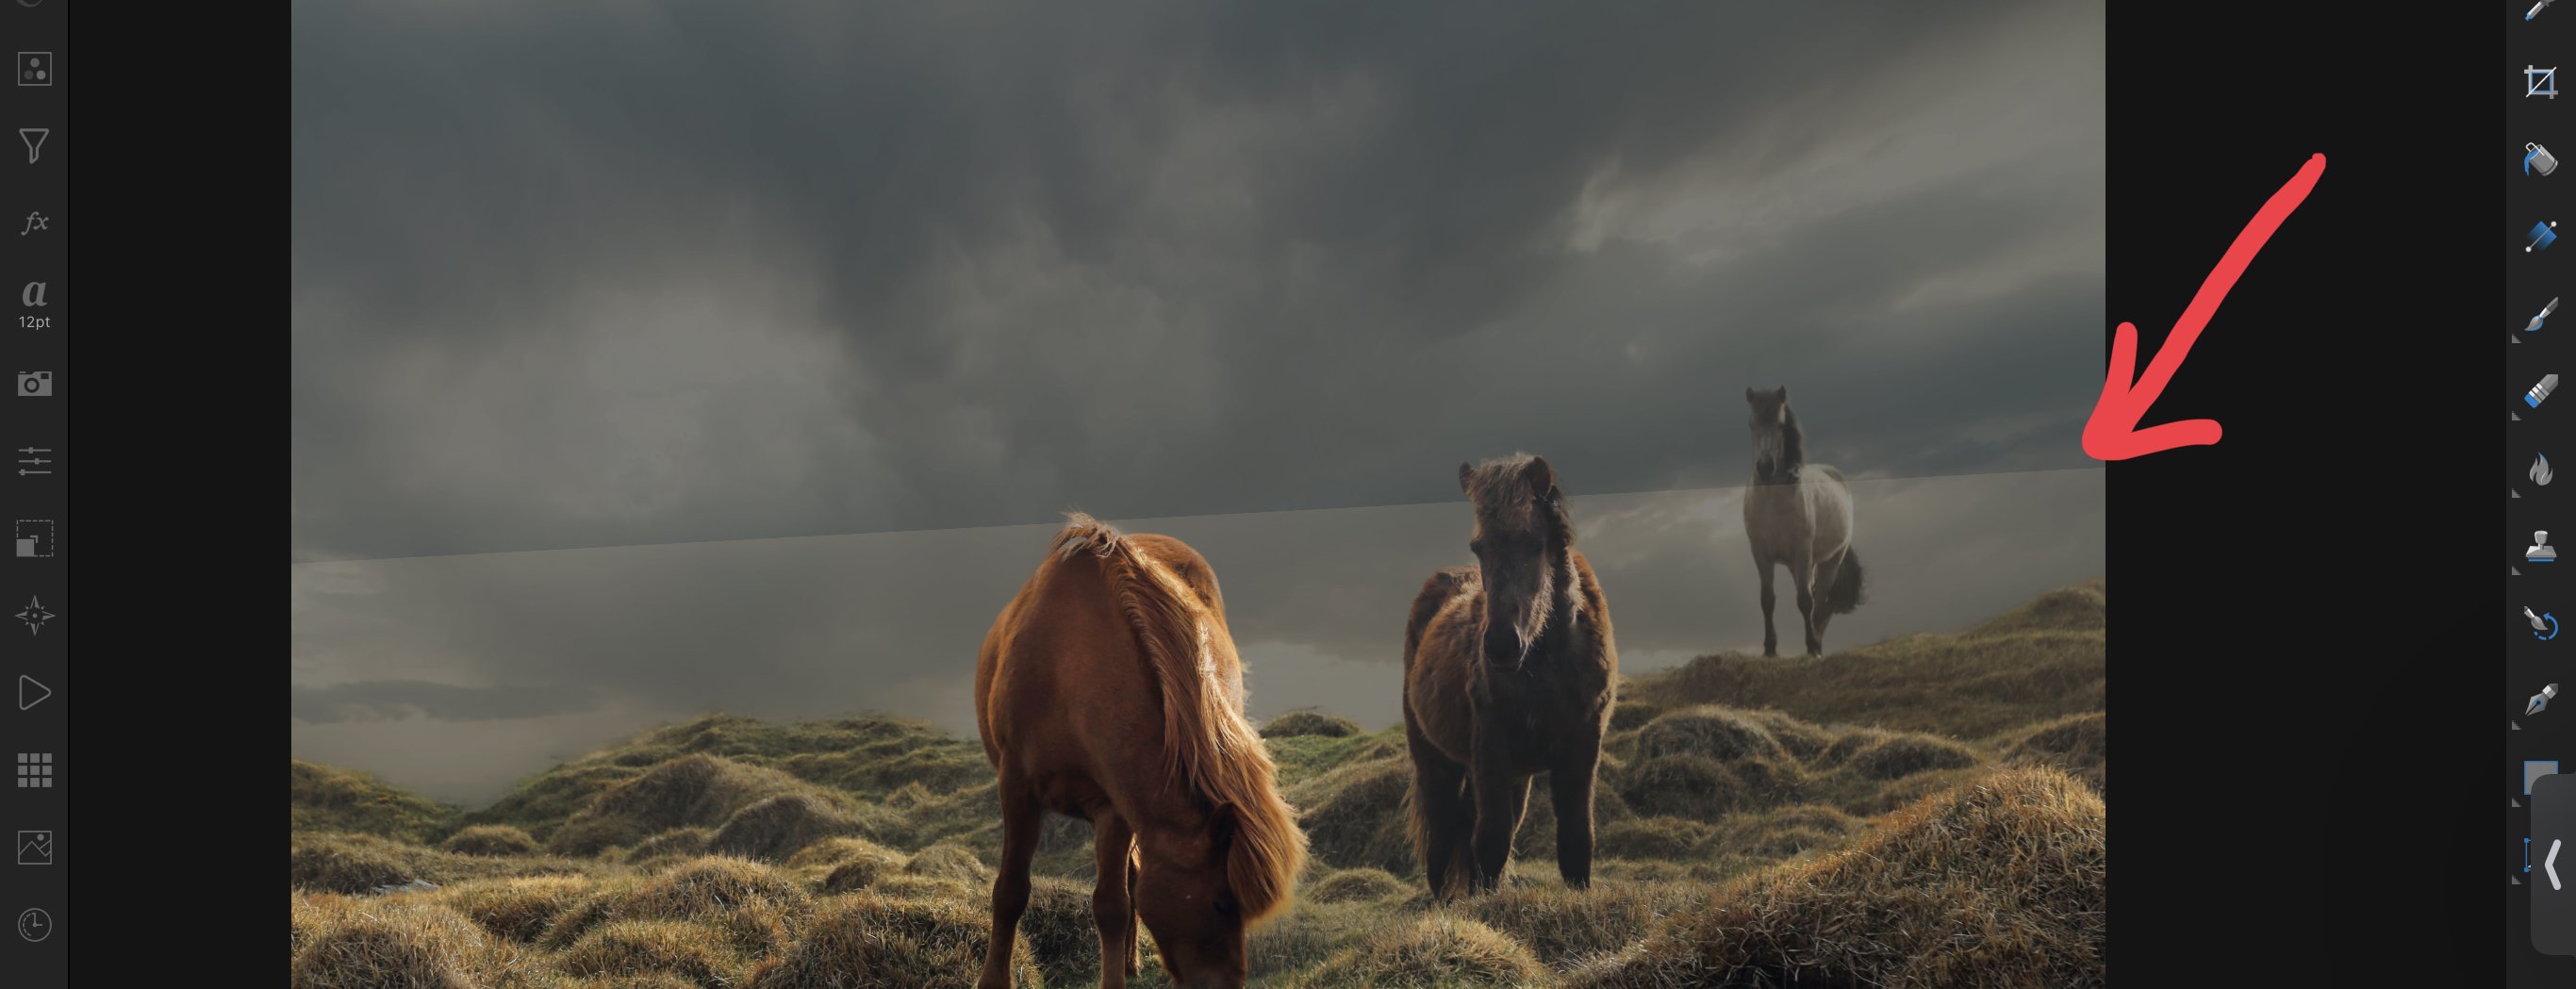
The guide refuses to turn off, once you activate it. I turned it off before exiting the project. Then when I launch project again, the guide is back on. This is occurring with multiple images that I used guide. This is truly annoying. If anyone knows a fix… i’ll take it! I hope devs are aware. All my software is up to date. I’m on iPad Pro 12.9 2020 model, rebooting iPad does not fix issue. IMG_0325.MOV