MikeFromMesa
-
Posts
1,194 -
Joined
-
Last visited
Everything posted by MikeFromMesa
-

Trying to record a macro
MikeFromMesa replied to MikeFromMesa's topic in [ARCHIVE] Photo beta on macOS threads
I am sorry that it took me this long to respond but I was out of town yesterday and did not have a chance to get back to you until this morning. I took your advice and re-selected each layer when recording the macro and that "sort of" worked. That is, I could record the macro fully and play it back, although it is not acting as I expected. All of this came from what I remember about how I was able to handle masks back when I was using Photoshop CS 5.1, so it was a long time ago, and perhaps I am not remembering correctly, but I thought I remembered that I could create 3 new layers, tie the highlights, midtowns and shadows masks to the appropriate layers and then make adjustments to only those selected areas by dragging an adjustment layer to the appropriate place. That is not working as I expected with APB, at least as far as I have tested. Nevertheless your idea of selecting a parent layer before selecting the child layer worked. Thank you. -
Trying to record a macro
MikeFromMesa replied to MikeFromMesa's topic in [ARCHIVE] Photo beta on macOS threads
No. The macro I was trying to create started with creating new layers (only 3) and labeling them, and that part of the process worked. The macro recording failed when I tried to attach masks to each of the layers. Essentially I could add one mask to one layer but when I tried to select the next layer to attach a mask to it APB raised a dialog box. Sometimes the dialog box had a valid selection I could make and some times the dialog box that was raised had no selection that could be made (that is, all of the radio buttons were disabled). In those rare cases when I was able to work through each dialog box and select a layer and then add a mask, when I played the macro back I got something completely different from what I expected, but in general the process did not work. -
Trying to record a macro
MikeFromMesa replied to MikeFromMesa's topic in [ARCHIVE] Photo beta on macOS threads
Thank you. Now I can stop worrying about it. -
Trying to record a macro
MikeFromMesa replied to MikeFromMesa's topic in [ARCHIVE] Photo beta on macOS threads
Sure, but just because we, between ourselves, decided this was a bug does not mean that the developers agree. Normally I wait for a moderator to say that it is a bug before I am sure it will be brought to the attention of the developers. If I see something from a moderator saying that some lack of functionality is a bug I let things go. Otherwise I wonder if I should formally enter a bug report. -
Trying to record a macro
MikeFromMesa replied to MikeFromMesa's topic in [ARCHIVE] Photo beta on macOS threads
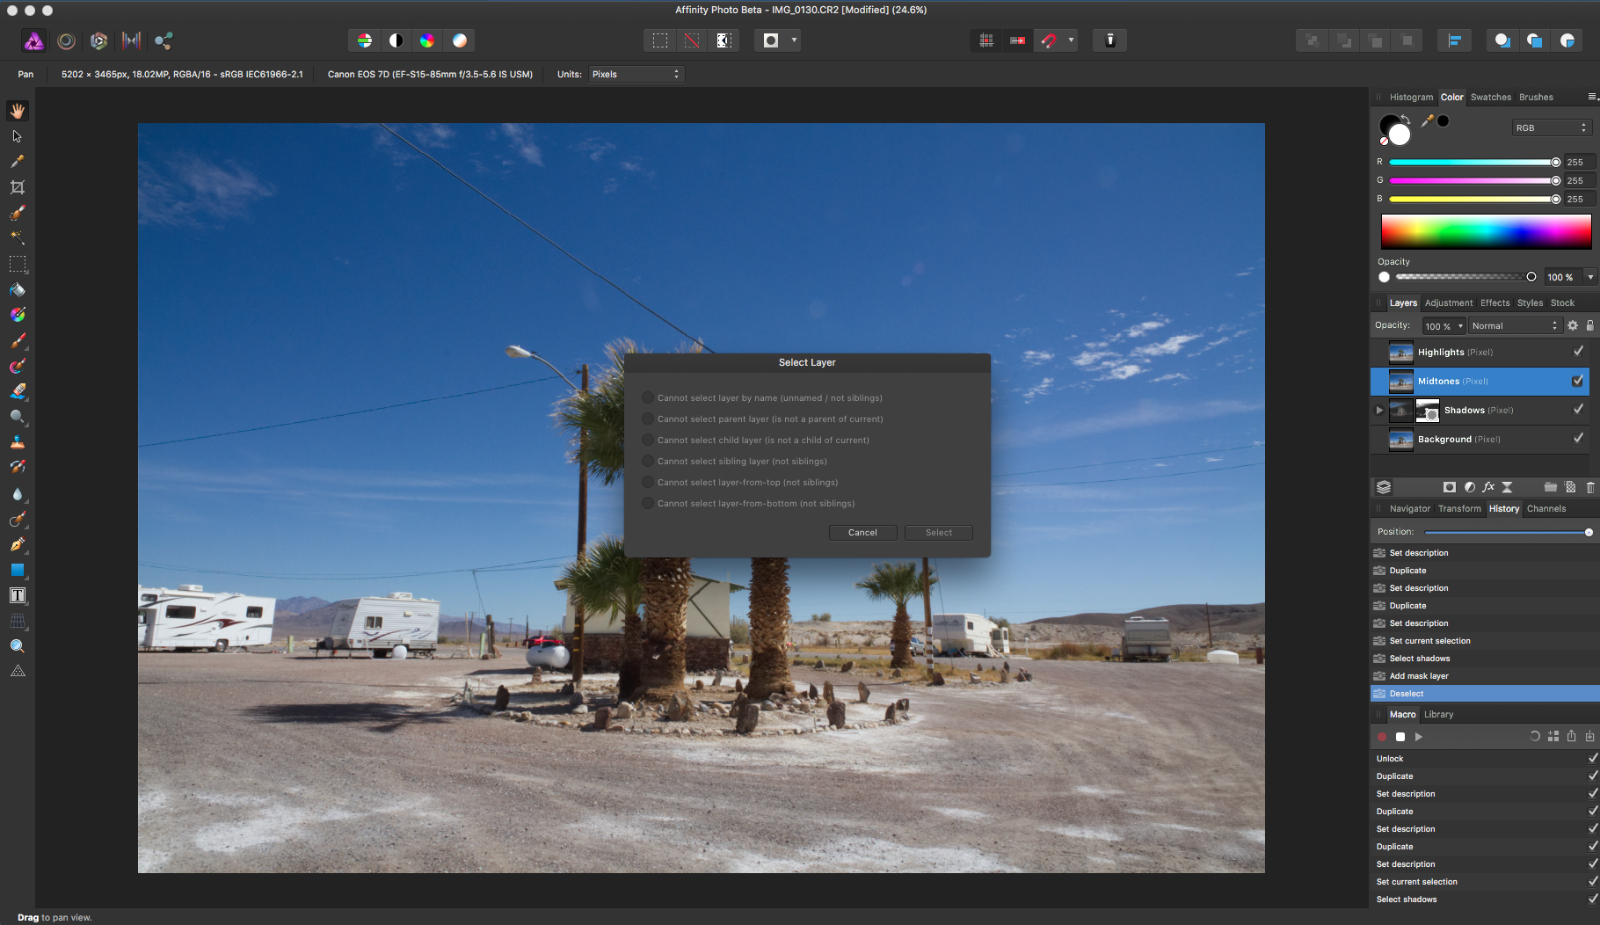
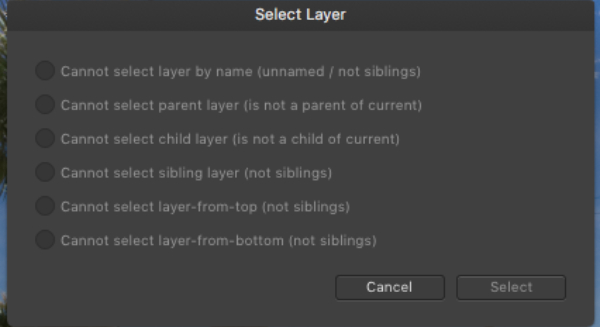
Here is a screen shot of the latest attempt. Notice that there are no enabled selections on the dialog box that I can choose. I am basically stuck at this point trying to record the macro. I can add one mask, but not a second one.
-
Trying to record a macro
MikeFromMesa replied to MikeFromMesa's topic in [ARCHIVE] Photo beta on macOS threads
No. It still does not work. In this case I created all 3 new layers and labeled each one appropriately. I then selected the Shadows layer (responded to the dialog box), created the selection and created the mask. So far, so good. I next selected the Midtones layer and got a dialog box with no enabled selection. That is, I could not respond in any way to the dialog box. In this case all of the layers were labeled differently, but it sill could not select the layer I wanted. If I can not use the Macro functionality to create something this simple (3 new layers, each with a mask attached) I believe there must be a bug in the Macro/Record functionality. Given that MEB has been on this thread I do not know if I need to file a bug report or not. -
Trying to record a macro
MikeFromMesa replied to MikeFromMesa's topic in [ARCHIVE] Photo beta on macOS threads
Perhaps, but my issue is that I expect the system to respond the same way when I am recording a macro as when I am not recording a macro, and that is not happening here. In the past when I have responded to that selection dialog box to continue recording the macro, the macro I got in the end did not even come close to repeating what I was doing when I was recording it. And, as I mentioned, sometimes the dialog box did not present me with an option that was usable. In this particular case I stopped recording when I got this new dialog box, but I will go back and try again, if only to see if I can actually record a usable macro doing this. -
Trying to record a macro
MikeFromMesa replied to MikeFromMesa's topic in [ARCHIVE] Photo beta on macOS threads
Thanks for trying. I do think there is some bug here as I am sure I should be able to select one of the layers. You can see from the post above that I could not even select a layer if it was not the first without getting a dialog box, regardless of masks or not. -
Trying to record a macro
MikeFromMesa replied to MikeFromMesa's topic in [ARCHIVE] Photo beta on macOS threads
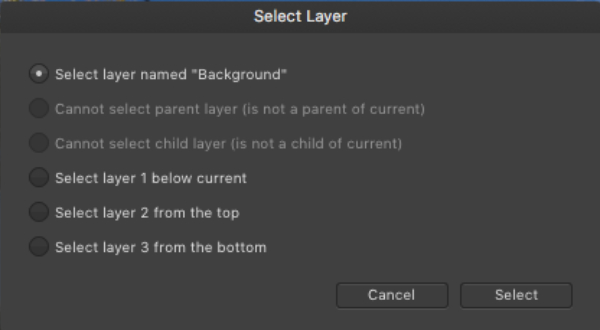
MEB: No. It seems more widespread than that. I tried the following while recording the macro: 1) Unlock the Background layer, 2) Duplicate the Background layer and rename the new layer Shadows, 3) Repeat, but this time use Midtones, 4) Repeat, but this time use Highlights I was OK up to this point and thought I would try to add the masks from the bottom up rather than from the top down. I tried to select the 3 layer (Shadows) and got the same message dialog box, but this time there were no masks attached yet. I could not even select the lower layer. I did get a dialog box with the radio button marked Shadows both enabled and selected, but I got the dialog box when I do not see why I should have gotten it. -
Trying to record a macro
MikeFromMesa replied to MikeFromMesa's topic in [ARCHIVE] Photo beta on macOS threads
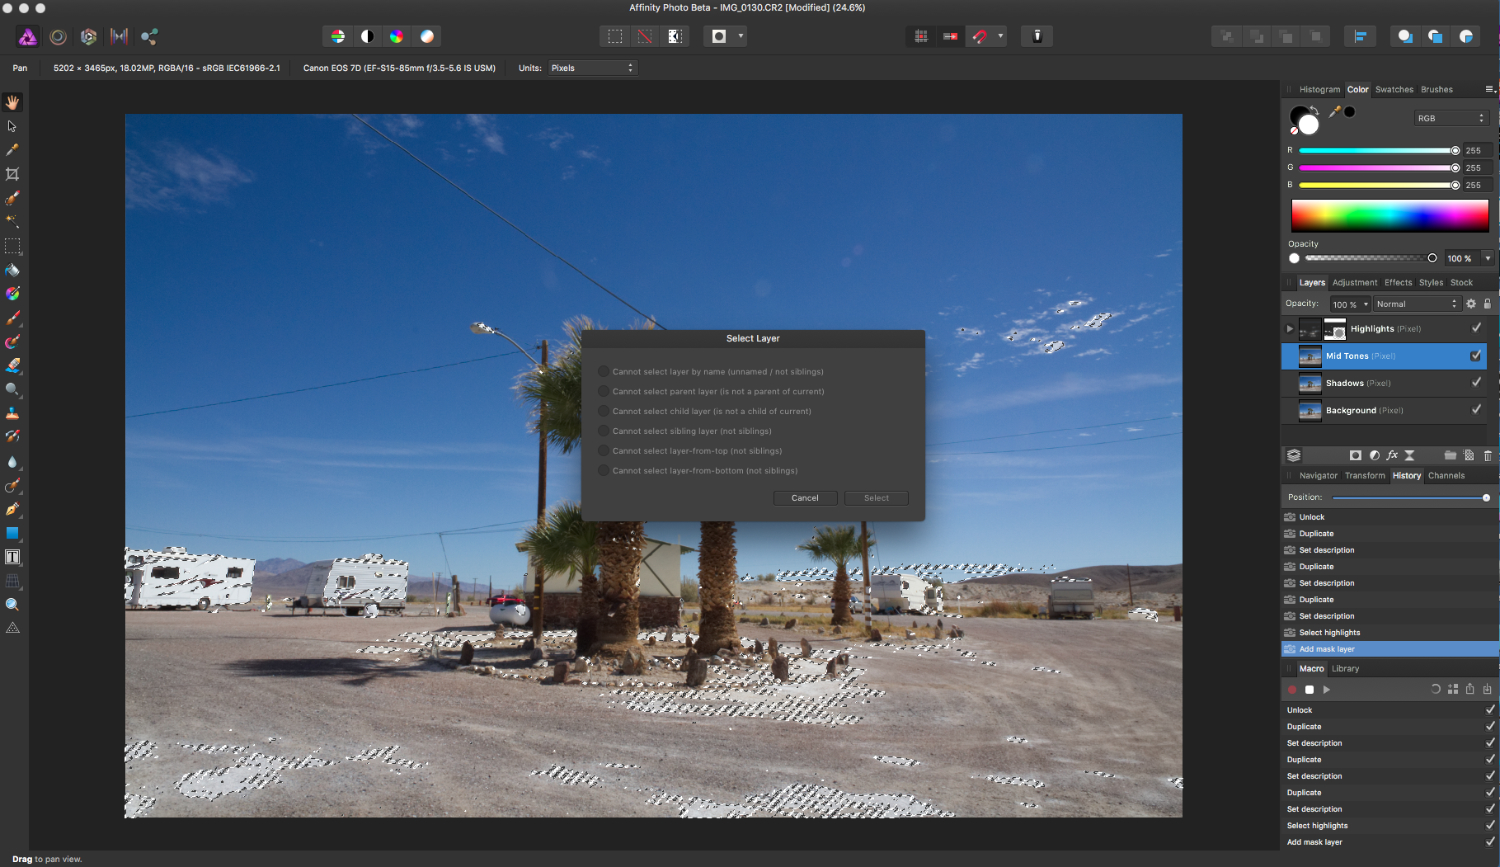
smadell: Your answer made so much sense that I wondered why I did not see that for myself when I was recording and, without any hesitation, I began recording again, this time renaming each layer as it was created. I got all 4 layers (1 Highlights, 1 Mid Tones, 1 Shadows and 1 Background) and began attaching the selections. Then I ran into this: with this dialog box which has no enabled selection for me to make: In this case I got only the first selection mask attached to the first layer but ran into the same issue when I tried to select the second layer. As you can see in the screen shot all of the layers are named differently and I still ran into this problem, although this time there are no enabled responses in the dialog box. So I am still doing something wrong but I have no idea what.
-
I found that it was easy to adjust highlights, md tones and shadows separately by creating multiple layers and adding the appropriate mask three of those layers. I have done this successfully manually and decided to record a macro to take care of the tedious work of creating, labeling and setting the masks for each of the 3 layers. However, during the process of recording the macro and when I tried to select the second layer, this happened: Here is a closeup of the dialog box: This never showed up when I did this work manually but shows up for every layer after the first when I am recoding a macro. In addition sometimes the dialog box does not even allow me to select any layer as no choices are enabled. Why am I seeing this when recording a macro but not when doing this manually? And is there any way for me to proceed and still have the macro work? I have tried responding to the dialog box during the macro recording but when the macro is played back with a new image it does not work as expected. What am I doing wrong?
-
Unsupported bit depth?
MikeFromMesa replied to MikeFromMesa's topic in [ARCHIVE] Photo beta on macOS threads
OK. Got it. There is a dialog box under Document -> Color Format that allows the user to set the bit depth to 16 bits. I had not seen that so I did not know there was a way to produce psd files that could be used by other apps. Problem solved. -
Thanks. The basic numeric values of 1 and 65535 are not really helpful. It would be much better if they displayed the actual color space values of sRGB, Adobe RGB and so on.
-
Unsupported bit depth?
MikeFromMesa replied to MikeFromMesa's topic in [ARCHIVE] Photo beta on macOS threads
If APB is saving the psd as a 32 bit file, then APB ought to allow for the selection of 16 bits when exporting a psd so the file can actually be used somewhere else. It does not, or at least it does not in any dialog box that I found when exporting it. To be able to actually use this psd file in another editor I had to load it up into the only editor that I had that would load it (PhotoLine), save it as a tiff, reload the tiff and save it as a psd. That seems like a bit too much trouble just to generate a psd from an HDR merge. -
I used APB to create an HDR from 5 raw images and saved 2 versions of the resulting image, one without HDR adjustments and one with,as psd files to test and see how much extra dynamic range resulted from the merge. However when I tried to load these into some external (to APB) tools they would not load and I received the error message saying that the images had an unsupported bit depth and could not be loaded. These images failed to load into Lightroom, Elements 12 (yes, very old) and On1 RAW. Can anyone please explain to me why these psd files have an unsupported bit depth? I also created tiff equivalents and those loaded properly. Only the psd files were a problem. I can supply links to the files if anyone is interested. UPDATE: I have repeated this process with a second HDR image sequence and with each of the Preserve Accuracy, Preserve Editability and Final Cut settings on the psd dialog box. The same problem showed up with the new HDR sequence and with all three Perserve settings. I would have thought that Preserve Editability would have been more able to be loaded by other editors, but apparently not.
-
Sorry for the delay in responding but after this much time I had mostly stopped checking for a response. I recognize that this is not a serious issue and just assumed people were concentrating on items that had more of an impact on users. I have 3 main tools; two workflow tools (CaptureOne, Dxo Optics Pro) and a masking tool (On1). CaptureOne only has export options of sRGB and Adobe RGB so these files came from Optics Pro. I had created tiffs and jpgs using sRGB, Adobe RGB and ProPhoto and checked them with Canon's Digital Photo Professional. If correctly identified all 3 color spaces. I also checked the files with Phil Harvey's exifTool but that, along with Canon's editor, displayed the proper string values (sRGB, Adobe RGB and ProPhoto) and not the actual data in the file and I wondered exactly what the actual numeric data in the file was. Since the tools I had were not displaying the base data for the color space (other than APB) I thought I had no choice but to write up a quick exif reader to parse the files. That turned out to be a more interesting job than I had anticipated (much of the information easily found on Google was either unclear or out of date) but when I finished I found that the sRGB file contained the value 1 and the others contained the value 65535 so I assumed that the tools I had used that correctly identified the color spaces as sRGB, Adobe RGB and ProPhoto had to be using some other information than just the exif color space value and, as I understand your response, that is what you were also saying.
-
Bill, Of course what you posted is absolutely correct, but I had assumed when I read the post that the user wanted to send the original raw file to APB, not a created copy. If you do that (Open With) instead of Edit With you can not get the saved APB file back into C1 without separately importing it. That seems to be one of the issues with cataloging workflow software. LR has solved this problem by providing a round-trip mechanism but C1, to the best of my knowledge, has not, and that is one of the reasons I still keep software like Dxo's Optics Pro on my system as that does not rely on cataloging and I can return a new image to the software without worrying about importing it.
-
I have been doing some testing using different color spaces and, in connection with that, I created 6 images from my original raw image. The original image was taken in camera in sRGB but I used a workflow tool to create tiffs and jpgs, one each in sRGB, AdobeRGB and ProPhoto. I then verified that each tiff and jpg actually used the specified color space by checking them with Canon's Digital Photo Professional. I then loaded them into APB to check the exif values and found the following: Both sRGB images (tiff and jpg) showed an exif color space value of 1 Both of the AdobeRGB images (tiff and jpg) showed an exif color space value of 65535 Both of the ProPhoto images (tiff and jpg) showed an exif color space value of 65535 This leads me to a couple of questions. Why are the AdobeRGB exif values identical to the ProPhoto exif values when Canon's DPP shows them as different color spaces? And why are the displayed values numeric instead of representative of the proper color space? I can upload the actual images to dropbox if anyone is interested.
-
HISTOGRAM RESPONSE LAG
MikeFromMesa replied to A. J.'s topic in [ARCHIVE] Photo beta on macOS threads
Ha. That must be the equivalent of about 5 of my Minis! Yes. You would think there would not be a problem. I'll try to remember your issues the next time I tell myself I should have bought a Pro instead of the Mini. ;) -
HISTOGRAM RESPONSE LAG
MikeFromMesa replied to A. J.'s topic in [ARCHIVE] Photo beta on macOS threads
I have seen that as well, although it differs depending upon what Persona I am in. If I load a raw image and adjust it in Develop Persona the histogram movement is immediate and I see no delay, but when I move to the Photo Persona and adjust using the adjustment layers I see a noticeable delay between a layer adjustment and histogram movement. If I use the Auto Controls I see only a small time delay. I am using a Mini with an i7 chip and 16GB of RAM so I have always assumed the issue was the speed of my machine. -
APB plugin default folder
MikeFromMesa replied to MikeFromMesa's topic in [ARCHIVE] Photo beta on macOS threads
Yes. It was the On1 plugins that I was referring to. I am curious as to why they are not even detected, and they are not the only ones. The PhotoMatix plugin is also not recognized and, I believe, others although I am not at home and cannot check my main computer. I did not expect them to work but I did expect them to be detected. -
APB plugin default folder
MikeFromMesa replied to MikeFromMesa's topic in [ARCHIVE] Photo beta on macOS threads
I was referring to other plugins, not the Nik ones. While I did not expect them to work I did think that putting them in the default plugin folder would at least list them as plugins. I placed the OnOne plugins (Develop, Effects, Resize) in the plugin folder but they never appeared in the Filters plugin list so I began to wonder what criteria a plugin must meet to even be recognized, even if it does not work. There are other plugins I have tried that have not shown up in the list as well, but these are the ones I tried after updating APB. -
I do see what you mean in this photo, although I am not sure I would have noticed if you had not said something to begin with. I would try 2 things. First, the selection around the shoes seems a bit rough - perhaps you could try to smooth that out. Second, I would try to add a shadow to make the images seem rooted in the photo. As it is, with no shadow, even a small one, it might seem to some as though the people were not part of the original image. You could even add a small shadow at their feet since the direction of the sun is not clear, and that would help to disguise the rough selection around the shoes. Even a small pool of a shadow would help, I think. Just some ideas.
-
Yes. Attaching the photo would help a lot.
-
I have seen that as well, but sometimes I think it is really because I know that I moved the person and that he or she was not really in the photo before. It is more my knowledge that is at fault rather than anything having to do with the placement. Of course it can also be because the size of the person moved doesn't match the surroundings or the light is not right or there is a problem with the shadow or a dozen other things but you might want to consider that the composite really is OK and it is only your knowledge of the move that is causing your concern.