

nitro912gr
-
Posts
350 -
Joined
-
Last visited
Posts posted by nitro912gr
-
-
Hello I'm a bit confused here and that's probably a bug.
I use Affinity Designer 2.6.3 and MacOS 15 latest version. I use the transform panel a lot to change size of artboards and objects to my desires, most of the time when I pick the W size then press tab and it moves to H size so I can quickly set the desired sizing in both directions.
In windows where I also use designer and this function, hitting the tab key ALWAYS moves me to H size, but in mac sometimes it go and get me into the Y position box, it is happening so randomly that it just happened now, came here to report this and now that I try again, it goes as it should to the H size box. (but have already happened a lot to be 100% sure that its not me hallucinating).
So I just report it here, just in case I do something wrong or I don't know, hit another key before tab quickly and don't realize it that make this behavior possible?
-
On 4/15/2025 at 6:05 AM, ThunderbirdOne said:
If you copy an item on an artboard, then (using the artboard tool) select your destination artboard. You can then press Cmd/Ctrl + V to paste the item in the same location on the artboard.
this is not answering the question, the problem is to massively paste on each board you have or the selected ones.
-
I just wanted to add a bit more in the topic, if I go to the resources manager and press open in explorer/finder it opens the right folder pointing at the right file...
weird, as it still doesn't properly load the image if I don't relink.
-
1 hour ago, walt.farrell said:
There is specific support to handle this for iCloud which is applied automatically, and specific support for Dropbox which is applied optionally (Linked Services in the application Settings), but no support for other cloud services.
For a non-cloud setup, it is rumored that it can work if you have an Affinity file in a directory X, and a folder Y containing linked files, and Y is also in X. In that case, if you move both the Affinity file and folder Y to another directory Z it may work. (I have had success in the past, some other users not, and I haven't tried it recently.) But I don't know if it will work in a cloud context. But note that it may require that specific setup: file in a directory, and a sub-directory of linked resources in that same directory.
I don't know if that's the structure you have, or not.
most of the time I have them in the same folder as there are like 10 files so there is no need to use folders.
I will try to do that however, if it works it worth the extra step because the more we roll into summer the more I need to work extra hours from home.
Thank you both for the answers
-
30 minutes ago, GarryP said:
A pixelated image (unless you have made it so) usually tells you that the image is a linked resource which cannot be found.
Linked resources are linked to the physical storage location where the resource can be found.
If you try to open the document on a different machine you will have missing resources if the resources cannot be found, e.g. if they are not on the machine you are using and/or they are not in the same location relative to the document location.
So you mean affinity is not looking for the resources in the folder of the affinity file? Because the folder path sure is different because onedrive is installed elsewhere in each machine.
-
Hello I have this happening to me and I can't figure out what's wrong, the resourece manager show everything is fine and the files linked and yet when I open a file I worked at home on my windows system, with my mac mini the imported pictures are pixelated and need to be relinked.
Is there something I miss here?
-
oh and I was wondering why snapping was closing itself

ok so I removed A from the default shortcut and used it for artboards, and since it is a common key on both english and greek it works, now I'm gonna need to change in my windows machines and get used to it, but it works and since there is nothing else to do I have to live with it.
Thank you for your input!
-
ok it works it stayed where I left it now and it doesn't affect me greatly in my workflow. But for whatever the reason designer show notifications like missing fonts behind those tool bars, I think the notifications are part of the main window and the toolbars are acting like a different "on top" window outside of the main designer window.
Anyway just reporting in case anyone stab on this thread while looking for something like this on google.
Thank you all for your help
-
Sorry guys I'm gonna make a ton of new threads as I discover the quirks and differences on designer for mac 😅
So I assign a key shortcut for let's say artboards at Q. On windows designer or the system, didn't cared if I had english or greek keyboard selected when I pressed Q to select the artboard tool. But in Mac it cares and doesn't select the tool if I have the Greek keyboard that in Q it have the ;
So is there a way to assign both Q and ; as a shortcut?
Thanks and please bear with me as I rediscover designer 😅
-
Thanks I already installed those, they just add a bunch of things in the basic system dialog. It works for basic prints but for the more advanced ones I fire up the windows system. Better than the bareback settings but still lacking.
That is not adding their own printing dialog (like the PS driver on windows, I keep both because PS is even more customizable on color management). I wonder if KM is to be blamed here but that's a 4K printer not some home low end machine.
I wonder if they will have the dialog on the mac for their production machines. Those only have PS drivers for windows too but they have this super advanced print dialog box. I will find out next month I guess.
-
13 hours ago, R C-R said:
Affinity on Macs use the print interface built into the OS, so what you see varies depending on the print drivers & their support files that have been installed, which in turn varies depending on the make & model of your printer(s).
Because of this, it is best to consult the printer's manual or user guide to see what it says about printing with a Mac. There may or may not be any options comparable to what the Windows dialog offers.
unfortunately printing on mac seems to be pretty basic, my KM c258 doesn't even provide a PCL driver for it neither their advanced control panel for print configuration.

it too, like affinity depends on system dialog box that is extremely limited.
all in all looks like a printshop just can't have just macs around to get things done.
-
38 minutes ago, thomaso said:
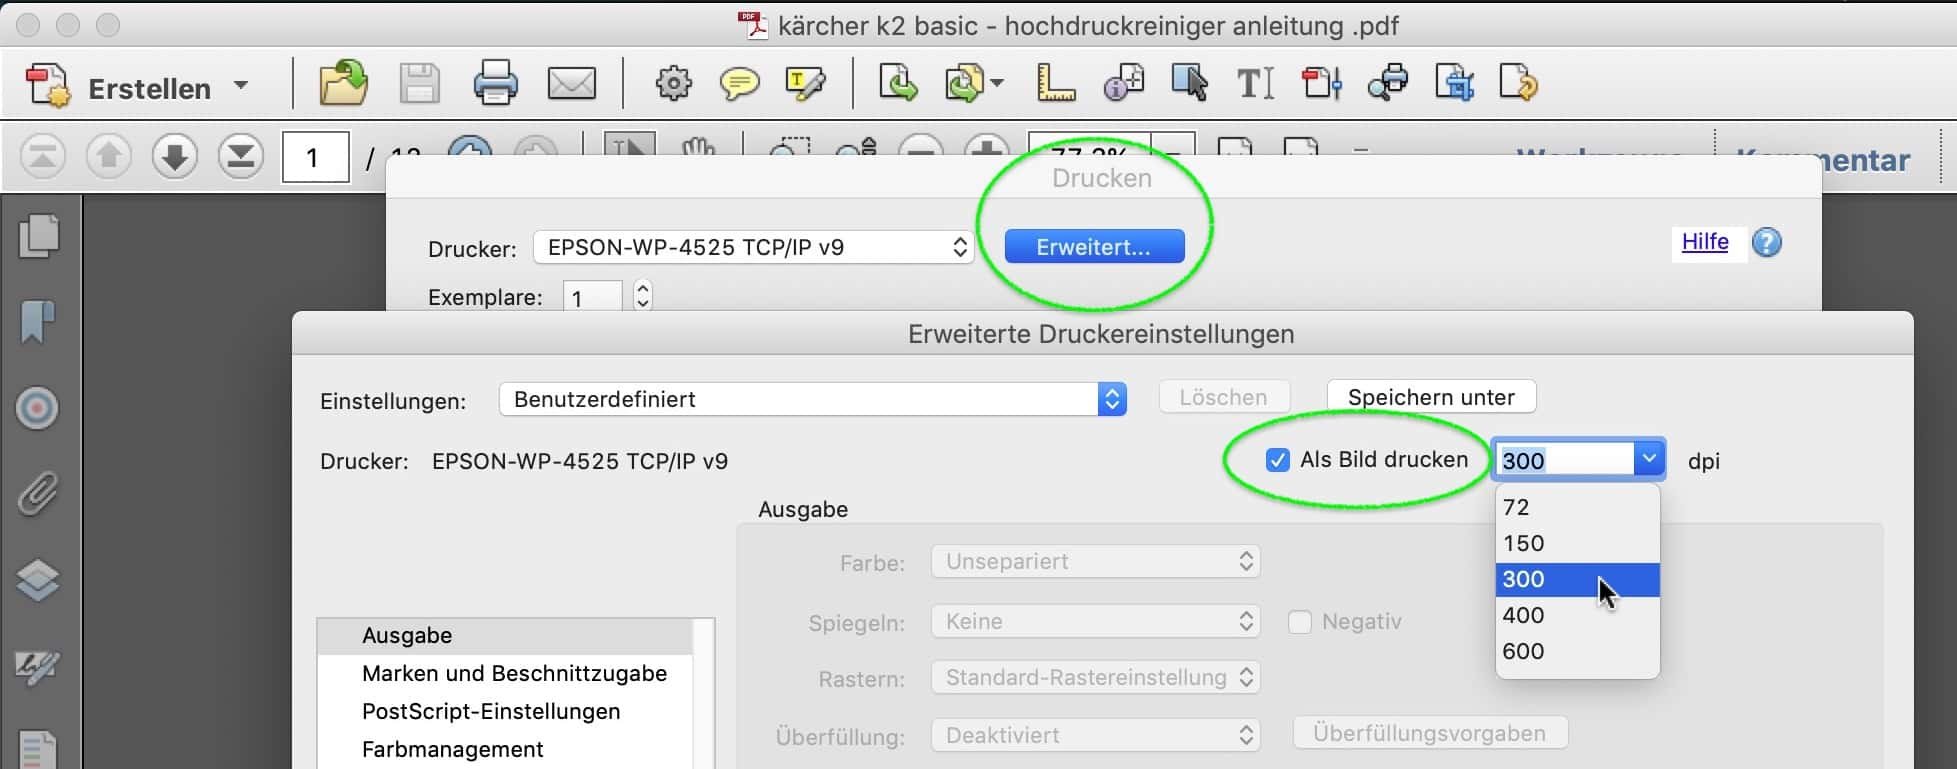
Possibly this is another inconsistency in the Affinity options between mac and Windows. I haven't seen this option in the Affinity print dialog and only know it from Acrobat, where it's called "Print as Image" and hidden in the "Advanced" print options.
Furthermore In my experience the available print options in macOS depend on the way how the virtual printer is setup. For instance if setup via Bonjour/Airprint (the default in my macOS) the print dialog doesn't show printer specific options (e.g. colour management, quality, et al.) which only appear if I setup the printer via TCP/IP. Apparently the difference is related to different drivers while Apple's Airprint was announced to use a "driverless" method.
thank you for your reply, I don't use acrobat in mac to check out but so far I remember it is the same between versions, I know the function from the windows version.
Weird to find so many inconsistencies tho, I was expecting things to be lost from mac to pc not the other way around, since affinity started on mac.
So the problem remains then because I open PDFs with preview which have the same dialog box for printing and no flatten option

I guess another thing to do through VM.
-
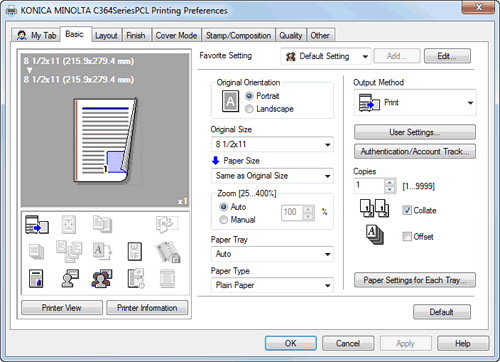
Hello on windows when I send a print from Designer there is an option to send it rasterized which help to avoid artifacts from transparencies or bad fonts.
The print dialog box is completely different in MacOS and I just can't find this option anymore, any help?
Thank you!
-
On 4/29/2025 at 8:45 PM, R C-R said:
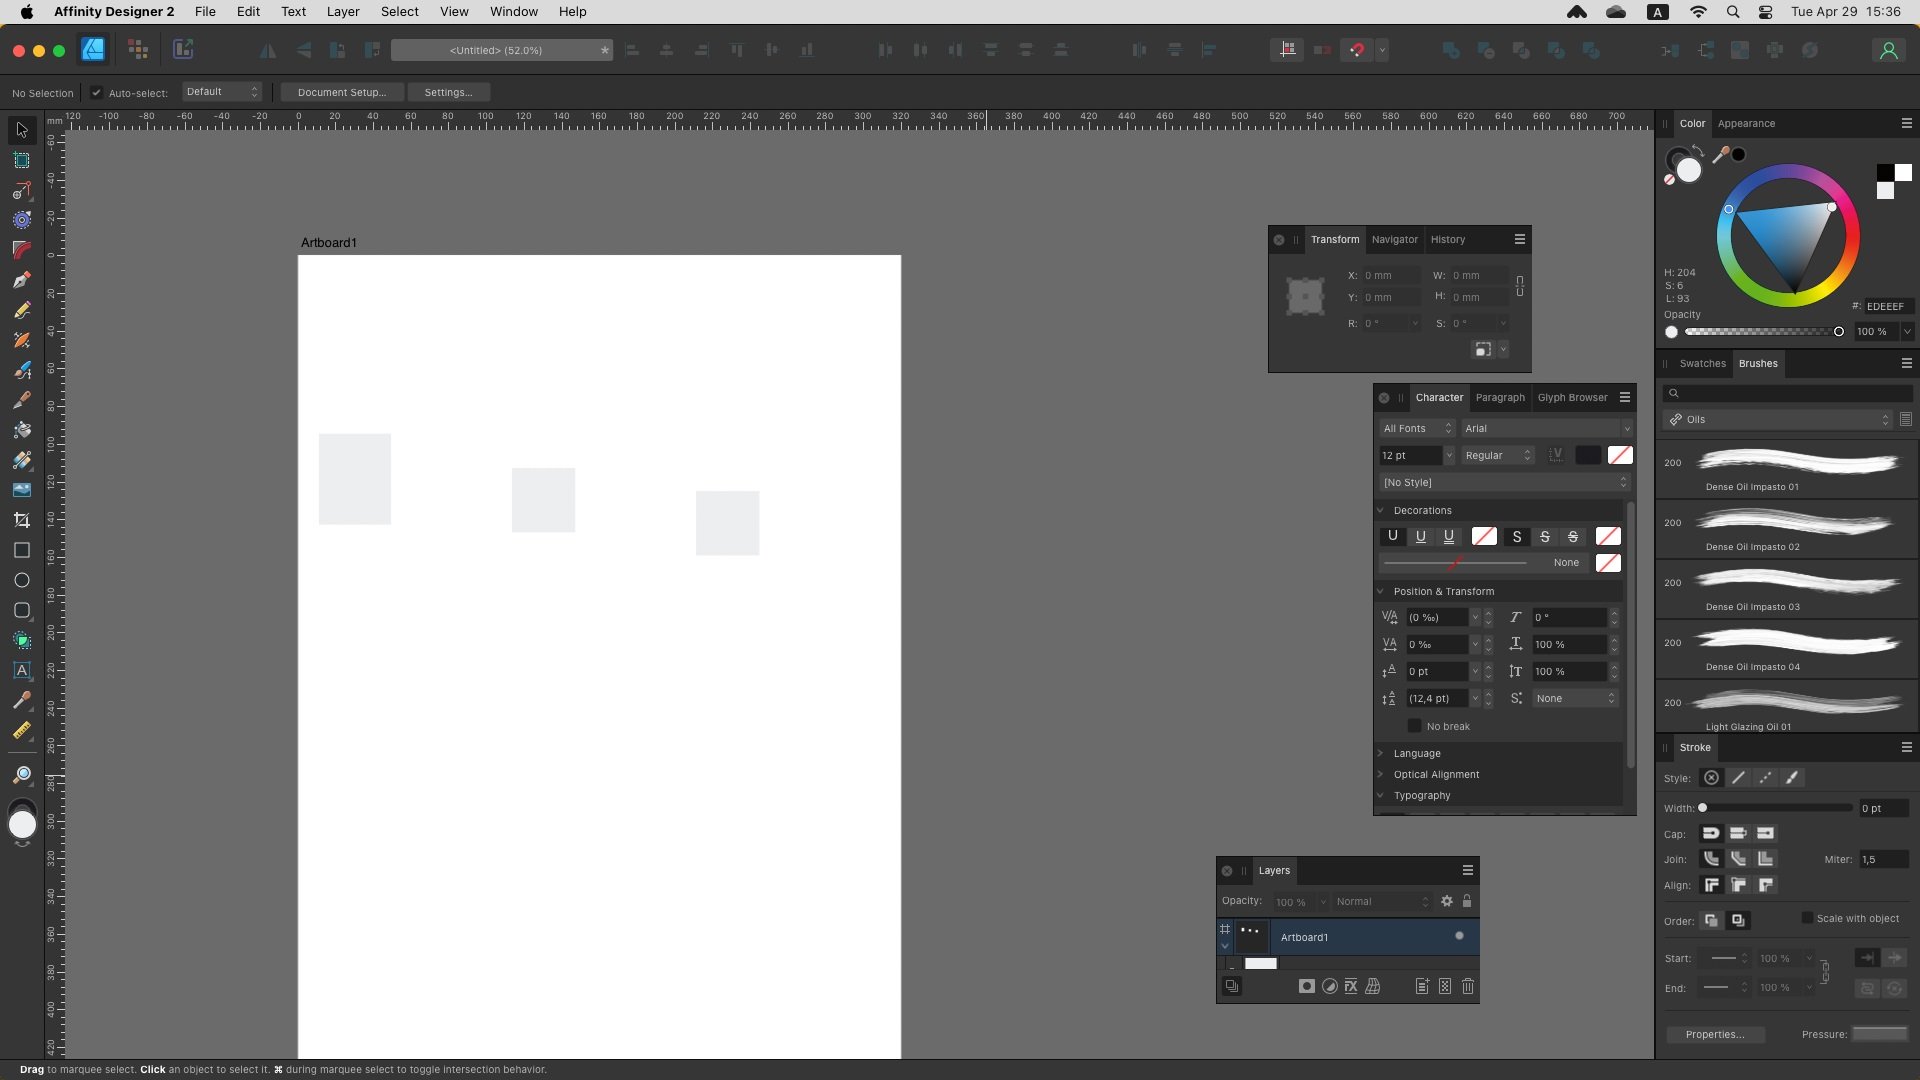
What I do is to float some panel groups on the right side & reduce the width of the document window to make room for them without covering any of the docked right side panels or the document window. so for instance, in AD's Designer persona I float the Brushes & Layers panels next to each other to the right of the document window. I have both set to the nearly full height of the screen, which for my workflows is ideal.
I also have several Studio panel presets with different layouts.
So at first tried the other side panel and then just added them floating and worked like this for the rest of the day. But today that I opepend again the panels where closes, trying to open them again showed them returned to the left side panel.
Weird I will save a preset to see where this is going.
-
I may try this as well, it is not a big deal get them on the left panel but I still work on another windows machines so I want consistency on my arrangement.
-
-
hello I'm moving my design work on mac lately and I try to set my tools and UI the same as I did had it in windows. The problem is, I can't snap the second column of tools I use next to the right column or with each other at all.
Do I miss something?
-
7 minutes ago, MEB said:
Hi @nitro912gr,
Only the two first brushes in the Pens category (Solid Pen with Pressure and Solid Pen with Pressure & Opacity) in Designer can be expanded to paths because they don't use any bitmap texture. All the other brushes can't be expanded to paths/vectors as they rely on bitmap/raster textures for rendering.ah shame I guess I will import from elsewhere to get the effect I need.
I hope designer get's image trace in the future so we can rasterize and trace as a workaround, if not full vector brushes.
Thanks for your respond.
-
So eh I don't understand, is there a way for the brush to turn to a vector object or not?
I have circle with a brush and I want it to turn to vector so I can send it for printing but it doesn't work for me either.
-
just wanted to add my frustration on this one too because I just lost work because undo or moving back in history does not restore the lost content...
for whatever the reason some of the objects, either texts or curves, are lost for good once I selected all the objects and groups and then to make curves.
I have to ungroup everything for it to work.
-
Yeah tested too on my laptop with Vega 6 and only the CPU bother doing anything
I think we need a general roadmap about implementing the ML tools and what they require. I mean, I don't want to go buy a 6GB GPU only to find out down the road that 8GB is the minimum VRAM the later tools will need.
-
Oh finally! Thank you for this update.
But I can't seem to be able to pinpoint specific system requirements for using the ML tools on photo. It just says Windows 10-11 for example.
Will I have trouble with me ancient Radeon 7790 (GPU acceleration enabled, as it is the only of the 7XXX that can use it).
Will I need a new GPU with more VRAM to make good use of them? I was planing to upgrade but if I can make my purchase more targeted it will be great.
-
OK so this is the biggest block in my move from indesign to publisher so far. I have read around the net other topics, I have seen many similar things between the programs, but I just can't do the same operation that I need.
I make tickets to order and in a page of SRA3 I can fit like 18 of them. Each one of them need to be numbered for the raffle of the event.
Each of the tickets on the page need to have the numbering 2 times, as it will be cut to give one to the buyer and to keep the other part for the raffle draw.
Like this picture
So in indesign as seen above and the video below step by step, I make a text box (step 1) with numbering enabled, press enter once to get the numbering without other text in the box (step 2), then I go to bullets and numbering options (step 3-4) and there I pick to make a new list (step 5). I select to start at number 1 (step 6), then change the option to continue from preview number and hit OK (step 7). The number in the text box changes to what I entered in step 6.
Then I make a new box (or copy the same one, it doesn't matter) and go again in bullets and numbering options to make a new list, start at the same number and do again the above things.
This have made the 001 and the 001 above, I go on with making new lists and so on till I'm done.
Then I go and add 9 more pages in the document (step 😎. Apply the master and then select them all and check override all master page items and this make each page to get the next number in the list according to their order. So page 2 will have 002 and 002 and 012 and 012 and so on.
Like this:
Now to publisher
I make the same text box, get it numbered list, name that list to create it. I make 2 lists for 001s, then 2 lists 011s and so on.
Question one, how do I make the above operation of selecting to start at 1 and then change it to continue from the preview number? I think this is a critical spot where I actually pick the number to start but also tell the program to continue from the last number too. I can't understand how to do it in publisher.
Next, so I add the pages, apply the master, how I do that override all master page items so I can get the numbers change accordingly?
Any idea how it can be done?
Thanks!
-
On 12/21/2024 at 1:14 AM, R C-R said:
What font manager do you use?
sorry didn't see that at all, Nexusfont manager
34 minutes ago, DWright said:The active fonts are loaded when the app starts so if you change the status of any fonts while the app is open this will not update the font list until the app is restarted and the active fonts are reloaded.
it was updating without restarting the app since v1 and till recently tho. And the second font menu is still updating.
it not a big deal really but it was nice to have 2-3 sub categories of fonts to load on the fly.

.png.6b04fd9bf88132be99a6c4fb1250bfda.png)

inconsistent Tab key reaction on transform panel (Mac OS)
in Desktop Questions (macOS and Windows)
Posted
oh yes failed to report that this is indeed an undocked panel as the mac version don't provide the functionality to dock 2 rows of panels, so I left some in midair.