wolfnowl
-
Posts
21 -
Joined
-
Last visited
Recent Profile Visitors
1,661 profile views
-
Hi Garry: Thank you for your prompt response. I've played with this a bit more and have some further information for you. I solved my problem and it has nothing to do with AP. 1) I was curious, so I took one of my Sony A7RIII raw files and opened it in AP. I selected the crop tool, set it to unconstrained and typed in 7680x2160 pixels, then exported that as a .jpg file. I opened the jpg, set the crop tool to custom ratio, 16x9 and AP provided a 3840x2160 crop frame, just as you'd expect. 2) I unplugged the second monitor and did a screen capture from my laptop screen only, then in AP went to New from Clipboard. I went to Document/ Resize Document and AP told me that the document is 3840x2160 pixels - appropriate since that's the resolution of the monitor. 3) After plugging the second monitor back in I created a second screen shot, opened it in AP (New from Clipboard) and again went to Document/Resize Document. This time AP told me the image was 7680x2168 pixels. I missed that yesterday. With that, it's not surprising that AP would create a 3856x2168 pixel, 16x9 crop. But where did those other 8 pixels come from? In looking closely at the screen shot of the two screens, I noticed there was a very thin - 4 pixels, actually - white (blank) space at the top of the left monitor and at the bottom of the right monitor. As you know (with Windows, anyway) it's possible to go to the Display settings and offset the horizontal and vertical alignment of your monitors. For some reason the two monitors had gotten shifted out of vertical alignment - by 8 pixels. I moved the one monitor in the Display settings until they snapped back into alignment again, saved that at did another screen shot. This one is exactly 7680x2160 pixels. No idea how they got shifted like that...never seen that one before. But at least we know it's not a bug. Thanks again for your time. Mike.
-
Hi There: I have Affinity Photo 2.42 running under Windows 10 Pro, 22H@, OS Build 19045.4355. I also have a two-4K monitor setup. If I do a screen capture and do an 'Open from Clipboard' in AP, I get an image that is 7680x2160 pixels. This is expected. However, if I want to select one screen I choose crop, custom aspect ratio, 16x9, and I get: 3854x2168 pixels. That's not what I want. If I reset, go to crop, custom aspect ratio and type in 3840x2160, I get: 3854x2168 pixels. With snapping turned on, if I try to drag one of the corner handles, as soon as I get beyond about 3829 pixels it snaps automatically to 3854 pixels. There doesn't appear to be any way around it. This is obviously a bug...wasn't sure where to report it. If there's a way to fix this please let me know. Mike.

-
Thanks much for your reply! Spread origin settings was my first thought, but when that didn't work I wasn't sure where to go. Stay safe. Be well. Mike.
-
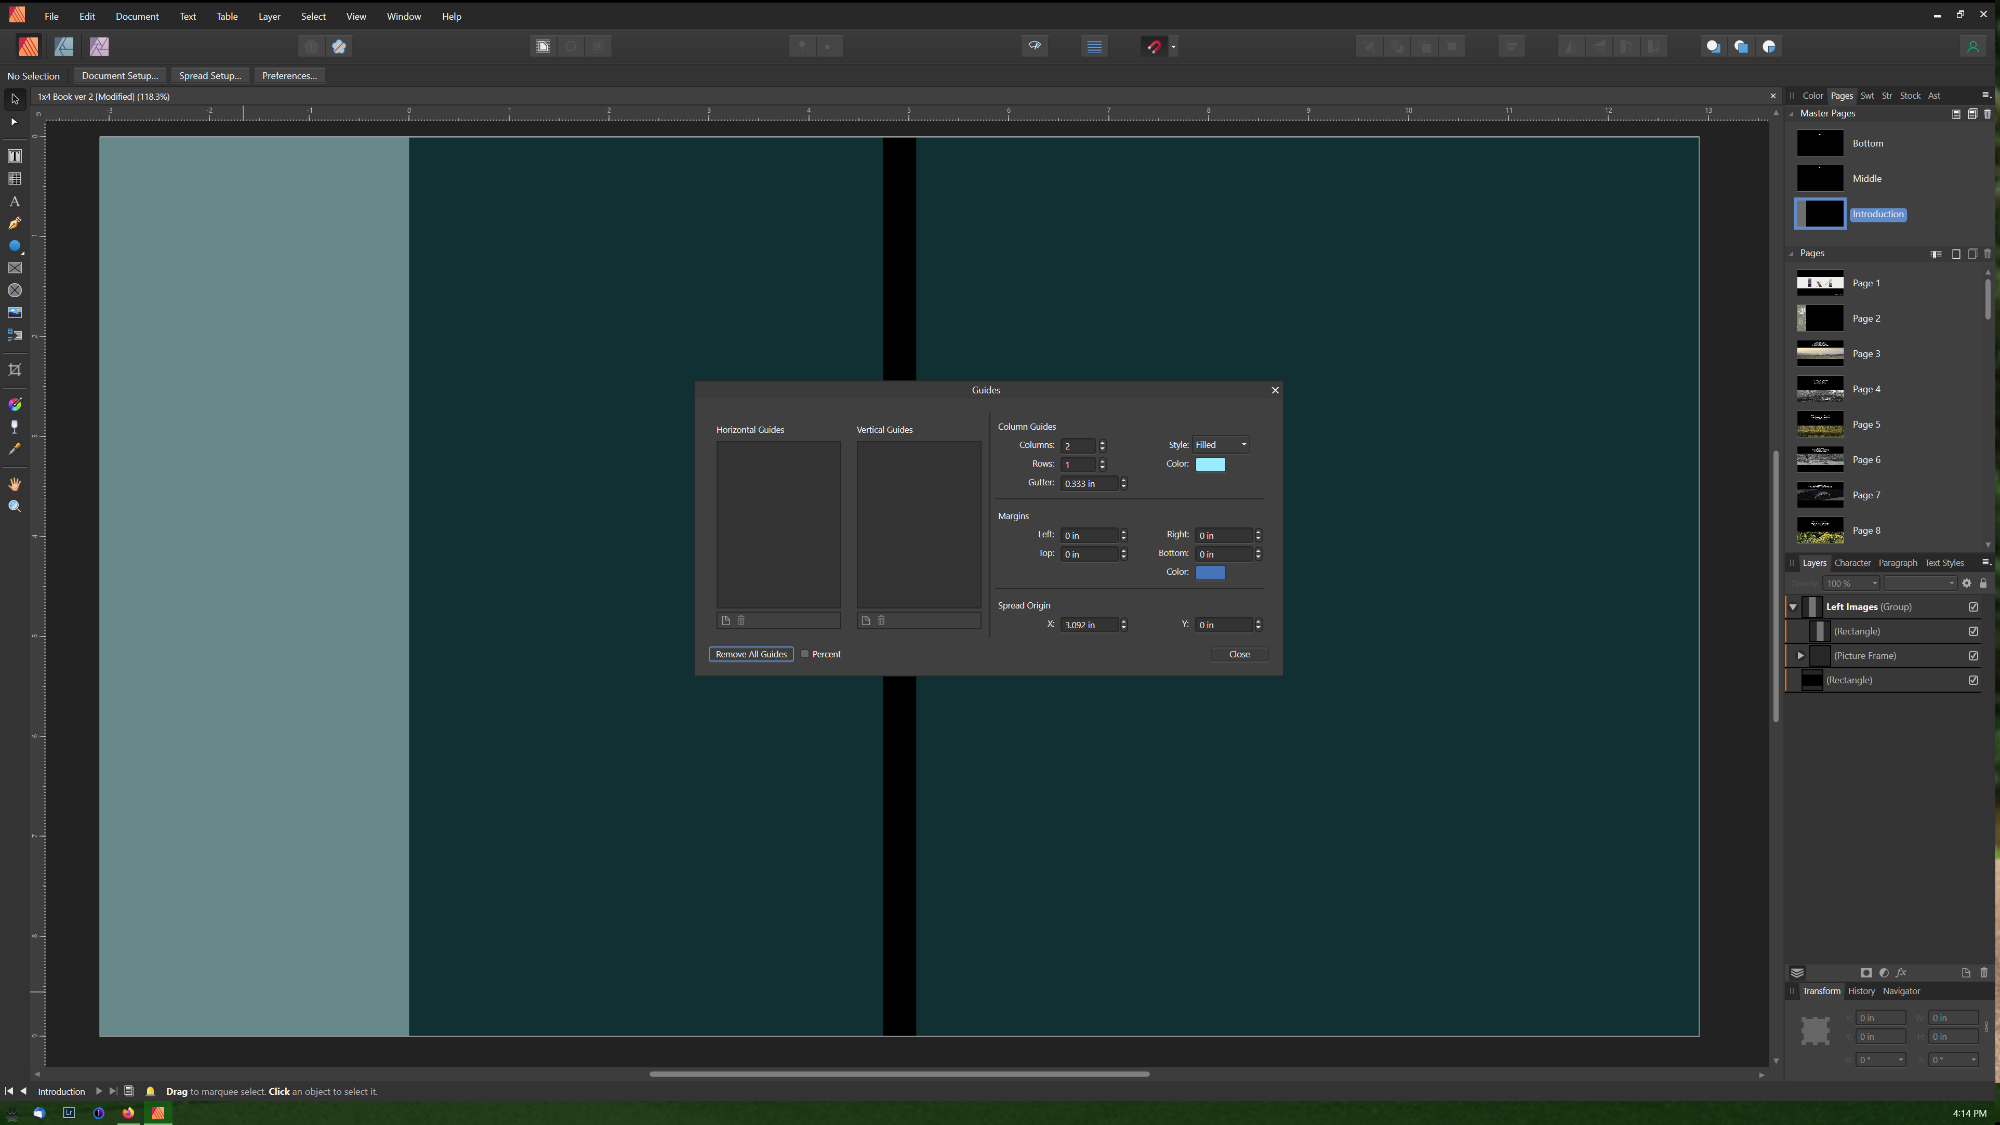
Hi There: This may be a question that I think should be possible, but isn't. I'm trying to create a page layout that has an image aligned vertically on the left side of the page, with two, equal-size text columns beside it. I create the image frame box the right size, no problem. I went to Guide Manager and entered two columns, one row, but the two columns span the width of the page (including the image frame). I tried setting the X-offset using the ruler to the 3" width of the image frame, but that had no effect on the column width. I could manually calculate the remaining width of the page and use manual rulers to set the dimensions but I was trying to avoid doing that. Of course, in the time it's taken me to type this I could be done, but I'm just beginning with Publisher and stumbling my way along as I go. Thanks, Mike.
-
Affinity GPU
wolfnowl replied to wolfnowl's topic in Pre-V2 Archive of Desktop Questions (macOS and Windows)
Thanks! Mike. -
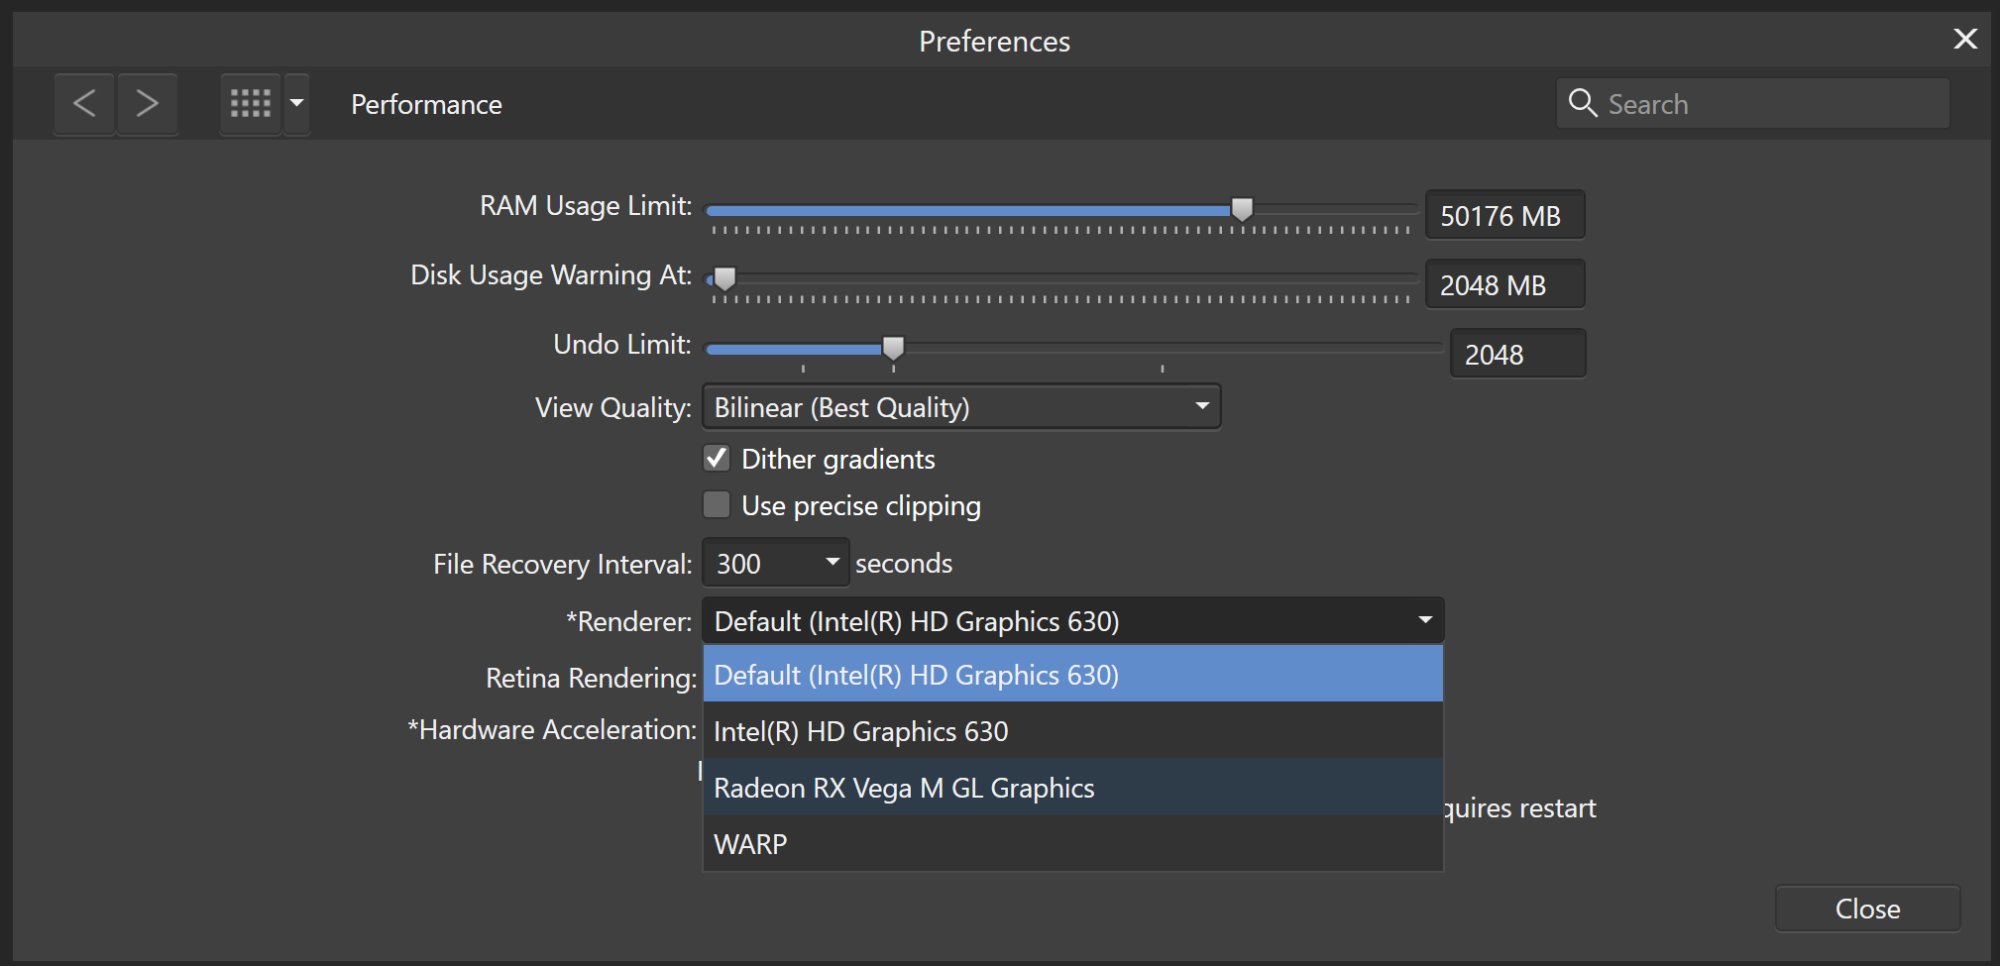
Hi There: I understand that Affinity now allows use of GPU hardware acceleration, which is a handy feature. However, my Dell laptop has two built-in graphics cards. It's currently set to default, but honestly I don't know enough about the differences to choose. Any suggestions appreciated. Mike.
-
 Fixx reacted to a post in a topic:
Affinity and Capture One 21 Beta
Fixx reacted to a post in a topic:
Affinity and Capture One 21 Beta
-
Hi There, and thanks for your response. Capture One 21 was released today; I downloaded and installed it, and so far Affinity seems to be working fine!! Mike.
-
Hi There: I use Capture One 20 for my raw editing and image processing, and Affinity Photo for pixel editing, etc. This is all under Windows 10 (Intel(R) Core(TM) i7-8705G CPU @ 3.10GHz, 16GB RAM, Windows 10 Pro 20H2, OS Build 19042.662, Experience Pack 120.2212.551.0). I recently signed up to be a beta tester for C1 21 and have played with it a bit. This thread won't violate the beta NDA. This morning I started Affinity Photo (1.85.703) and when I went to open a .jpg file, it crashed. I tried other jpg files, a tiff file, and even creating a new document. It crashed every time. I went to the Affinity site, re-downloaded the install file and ran a repair installation. Hard booted the computer. Still crashed. I tried opening a file in Affinity Designer. It crashed. Downloaded the install file... The only other installation I've done recently is the C1 21 Beta program, so I used Revo Uninstaller Pro to uninstall the C1 21 Beta (I still have C1 20). Restarted the computer and Affinity works fine. I haven't yet tried reinstalling the C1 21 Beta program, but thought someone might like to know. Mike.
-
Here’s another example: This is an overlay with two of three raw files in C1 on the left, and the panorama made from them in Affinity Photo on the right. Again, I exported the three raw files as .tif files and made a panorama out of them: Again, quite a difference. It seems that while Affinity can make panoramas, I need to create .tif files first rather than simply using the raw files. Mike.
-
Here’s the comparison: The top three images are the raw files in C1. Bottom left is the panorama made from the C1 .tif exports. The other two images are the panoramas made from the raw files, using an sRGB Document profile and a PhotoPhoto RGB Document profile. The last two are almost indistinguishable, but there’s a small difference with the other four.
-
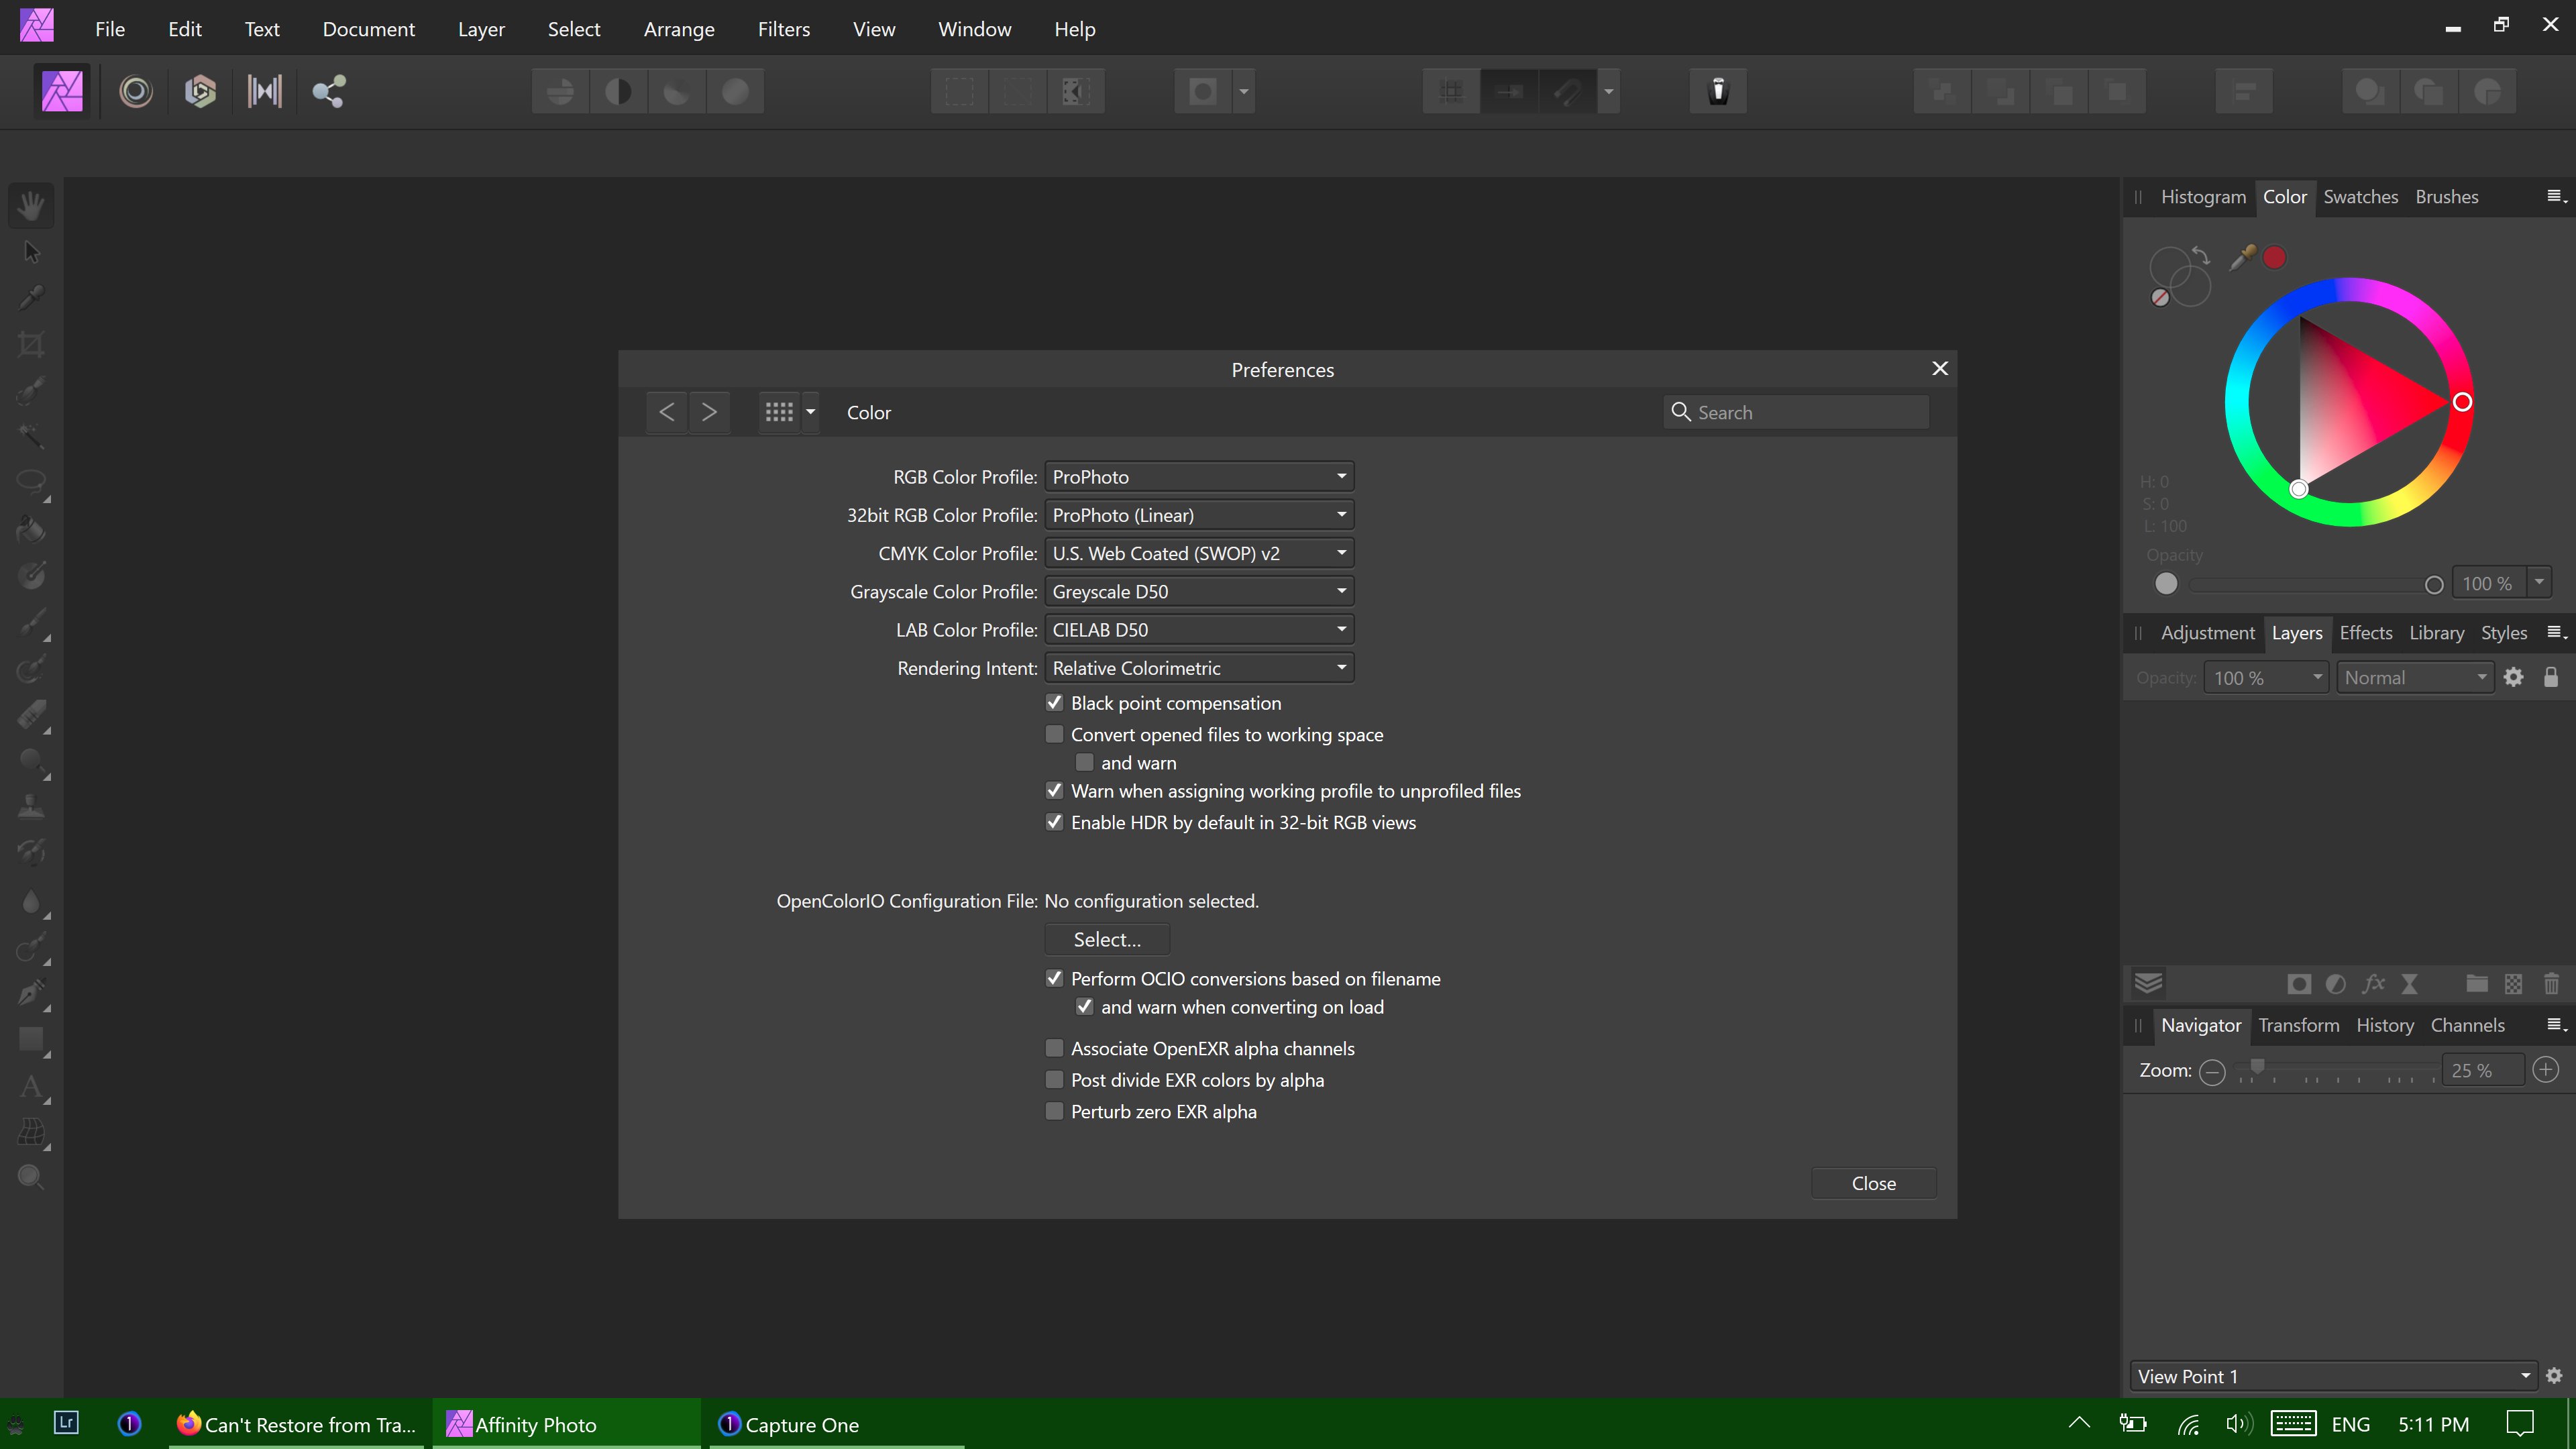
I’ll be the first to admit there’s a lot about colour I don’t know, so feel free to correct me if I mis-step. I have a Sony A7RIII, Capture One Pro for Sony 20.1 and Affinity Photo 1.8.3. NB: I can’t see what you’re seeing because your monitor is different. Also, these are sRGB .jpg screen captures of what I’m seeing. Still, there’s value in comparing them to each other. 1) In Affinity/Preferences/Colour I have the default set to ProPhoto RGB: 2) If I select some raw files and make a panorama out of them, Affinity stacks them and renders them as a panorama. At that point I click on the Develop module, go down to Profiles and set the profile to ProPhoto RGB and click Apply. Once you click Apply it sets the rendered file as a pixel layer. Now, if you go to Document/ Convert Format / ICC Profile you’ll see that Affinity has set it to ProPhoto. It appears to default to sRGB but I haven’t tested it extensively. 3) Now, Lightroom works with Melissa RGB as a default colour space. Capture One doesn’t say, but I presume it’s similar. No matter. When I imported these raw files into C1 I used the Sony A7RIII generic profile, and the standard curve. No other adjustments have been made. 4) I exported the three raw files from C1 as .tif files using the ProPhoto RGB colour space, imported them into Affinity Photo and made another panorama. I exported the panoramas made with the raw files using an sRGB Document profile and a ProPhoto RGB document profile (both exported using a ProPhoto RGB profile), and I exported the panorama made using the .tif files, again using a ProPhoto RGB profile. I imported those three panorama files into C1.
-
Fixx reacted to a post in a topic:
HDR Panoramas
-
Hi There: Making HDR panoramas is a part of my photography workflow, and there are a few things in AP that would make this better. As it currently stands (1.83), one CAN combine all of the images into one panorama directly but this yields results that are distinctly lacking. The better way is to make the HDRs of each sequence first and then merge them into the panorama. There are two issues here. One is that while one can save the merged HDR files as .aphoto files, those files cannot be used to make panoramas. They're invisible in the selection window for the panorama. The next best way is to export each HDR merge into something like a 32-bit .tif file, and then gather those .tif files into the panorama. The second thing is that it's vital to do some tonemapping for each of the HDR merges before exporting them. Since (if one does this properly and used manual exposure control during capture) the exposures are all the same, the tonemapping choices for each set of merged images should also be the same. The simplest thing to do would be to create a macro before tonemapping the first HDR merge, and then run the same macro for each of the following sets. That's not possible. The best option I can come up with right now is to use Notepad to record the slider values I set for the first HDR merge, and then manually apply those values to each subsequent set before exporting them to .tif. Thanks! Mike.
-
Chris B reacted to a post in a topic:
Gradient Tool?
-
Thanks, Walt. The teaching assistant and I couldn't figure out why we were getting different results when doing the same thing. It turned out she was working on a rectangle (vector) layer and I was working on a pixel (raster) layer. The gradient tool does indeed perform differently on the different layer types. Mike
-
Hi There: This may not be a bug as I'm still new to Affinity and taking a course on learning it, so feel free to correct me. 1) I created a new document, added a pixel layer, and dragged a gradient across. I set the left point to red, and the right point to blue: Now, without leaving the gradient tool, I added a third point at 50%: Here you can see there are three colours, with yellow in the middle. If I switch tools or even click on the canvas outside the document, I still have the colours showing but I've lost the gradient. This is where I decide I want to move the yellow more to the left. I click on the Gradient tool, but I still don't have my existing gradient (only the colours, not the control points). I draw a new gradient, but it looks like this: Clearly this is not what I want. I click back on the white->gray colour in the context bar and click on Swatches. Here my previous gradient is stored under Recent. I click on that colour bar and it replaces the white to gray gradient with the previous colours. From there I can click back on the Gradient option in the context bar, select the middle point (yellow) again, and move it to 25% for example. The biggest challenge as I see it with this method is where the gradient doesn't go straight from left to right across the document, but starts somewhere in the middle, or is angled like this: Duplicating that is going to be a challenge. The swatch maintains the colours, but not the gradient parameters, or if it does, I don't know how to find them. Mike.
-
Walt: Thanks for the response. I understood that I could create specific pixel or size dimensions and create a custom aspect ratio from that, but I wanted to be able to draw something out from the screen and create a preset from that. Madpeaz: Thanks also for your response. For some reason I tried that yesterday and it didn't work, but it did today. Must have been a 1 or 0 in the wrong place. Mike.