

- S -
-
Posts
832 -
Joined
Posts posted by - S -
-
-
Since the compression in Affinity is different than Photoshop, what would be a comparable option in Affinity to a setting of 72 in Photoshop?
That said, just to test it myself, I cropped the original image of the car (from the onedrive link above), and exported it as jpg in affinity and photoshop elements using the max options for optimization, bicubic resampling, and the results are here.. personally, I think the PSE file still looks better.
I'm not sure about Photoshop Elements as I only have Photoshop, however I've just used Photoshop to resize your car pic and these were the settings I used to get more-or-less the same image quality/file size.
Affinity Photo
Size: 1333 X 1000
Resample: Lanczos 3 Separable
Quality: 85
Embed Metadata Off
File Size: 334KB (342,383 bytes)
Pic (Direct Image Link):

---------------------------------------
Adobe Photoshop CS4
Size: 1333 X 1000
Resample: Bicubic Sharper
Quality: 65
Embed Metadata already off in 'Save For Web'
File Size: 334KB (342,786 bytes)
Pic (Direct Image Link):
---------------------------------------
For the record I also tried Affinity Photo Bilinear with a quality setting of 88 (which made a 352KB file), but it's noticeably softer than the above two, so I'm not entirely sure why that's the default Affinity resampling method rather than say Bicubic or Lanczos 3 Separable.
Also, although it shouldn't affect your smaller photos, it may be worth going to Edit > Preferences > Performance, and changing the View Quality setting from 'Nearest Neighbour' to 'Bilinear (Best Quality)'. It's set to 'Nearest Neighbour' by default, which displays jaggy edges in Affinity Photo when a larger image is displayed smaller than 100% (it doesn't affect the export quality, only viewing in Affinity).
-
I would also like to know this. I've been creating brushes in Affinity Photo, however I've noticed that there are certain features missing compared to Photoshop. Things like 'Initial Direction', Foreground/Background jitter, texture settings, etc. just aren't there, which would explain why a few people have had problems importing some Photoshop brushes.
I'm new to Affinity Photo, so maybe there's a way that I'm not aware of, but the closest I've managed to get to jittering between two colours is by manipulating the Hue Jitter 'Ramp', as shown in the below screenshot. However, this doesn't use your background colour at all, all it does is offset the Hue of your main colour around the colour wheel by a certain percentage. Therefore it's not a real solution, I just thought I'd share it until someone else comes along.
Screenshot:
NB: In the screenshot the left side of the ramp is at 100%, however it should be at 0%, as it's the same. Like this:
-
What's the best way to clone/heal on an image that isn't fully opaque? For example, if I wanted to remove the splat from the attached file.
I can use the Inpainting Brush tool as it preserves transparency, however depending on the image the inpainting tool doesn't always work, so I'm looking for a way to manually choose the clone source (for example with the Clone Brush tool, the Healing Brush tool or the Patch tool). However, those tools multiply the transparency making the cloned area darker.
-
I've been using Affinity Photo extensively for almost a month now and I like it a lot, both the software itself and the company. This got me thinking about the upcoming Affinity Publisher. Desktop Publishing software has never really been on my radar, however looking at a couple of PagePlus video's it shows editing PDF documents and creating ebooks too. Therefore, unless I'm missing something, if it could export in a Word Processor file format is there a reason why Affinity Publisher couldn't be used as a Word Processor as well?
So, the feature request is to allow Affinity Publisher to both open and export documents in Open Document Text format (*.odt) too.
-
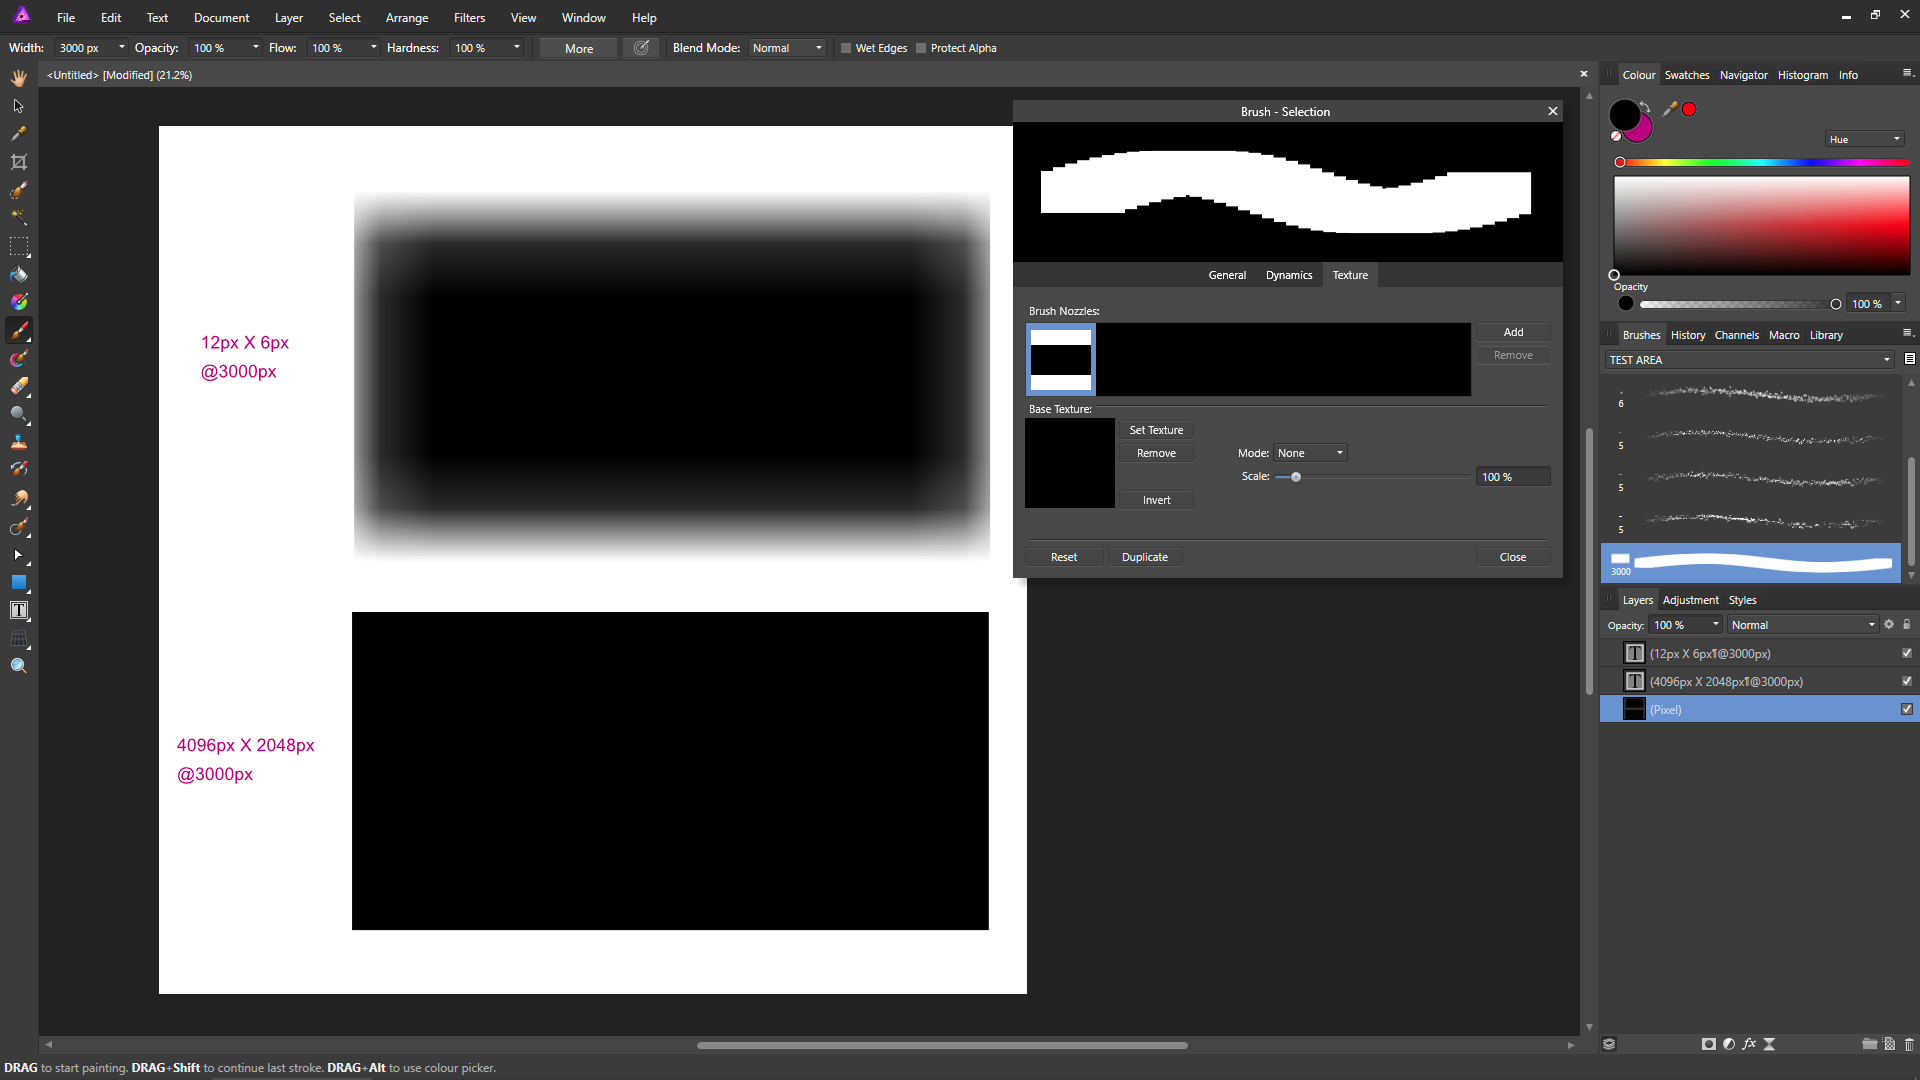
I'm not sure whether your attached pic is showing the brush on a canvas at 100% view, or a small canvas blown up to greater than 100% view. However, 12 X 6 px is pretty small, therefore if you increase the brush size it will need to guess the extra pixels hence the blurry brush. So, when you create a PNG for a brush nozzle, make it much bigger (Affinity Photo brushes go up to 4096px X 4096px).
I don't know why the ratio is changing when you change the brush size, as I haven't seen that before. Maybe make sure all the settings in the 'Dynamics' tab are set to 'None' in case what you're seeing is actually jitter.
-
+1 to this.
-
I suggested the vector bitmap fill method because it is both non-destructive & very flexible -- you can apply different horizontal & vertical scale factors or lock the ratio to 1:1, rotate the bitmap as you want, & change the position of where the bitmap starts; & go back at any time & change any of this or even replace it with another bitmap.
Using that method, if you have a 500px X 500px seamless tile and you want to fill a 5250px X 3500px canvas, how do you set it so that the texture is used at exactly 100% the original size without any scaling?
-
I'm not familiar with UV mapping for 3D objects, however when I was looking for a way to do it for normal 2D images, I didn't get on with using the gradient tool set to bitmap because it doesn't tell you when your texture is at 100% actual size. I found you had to just drag and guess, which I didn't like. Sooo...
Alternative Method 1:
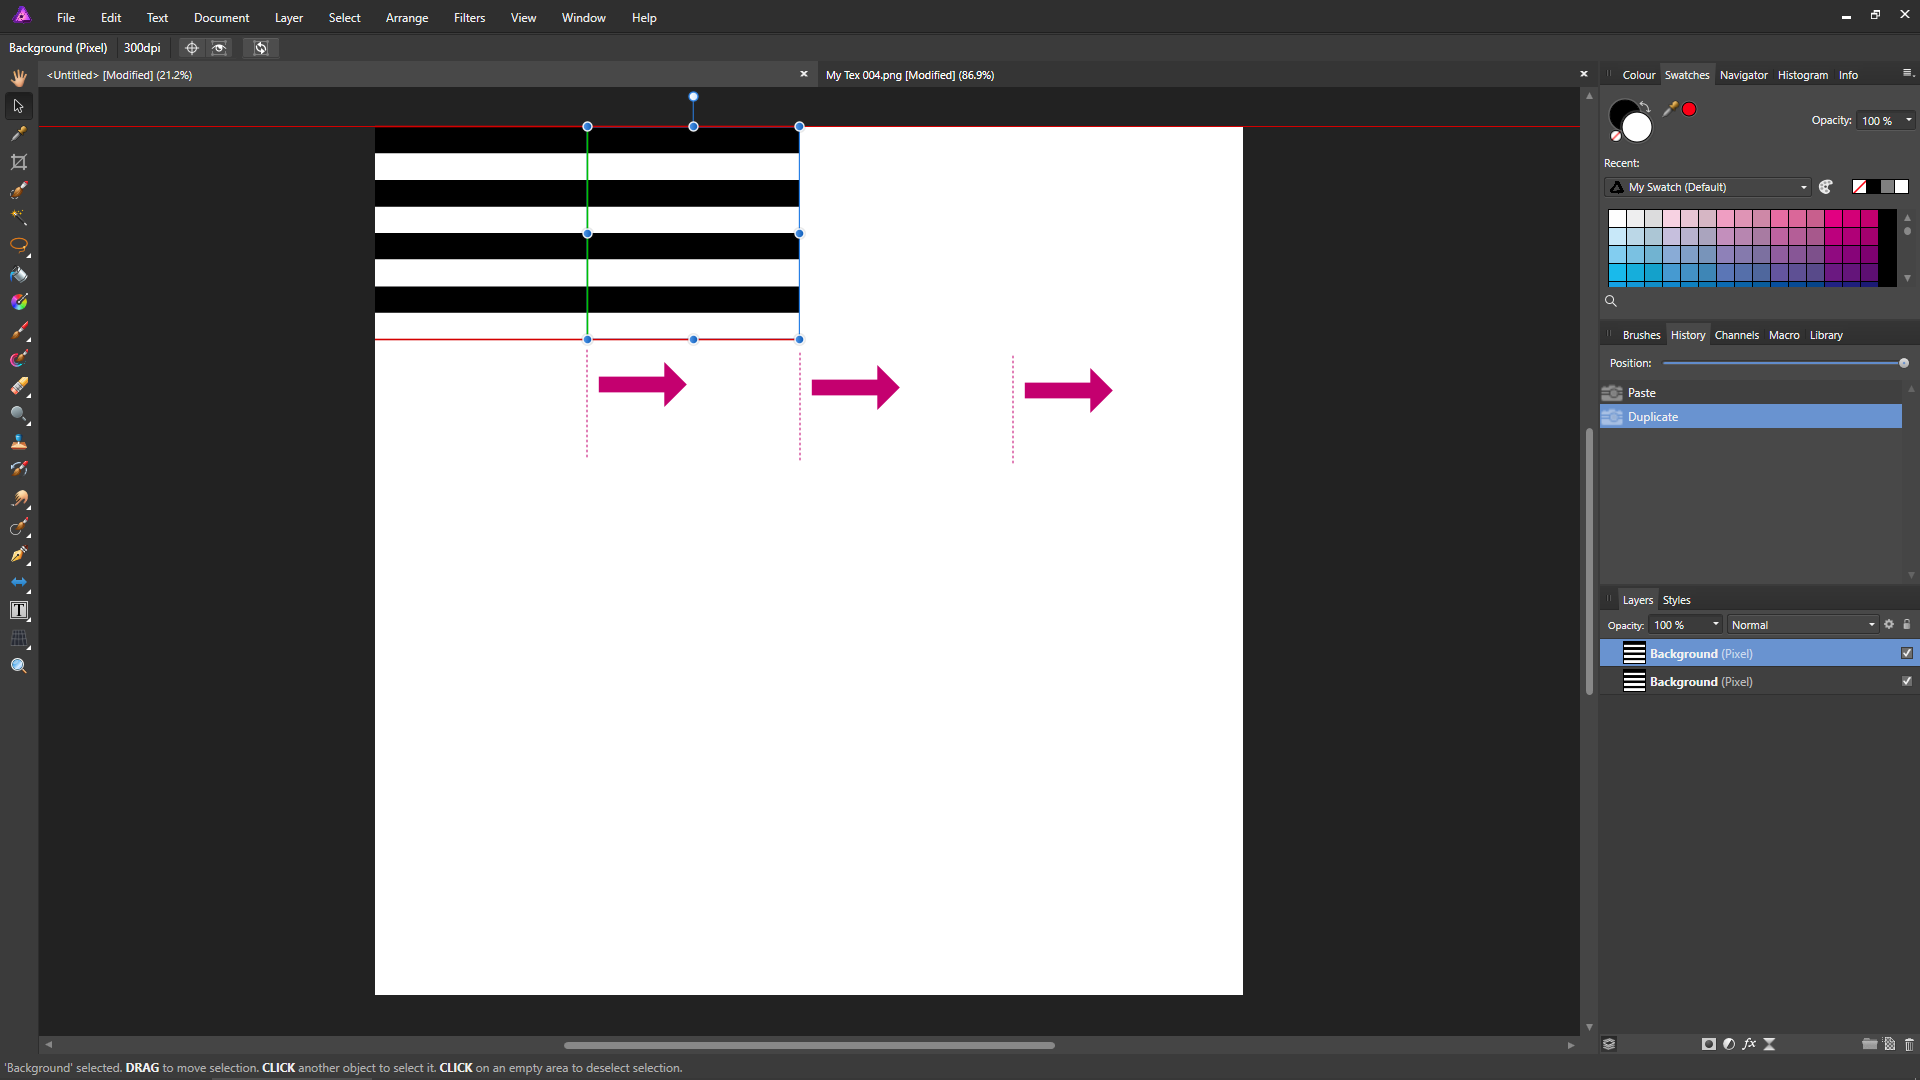
What I ended up doing instead was a pretty crude method of copy and paste, but using a really useful feature in Affinity Photo called 'Power Duplicate', where you can duplicate an object multiple times and it will automatically offset it for you. There's a video HERE for Affinity Designer demonstrating 'Power Duplicate', but it works in Affinity Photo too.1) Copy & Paste the tileable texture on a new layer
2) Press V (for the Move tool)
3) Press CTRL + J (Or Layer > Duplicate)
4) Move the tileable texture right so it snaps (green bar) to the right of the previous tile
5) Press CTRL + J and keep pressing CTRL + J until it fills the entire row
Once one row is done, you can repeat the same process, but with the entire row to fill the rest of the document.
6) Hold the Shift key and select all the tiles in the first row7) Press CTRL + J (Or Layer > Duplicate)
8) Move the tileable texture row down so it snaps (green bar) to the bottom of the previous row
9) Press CTRL + J and keep pressing CTRL + J until it fills the entire canvas
Then group them.
10) Select all those layers (Shift click top and bottom layers) and group them together (CTRL + G) and then rasterise the group11) You can then add a layer mask and use normal layer masking techniques to hide/show the texture
In the real scenario I was creating a paper texture, but for this post I'll use simple black and white stripes as it's easier to see what's happening.
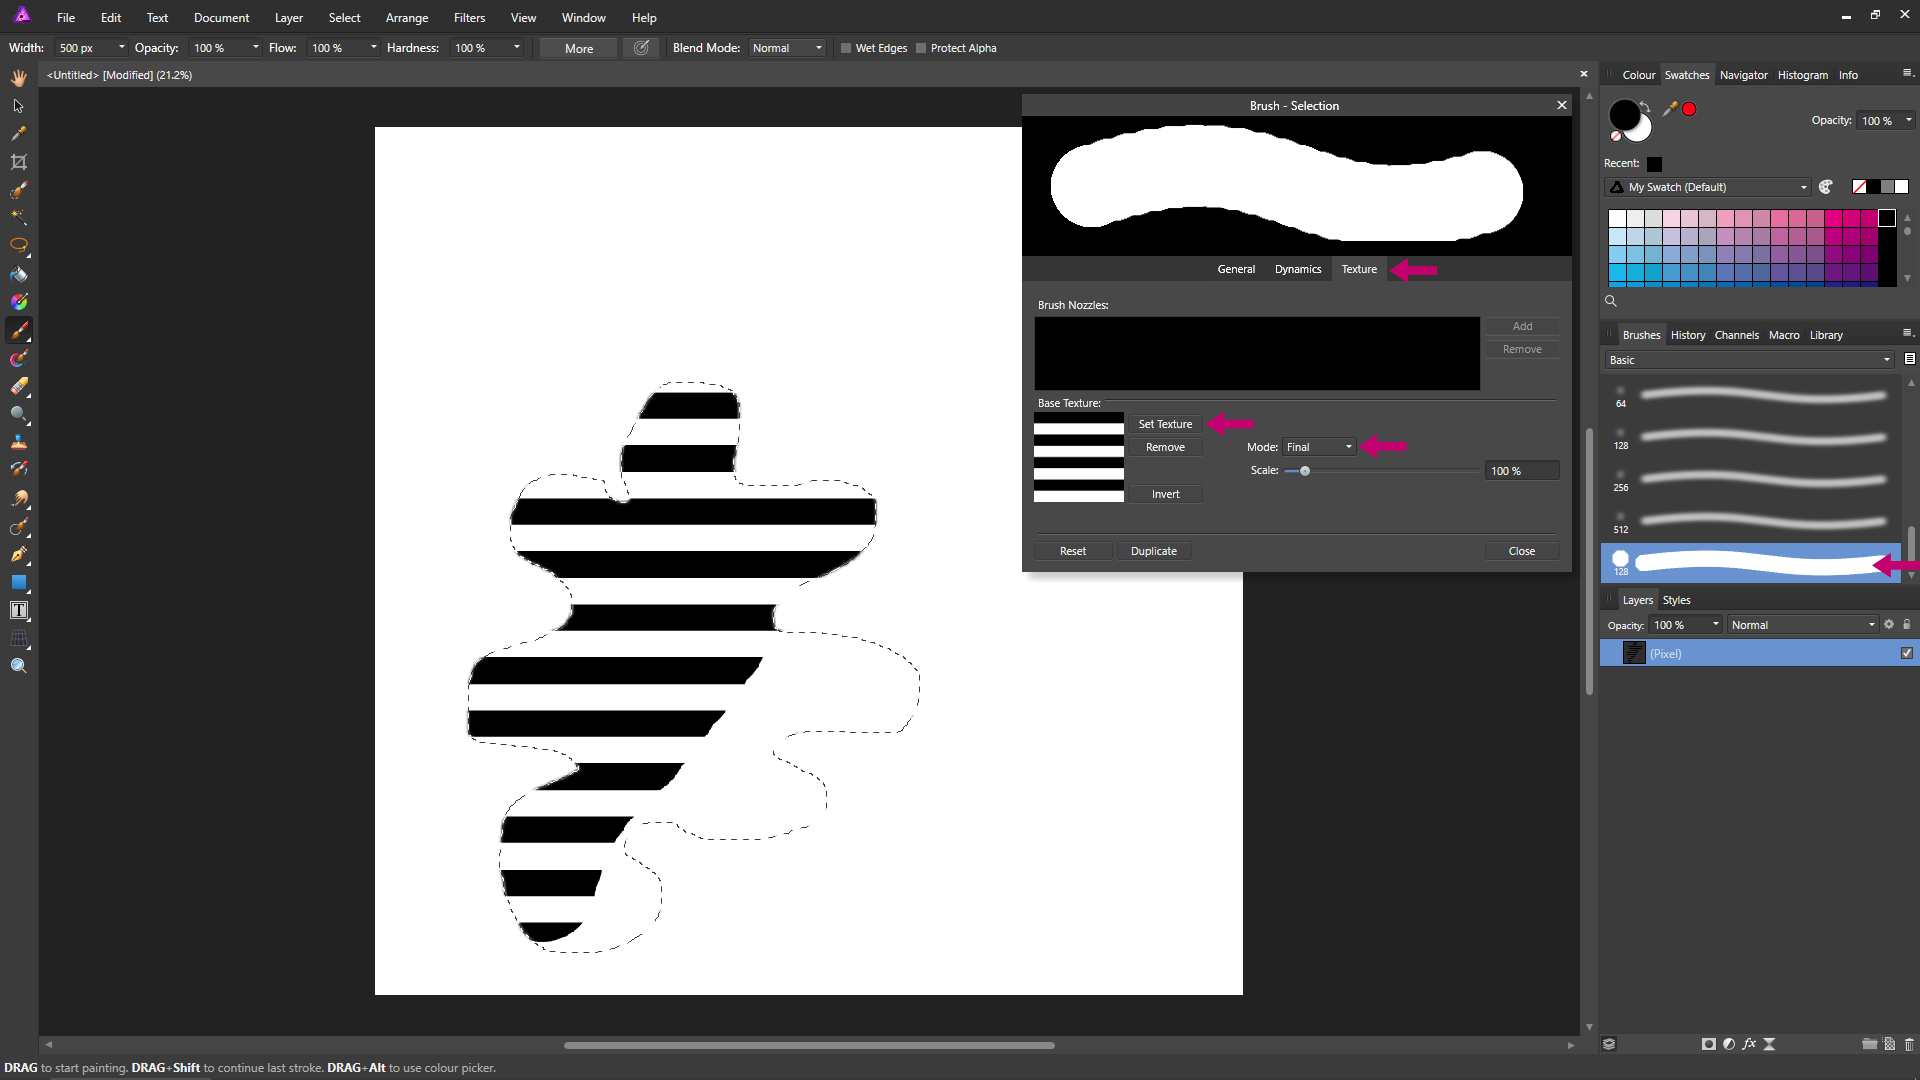
Alternative Method 2:
An alternative method is to use your texture with a brush. Although this will be more tailored towards greyscale textures.1) Go to the Brushes Pane, under 'Basic' Brushes double-click the large hard round brush to open the brush properties, then click the 'Duplicate' button at the bottom. Close the properties box.
2) Go to the duplicate brush you just created at the bottom of the brushes list, double-click it to open the brush properties
3) In the 'General' tab, make sure Accumulation/Hardness/Flow are all set to 100%
4) In the 'Dynamics' tab, make sure everything it set to 'None'
5) In the 'Texture' tab, click 'Set Texture' and load your tileable texture
6) Set the 'Mode' to 'Final'. Close the properties box.
7) Select the brush tool, adjust the brush size and start painting with the brush. But you need to be careful to paint in one go, if you lift the mouse button and draw again, it will draw darker over the previous stroke.
Screenshot:
-
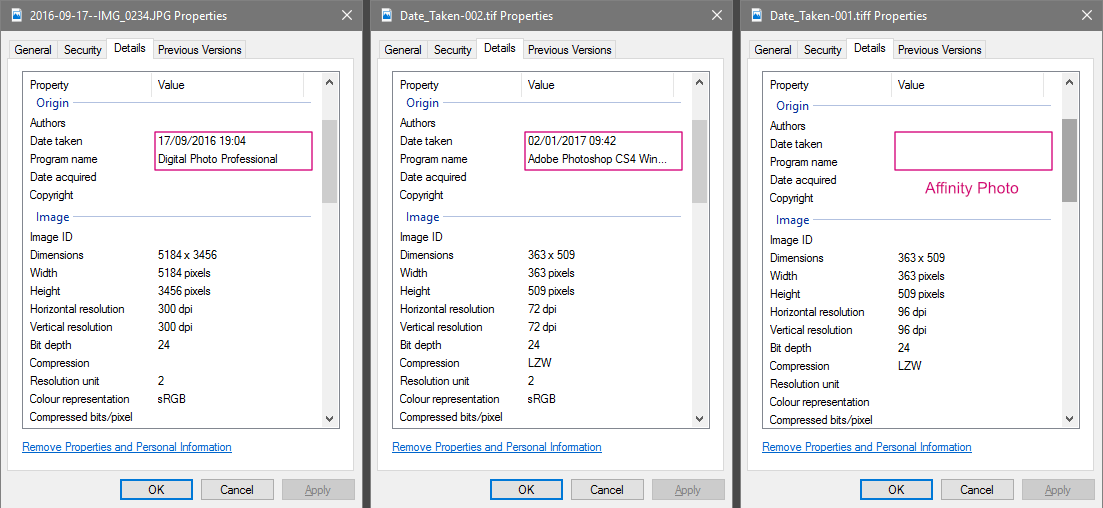
Most modern software such image viewer apps now use the 'Date Taken' field from the metadata as the primary field, particularly when automatically organising user photos. Although they will fall back to the Date File Created, Date File Modified and Date File Accessed fields, those fields have always been an unreliable mess.
In Affinity Photo, if an image came from a camera for example, the 'Date Taken' field in the metadata is already populated from the original file. However, if you create a new file in Affinity Photo and save it, Affinity Photo doesn't populate the 'Date Taken' field.
Therefore, this request is for Affinity products to populate the 'Date Taken' (and 'Program Name') fields in the metadata when new files are saved for the first time. Image attached.
-
In all honesty I don't use .afphoto for anything, as it's not a widely recognised file format. I use the following three main file formats:
TIFF (With Affinity Layers) - This is the main working file format I use. It saves layers, live adjustment layers, etc. and the file can also be opened in virtually any other software (albeit flattened), the file metadata is displayed properly in Windows File Explorer, etc..
TIFF (Flattened) - This is the format I save as when I'm finished. I don't usually keep layers, not due to file size so much, but more for long term file preservation. A flattened 24-bit TIFF is a widely recognised archival format and probably the best format for long term file compatibility. I'm not a professional user and so once I'm done with an image I almost never go back and make adjustments again, therefore for me personally although TIFF (With Affinity Layers) will likely be fine too, I stick with what I know.
PSD - This is the format I use if I need to transfer a layered file between multiple applications (such as Clip Studio Paint). Although, it's worth keeping in mind that when saving as PSD you lose some of the Affinity Photo specific functions (for example, a Gaussian Blur Live Adjustment Filter will be rasterised).
-
Yeah, I noticed the same thing.
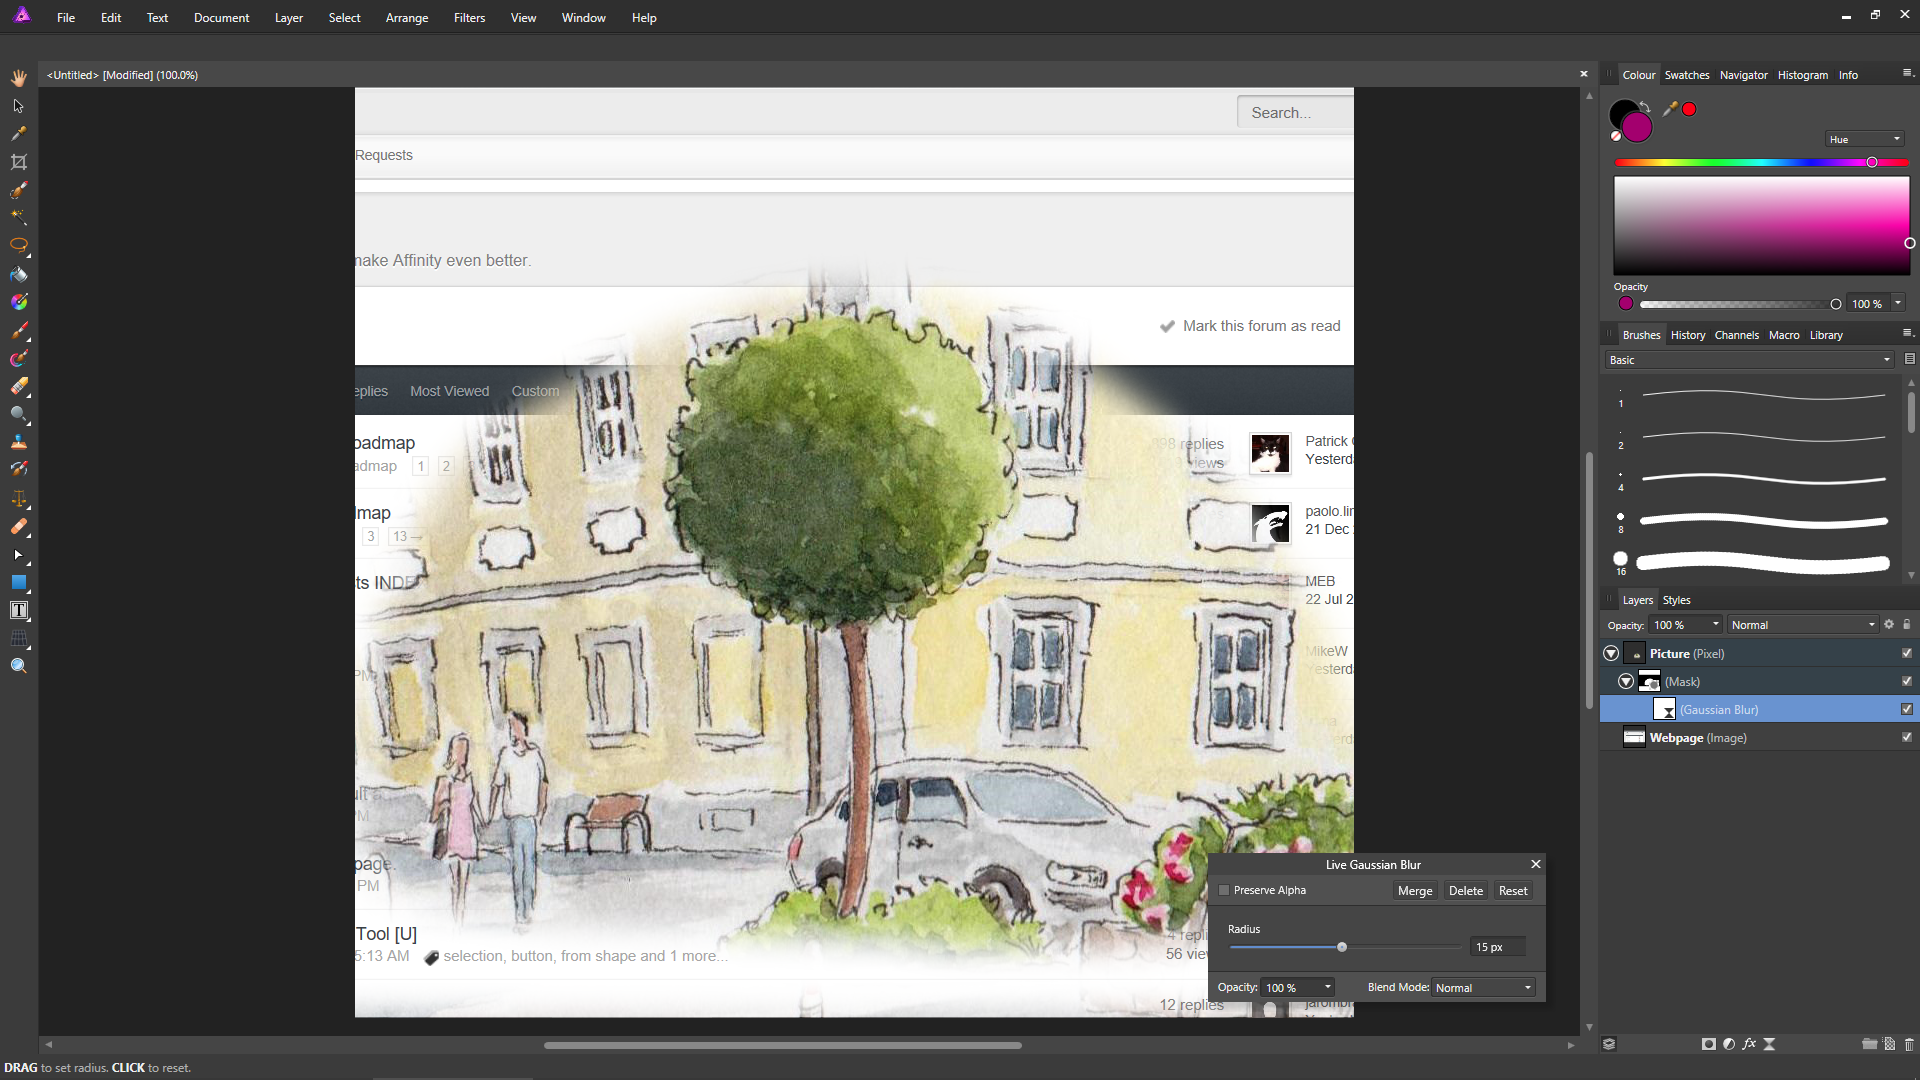
You have to drag the mask up slightly to make the Mask clip to the pixel layer first (shorter horizontal blue line) for it to work. If you just draw a selection and click the 'Mask Layer' button, it won't allow you to just add the 'Gaussian Blur Live Filter' under the mask as a clipping layer.
Another thing you may have noticed. If you make a selection and then click the 'Add Mask' button, the mask bounding box will be the same size as the canvas. So when you then blur the mask, because the mask is the same size as the canvas, as you start to increase the radius of the Gaussian Blur Live Filter you'll notice that it'll start to make the edges of the image transparent too.
To prevent this, don't make the selection first, but do it this way instead:
1) Select the top layer and press the 'Mask Layer' button to create an empty mask for that layer
2) Drag the mask up slightly to make the Mask clip to the pixel/image layer (shorter horizontal blue line)
3) Make your selection
4) Press Shift + F5 (or Edit > Fill) to open the fill dialogue box and then fill the selection with black
5) Deselect selection (CTRL + D)
6) Add the Gaussian Blur Live FilterThis way, the bounding box is just around your selection, not the entire canvas.
-
I'd love ability to apply non-destructive gaussian blur to layer mask (as an object property or with live filter).
It may be worth giving more details on what you are trying to blur, as there could already be a way to achieve what you're trying to do.
For example, if you're trying to blur all the contents inside the mask (or outside depending on colour), you can create a Gaussian Blur Live Filter and drag it onto the square mask layer icon so that it nests below it.
Screenshot:
If you're trying to blur just the edges so you can adjust the amount of feathering again later (like the Photoshop 'Feather' slider in the Masks Panel), you can create a Gaussian Blur Live Filter and drag it under the mask as a clipping mask.
Screenshot:
Although the above two screenshots look similar, the way the two middle layers are nested make a big difference to how the layers act. For more info, see the below "Clipping vs Masking" video about using the different blue nesting bars when dragging layers.
Finally, if you view just the black and white mask layer by Alt + Clicking the mask thumbnail, Affinity Photo behaves a bit different to Photoshop. The black and white mask itself won't show as being blurred even though it's affected by the Gaussian Blur Live Filter. However, you can still paint on the mask layer with a black or white brush or make another selection on the mask layer and fill it with black or white and the live filter will still apply to it.
By the way please increase gussian blur radius slider range from current 100 to 300 or more.
Although not particularly intuitive, with some filters it's possible to go further than the 100px slider scale by dragging on the canvas instead. More details in the below video:
-
Yeah, I welcome this too. Along with the ability to add more randomness to the 'Perlin Noise' filter (like the 'Difference Clouds' filter).
-
According to the Affinity help page, it will prompt you if there's an update available:
How do I download digital product updates?
When you launch your product you’ll be prompted to download the latest update if available. On clicking Download you will be directed to a web page that will offer you the latest Windows release for your Affinity product.
-
When creating your own brush nozzles, what's the optimal resolution to save them in?
I noticed that the nozzle in post No.2 is 256 X 256. However, as document resolutions get larger and larger and therefore the size of brushes used get larger and larger, would making a nozzle 1000 X 1000 be more future proof?
-
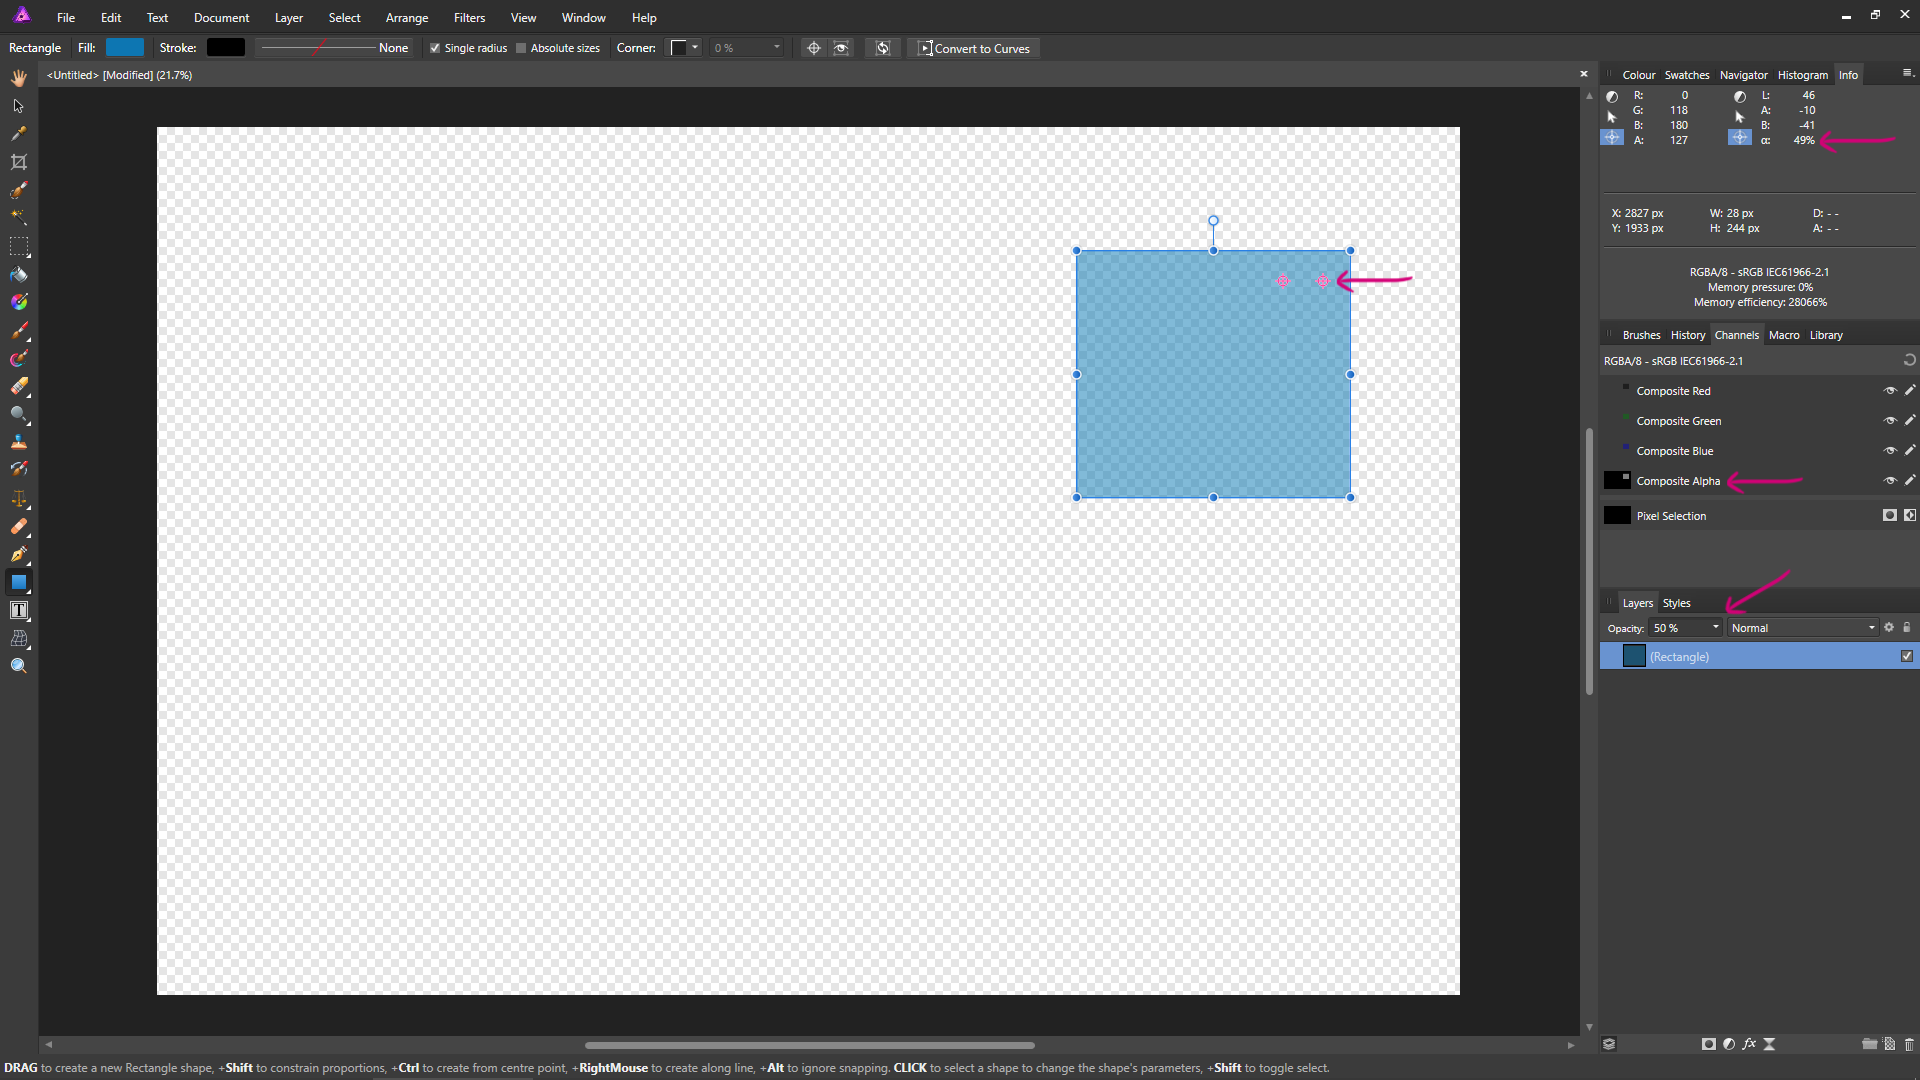
That's the alpha channel value.
In RGB:
0 = fully transparent
127 = Half transparent
255 = fully opaqueIn LAB/HSL/Greyscale:
0% = fully transparent
49% = Half transparent
100% = fully opaqueTo see it for yourself:
1) Open a new document
2) Go to Document > Transparent Background (to toggle background to transparent)
3) Use the Rectangle Tool to drag a rectangle on the canvas
4) As you change the layer opacity of the rectangle, the Alpha value in the Info Pane will change accordingly -
Coming from Photoshop I too am in the habit of dragging a selection, using spacebar to move/align the selection, then continue dragging. So I'm missing that feature as well. I'm not sure whether there's a better way, but this is what I've been doing instead as a work-a-round:
1) Make a selection with one of the Selection Marquee tools
2) Press 'Q' to enter Quick Mask mode
3) Press 'V' to select Move tool
4) The selection marquee is now draggable/editable
5) Press 'Q' to exit Quick Mask mode and go back to the marching ants
Maybe it was something that was just overlooked, because the Affinity Photo shape tools (such as the rectangle/eclipse tool) work with the Spacebar, just not the marquee tools.
Alternatively, depending on what you want to do with the selection, you can use the rectangle tool, eclipse tools, etc. as a layer mask as shown in this video:
-
I think so. Despite the error message it still resets the brushes though.
I reported it in the bug section here:
-
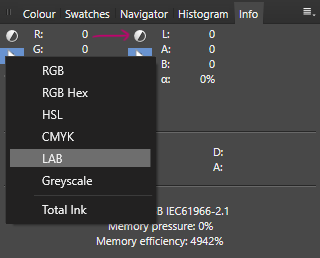
In the info pane, the symbols on the left are clickable. Therefore, if you click on the round symbol at the top, it will give you the option to choose which values you want it to display.
-
If your mask and image layers are seperate, then drag the mask layer on top of the image thumbnail that you want the mask to apply to, so that the mask nests with it. Once nested, if you select just the mask layer, the move tool will move just the mask. If you select the image layer, both the mask and the image will move together.
You can find a video demonstrating it here:
Alternatively, if for some reason you want to keep the mask layer and image layer un-nested and completely separate, press the CTRL key on the keyboard, then select both layers whilst keeping it pressed. As both layers are selected, they will then move together when using the move tool.
-
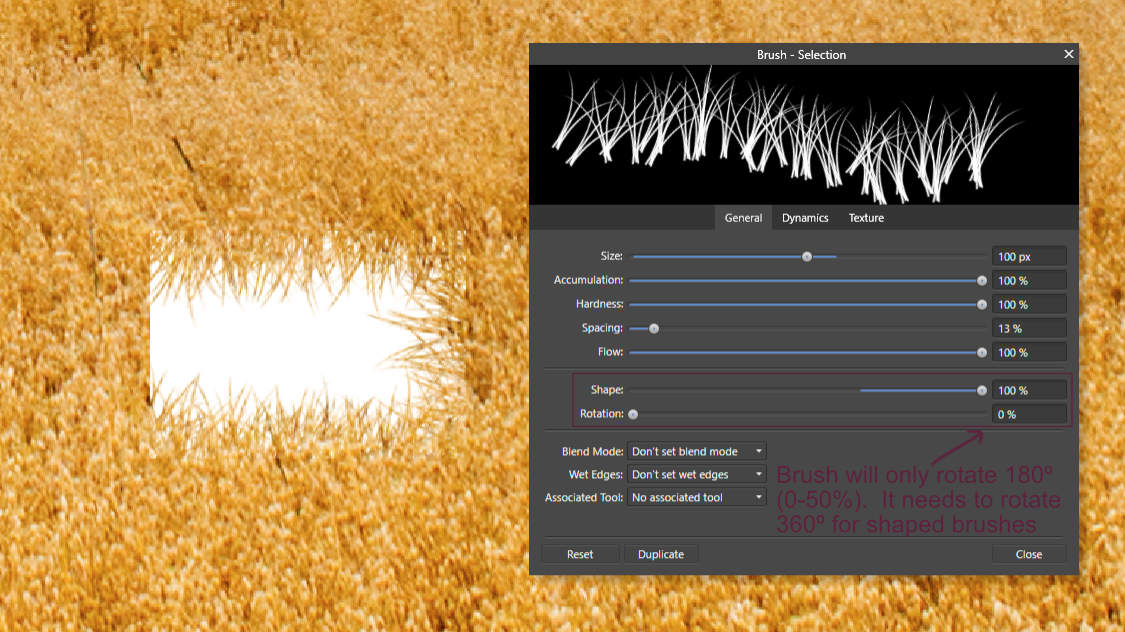
Thank you for your reply and providing a work-a-round, however it seem odd that this is by design. Therefore, would it be possible to move this post to the 'Feature Request' section of the site, as I feel that the slider should still allow the full 360º rotation of a brush head.
Instead of restricting the slider to 50% for everybody, I think it would be a lot more usable to have the slider span the full 0-100% and then in order to accomodate for those who are only using a basic round/square brush with the shape compressed, just put a 'notch' half way along the slider at the 180º point and allow snapping to that point.
-
In Brushes > More, the 'Rotation' slider only goes from 0-50% (instead of 0-100%).
This means brushes can only be rotated 180º, instead of the full 360º. For plain round or square brushes, this may not be such a problem, however for shaped brushes this obviously creates a severe limitation.
As an example, if you're painting on a layer mask with a grass brush in order to blend an object, because you're only able to rotate the brush 180º, you can't use that brush for all sides. That's obviously only one scenario, however the same would be true for lots of different types of brushes, I.E. Hair brushes, fur brushes, arrow brushes, etc. where they need the full 360 degree rotation.
Additionally, there also doesn't appear to be a way to flip a brush on the X or Y axis either, although having the ability to flip a brush maybe more of a 'feature request' than bug per se.
Please see attached screenshot.
-
Yes - all settings are put into a single dialogue box.
All you need to do is rename the descriptions for each slider to something more meaningful, as per my previous post.
Now I see what you mean.
The problem with that is not only would it be a long-winded process renaming each individual field, I would prefer to just stick with the standard slider names for each tool. Therefore I'd still prefer each filter to have it's own dialogue box that the macro launches in a sequential order.
-
Dasim,
When you select the eye icon, you can rename the slider's description to something more meaningful.
Hope that helps (a little).
It's probably easier to show what I mean with a screenshot. As they say, a picture tells a thousand something, something.


Shrinking Images Makes them Jagged/Fuzzy
in Pre-V2 Archive of Desktop Questions (macOS and Windows)
Posted
Yeah, they're pretty close. Here's the 1000px X 1000px straight crops as well in case you're interested. I also added a note to the end of the previous post about the view quality settings just as you posted your reply.
Affinity Photo
Size: 1000 X 1000 (straight crop)
Resample: Lanczos 3 Separable
Quality: 85
Embed Metadata Off
File Size: 205KB (210,451 bytes)
Pic (Direct Image Link):
---------------------------------------
Adobe Photoshop CS4
Size: 1000 X 1000 (straight crop)
Resample: Bicubic Sharper
Quality: 65
Embed Metadata already off in 'Save For Web'
File Size: 206KB (211,211 bytes)
Pic (Direct Image Link):
---------------------------------------