Max Kaladin
-
Posts
9 -
Joined
-
Last visited
-
 lacerto reacted to a post in a topic:
Symbols on a circular text path don't align correctly
lacerto reacted to a post in a topic:
Symbols on a circular text path don't align correctly
-
I'm on a Mac and I ended up finding a star in wingdings using the font book and then copy/pasting that to make a text path with that character. I wanted a circle of stars and I kind of had to play with the start and end points of the text to get an evenly distributed circle (using Justified All spacing) but it works and I got where I wanted. If I ever want to use a symbol that isn't in a font, I'll have to try the photo/designer trick. Thank you all!
-
I'll have to look into doing it in Photo or Designer then. Thank you!
-
 Max Kaladin reacted to a post in a topic:
Symbols on a circular text path don't align correctly
Max Kaladin reacted to a post in a topic:
Symbols on a circular text path don't align correctly
-
Ok, I've tried that and it does seem to work fairly well. Is there any way to do that with the Transform panel so I can just enter values since I know what I want?

-
Ok, so that's progress of a sort. I created a new circle and didn't tweak the size in any way (I had previously adjusted the size of the circle by typing in position, height and width in the lower right corner before converting to a path). I then selected the artistic text tool and hovered over the circle and clicked to convert to a path and started pasting stars. Everything went the way I'd expect it to with the stars in the right spots. When I then tried to change the size of the text path, I got the behavior I've been seeing. So apparently the only way this is working is if I can somehow make the circle the exact size I want when creating it and don't adjust it in any way.
-
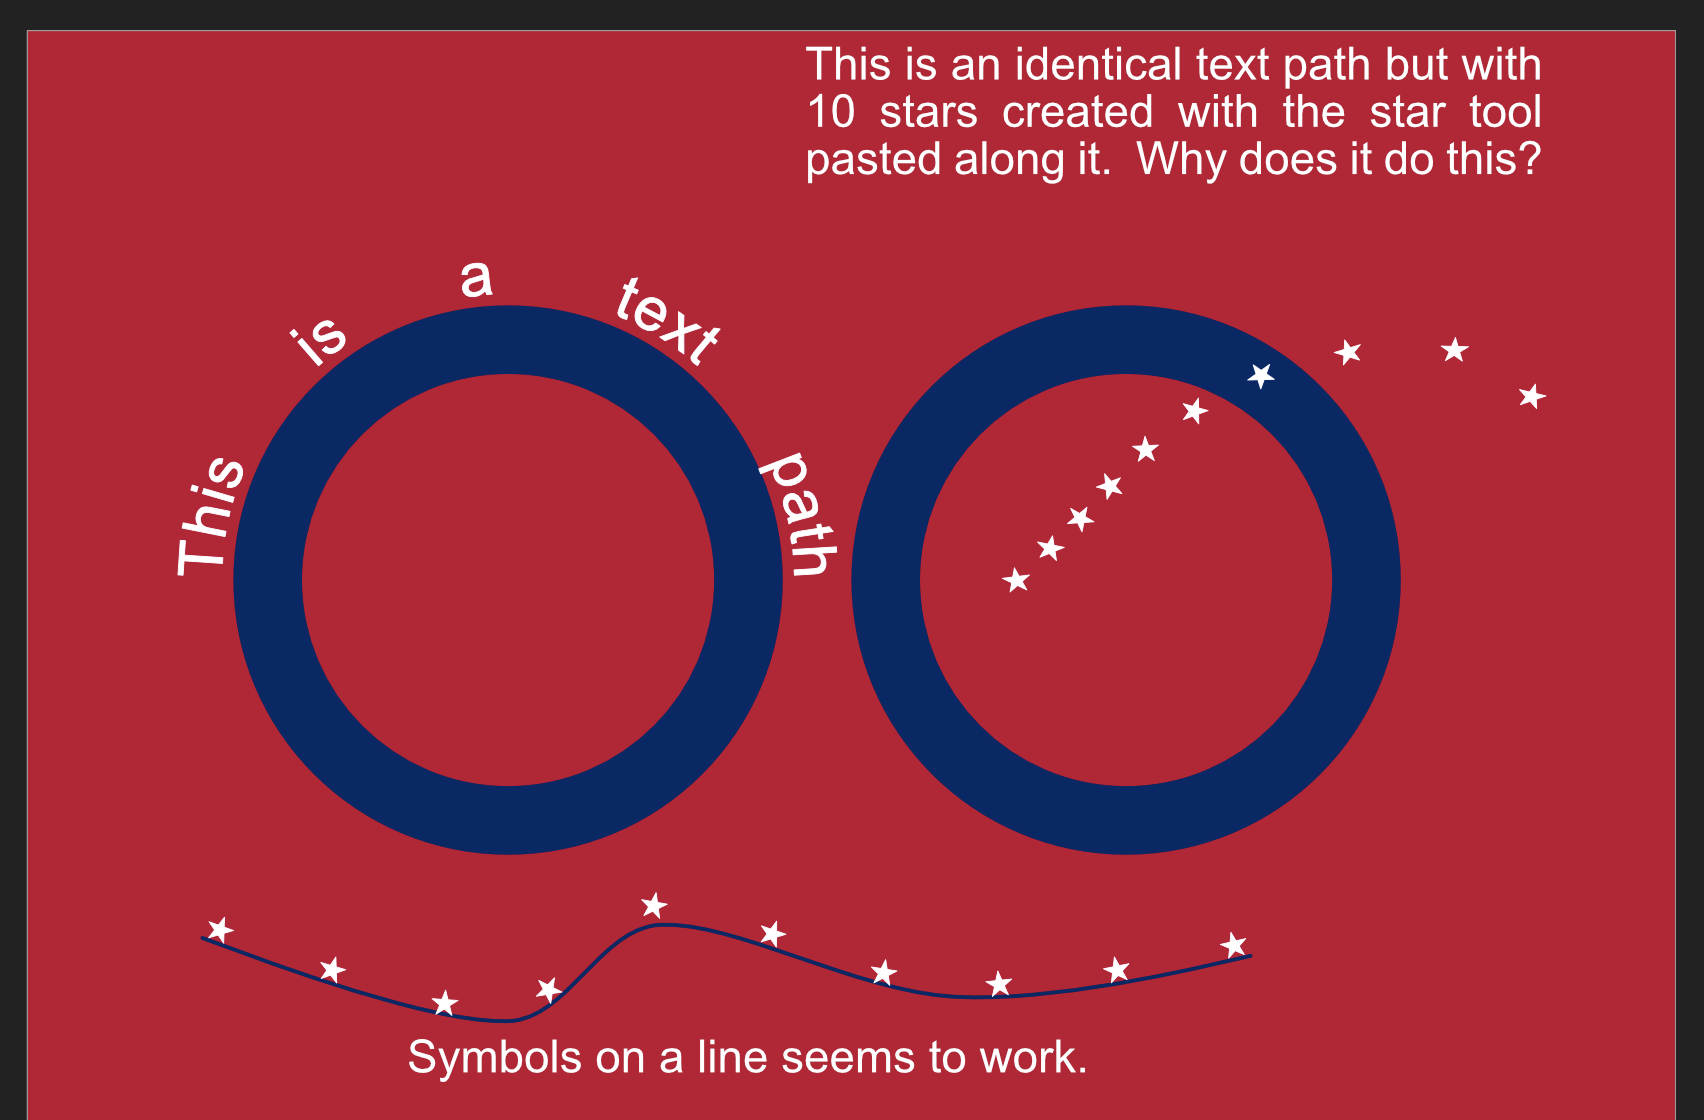
I'm using the "Star Tool" on the left side of the screen to make a star and then I copy it and paste it into the text. I suppose that counts as a simple shape? Basically I do this: Use the star tool to make a star. Use the circle tool to make a circle Select the circle and use the "Layer" dropdown and select "Convert to text path" Select the star and copy it Select the "Artistic Text" tool on the left. Hover the mouse over the circle until the cursor changes to indicate it's over the path and click. Paste one or more of the copied stars. Wacky placement ensues.
-
henryanthony reacted to a post in a topic:
Making Hex Grids for Mapping
-
Old Bruce reacted to a post in a topic:
Making Hex Grids for Mapping
-
Making Hex Grids for Mapping
Max Kaladin replied to Max Kaladin's topic in Desktop Questions (macOS and Windows)
Sorry it took so long to get back to this but life intervenes. Thank you for the advice. I've found that making a hex or half hex by drawing with individual lines made all the difference. Using the hex tool is what seems to cause all the problems I was having with snapping. I note that when I select a hex made with the hex tool, it has a border around it that's wider than the actual hex while one I make with lines has borders that are exactly as high and wide as the hex I drew. I suspect that's where the difference comes in. Making my own hex made all the difference and I was able to do what I wanted after that. Thank you all for your help! -
I'm trying to put stars around a circle. Looking online, it appears the way I'm supposed to do this is to create a circle, turn it into a text path and then use the artistic text path tool to put text on it. I create a star symbol using the star symbol tool and copy/paste it to the path and they go nowhere near the path I want. I try this with actual text and it works fine. If I try the symbols on a random wavy line I made and it works fine. What am I doing wrong with the circle? If it's inherent to the circle tool somehow, is there a way I can draw a circle or a half circle or something using other tools? Thank you!
-
Making Hex Grids for Mapping
Max Kaladin replied to Max Kaladin's topic in Desktop Questions (macOS and Windows)
Thanks, everyone! I'm sorry it took so long to get back to this but life finds a way to interfere with hobbies. The advice above is helpful. Some of those things were things I was already doing and some was new. In particular, the CTRL-J trick and the trick of making the grid half the size I want were both useful. I've been doing some experimentation off and on and I find the above works as advertised some of the time. The problem appears to be related to size. What I mean by that is that if I made a hex grid and a hex of one size, everything works just like everyone is showing above. If I do exactly the same thing, but make a different size, I get the weird snapping behavior and things are always just a bit off because of it. In those cases, it appears that the hex itself is the wrong size ever so slightly even though the numbers on the screen say otherwise. About the only thing I found that helped with this was changing from using inches for everything to using pixels. I encounter the same problem but more rarely. I think there is some rounding going on that's causing it since the precision is limited. If I use sizes that round well, it's all fine but if not then I get the issue with snapping. I expect I was encountering that a lot before in part because I am trying to make an overlay of a map of a known scale so I was calculating the exact size hex for the known scale and it's not a pretty number. (Though, even there, when I tried making the same grid on a completely new document it suddenly worked right.) Of course, the other thing I have not figured out yet is how to combine a bunch of symbols into one big symbol so I don't end up with a grid composed of thousands of individual hexes. Again, thank you all! -
Hi, I'm trying to make maps for tabletop RPGs (like D&D) and I'm trying to set up a hex grid (a honeycomb pattern, basically). This is intended to be an overlay on top of a map I'm making. Ideally, I'll have multiple grids in different sizes in different layers so I can turn the size I want on at any time, but first I need to get one grid right before worrying about that. What I have done is to use the polygon tool to make a hex with of the specific size (.25") I want. Then I used the grid tool to make a triangular grid with the same size as the long diagonal (the distance between two opposite corners), which is .289" in this case. I turned on snapping and tried copying a hex and moving it into position next to the other one but the snapping doesn't really seem to work right. I'd expect it to line up perfectly and I can just place the symbol but when I try to move a hex into position it seems to be jumping around to various spots that are close to but not exactly in line with the other. In particular, the diagonal sides seem to be hard to align. If I zoom way in and fiddle, I can generally get it right but it's pretty time intensive to do that for each hex. I've tried messing with the snapping settings but that hasn't really seemed to make a difference. I also suspect I'm going about duplicating this wrong. I tried making a sort of mini grid by painstakingly placing several hexes and then copying all of them and moving them into place to make a bigger grid so I could then duplicate that group and basically keep working my way up to larger and larger sets of hexes but I find sometimes that the snapping doesn't work right for those either (even worse, in fact). Plus, for making some grids this seems like it would get really unwieldy as I might have thousands of individual hexes to move. At one point, the screen wasn't really keeping up with the updates due to the number of individual hexes I was moving at once. I suspect there must be a way to collapse those into a single object but I can't figure out how. I'm looking for some suggestions about what I could do to get snapping to work better and to make the process of making large grids easier. I'm pretty patient but if there is a better way than lots of patience, I'd love to hear it. I'm sorry if this is confusing but I'm not a designer so I'm sure I'm not using the right terms and I've never learned to use anything like Adobe (the closest is CAD based software). There may be some really basic mistakes I'm making. I'm not suggesting there is any problem with the product, but with the operator. I currently own Affinity Designer and have the trial of Affinity Designer 2. Both on MacOS. Thank you.