darinb
-
Posts
28 -
Joined
-
Last visited
Everything posted by darinb
-
Encountering lots of weirdness -- new user
darinb replied to darinb's topic in Desktop Questions (macOS and Windows)
Tried Acrobat as an alternative to Preview but it also showed the error. Replaced the Photoshop files with jpegs and the "rectangle" or "line" error is gone but the other issues remain. My goal in trying out Publisher was to get down "on paper" a few ideas for a new photobook--The book would not be designed in Publisher but would give me something to show my book designer, etc. I've managed to export what I have to pdf and I'll delete pages from there (which will avoid the weird background-changing-color issue and will be good enough for my purposes. So I'm done with this for now--if I come across any more info on these weird issues I'll post here. Thanks for all of your help. --Darin -
Encountering lots of weirdness -- new user
darinb replied to darinb's topic in Desktop Questions (macOS and Windows)

-
Encountering lots of weirdness -- new user
darinb replied to darinb's topic in Desktop Questions (macOS and Windows)
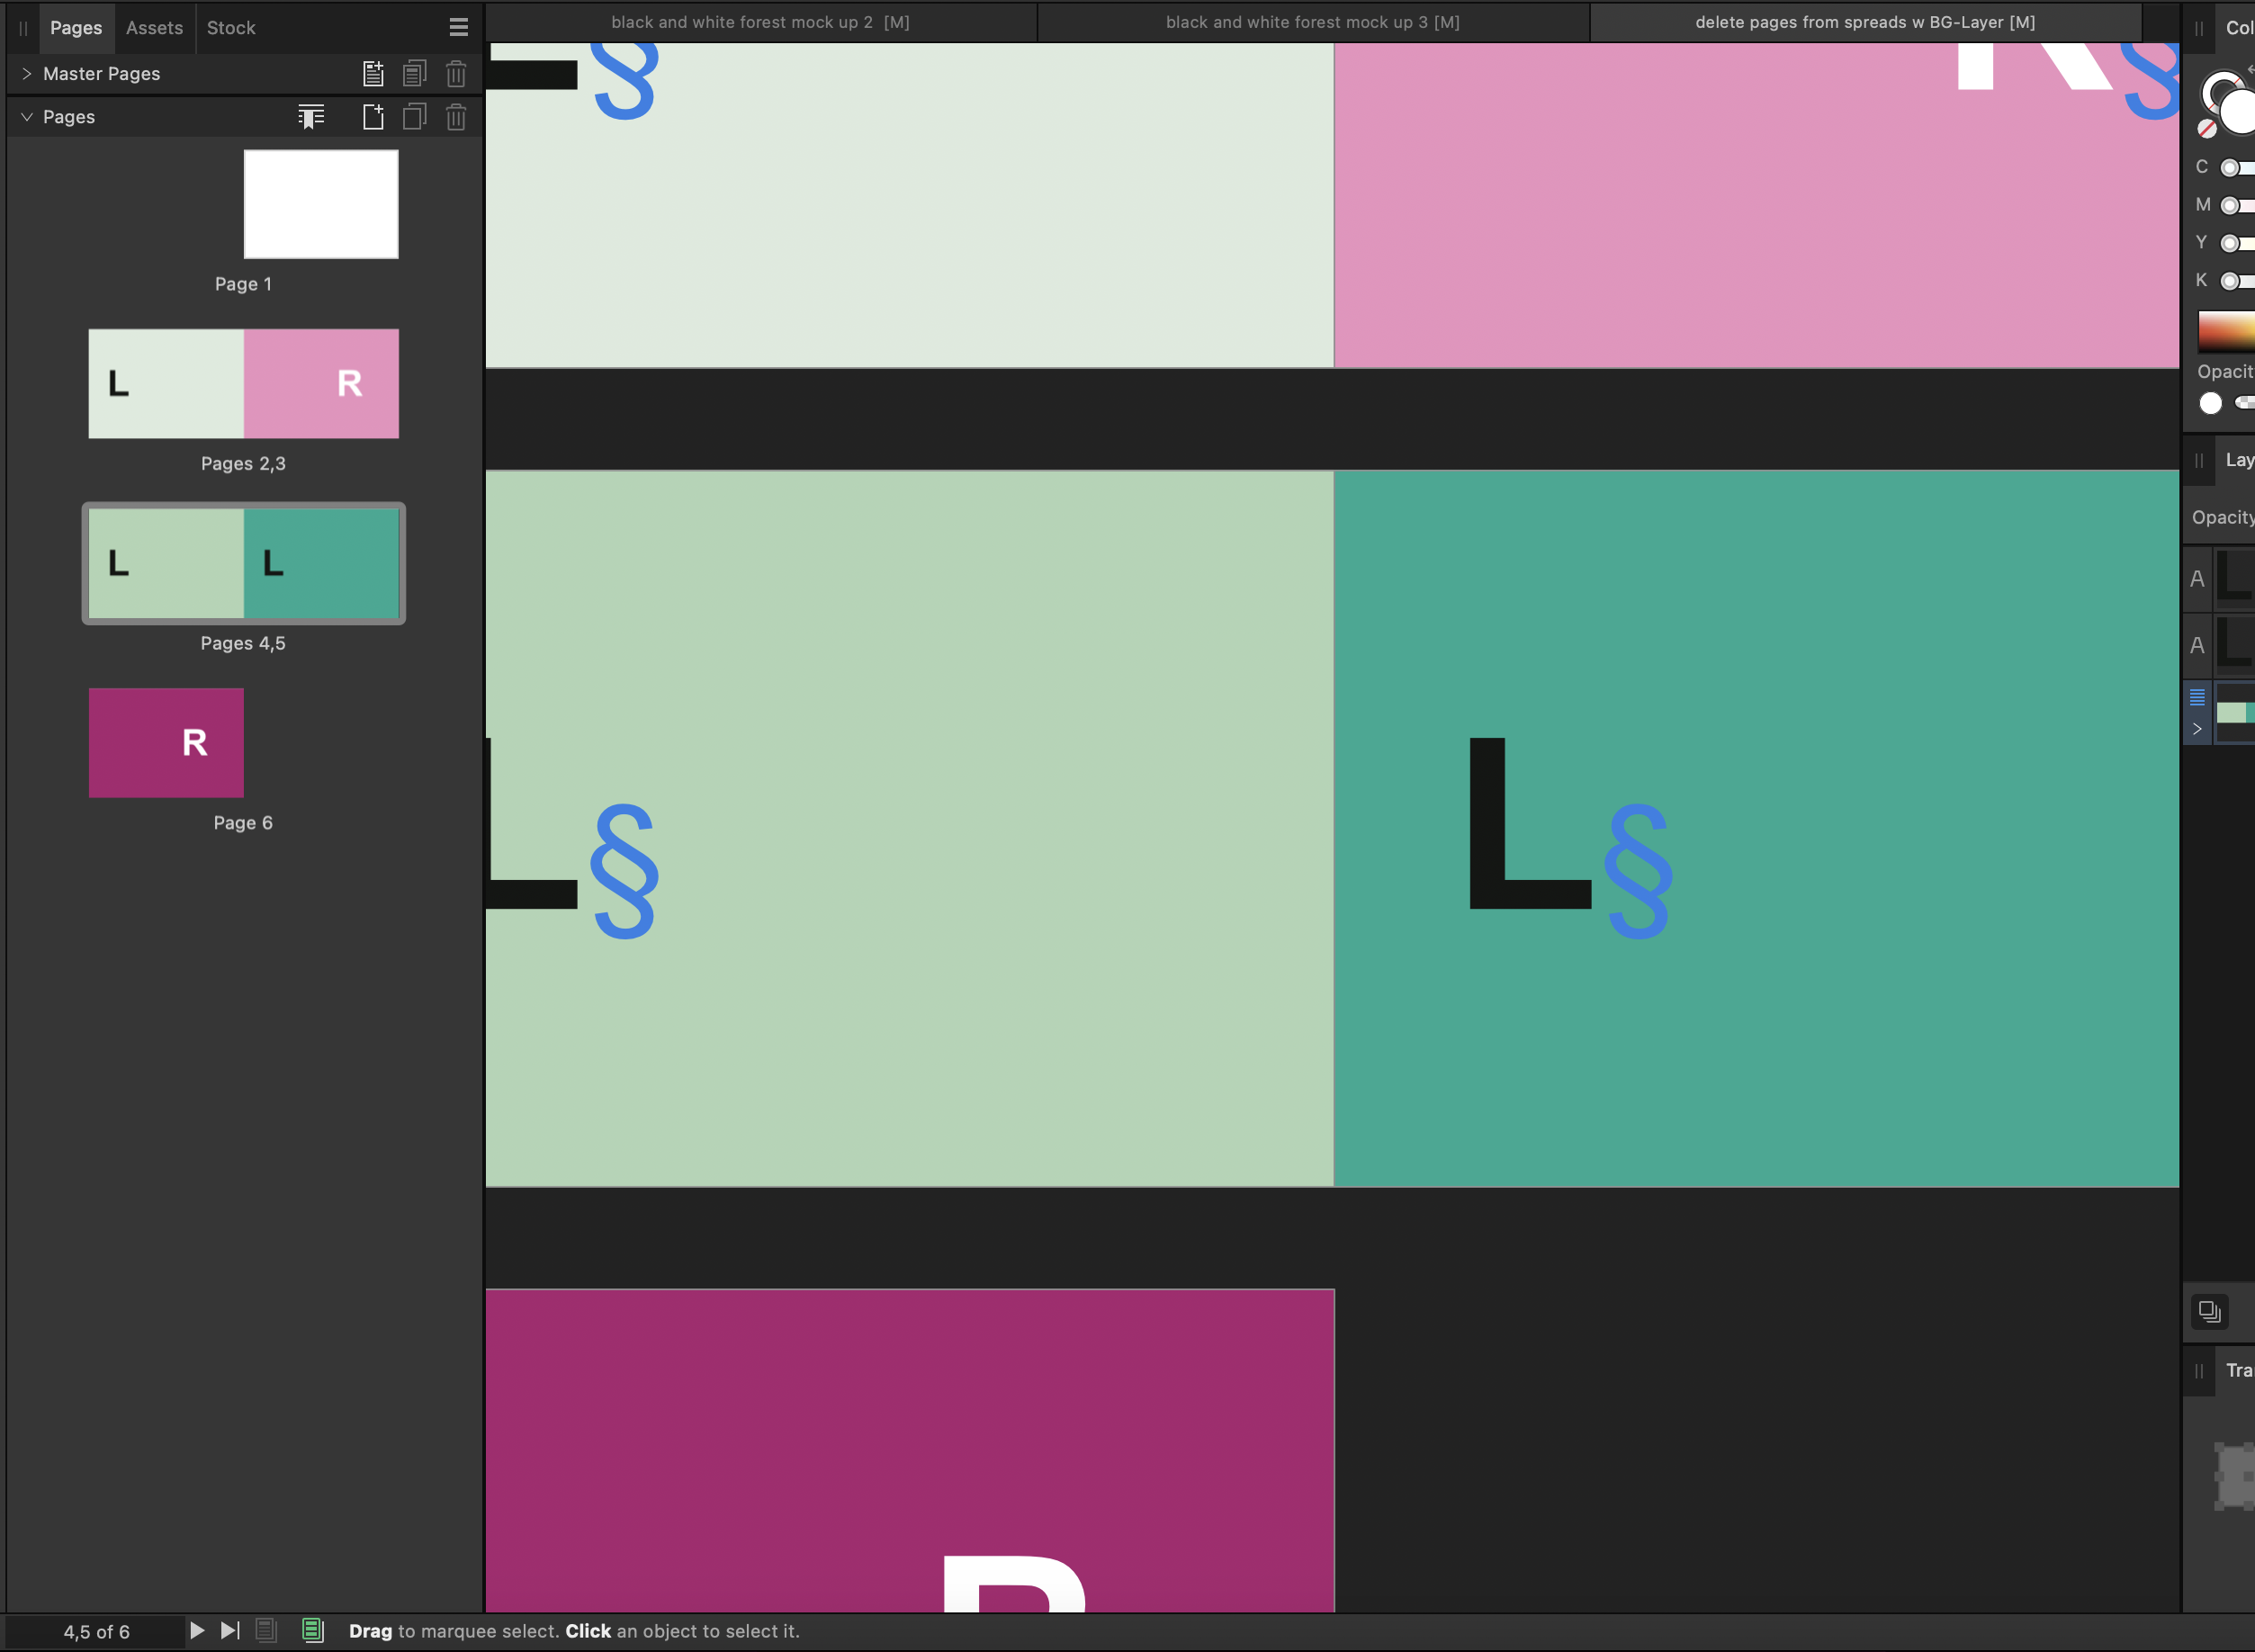
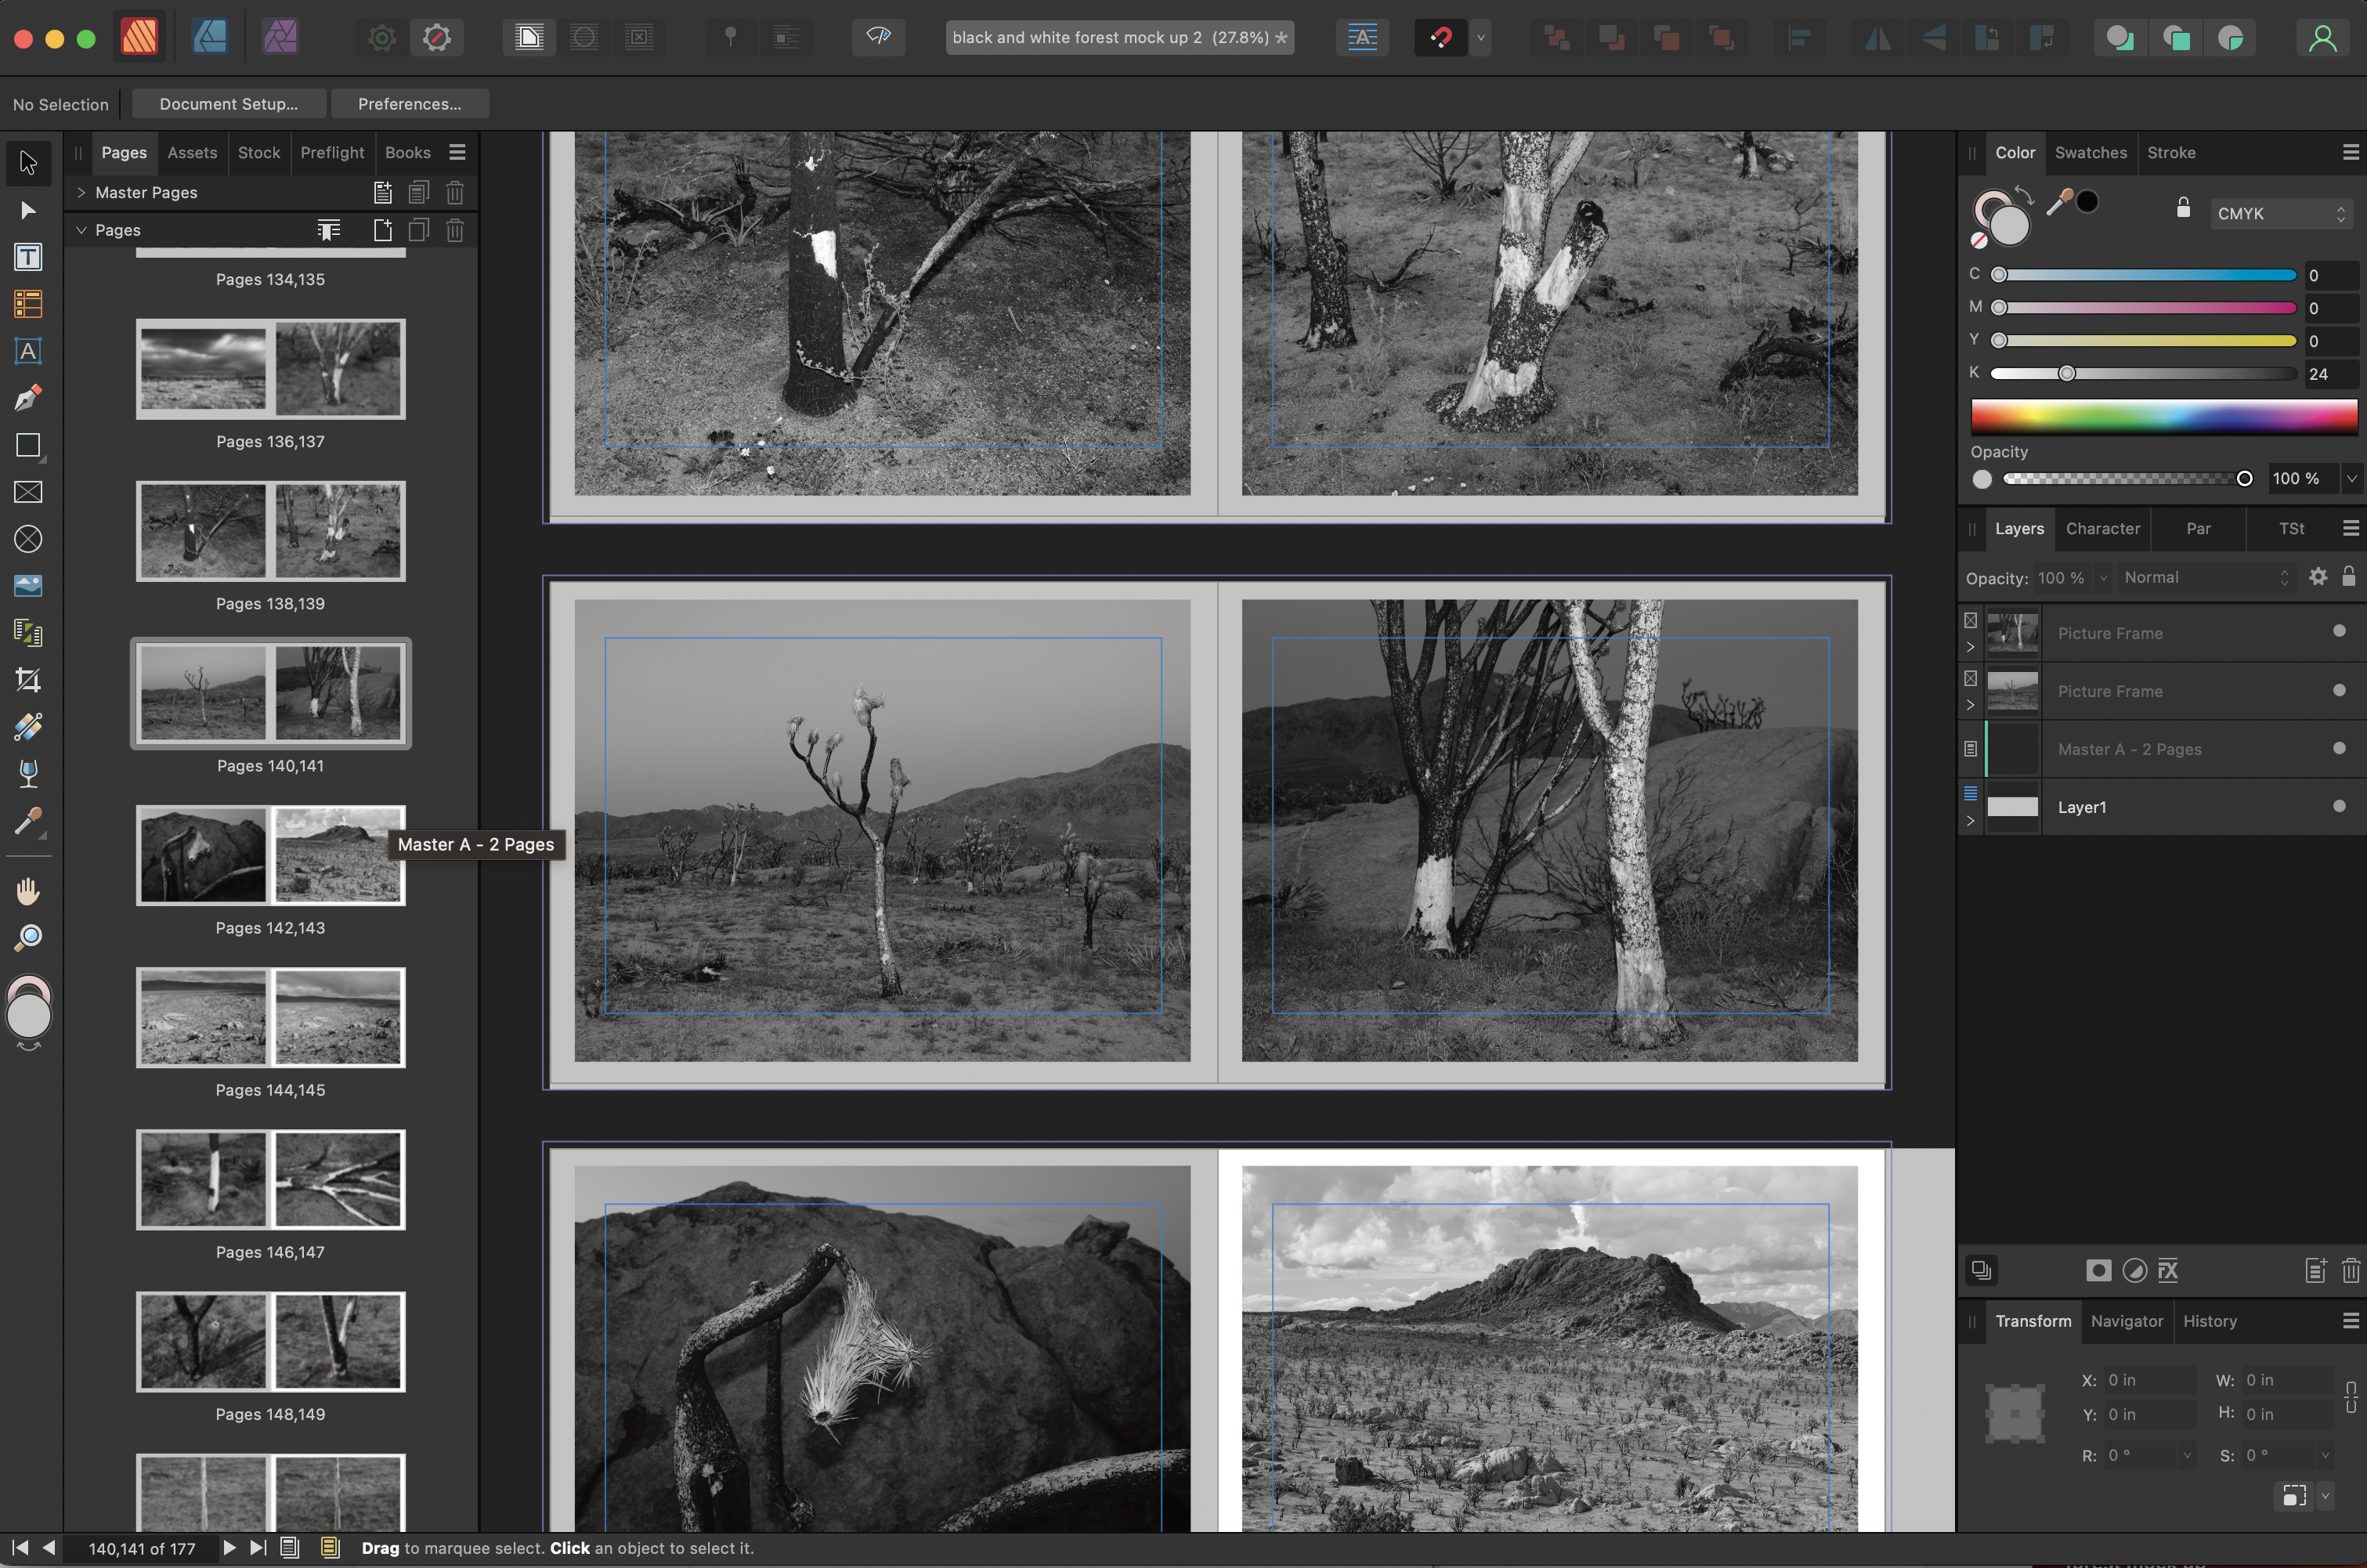
Hello, Oh, I know, I should have set up Masters, but this was my first time using Publisher and I was just playing around. I figured duplicating (which was quite easy) would amount to the same thing for my test run. I experimented--here are the results: Every layer on: Error Only Master layer turned off: Error Only left picture frame turn off: NO ERROR Only left Photograph turned off: NO ERROR Something to do with the left page, obviously, but what? And, again, no error is visible within Publisher--I can only see it on the exported PDF document. I tried turning on/off various options in the export dialog box but no luck. Then I tried substituting a jpeg for the Photoshop file on the RIGHT hand page--no error. Something strange here if what is on the left page interacts in a bad way with the picture format on the right page? --Darin -
Encountering lots of weirdness -- new user
darinb replied to darinb's topic in Desktop Questions (macOS and Windows)
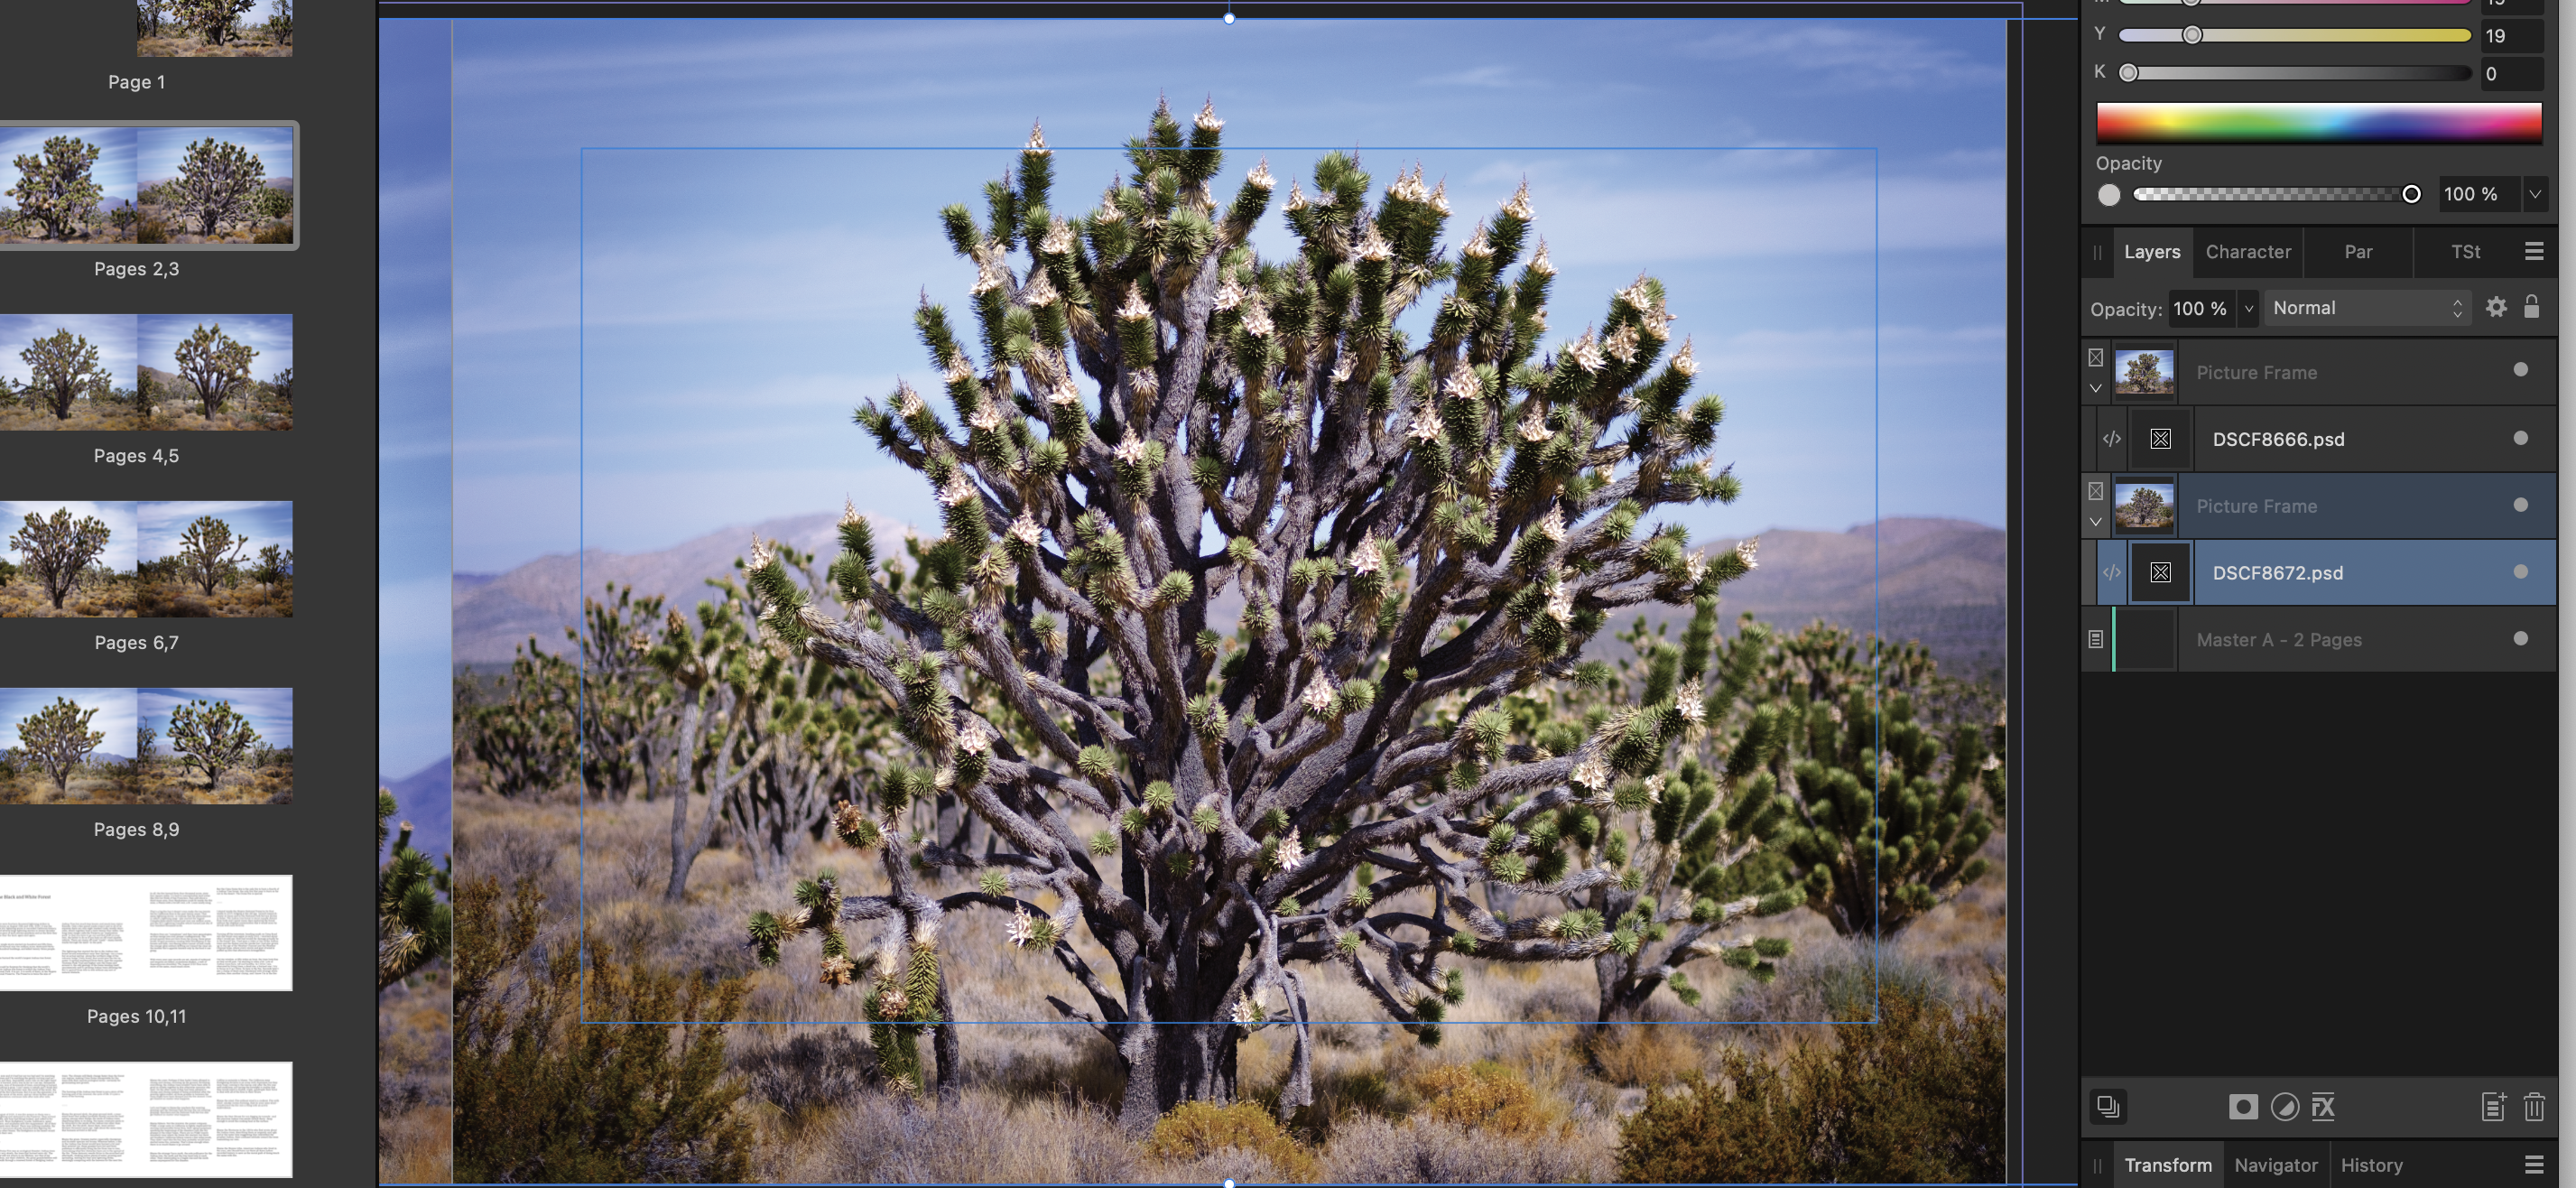
Hi, here is a sample screen showing one of the images within Publisher. All of the layers are in "Normal" blend more. I do not see any wayward elements. However, I do notice that these are photoshop files and so maybe that is a clue--is there a problem with using photoshop files? Note, I couldn't figured out how to set "Checkerboard Background." Also note, the weird problem is not visible inside Publisher--it only appears in the exported PDF. The b&w images with a white border are made just by placing an image in an image frame over the master. The black and white images with a gray or black background have an additional color layer created with a rectangle tool and a color-filled full-page rectangle. The master page is just a default master page with no elements. I'm not 100% I understand what you are saying. In the "pre-delete" screen shot you can see two background layers and two jpgs (one each from the image peaking in from the left). Once I delete the page and all of the following pages shift up one, I can see the background layer (the gray) has vanished leaving the border white, instead of gray. For reasons unclear, all subsequent spreads also lose their right-hand background fill layer. I hope that gets to your question. Thanks again for your thoughts! --Darin
-
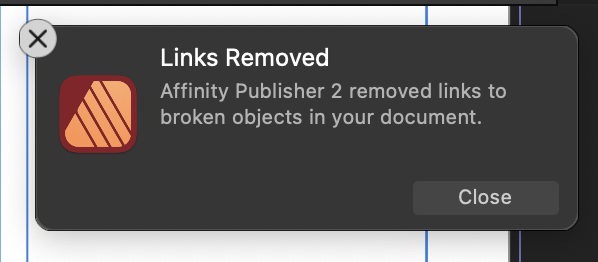
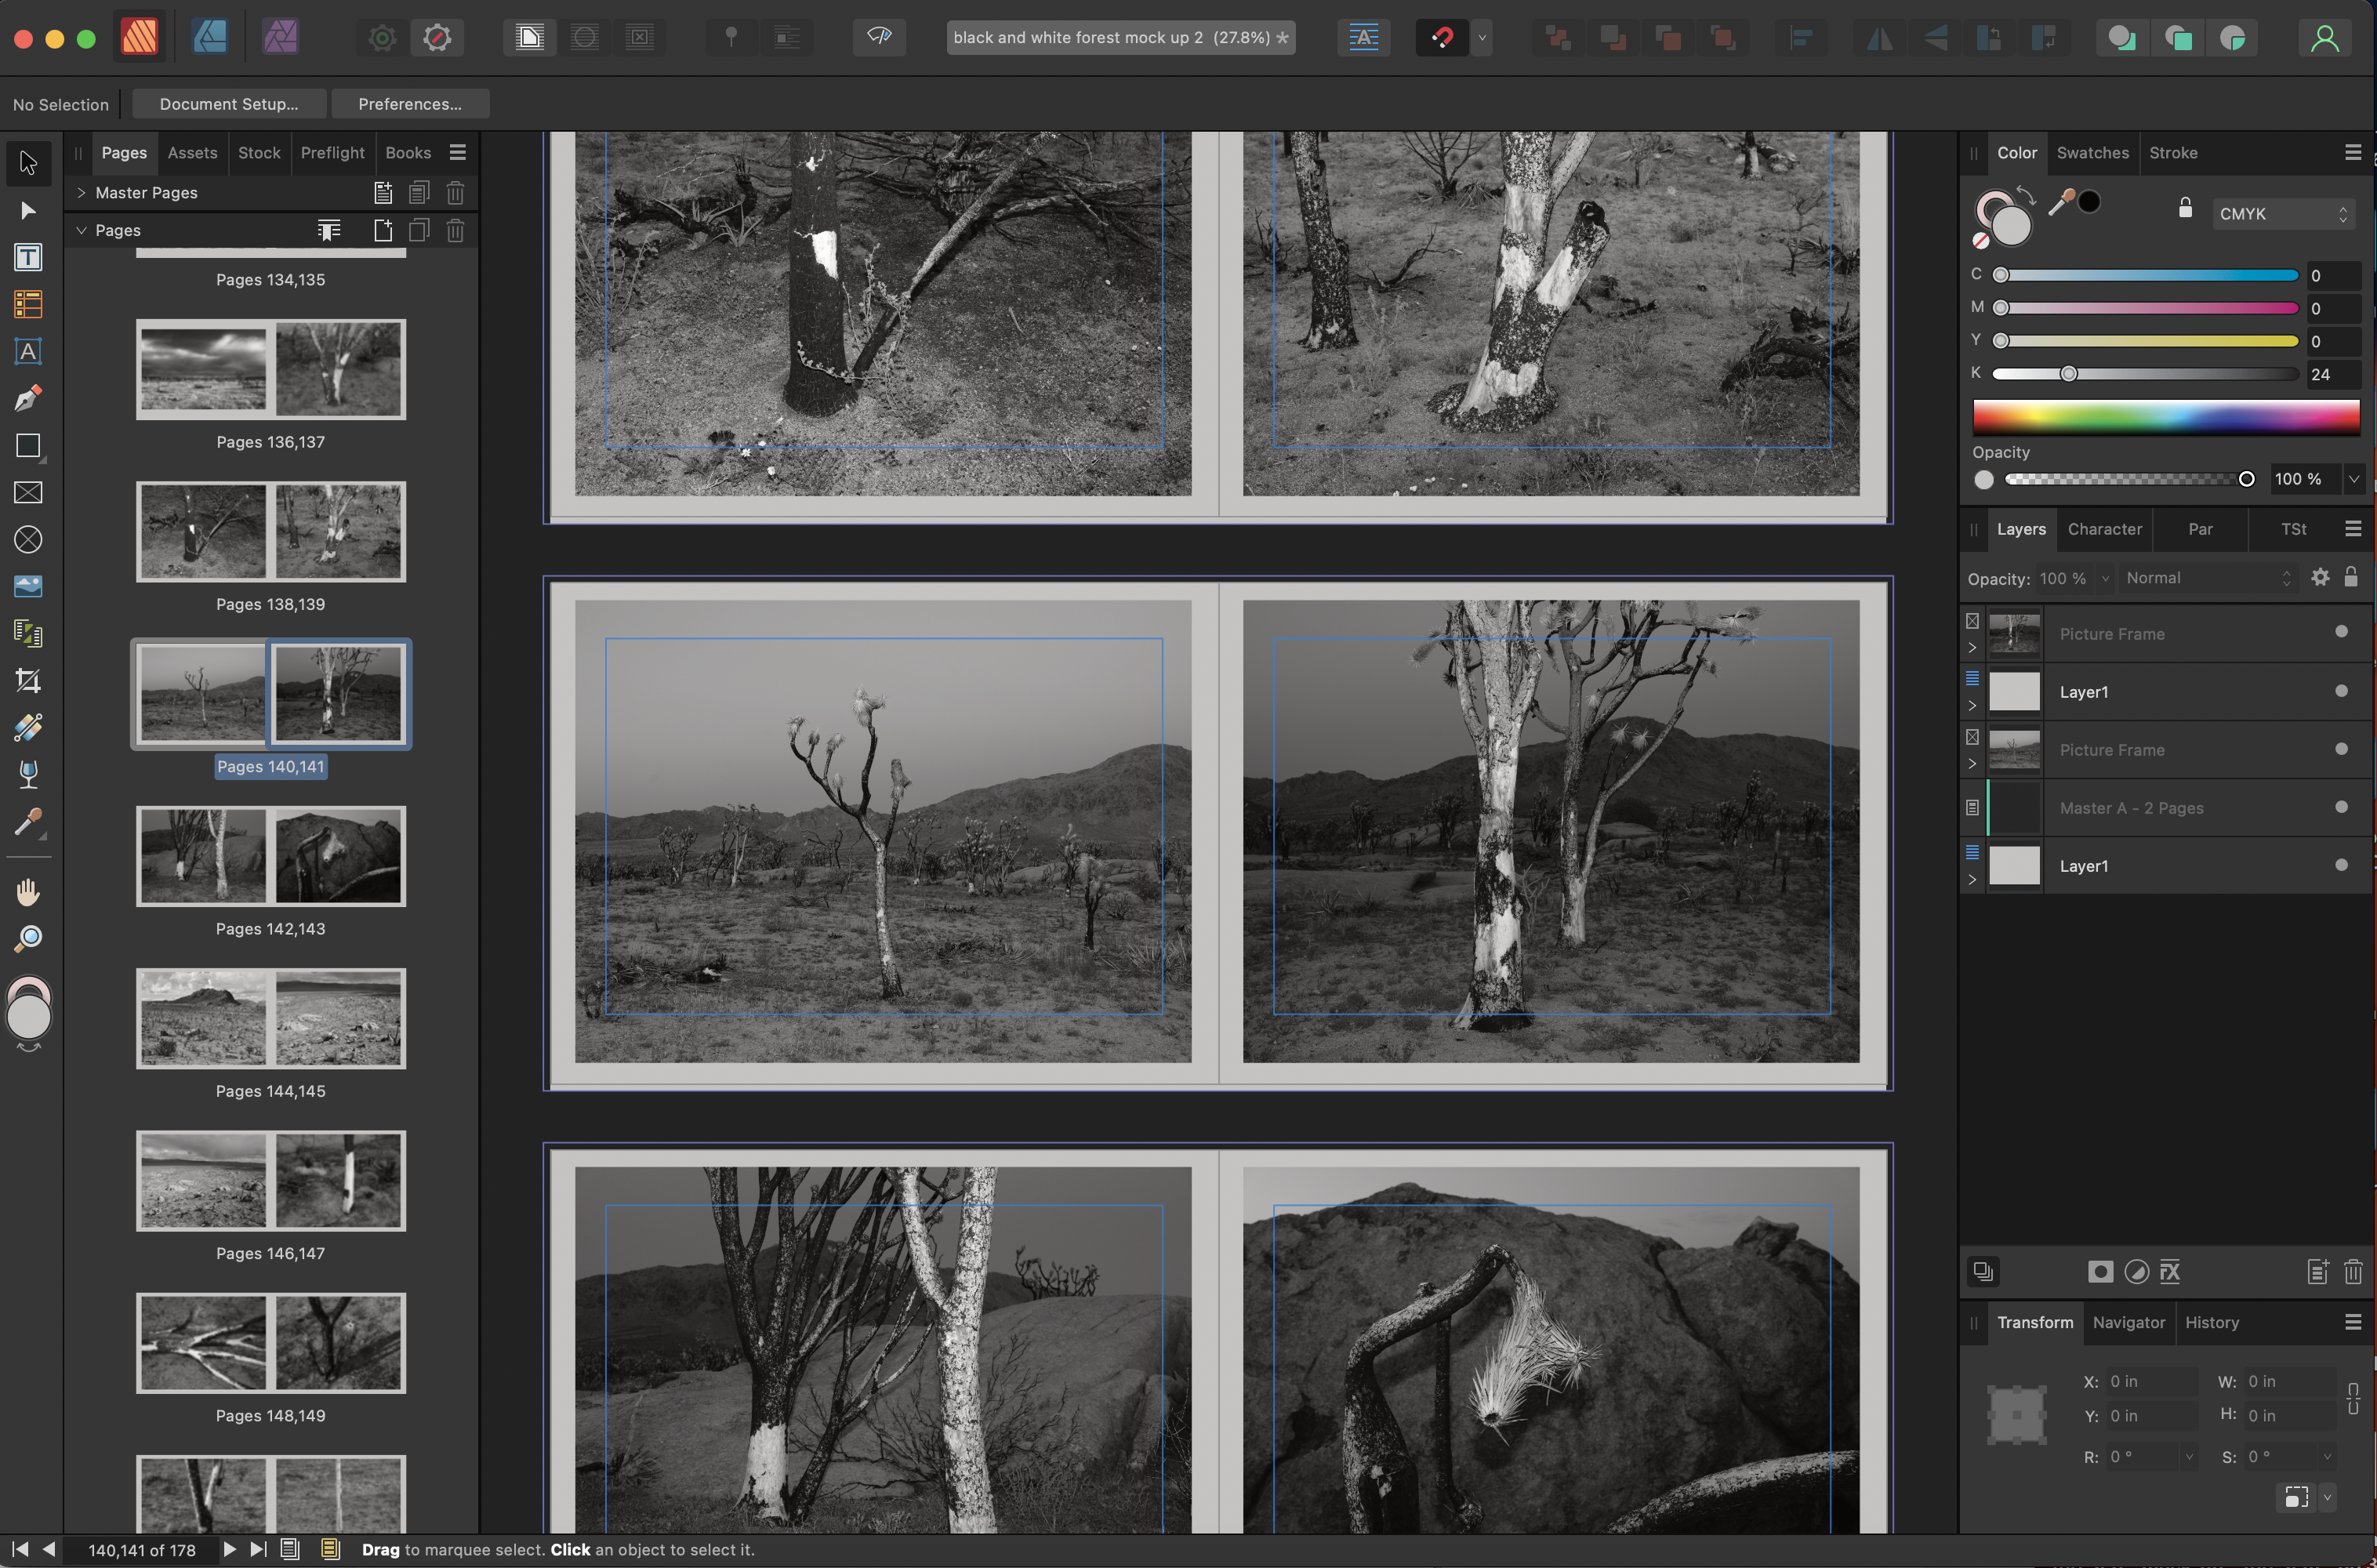
I'm trying to learn to use Publisher but am encountering lots of weird behavior. Here are four examples: 1) I'm working on a photo book. When I export to pdf (both print and small sized) the photo on the right has a vertical "line" which is also visible in the preview in the pdf reader. This line is visible within Publisher itself. I do not know if it is visible within the PDF export preview window as it takes forever to load. This issue has stopped my project and I either need to fix it or abandon Publisher. 2) Publisher uses a lot of memory. I have 96 GB and it gave me a warning at 32 when I first tried to export to pdf (but not since--I've relaunched the program without additional warnings). Project is 178 pages, mostly images (all jpegs). Activity Monitor routinely shows it using 60-80 GB. 3) On this file (I haven't tried others) I will sometimes get a warning box saying that links to broken objects have been removed. It offers me a "close" button and a "close" X in the top corner, but no indication at all what the warning is talking about or how to get more info. I can find nothing wrong with the file. And sometimes it will appear on opening, sometimes not, even when there has been no change to the file or the locations of any of the source files. 4) I made the page in the project by creating a page, using the image tool to create an image box, then using the shape tool to create a solid color layer (gray or black), which I placed behind the image--the color layer shows through at the border of the images. The first pages have white borders, then mid-gray, then finally black. I created additional pages by duplicating the first. When I delete a page I would expect that the subsequent pages would just shift one "space" closer, with no other changes. What I find is that from that point on the backgrounds all go white--but only on the right side. The right side shows the error no matter if I delete an image on the left or right. I am bewildered at encountering so many weird issues so quickly on so simple a project. Any insight would be greatly appreciated. --Darin
-
For many of the programs that don't yet support the GFX 100s but which do support the older GFX 100, changing the EXIF model from "GFX100" to "GFX 100s" will do the trick (mind the space in the new model name). It is the same sensor (for sure) and the same processing (I think) so this makes sense. As a side note Capture One--which I bought in September and my understanding was that I would get a year of updates--tells me that they will not be updating v20 with the small change to allow the GFX 100s files to import. So much for my year of updates! And all the more reason for Serif to build a DAM (ahem).
-
That's a sign! Puzzling but there it is. Thanks...Darin
-
Indeed, the workflow regarding a DAM with Affinity files is problematic. I wish there was some indication on whether they were still working on a DAM--if not, that's cool, and I can figure out what product to commit to and whatever workflow required. But if they are, and it might come in the next 6-12 months, then I'll do what I can to wait.... Affinity! Give us a sign! --Darin
-
A DAM seems obvious. Photo adjustment programs and DAMs are sort of merged to a large degree. Having a Photoshop replacement with Affinity Photo without having a Lightroom replacement seems like a halfway solution. Plus the DAM market seems quite fragmented. There's Lightroom, Apple Photos, Capture One, and many more. I suspect Affinity can bring both their high standards to play here and offer integration with their other products that will make for quite a compelling product. In video? DaVinci and Final Cut are already strong there. I don't see people crying out for something else and I don't see the same opportunities for integration with their exiting apps. Animation is too much of a niche. 3D texturing, ditto? If we are doing niche please, somebody do a modern e-book creation app. The current situation is quite bad.... --Darin
-
Shortcuts for auto rotate, deselect, zoom in/out?
darinb replied to darinb's topic in Pre-V2 Archive of iPad Questions
Thanks. I did try before to "turn on rotation in all tools" in the preferences and the feature drove me nuts--rotating when I didn't want it to. Locking the screen in global preferences is suboptimal but I think I'll try it and see if I can get used to it. Maybe they will add a preference checkbox down the road. -
Shortcuts for auto rotate, deselect, zoom in/out?
darinb replied to darinb's topic in Pre-V2 Archive of iPad Questions
I'm trying to get that to work, but no luck. Freehand selection tool-->Add mode-->draw the area-->long press...but nothing?? [Update] I just tried the long press with my finger and the context menu appears right away. Has several options--very nice. Cannot get it to invoke with Apple Pencil 1. This would be the perfect solution if it worked with the Pencil! -
Shortcuts for auto rotate, deselect, zoom in/out?
darinb replied to darinb's topic in Pre-V2 Archive of iPad Questions
-
I'm starting to use the iPad version of Photo and have a few minor questions that I don't see in the tutorials so far. 1) How to turn off auto-rotate? Of course I can lock the iPad at the macro level but I like that feature for every other app. Turning it on and off that way isn't ideal. I'd really just like Photo to always be in horizontal mode. 2) How to deselect? I want to make a series of selections (in Add mode), create a new layer based on that selection, then make a change while observing it. Is there a shortcut to deselecting or hiding the marching ants? I know in "New" mode I can just tap with the pencil, or in any mode I can go to the dropdown menu to hit deselect. Is there a faster way? 3) Speaking of Add mode, is there a way to change the tool default to "Add" vs "New"? 4) When I'm working I will often want to zoom in close and then, while working zoom back out to look at the overall, then zoom back in. I see that I can tap twice with the pencil to zoom out to fill frame, and I know I can use the studio function on the right to choose a magnification (and, of course, use my fingers to zoom in and out). Is there a better shortcut for this when using the pencil? Thanks! --Darin
-
I'm stitching panos on two computers using the same Samsung SSD: A 2012 iMac and a 2016 MacBook pro. Much to my surprise the pano functions (both stitching and rendering) take about 50%--or more--longer with the newer machine. For the iMac I use a USB-C to USB-A cord, for the MacBook a USB-C to USB-C cord. I tried a different cord, and tried different USB-C ports on the MacBook. Stitching, for example, six or eight 16-bit Tiffs originating from a Fuji XT3. Specs screenshots attached below. I see that the processor is (to my surprise) faster on the desktop, but other programs seems much quicker on the MacBook. Memory is larger on the older machine, too. Can it be that my old Mac is faster than my laptop???? Suggestions? --Darin
-
Spent the morning looking into this and still not clear--maybe I should rephrase my question: When I use a soft-proof layer or when I choose Document-->Convert Format/ICC profile, and then I choose an icc profile, the image on my screen changes (as one would expect). So, #1, does that revised image represent what will be printed by the printer (in this case an offset printer using CMYK)? Or, #2, do I need to check the Gamut Warning check box in the soft proof layer and make further adjustments until less of my image in out of gamut? #1 is how I *think* things (should) work. #2 is what the tutorial video shows, which makes no sense to me--if large areas of the image are still out of gamut after the profile change what then did the rendering intent do--should it not have brought everything into gamut via a choice of methods? Bewildered a bit, hoping to avoid renting Photoshop. --Darin
-
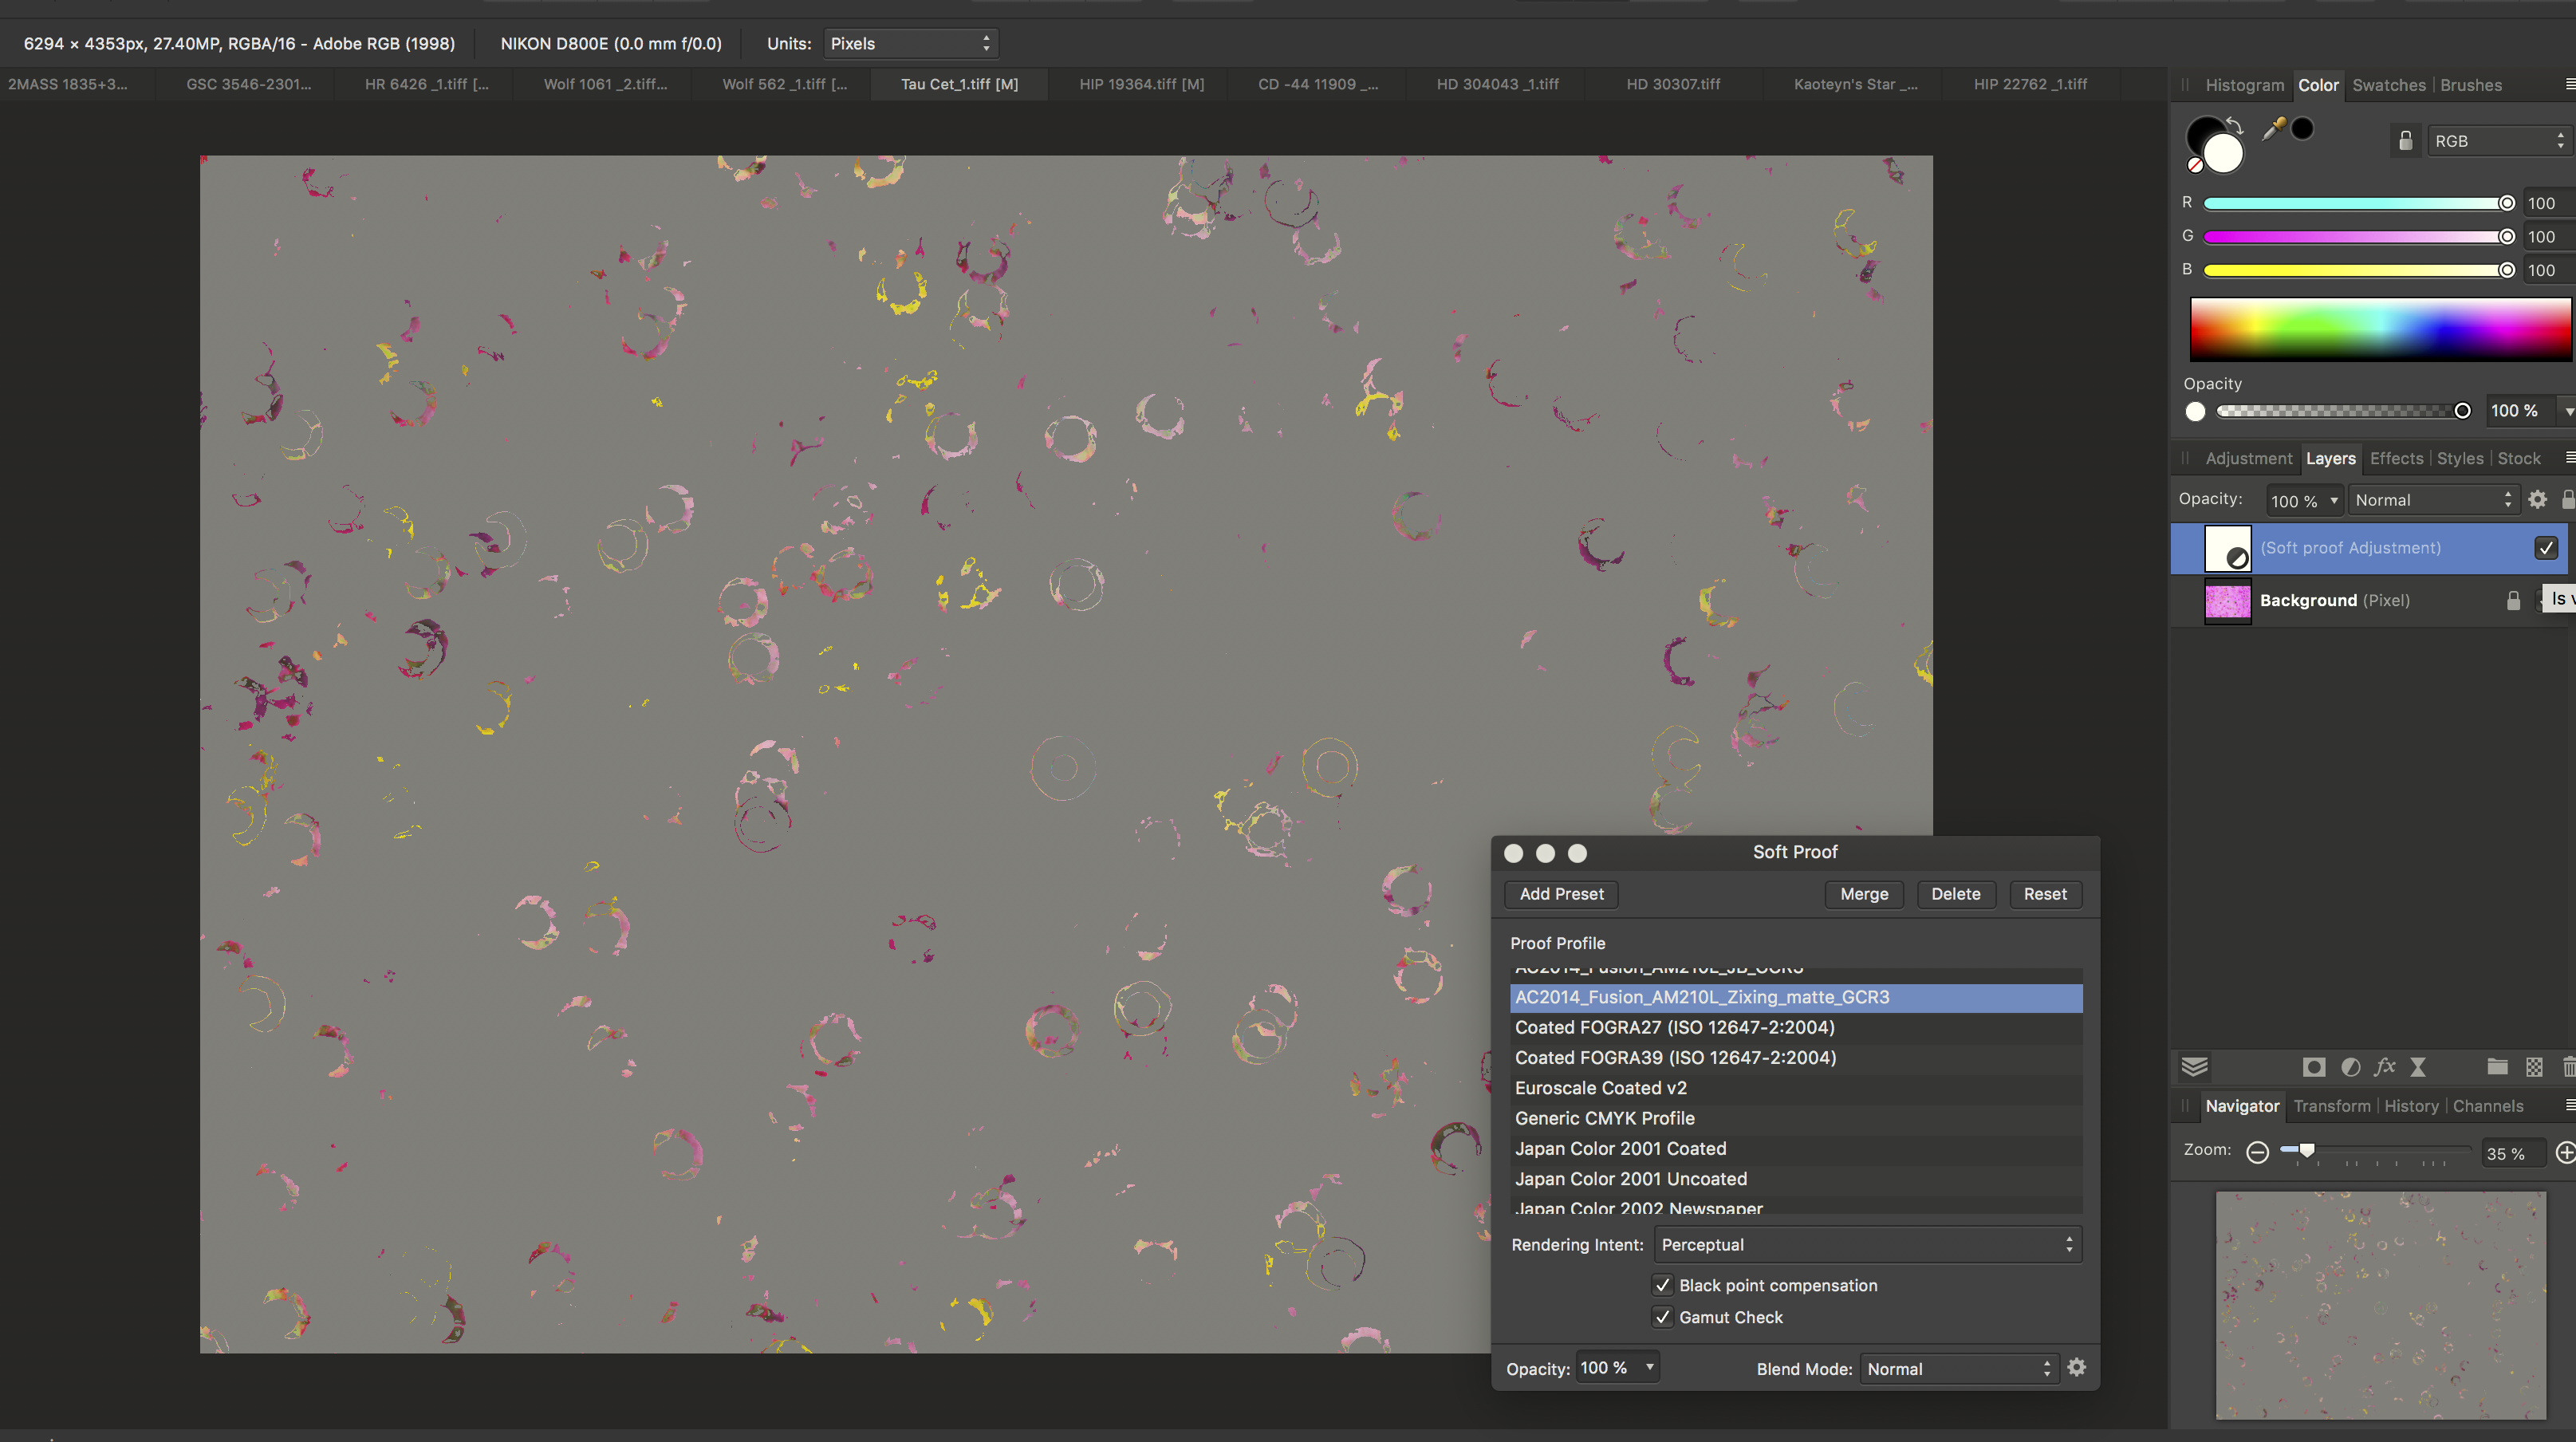
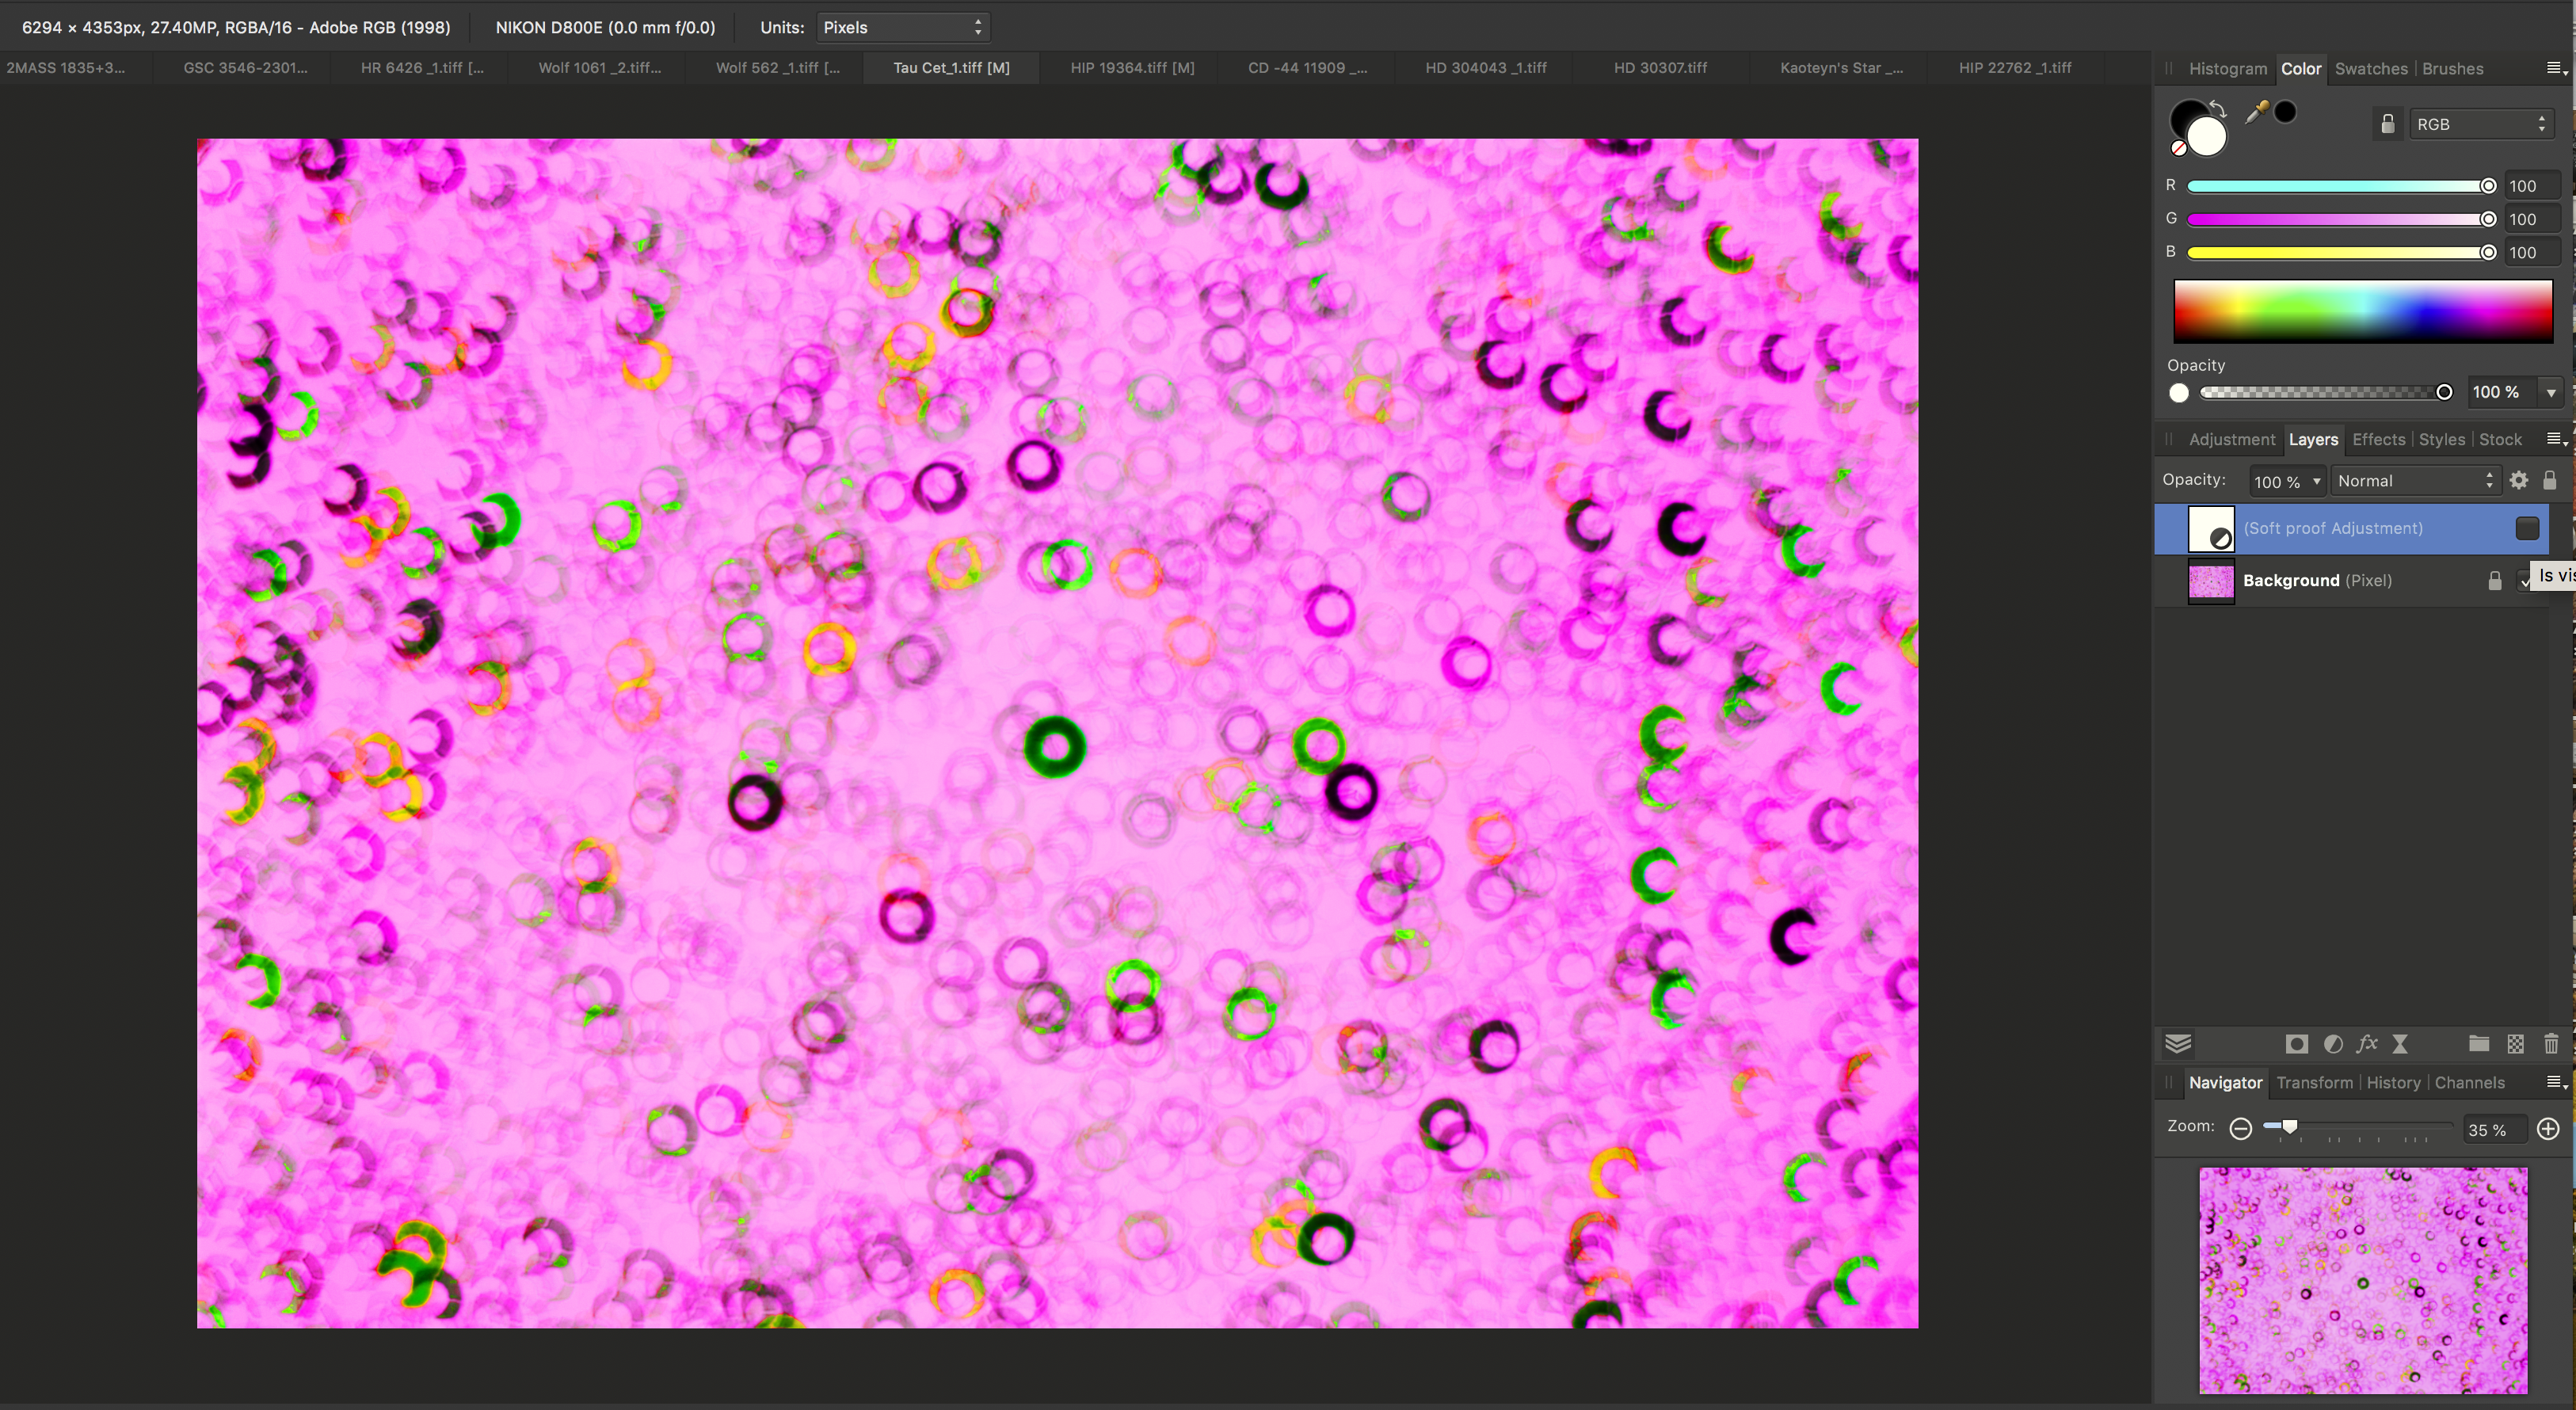
I'm converting my images to CMYK for offset printing (an art/photo book) and I'm new-is to all of this. My question: I have a series of images that is made up entirely of super-highly saturated colors (just shy or just over the limit of Adobe RGB color space). When I use a soft proof layer and choose the appropriate icc from the printing company the image, of course, looks much duller, many of the color relationships change (sometimes drastically, purples and oranges, for example, seem doomed). I think I get all of that. What puzzles me is that when I check the out of gamut checkbox in the soft proof dialog box my *entire* image is shown in gray as being out of gamut. I understand that the Adobe RGB version is entirely out of gamut--it's at the edges of its own larger color space--but why is soft proofing still showing me everything is out of gamut when that layer is visible? I thought the soft proofing was supposed to show me (in an approximate way) how the image will look with the paper/process and I thought that all of the various rendering intents brought everything back into the smaller color space, just using different methods. Should I pay attention to the out of gamut areas in the soft proof layer? Or just work to make the image look good? Attached are screen grabs showing the image with and without the gamut box checked, and one with the soft proofing turned off. Thoughts? --Darin
-
Hi @stokerg. Thanks for the link to that page. Useful stuff. I *will* be getting an icc profile for them to match the paper etc. @kaffeeundsalz Thank you for your thoughts. Very valuable. So my basic plan is to make them look good in RGB, convert to CMYK, then tweak it in CMYK to see if I can improve things? I feel so way out of my element when I start reading about ink loads and so forth. Maybe I'm more worried than I should be? Maybe I'm overthinking it? A few questions: I have a book designer and I will give him to CMYK images which he will then use to replace the low res ones we used to design the book. How important is it that I give him exact-sized images, vs just giving him all images at maximum size and let InDesign do the size adjustment? Aside from, color, what about sharpening? Sharpen until it looks right on screen, even if not at final size? We will get two rounds of paper proofs as part of the process, so we will have a chance to make course corrections. I'm sure one I get this underway it will be more starightforward than it now seems. --Darin
-
I am a photographer and am publishing a book of my work. It will be printed at an offset printer overseas (not Blurb, etc). I'm self-publishing so am bearing the full expense. I need to convert my RGB image files to CMYK. I've spoken will a color separator who offered great advice, but too expensive to have him do it for me. I am not an expert in color management. The printer will give me an icc file. So.....is there a video or web site that might offer newbie tips and tricks that I can lean on? Doing a straight conversion in Affinity seems to get things close but I could really use a "top ten things to look for" to help gain confidence in doing this right. What I've found so far seems rather vague. Any photographers been through this before and want to suggest lessons learned? Thanks, --Darin
-
Ahhhh, thank you very much. Choosing the drop down "preserve edibility" seems to have made all the difference. Thanks! --Darin
-
I'm exporting to psd. I expected the layers to be there, but they are not. I'm new-ish to Affinity--is there something I should look into? I don't have photoshop but I saved the psd file and reopened it in Affinity. No layers. I also sent it to my designer ti check (he has photoshop but no Affinity). No layers. I'm sure I'm making a dumb mistake, but what? --Darin
-
Hello, I'm trying to export to Photoshop and preserve the layers (a background and another image). When I export it gets compressed to a single layer. What am I missing? --Darin
-
Maybe it is right in front of me... Is there an Affinity Photo equivalent to the Photoshop View-->Proof Colors menu function? (i.e. a way to preview your image on screen using the tonal curve of the paper you plan to print on) Thanks, --Darin