pipkato
-
Posts
34 -
Joined
-
Last visited
Everything posted by pipkato
-
Thanks R C-R. I've actually tried this on two separate Macs, one Intel and one Apple Silicon M1, both running Ventura 13.4 with the same problem. It's really strange. Roy
-
Thanks very much NathanC. Yes, the the Nik Collectio runs fine as standalone apps. I've been using them for years with Affinity Photo until this issue. I'm beginning to wonder if it's something to do with the latest MacOS 13.4? I'm glad to hear they worked fine for you. I'm wondering if there's something weird about my install sequence. Does it matter whether a normal standalone install of Nik 5 is done first or second? Do I have to select the DXO folder created in Affinity Photo or just the enclosing folder? Regards, Roy
-
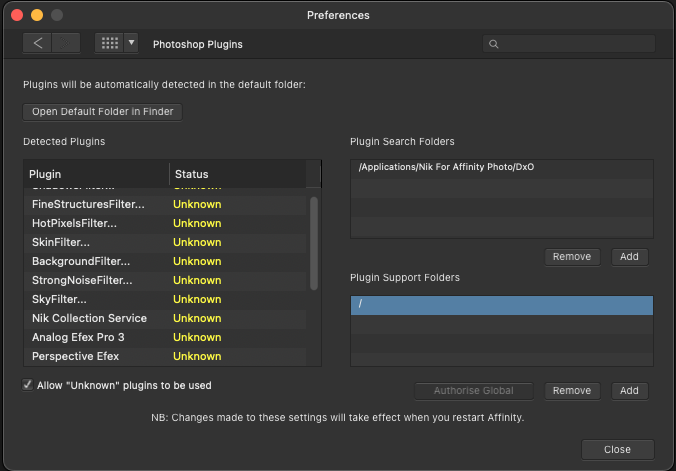
I'm using the above on an M1 Mac Mini. I've set out my steps below but I'll summarise here. Did a brand new install of Affinity Photo 1.10.6 and of 'Nik Collection 5' into its own folder in 'Applications'. I followed the DXO advice and the steps in the Nik Collection User Manual for V.5. I created a new separate folder in 'Applications' and named it 'Nik for Affinity Photo'. I then did a new installation of Nik Collection 5 into that newly created folder. When I checked the folder it had a 'DXO' folder within which were folders for each of the Nik Collection Filters. I then opened Affinity Photo and followed DXO's instructions to activate the Nik 5 plugins properly. I found that they were effectively already activated since the 'Search Folders' was already filled in with the correct location and the 'Plugin Support Folders' likewise so 'Authorise Global' was already selected and could not be selected again. I'm presuming this was to some extent because I'd already tried this process unsuccessfully before deciding to try reinstalls of Affinity Photo and Nik 5. Anyway, to be sure to be sure I 'Removed' the selected folders and 'Added' them again allowing me to 'Authorise Global'. I then deselected and reselected 'Allow 'Unknown' plugins to be used. After all this I closed and reopened Affinity Photo. The Filters appeared to be there and with an image in place could be selected. But nothing else happened - no new Nik window, just the existing Affinity Photo window. Any suggestions much appreciated as I have a pile of old images to process. Here are my steps in the process. New install of Affinity Photo 1.10.6 New install of Nik 5 in its own folder Create new separate 'Nik for Affinity Photo' folder Install Nik 5 again to that folder (produces a ‘DXO’ folder inside of which are folders for the Nik filters). Open Affinity Photo and select Photoshop Plugins. Folder already detected but tried deleting and adding the ‘DXO’ folder again All the plugins showing as detected on the left ‘Authorise Global’ and ‘Allow Unknown Plugins to be used’ already selected. I 'Remove' and 'Add' back the folders and click 'Authorise Global', untick and tick 'Allow 'Unknown' plugins to be used'. (see attached image). In Affinity Photo I can see the filters and with an image open even select them but the window does not changes to the Nik window - it just stays on the Affinity window. I can select Filters/Plugins/Nik Collection and choose a filter but it never moves on to the Nik window.

-
Thanks firstdefence. I'm going to do some more experimentation with selection tools in general. I did manage to get 'Refine Selection' to display, but still don't know how. My image is an old relatively flat black and white shot. But I think I can learn a lot from trying the various methods advised above. If I draw a complete blank I might post it here. Thanks again.
-
One final quick question. I just tried the 'Select/Refine edges' suggestion but 'Refine Edges is greyed out. My image is in black and white. Is that the reason, or should I have done something before the 'Select/Refine Edges' command? Thanks!
-
Thank you all very much for all that great advice - Toltec, FirstDefence, Smadell. I'll give those methods a try. It's great to know there are so many alternatives. Thanks again!
-
I have some people against some white walls and would like to be able to mask them and make the white wall whiter and cleaner. Can't seem to find out how in the tutorials. Can someone suggest a way for a relative novice? Thanks!
-
Thanks to everyone who offered great suggestions. I tried the approach suggested by toltec and it worked really well. Much appreciated!
-
Hello Toltec. That sounds great. Thanks for the info.
-
Hello GabrielM. I'm afraid I don't have enough experience with Affinity Photo to understand all that. Any chance you could suggest a tutorial or tutorials that deal with those techniques. Thanks!
-
I'm working on a colour photo and the subject has quite red-rimmed eyelids. I would like to use a soft brush and selectively brush out the redness in the eyes. Can anyone suggest the best way to do this? Thanks!
-
Thanks John. Very helpful.
-
Hello John, and thanks for replying so quickly. All the images I tried show as 'grayscale' when I checked. I don't know much about the whole colour space area, but I tried exporting some of them from Affinity to JPEGS and changed the colour space to RGB. And, as you suggested, I was able to use my Nik plugins on those images. I'll also take your advice and check out my scanner. It's an elderly Minolta Scan Multi II which I'm using with Vuescan software. I never came across this issue before, but maybe everything else I did was originally RGB. Anyway, it's great to find out what the cause of the problem is. I presumed that since the Nik software dealt with B&W images as well as colour that it would be happy with any B&W image. But it appears not to be the case.
-
My Nik plugins are greyed out on some images but not on others. I recently scanned some old B&W negs to JPEG images and was trying to use my installed Nik plugins in Affinity Photo but they are greyed out. Other JPEG images I have in my folders work fine and all the Nik plugins are available for both B&W and Colour images. It seems that all my recent scans will not work with Nik plugins. I presume I've done something wrong but I've no idea what that is. The only thing I've noticed that seems new is that when I open those problematic B&W scans in Affinity Photo I get a window with a message saying 'Assigned Profile - Affinity Photo assigned your working profile, (Greyscale D50) to this unprofiled document' which disappears after a short while. I don't really know what this means or if it's significant in relation to the Nik Plugins issue. Can anyone help? Thanks!
-
Thanks v_kyr. Thanks too for those links, which look very useful.
-
Apologies to all who replied. I thought I was automatically notified if replies were made to this topic, but just now discovered I have to select 'Follow' the thread. So I just checked in to see why I'd heard nothing. 1. Walt. I've used the 'Soft Proofing'before and it does help, but I'd prefer to look at a print and want to try and cut down on ink and paper usage. 2. firstdefence. Thanks for the suggestion. I've seen that in tutorials for Photoshop users. I'll probably try that approach. However, I'm not really that familiar with Affinity Photo so hoped someone had already done the spade work and created a step-by-step tutorial. 3. R C-R. Thanks, but as I said above I'd prefer to be able to look at variations on actual paper. 4. v_kyr. What I meant was that the results I've had from mostly B&W prints (from scanned film original negs) have fallen short of what I could have achieved with the originals in a darkroom. If I had to put it simply I would probably have printed on a slightly harder grade of paper to get more punch. My inkjet prints seem to fall a little short of that 'punch'. But I've seen commercial inkjet prints that look great, so I know it's possible. And, I'm assured that the P800 can deliver the goods. 5. firstdefence. Thanks a lot for checking this out and offering the suggestion. If I go the soft proof route in the end I'll make sure to rename the layers. Apologies to everyone again for this tardy reply.
-
Is there a tutorial anywhere on using Affinity Photo to print the inkjet equivalent of darkroom test prints? That is, using a small sheet of paper to get print variations on a selected area of an image. I want to make some A2 prints on my Epson P800 printer. My tests so far have not been what I wanted, although my monitor is properly profiled and I’m using the correct ICC profile for the paper. So, rather than continue to waste ink and paper, I was hoping to use a key area of my image and print a strip series of variations on e.g. an A4 sheet to decide on my best settings. Thanks!
-
Printing assistance (persona)
pipkato replied to paristo's topic in Older Feedback & Suggestion Posts
This is a very good idea. If Affinity don't do it maybe some third party could sell it as a plug-in on the Mac App Store. -
Hello James, About my 'printing to an exact size query', I may have confused you with my borders reference. I was just trying to say that it was not a 'bleed' or 'borderless' print. I haven't done much printing recently but I have had awful problems trying to print an image to an exact size. For example, if I have a 10x8 mat and I want to print just slightly bigger so that the image will be just about covered by the mat opening, but no more. I've had real problems doing that in the past with other photo editors which didn't always print the exact size I set. I just wondered if AP can reliably print an exact image size - for example in this case 10.1"x8.1". Thanks again, and thanks too for the new stuff on borders and Nik plug-ins.
-
Hello James, and thank you very much for that really useful tutorial on Printing on a Mac and for all your wonderful tutorials. If only all other companies took the approach of Serif. I have a further query I hope you can help with. I regularly have to print a photo with borders that must fit an existing matt. I use an Epson P800 printer. I would like to know how to print to an EXACT print size, so that I can be absolutely sure the edges will be very slightly overlapped by the matt. I've had lots of problems with this in the past using various Mac photo software. I hope you can help. BTW what's the story on Serif's DTP program? I was a great fan of PagePlus and I'm looking forward to its successor. Best regards!
-
My apologies, Alfred. You're absolutely right ... in my rush to keyboard I did misread your post. And in all the years I've been looking at those filters and using them it never occurred to me. Regards, Roy
-
Thanks again smadell and Michael for taking the trouble to create those screen shots. Very useful and an adjunct to James' excellent new tutorial. Thanks too to Alfred for discovering that my YouTube link is still buried somewhere in my earlier post. BTW Alfred 'Neutral Density' in it's original photographic use is not such an oxymoron - It's 'Neutral' in that it does not affect the colours in the scene, and 'Density' in its ability to reduce the amount of light entering the lens. But there were variations, as I mentioned, in my response to James above. Some of the graduated filters were also ND but many were tinted for special effects. Regards, Roy
-
Hello James, The effect in your tutorial (big thanks by the way) is just like 'graduated neutral density filters'. When I was shooting film I would always have standard ND filters without any graduation , and some graduated ND filters for dealing with skies. In fact a common one, a resin type made by Cokin, was called a 'Tobacco' filter, if I remember correctly. It was graduated from the Tobacco end to clear and usually used in the reverse of your warm tint effect. It gave the sky a nice warm sunset type look.
-
Thanks very much James! That would be fantastic. I'm an old school darkroom photographer and spent a lot of time 'burning in' skies. So I'd love to be able to manage it easily in Affinity Photo. Looking forward to the tutorial.
-
Thanks again MJSfoto1956, but I'd rather not post the photo. It belongs to a friend and I don't want to get involved in permissions etc. But, as I said, it was originally quite underexposed on the foreground. It was taken with an iPhone 6 against a morning sunrise. I managed to adjust the foreground so that it looks quite decent, but in the process lost most of the information in the sky. As I mentioned in my earlier post, I did manage to bring them a lot closer together in Affinity but could not get the gradient working properly. Following the PSE 9 tutorial worked immediately and I could control the sky. So I have more or less solved my problem, but not how to achieve the ND effect in Affinity. I've searched online video tutorials for some help with this but it seems no one has dealt with it in Affinity Photo. I'm surprised at that since I would have thought enhancing or controlling the sky would be a fairly common problem. I hope Affinity address it soon in their tutorials section. But I'm sure they're inundated with requests for tutorials, and they have done a terrific job with what they've provided so far. Thanks again!