

Glyphs
-
Posts
181 -
Joined
-
Last visited
Posts posted by Glyphs
-
-
OK, this is going to be hard to explain, so here is a sample file. This is part of an image I edited in Affinity Photo. I stripped it of all its layers save the problematic ones. I have been working on a werewolves story, and needed the werewolves on the cover to have different fur colors, so I asked my colorist to send me a file with the flats on a layer, so that I could better select the werewolves' furs, and update the colors myself. The result has been fine with the previous versions of Affinity Photo, but since the updates, the cover file updated itself too, and not for the better. Not sure if I understand how it works, but here is what you can do with the attached file: Just develop the Teared Cloth group, and put its layer out of the group. To change the colors, I had created three group layers titled Red, Blue and Brown. As long as the Layer 1 stays in the group, the colors are fine. As soon as I put it out of the group, the colors revert to their original version. This didn't happen in the previous versions (and I didn't have to put the Recolor Layer in a group for it to work). Does anyone has any idea about what is happening?
Update: I have tried to add a Levels layer on top of all the layers inside the Test folder, and it also cancels the colorization layers effect. The only way to avoid this so far, is to select the Level layers and put it out of the Test Folder, or to ctrl-click the Levels layer and place it in a group. I have tried a few other Adjustment Layers, and had the same problem. This bug might be affecting all the Adjustment Layers.
-
1 hour ago, walt.farrell said:
I don't think there's any way to apply a macro globally like you want.
I'm a bit puzzled by your comment about having to use the Move Tool, etc. Why not just navigate using the page navigator down at the left side of the Status bar?
Ah, I hadn't seen the page Navigator. I'll try it next time, thanks.
-
Still trying to optimize my workflows with Publisher. Now, I'm trying to simplify the localization of my books. I'm almost there, but a few things are missing. The good news is that I can actually use Photo's Macros on Publisher's pages in the Photo Persona, so even if Macros haven't been implemented yet in Publisher, I can still find a workaround. The bad news (so far) is that I haven't found a way to use Photo's Macros in all the pages at once. Each time I use a macro on a double page for example, I have then to go to the next double page, then select the Move tool and click in an empty part of the workspace so that the layers' page are visible, and then use the same macro again. So my question is: Is there a way to use the same macro on all the pages of a document at once?
-
I just bought Publisher, and it does look great for optimizing my workflow, but I still have a few questions about StudioLink: Is there a way to have the same saved interface in Designer and Designer for Publisher for example? With the same Assets in the Assets panels, the same Brushes in the Brushes panels, and so on?
-
On 4/23/2019 at 10:26 AM, mac_heibu said:
As I said, no answer possible.
Please decide in first place, what you want us to answer. As I told you, you changed your question very often during the discussion (RGB values, corresponding CMYK values, CMYK important or not — and if: why asking about RGB values and show us CMYK values without saying/know, how they were achieved?
As I said: We would need at least(!) the Publisher page, which contains the element you showed in your last GIF. Otherwise, as I said, no answer possible.
Sincerely sorry for all this. What happened is that Kindle Tech support told me there was a problem with the black values, and I thought it came from… the black values. I have received my new proofs today, and everything is now fine. Here is what I did, and what (I think) happened: as the black values seemed to be fine in the original files, but seeing that Kindle's software had created a color difference between the layers, I thought the problem might come for the layers, so I flattened every layers on every page, so that each page actually contains only an image, and it worked.
Now, of course, I have a new question since flattening the whole file page by page is time consuming, but I'm not sure if this question should be part of a new thread or not. Obviously, at first, I had exported a PDF with some kind of layers in it (or transparencies, as Kindle Tech Support seems to call it). I don't know how PDF conversion works, but it's obvious Kindle's software recognizes the same layers in the PDF file as in my original file. I have looked at Publisher's PDF export options, and don't know what option I should have checked to not have this layers problem, so my question is: is there a way to export a PDF with flattened layers, instead of flattening the layers in the Publisher's file itself, or if not, is there a way to add such an option?
I understand that you couldn't answer questions about the files generated by Kindle's software without having a look at these files, but I can't ask Amazon to send me the files they use, and a lot of us are going to use Kindle's services to publish printed books, so this problem is bound to happen again. I think the simplest way to do this would be to add an option to have Publisher flatten the layers in the PDF only when exporting the file. Should I start a new thread with this question?
UPDATE: Finally found out you can do this by exporting in PDF/X-1a: 2003. I didn't try the PDF (flatten) option yet, but I'll make a few tests with Amazon Kindle. Sorry for the trouble.
-
5 hours ago, mac_heibu said:
The values in your GIF are showing CMYK values, which are massively to high! Since your document is a RGB document, which you hopefully(!) exported correctly — and following your intentions — using the correct color space and colour profile, it is completely up to Kindle to convert correctly. An ink coverage of that height is definitely not correct, but this is not under your responsibility.
Before going on in this discussion, we should clear some thing up!
You are talking about a „Designer“ page, which is „cut and pasted“ into Publisher. Your sample file is no „Designer“ file but a „Photo“ file. And: Did you try not to copy and paste, but to place the image?
Didn’t we talk about RGB values (R=0/G=0/B=0) up to now? Didn’t you tell us, the CMYK values are not so important, because the book is published online? Why do you show us CMYK values? How were these values achieved? Which conversion profile was used?
In short: To investigate the „issue", it is necessary
- to have a look at the exact page, where the animated GIF was taken from.
- to know, which steps were undertaken and which colour profile was used to convert the RGB document to CMYK,
Otherwise, no valid statement is possible.
I kept the default values for the Publisher document and the PDF export, so there shouldn't be any problem with the RGB file or the color profile.
I copy files from Photo files. I select all the layers, then choose Merge Visible, and copy and paste the merged layer into a Publisher page.
I am showing you the result of Amazon KDP conversion. The GIF image is what they sent me. I don't know anything else yet. I don't think I could ask Amazon to send me the converted file, but I could try anyway, adding to my request a link to this thread.
I remembered yesterday that they sometime have a problem with what they call "Transparency" in a PDF. Maybe this whole thing actually comes from their process, so what I did is flatten all the pages layers, and send them a new PDF. I should receive a new proof in a few days.
-
11 minutes ago, mac_heibu said:
-
Look at the attached sample files: 1 AffFoto file, 1 AffDesigner file, 1 AffPublisher file and the exported PDF.
The black areas are defined as RGB 0/0/0 (document profile sRGB), placed in Publisher (RGB document, sRGB profile) and exported as sRGB PDF. The colour are and remain RGB 0/0/0. - Your sample document is a publisher document, with placed pixel(!) layers. Exported as PDF and opened in Acrobat Pro, the blacks show RGB 0/0/0. Exported as a RGB TIF and opened in Photoshop the blacks are RGB 0/0/07.
So: I can’t see a problem.
@eluengo: In most cases your approch is ok. But even if the export is a printsble PDF, it should be (and is!) possible to create the document in RGB and leave colour conversion to the output routines of Publisher. The biggest caveat is black text in images (as is in the initial posters document) will end up as multi-colour-black in the PDF output and that normally is unwanted.
Yes, in my Publisher document, the pixel layers should be the Comic book Designer flattened file and the fill layer (that I copied from an Affinity Photo document). Fill layers help me create a resizable background for each of my documents, be it Designer, Photo or Publisher files.
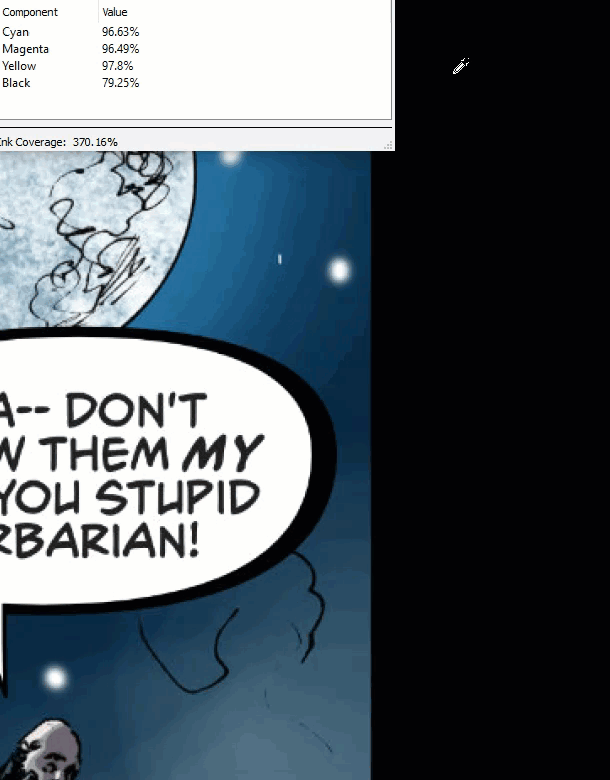
Kindle Support sent me the attached file about the PDF document I sent them. It shows that there really is a difference between the blacks. I did the same with the eyedropper in Affinity Publisher and didn't find any color difference in the blacks, so It looks like the difference appears only when the PDF is exported. I don't see any visible problem with the text. The colors are as they should be. The only problem is the background on which the pages have been pasted, but I can't seem to reproduce it. I even opened the original PDF in Affinity Photo. When I used the eyedropper on a page, there was no difference between the blacks either. I don't know how Amazon ended up with this result, but I do see that it has to do with the pasted images onto the black background.
I am at a loss of ideas, at this point. Maybe I should try to flatten the layers in the publisher file, and send them the resulting PDF, to check if it solves the problem. If anyone has an idea, suggestions are welcome.

-
Look at the attached sample files: 1 AffFoto file, 1 AffDesigner file, 1 AffPublisher file and the exported PDF.
-
2 minutes ago, eluengo said:
I’m not an expert, but preparing a document in RGB that is an light composing process (i.e. a projection, presentation), but a document that has to be printed should be prepared in CMYK that is a method of adding inks to obtain a colour. In CMYK a pure black has (in order to avoid an excess of ink that deteriorates paper) C0M0Y0K100, or a bit of C if texture should be cold, or a bit MY if texture should be warm. And black ink is frequently printed on top of the other inks. So a good practice is to see where your document will be used, and what for, and prepare it with the adequate procedure or colour space. Sure, techniques/colour spaces like LAB are general solutions, but if your product will be printed, is better to use CMYK whenever possible.
Actually Amazon Kindle Direct Publishing is OK for RGB files, especially since the books are primarily intended to be published digitally. The print-on-demand service is an option Amazon offers to KDP publishers. It allows us to create a printed version of the book with Amazon's digital printing service, but it's not offset printing, so there's no real need for a CMYK file. Amazon can handle any conversion necessary, so I've always sent them RGB files (and everything has been fine with this process, so far).
-
1 minute ago, mac_heibu said:
Tag the images with sRGB, measure the colour values, create a RGB Publisher document with the same colour profile and use the exact same black value as used in the image.
That's the problem. The Designer images and the Publisher file are both in sRGB/8 with the exact same profile, because I left the Default options as is in both apps. The black color is RGB = 0,0,0 in all the Designer files, and in the Publisher file. It's obvious in the printed book that the source of the problem is the difference between the black color in the Designer file and the black color in the Publisher file, but I don't know what option to change to make this right. At worst, I'll simply put a black fill background layer in each Designer file and paste the fill layer along with the image into each page. If the problem comes from pasting the Designer files, this solution might work, but it won't solve the overall problem. Is there some option to change in the Publisher and Designer files I posted to just make the Publisher file right?
-
OK, so this means that the software is fine, but the files have to be converted. All the book pages are RGB Designer files, and I need to send KDP an RGB PDF file. I suppose the fastest way to do this should be to paste each flattened RGB Designer file into an RGB Publisher file, and then export it into PDF. I thought that’s what I did, but obviously, I have it wrong. What would be the options to check in the Publisher file so that the pasted RGB Designer files, and the black background rectangle into the Publisher file have the exact same black values?
-
2 minutes ago, walt.farrell said:
Please provide a .afdesign file, and a .afpub file into which you've copied the page. Note that it does not need to be one of your book pages, just something you create that demonstrates the problem.
It will be faster with the real pages, since they are already done. Sorry about the free publicity, I'm really trying to have this book released. Here is the flattened Designer document, with its associated Publisher Page. The designer Page has been cut and pasted onto the Publisher Page, and a black background has been created as a master for the Publisher Page.
-
4 minutes ago, walt.farrell said:
I don't see why that should be the case. I might understand why you'd think that a pure black would be CMYK 0,0,0,100 but 100,100,100,100 makes no sense to me.
You'll see the same values, by the way, if you do the same operation in Designer or in Photo, or if you use the Info panel in Photo. And you'll probably see that with any other black in your Designer images, too.
I suggest not worrying about it, unless you have some blacks in your document that are behaving differently. But to comment further on that I would need one of the .afdesign pages that shows the difference.
Sorry about the black values:)
You're right for the Designer and Photo values, so the problem might not come from it (which is kind of worrying)
Here are the images I sent to Amazon Kindle Support once I received the proofs of my books (photos of two of the book's pages). As you'll see, there's a difference between the black values, and I know for a fact that the differences are between the images I pasted into Publisher from Designer flattened files, and the Background rectangle I created in the Publisher Master Page of the book. I am trying to solve this, and am open to any idea.
-
20 minutes ago, walt.farrell said:
I'm curious about something: If you're still sending to KDP, why not simply setup your Publisher document in RGB, to match your Designer documents?
Just select the Print preset when creating the document, and you have RGB.
Same reply as for Alfred: The files are in RGB/8 and I let them as is.The only thing I do is exporting the document to PDF.
What I find is wrong is this: Create a new document, choose the Print option in the Type menu, set the Colour Format to RGB/8 if it's not already set this way, click OK, then create a rectangle. Click the Fill color thumbnail on top of the document. In the Color Tab, set every slider to 0 in the RGB Sliders menu to fill the rectangle with black. Then click the RGB Sliders menu, and choose CMYK sliders. You'll see that the sliders have been automatically set to C: 72 M: 68 Y: 67 K: 88.
Choosing CMYK Sliders isn't like converting the whole document to CMYK. It would be more akin to checking if the CMYK values are right. I believe in this case, the values for Black should 100 for every slider.
-
11 minutes ago, Alfred said:
For eBooks you would be using RGB instead of CMYK anyway, and if you’re using a POD that asks for RGB files then you don’t need to concern yourself with the conversion process, so I don’t see why it should be an issue in either case.
It shouldn't be an issue because I don't convert the files. The files are in RGB/8 and I let them as is.The only thing I do is exporting the document to PDF.
What I find is wrong is this: Create a new document, choose the Print option in the Type menu, set the Colour Format to RGB/8 if it's not already set this way, click OK, then create a rectangle. Click the Fill color thumbnail on top of the document. In the Color Tab, set every slider to 0 in the RGB Sliders menu to fill the rectangle with black. Then click the RGB Sliders menu, and choose CMYK sliders. You'll see that the sliders have been automatically set to C: 72 M: 68 Y: 67 K: 88.
Choosing CMYK Sliders isn't like converting the whole document to CMYK. It would be more akin to checking if the CMYK values are right. I believe in this case, the values for Black should 100 for every slider.
-
40 minutes ago, Alfred said:
I think it’s to do with keeping Total Area Coverage (TAC) under 300 to avoid saturating the paper. The CMYK value (100,100,100,100) gives you a TAC of 400, but the CMYK value (72,68,67,88) yields a TAC of 295.
OK if we create a document for offset printing, but we publish eBooks too nowadays. And then, there's Print-On-Demand services, who tell us to send them RGB files, and handle the CMYK conversions themselves. If it has to do with the TAC, I believe it should be part of a setting instead of being here by default.
-
4 minutes ago, PaulEC said:
I'm no expert, but it seems to be something to do with the "Colour Format" you choose when creating a new document. If you set it to "CMYK", black has all the CMYK sliders at "0". If you create it as "RGB" then convert it to CMYK you get " C: 72 M: 68 Y: 67 K: 88".
I would assume, as you say, that it is connected to the fact that printing uses CMYK, while screen display uses RGB and that the values change when converting from one format to the other.
(By the way, I really like your images.)
Thanks:). The penciler is Alex Nascimento, and it's been colored by Dijjo Lima.
The color format is RGB/8, so I don't see any reason why the CMYK option shouldn't display 100 for each value in this case. Maybe this has to do with the color profile, but I can't be sure.
To check it, just create a new document, set it to RGB/8, then create a rectangle. Click the Fill color thumbnail on top of the document. In the Color Tab, set every slider to 0 in the RGB Sliders menu to fill the rectangle with black. Then click the RGB Sliders menu, and choose CMYK sliders. You'll see that the sliders have been automatically set to C: 72 M: 68 Y: 67 K: 88. I still don't understand why that is.
At this stage, having a way to change color values for all objects at once would be a great help.
-
I have been trying to publish the latest issue of my comic at Amazon Kindle. Usually, I just create the pages in Designer, then compile a PDF to create the comic, and send it to Kindle in RGB. Kindle then handles the RGB to CMYK conversion, and the printed result is always fine.
But this time, I used Publisher. I cut and pasted the flattened Designer pages into a Publisher document, then exported the book to PDF, and sent it to Kindle. As I needed a black background for the pages, I created a black fill rectangle in the Master Page, and applied it to all the pages. As you can see in the sample page I added to this post, the black color looks right (to my eyes, at least). But actually, it isn't. There's a slight difference between the blacks of the Designer page I pasted in the Publisher document, and the black background I used for the fill rectangle. So I checked the colors of the fill rectangle, and the RGB sliders are all at 0, as they should be. Then, I chose CMYK Sliders and I have the following values: C: 72 M: 68 Y: 67 K: 88. To be sure, I created a new document, created a black fill rectangle and checked the values. These are the same default values. I suppose this is where the printing problem is coming from, and these CMYK default values might be a way to have the black color look better in offset printing, but why are these values displayed by default instead of being part of some kind of Color Conversion setting, and why are the RGB sliders all at 0 while the CMYK values are not at 100? Shouldn't the RGB values reflect the CMYK values in this case?
-
On 4/15/2019 at 5:21 PM, mac_heibu said:
Thanks! I didn't notice the "Replace existing" option in the Apply Master's dialog. It's going to make me save a lot of time!
-
When you apply a Master to a page, all the Master's items are placed in a layers group at the bottom of the layers palette. Is there also a way to create a Master so that some items are also placed automatically at the top of the layers palette in each page? Or in other words, is there a way to create a Master so that it generates several layers groups for each page?
-
1 hour ago, Old Bruce said:
No, too easy to make mistakes when you double the number of files.
I wouldn't bother with merging the layers in Designer I would just tick the different language layer and then Export as TIFF. That gives you a merged file to place in Publisher.
I would set up two 24 page Publisher files named France and US. I would start the pages (Page_01) in Designer and export "US_Page_01.tiff" and "France_Page_01.tiff" as I worked on the pages. These would be placed in the Publisher files as linked files and then as I continue to work in Designer I just export, overwriting the original files and the Publisher file would wait for me to update using the Resource Manager.
Any change means One Designer file is changed, you export it twice (overwriting) and the two Publisher files get updated almost automatically.
I actually find it faster to just right-click a layer and choose Merge Visible in Photo than exporting to TIFF. And it's easier to manage too, since all I have to do when I have my FR and US merged layers is copy and paste it into a Publisher Page, then delete only these two temporary layers in the original Designer or Photo document.
Exporting TIFFs into a pages-layout software is how DTP is usually done, and we always end up creating a file for each language, but it's still too slow, and prone to errors. I find my way better (even though it's mostly subjective), but it's still too much work.
That is why having in every Affinity app a special layers palette exclusively dedicated to Localization would be useful to me. The goal here would be to import a Designer or Photo document into Publisher, and have it appear in the layers palette along with its localization layers (one layer for each language). When all the pages are imported, you check one option in Publisher, and all the French layers are displayed exclusively. You check a second option, and all the US layers are displayed the same way. And every time the original Designer or Photo file is updated, it refreshes in Publisher without loosing it's Localization layers. I am not sure how such an option could be implemented in future versions, but I am pretty sure it would be a great time saver for all of us.
-
Better if I send you a page. I have rasterized the layers so that you can read the text without having the fonts, but I usually have a group of layers called FR and US with vector shapes for the balloons and text on top of it. If I need an US version for a 24 page comic, I would need to show the US group and hide the FR group in each Designer file.
For now, the fastest way to have an FR and US version of a particular page would be to click the US group, merge all layers so that I have an image of the US version, then hide the merged layer and the US group, show the FR group and merge all layers again to create an image of the FR version, select both merged layers, cut it and paste it in the Publisher page. If I just place the image on the page, I would have one version of the file only, and it might be updated in the Publisher file with each correction to the Designer file. As you can guess, the fastest way isn't fast at all, but it's still the fastest way. The other way would be to have two versions of the same Designer file, but I would then loose time when I make corrections to the file.
-
27 minutes ago, Old Bruce said:
Is the only difference the language or are there other elements being localized, US wearing Stetsons and FR having Berets?
If it is just language I think you could use a master page for that but I will need some more coffee and a think before I offer up anything useful.
Do you have 24 designer documents for a 24 page book?
Actually, there can be many other differences than just text: All the localized layers contain graphic elements, meaning all the balloons and some sound effects. This is what makes it difficult.
And yes, I do have 24 Designer or Photo documents for a 24 page book.
-
I am a French Comic Book writer and publisher, and I am creating each issue of my comic in French and in English. Before Publisher, I created each final page in Designer, then compiled the pages into a PDF using Apple PDF Services. In each of these Designer files, there was an FR layer group for the French version, and an US layer group for the US version, so each time I needed to create a book, I had to check the right language layers group for each page in the Designer files, export each page to JPG, and compile the book in PDF, then check the other language layers group in each Designer file, and compile another book the same way. Not the easiest way of doing things.
Now that I'm using Publisher, I am transferring all these pages into Publisher documents, and many things are now easier, but not the creation of localized versions. Now, for each page in Publisher, I have to create FR and US layers groups (to avoid confusion in case I have to add a page between two pages of a book). Which means when I want to export an US version of the book for example, I have to check all the US layers and uncheck all the FR layers on each page. It can still take a long time, and of course, it's prone to errors.
I do need to optimize this workflow, and I think the best way to do this would be to create some kind of "Localization Layers" in all the Affinity Apps. Let's say I create pages of a book in French and in English in Designer or Photo. In each of these files, I put the French version of the design into a French Localization Layer, and the English version into an English Localization Layer. When I place the files into Publisher Pages, all the Localization Layers are recognized by Publisher (instead of the pages being updated when I uncheck a layer group in the original file), and all I have to do is check the US option in a Localization palette for example, to have all the US Localization Layers displayed, and all the other language Localization Layers hidden. Same thing for all the other languages.
I think this kind of option would be a great time saver, but I'm open to any other idea to save time for these kinds of workflows, which can be quite exhausting.
-
It took 20 minutes to extract the 1.7.0.227 update, then, less than 1 minute for installation.


Assets & Constraints
in Pre-V2 Archive of Desktop Questions (macOS and Windows)
Posted
Hi, sorry for the delay in replying. As this thread is 3 years old, I suppose the PM I sent at the time has been deleted, since I can't find any trace of it. Same for my video. These days, I don't have too many troubles with assets in Designer. When an old asset looks wrong in the Assets panel, I place it onto an image, correct it, then delete the old version, and put the corrected one in the Assets panel. I don't add any constraints to it.