Zero1
-
Posts
53 -
Joined
-
Last visited
Everything posted by Zero1
-
Bug in placing text in the artistic text tool?
Zero1 replied to Zero1's topic in Desktop Questions (macOS and Windows)
Thank you very much! -
Yes you probably could, but it's kind of an overkill Thanks! That sounds like be a good temporary solution. Reading the comments above, it seems like a bug (since v1). Hopefully this will get fixed in future releases.
-
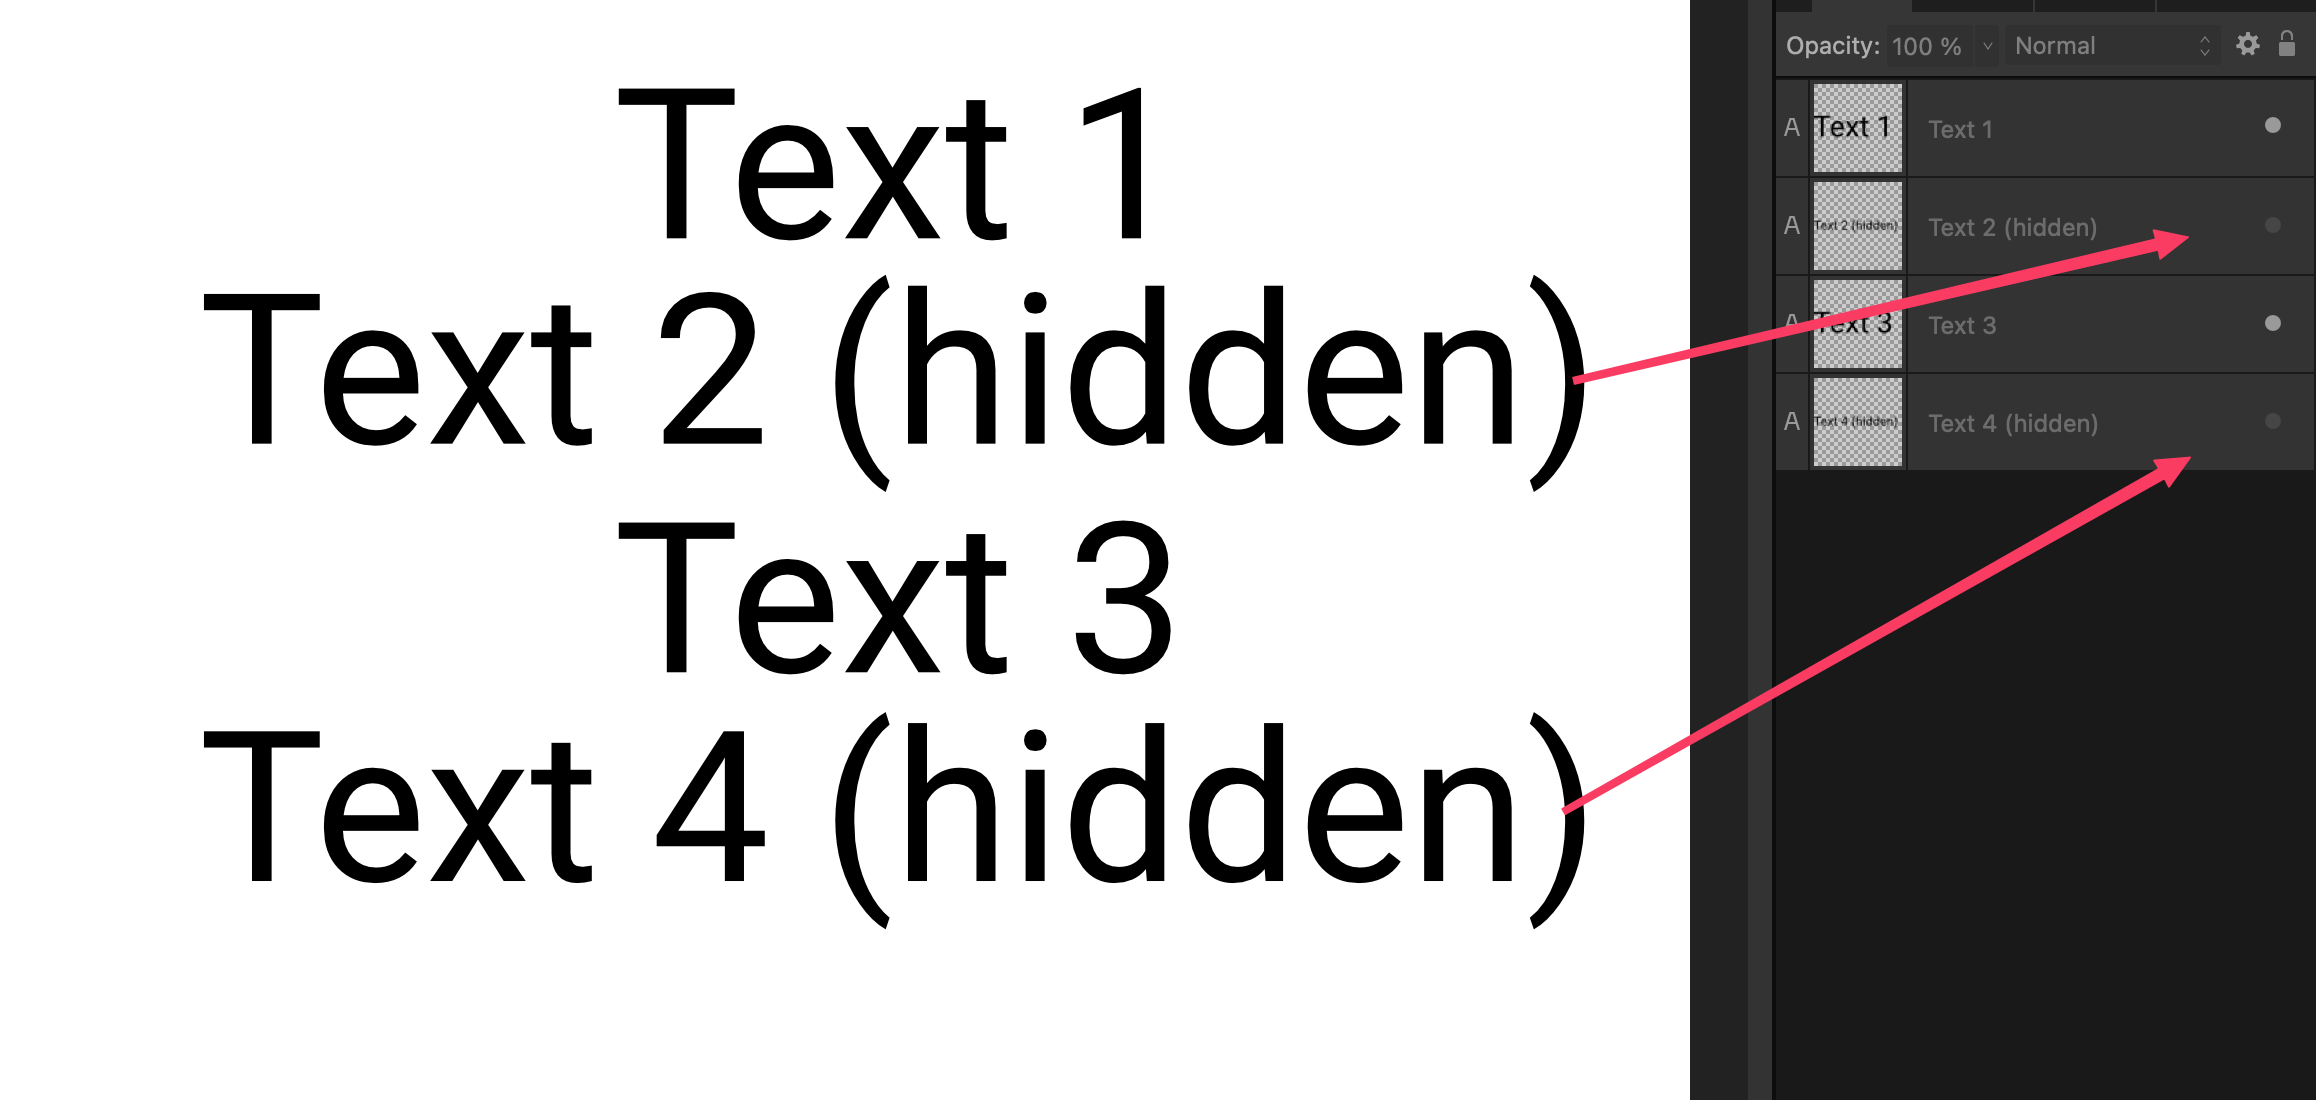
When the Show all text menu item is used from the Text menu, it also shows disabled (hidden) text. Is this default behaviour? If so, how you we restore the document, to hide the disabled texts again (except enabling/disabling the disabled text layers one by one) See below, the text 2 and 4 are disabled in the layers panel, but still being shown after show all text has been applied.

-
Bug in placing text in the artistic text tool?
Zero1 replied to Zero1's topic in Desktop Questions (macOS and Windows)
I am not referring about pasted text but placing text from the File-Place menu. You should be able to reproduce by adding the following steps: Create text frame and format Arial 12 Create art text and format Garamond 24 and type text While art text is active, use file, place and select a plain text file Placed text in art text is in Arial 12 and not Garamond 24 Optionally you can place a new art text (and it will be in Garamond 24, as this was the last used style), place text from file again and it will be arial 12. It is not logical that the last text frame style is being used for art text.. -
Bug in placing text in the artistic text tool?
Zero1 replied to Zero1's topic in Desktop Questions (macOS and Windows)
I was referring to plain text. When placing a plain text file in an artistic text, i believe it should use the current or last used text style, however it always defaults to used last text frame style, and i can't image this should be default behaviour as artistic text and frame text have different default. On the matter of default text style (while using artistic or frame text) using the last used text style, that is totally fine and as you mentioned it might not be desirable but it kind makes sense, but the issue I am referring to is not related to this. Currently it is mixing the last used text styles of 2 different tools, hence my idea that this is a glitch or bug. I am assuming that placing text (from a plain text file) in an artistic text, is using the same code as placing into a frame text. Hope this clarifies my point a bit. -
When I try to place text (from the File-Place menu) in a text layer (created by the artistic text tool), it does not use the current text properties but always falls back to the (last used/default) font properties of the text frame tool. Is this by design or is this a bug? I am guessing this is a bug
-
Unicorn Style Effect Stroke
Zero1 replied to RL2492's topic in Desktop Questions (macOS and Windows)
It is something like this....
-
Expand stroke does not always work correctly
Zero1 replied to Zero1's topic in Desktop Questions (macOS and Windows)
Thanks! -
Expand stroke does not always work correctly
Zero1 replied to Zero1's topic in Desktop Questions (macOS and Windows)
Well, for people wondering why this does not work... the donut has a hole radius of 100% but it is a closed curve, you see that when you convert it to a curve and start editing, so because it is closed, there are no line caps.. Makes sense, but feels awkward somehow
-
Expand stroke does not always work correctly
Zero1 replied to Zero1's topic in Desktop Questions (macOS and Windows)
Btw, converting the donut to a curve and then expanding stroke does not work either
-
When you have a donut with a stroke and line caps, the line cap is not expanded when the expand to stroke option is used. See image (using 2.5.5)
-
I found that the issue related to variable fonts (at least in my case). When the font https://fonts.google.com/specimen/Shantell+Sans is installed, Affinity crashes after loading fonts. Removing this font resolved my issue. Hopefully the AF-3190 will fix this too.
-
Blend ranges are no longer applied when the layer is clipped
Zero1 replied to Zero1's topic in V2 Bugs found on macOS
Thanks, obviously my search term was not good enough -
Yes, i am using Aphoto, the first one was indeed from V1 but as @lepr pointed out, it is because of the blue blend range why it is turning black when you turn off the HSL.
-
Thank you!! Missed that one.. It would be nice if Affinity would show the colored curves in the blend ranges (similar to a curves adjustment) so that you can directly see that there is a difference.
-
I have attached a document where it looks like the groups are an exact copy (at least i cannot find or missed the difference). Group1 is from an old document which i copied over... Group 2 is one i created from scratch... Any one an idea what is happening? Group-acting-differently.afphoto
-
I think title is self explanatory. I searched forums if this was already known but couldn't find anything. In the attached image you see that when the HSL is being clipped by a rectangle, the blend range is not applied.
-
@Lisbon I believe the transparent areas are treated as black (value 0), which then makes sense why everything is divided by 2 (with alpha 0.5)
-
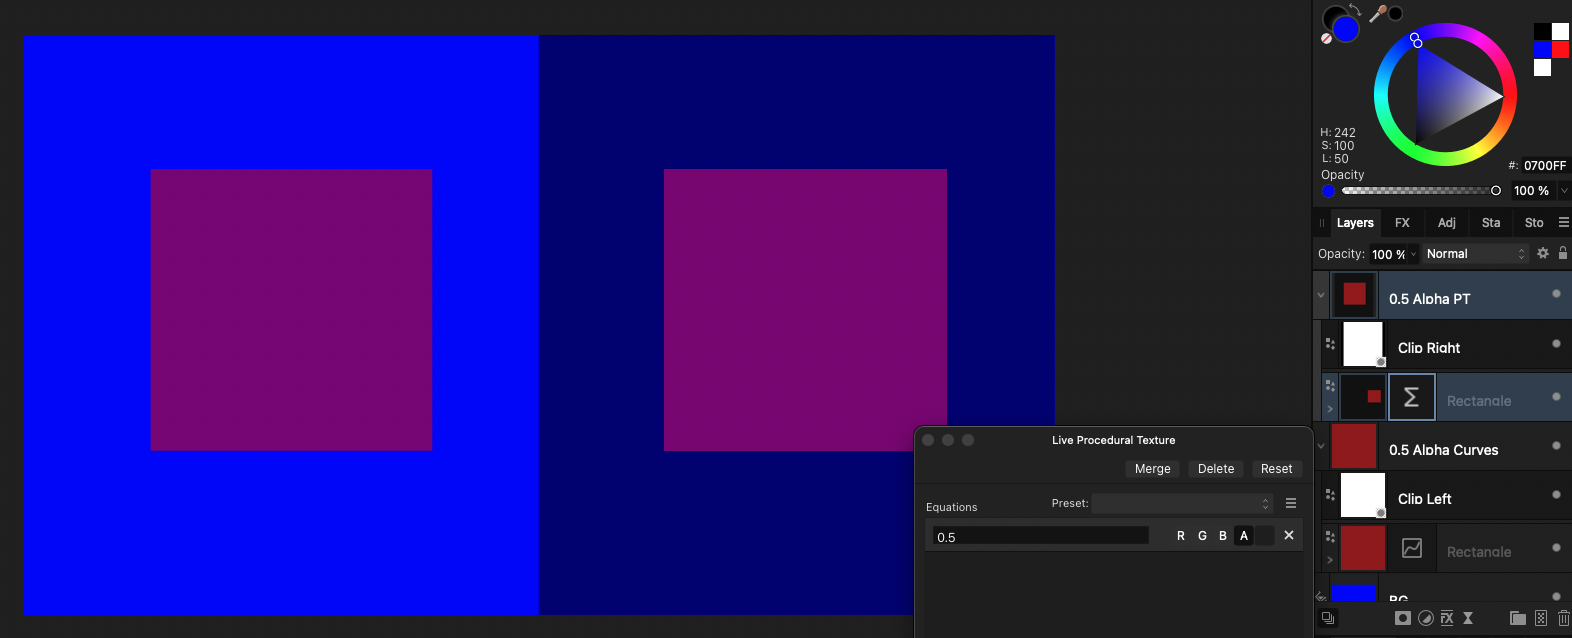
When a procedural texture is applied to a curve object (eg. a rectangle) and the alpha value is changed (eg. 0.5), i would expect it would only affect the curve object's alpha, however the alpha is also applied to the layers below. When i lower the alpha of the rectangle with a curves adjustment, it only affects the rectangle as expected. See the screenshot, where on the left, the alpha of a red rectangle is halved with a curves adjustment. The blue background is not affected. However doing the same with the procedural texture (live) filter on the right, the alpha of the blue background is also affected. Initially I thought this only happened with the Alpha, but the bug also exists with RG or B. Then i rasterized the rectangle and applied the procedural texture again and it still happens. So it looks like the procedural texture (live) filter propagates down for the transparent areas even though it has applied as clipping layer. I would expect, because it is a clipped child it would only affect the parent (like the curves adjustment). I assume this is a bug unless i am missing something here? PS. Using the latest v2.04 (mac)
-
How can you do a Pixel Art resize only to a layer?
-
Preserve Alpha disappears in Live Blur filters
Zero1 replied to Zero1's topic in [ARCHIVE] Photo beta on macOS threads
That is why this post is in macOS Beta forum -
Preserve Alpha disappears in Live Blur filters
Zero1 replied to Zero1's topic in [ARCHIVE] Photo beta on macOS threads
You are completely right! Which brings us to the original question A checkbox is being hidden without reason... which is bad -
Preserve Alpha disappears in Live Blur filters
Zero1 replied to Zero1's topic in [ARCHIVE] Photo beta on macOS threads
Haha, that is true, but still think it is detectable whether the merge is going to apply to the "parent" image or a child pixel... (at the end it applies to something and is processed if applicable, so it can be detected too...). Maybe hiding the button would case confusion (why not shown etc), but rasterizing the image layer would make sense. -
Recording macro issues when changing layers
Zero1 replied to Zero1's topic in [ARCHIVE] Photo beta on macOS threads
Thank you... missed that But in order to do that, i think Serif has to be very clear what is fixed/updated and not add a text like: - Assorted other fixes -
That would be perfect also