WarBeer
-
Posts
18 -
Joined
-
Last visited
-
How to remove cell walls?
WarBeer replied to WarBeer's topic in Desktop Questions (macOS and Windows)
@anto ...thank you very much! -
I see how to remove borders in the table window, but how do you remove the inner cell walls? I'm trying to create a table with no lines.
-
That Vector Crop tool did the trick in the blink of an eye!! Thank you very much!
-
Currently, I only have Publisher. I thought about photoshopping a graphic, but I was hoping I could use some feature with AP.
-
 WarBeer reacted to a post in a topic:
Masking/Clearing peripheral noise
WarBeer reacted to a post in a topic:
Masking/Clearing peripheral noise
-
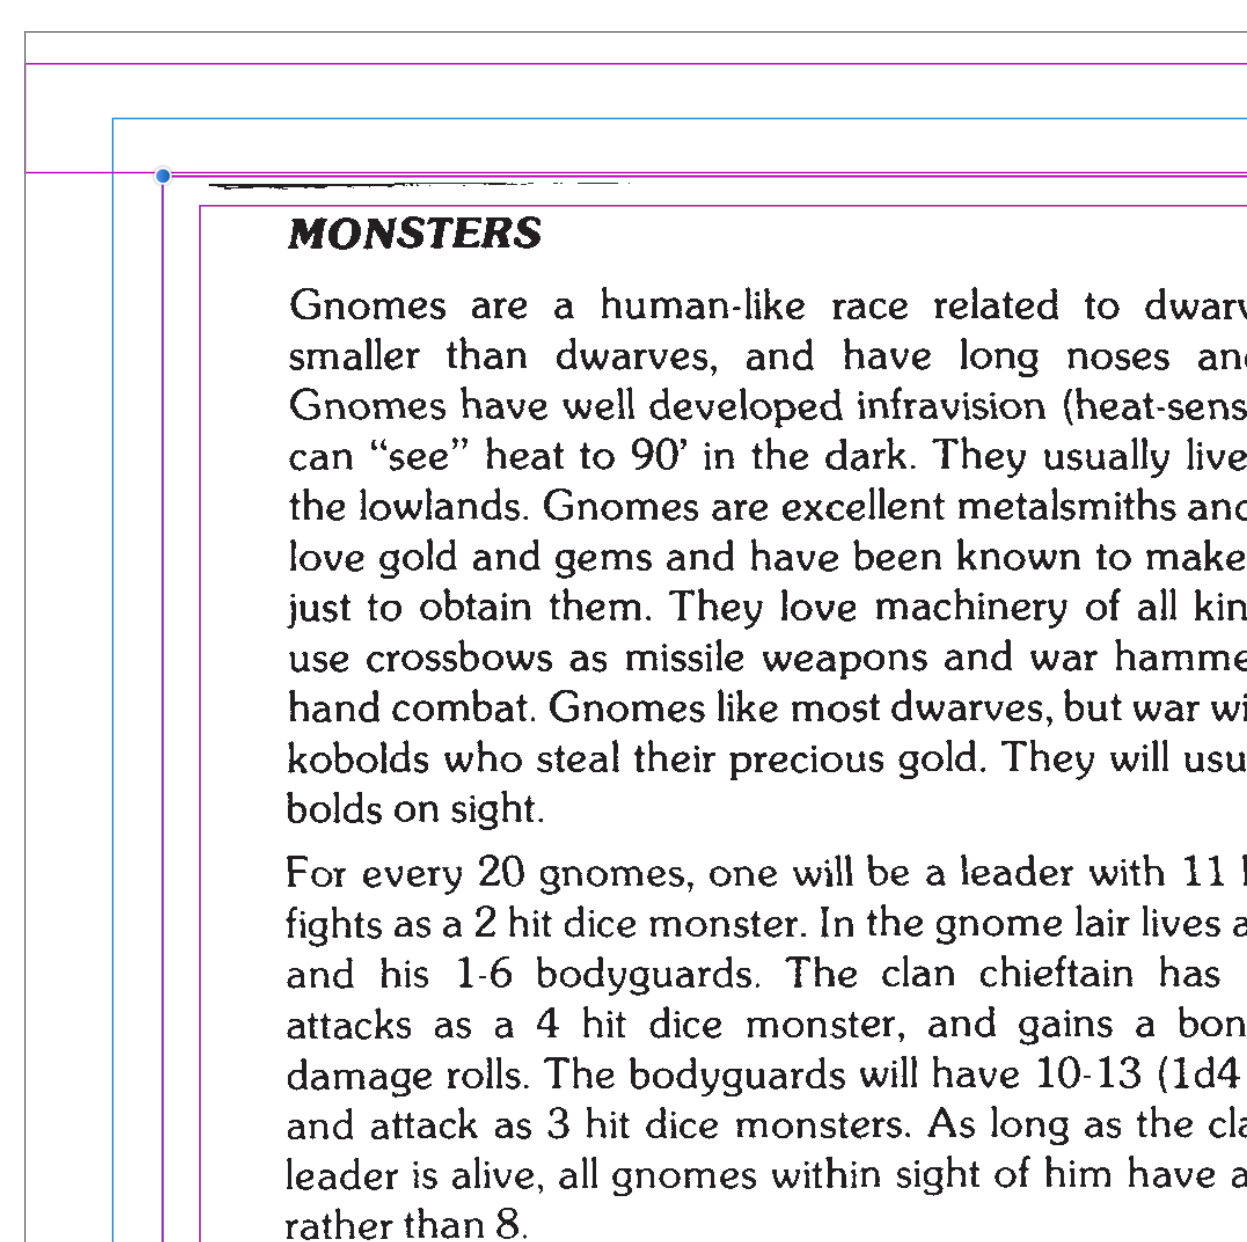
The source is the Moldvay '81 D&D books from the PDFs off of DriveThruRPG, so there are a few black line fragments/dots on the outer edge of the pages. I'm centering the text in a frame, but you can still see the noise in the "margins" in some places. I thought maybe there might be a way to create a mask for the margin/bleed area. Some of the noise is close enough to the text area that it'll probably show up if I printed it as is. The inner most rectangle (red) is the image-frame that I'm trying to keep all the information in.

-
Hi, I'm working on a project where the pdf info comes from a scan (albeit fairly clean). There's some edge-noise that shows up outside of my main print-frame. How do I create a mask so that none of this is visible? (on all pages)
-
firstdefence reacted to a post in a topic:
Margin and Duplicating pages
-
Margin and Duplicating pages
WarBeer replied to WarBeer's topic in Pre-V2 Archive of Desktop Questions (macOS and Windows)
Thanks, I'll definitely keep this in mind. I repasted the text after clicking on the Master-page and it pasted just fine that time. So, I'm not sure where I went wrong. I believe the first time I had only pasted into the first (a single, left-side page...as I also had a cover) and then link+shifted. The last time, I had a double page set up...so, maybe the right-side page was getting it's info from the single left? But even those were messed up. Like I said, it worked this last time. But I'm going to keep what you said in mind for future attempts, especially since I'm not even close to being done with this document. Thank you Old Bruce and firstdefence, The comments are most appreciated! -
WarBeer reacted to a post in a topic:
Margin and Duplicating pages
-
WarBeer reacted to a post in a topic:
Margin and Duplicating pages
-
When I have my margins setup in spread properties and then pates my text, followed by shift+link, my margins are not aligned properly. It looks like they're centered and not following the gutter differential on mirrored pages. The text isn't filling the margins properly. What do I need to do?
-
THAT was it!!! Thank you! I don't recall the workbook instructing me to do that...but it makes complete sense. I guess the trade off with having such flexible software is that you have numerous angles for many actions, which means that you've got to make sure all your "i"s are dotted "t"s are crossed;) Thanks again!
-
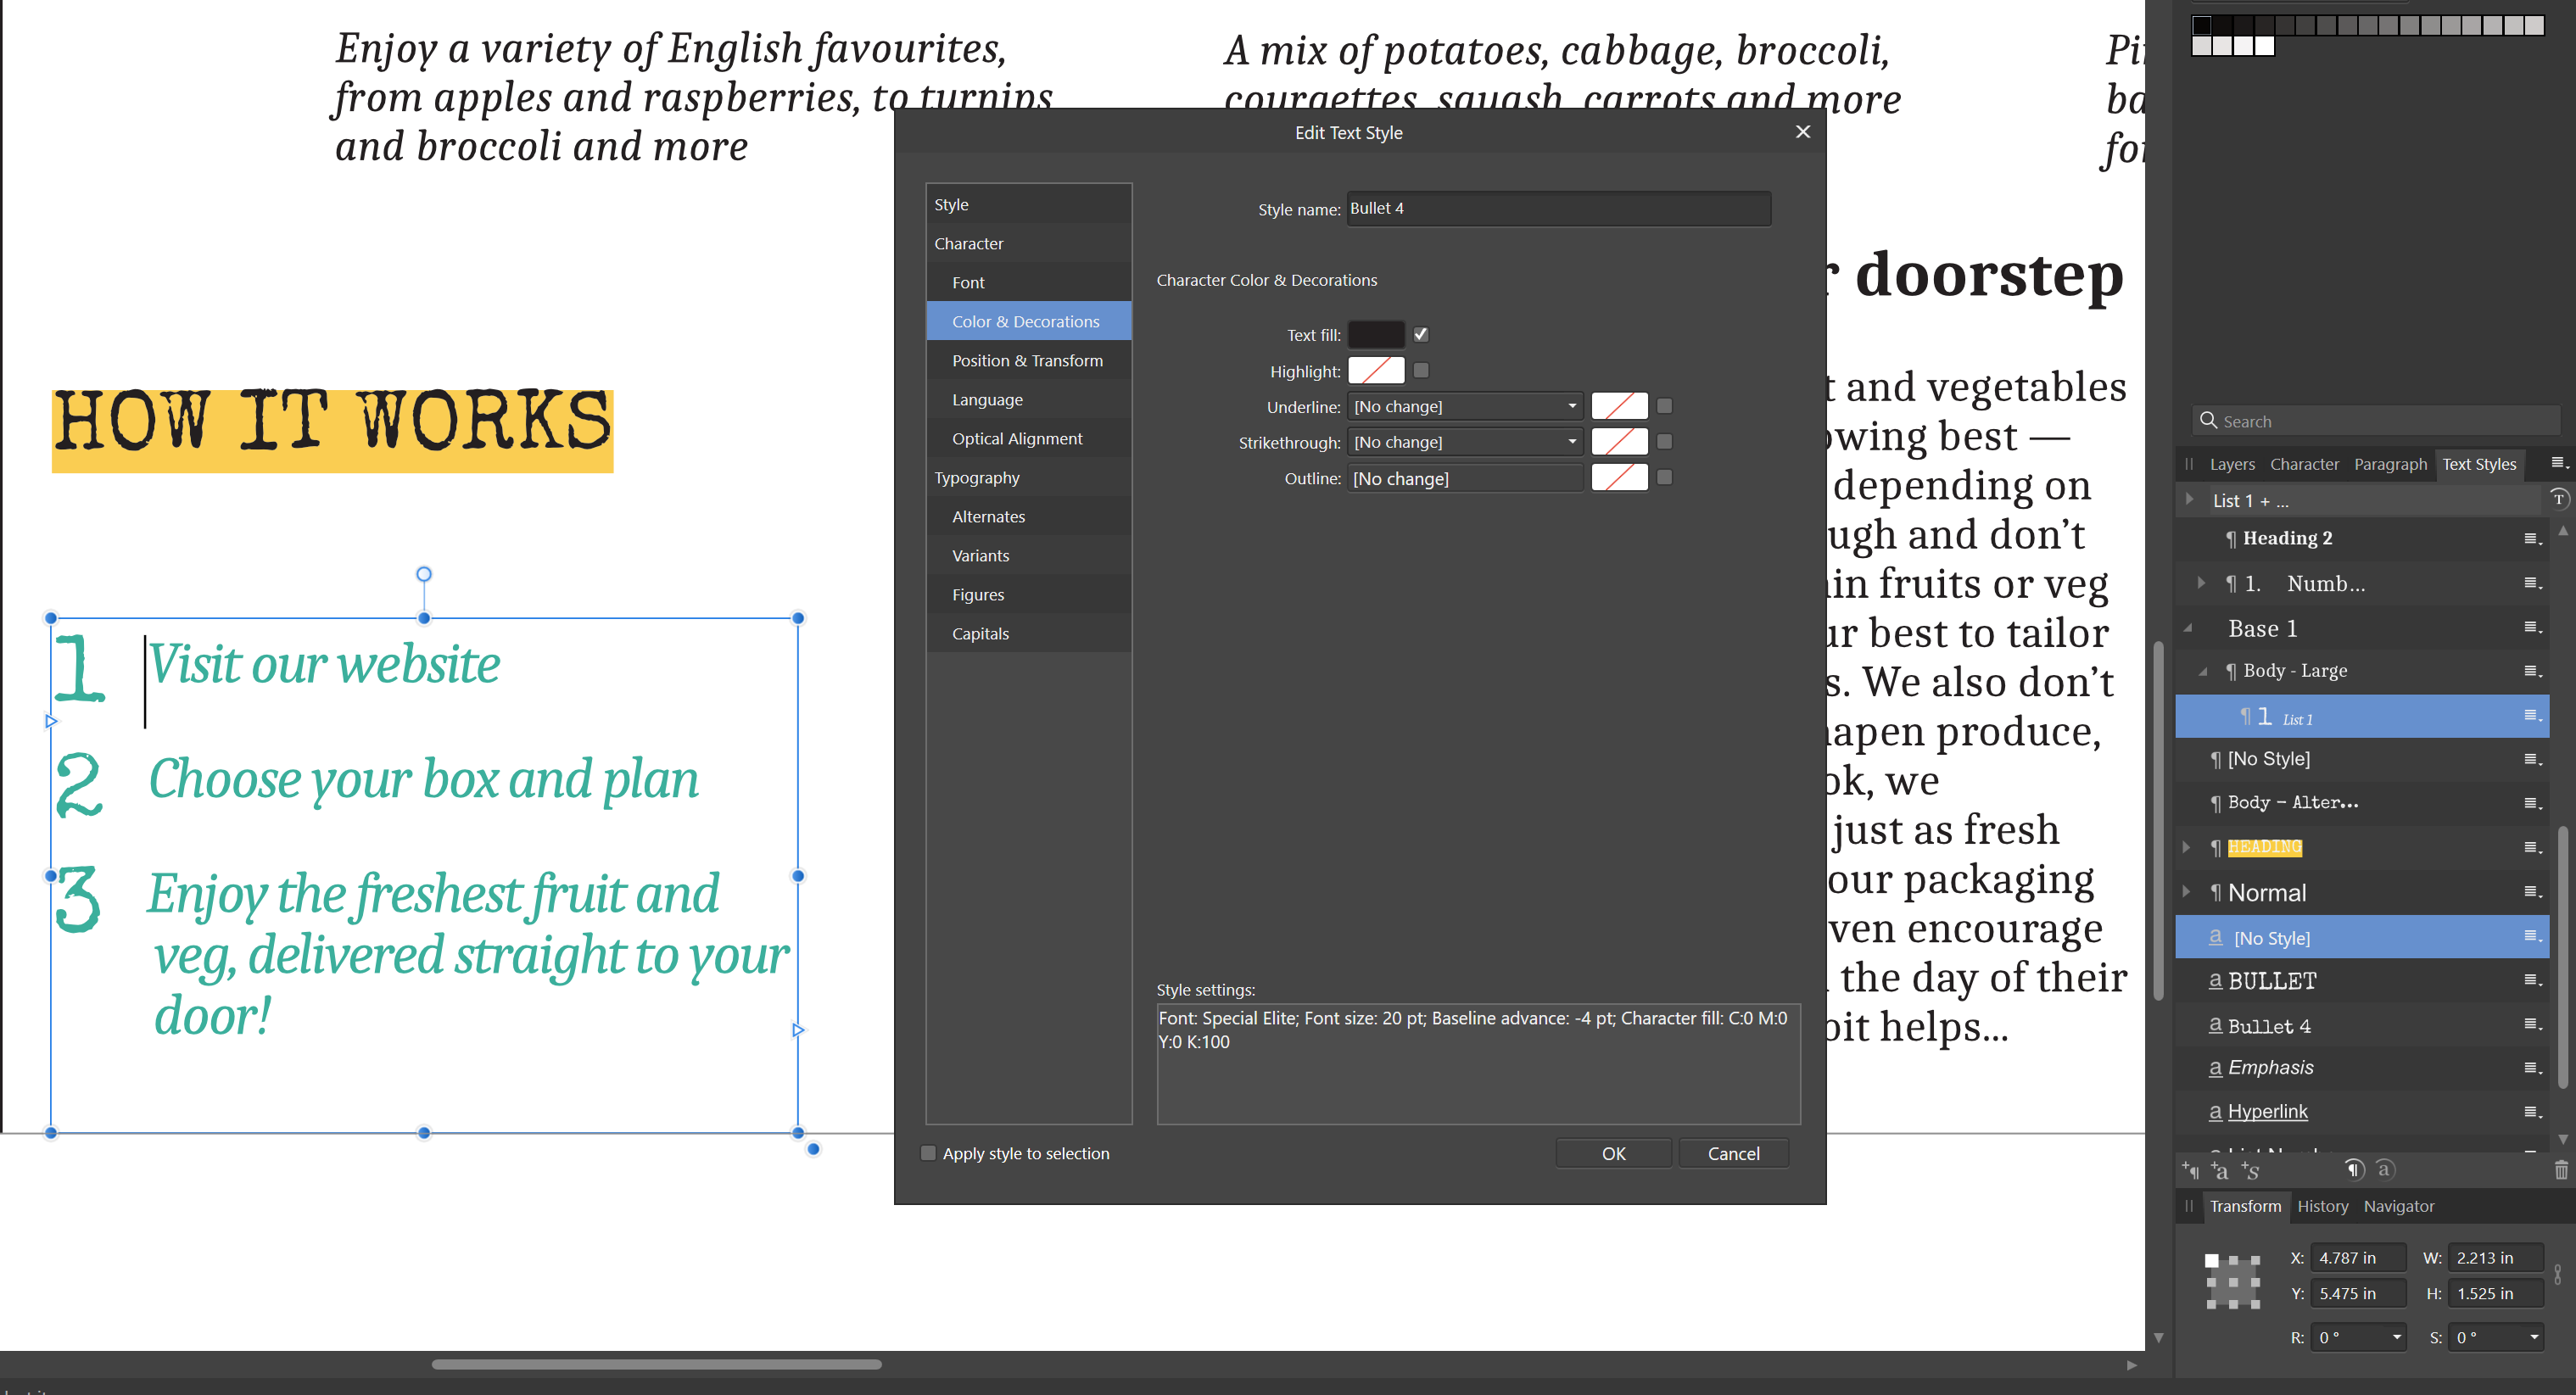
@loukash...I have a style for them "Bullet 4"...I shouldn't I be able to just "edit" that style and change the color? Because I'm still not seeing how you changed it. It's not changing for me...
-
Using Publisher and I'm trying to change the "fill color" of some text without applying it to the "numbers/bullets" as these are items within a "list". The workbook says that after I change the "text fill color" that I can "revert" the Numbers/Bullets back to black...but I'm not seeing where I do that.
-
Zoom Parameters?
WarBeer replied to WarBeer's topic in Pre-V2 Archive of Desktop Questions (macOS and Windows)
@walt.farrell...sorry, using Publisher. And yes, the text is outside the canvas. I'm finishing the first "full project" (root box) in the workbook and it had me place some text outside the workspace to grab bits from at various times. I did notice since then that I wasn't having this issue in text-frames within the canvas area. So, it appears to be just as you stated. -
When I zoom in to a certain point, I can no longer "highlight" text. I thought I remembered there being a section where you could adjust different parameters with regard to zoom...but I can't remember where that was.
-
Indent problem
WarBeer replied to WarBeer's topic in Pre-V2 Archive of Desktop Questions (macOS and Windows)
What I initially thought...but I set "first line indent to 0" in both the "list" text style (as required in creation) and I've done it in "paragraph". And it keeps resetting the lines at the previously stated misalignment. If I go into "list" and reduce "left indent"...it adjusts the "off lines" only...and I can fix it. But I don't get it...they're all supposed to be .3 inches. It's like something has them all separated.
-
I'm working on the first project in the Affinity Publisher workbook. (the Root Box project) On page 195 it has me creating "bullets" for the "How It Works" section. After doing this, the last entry...#3 has three lines of text. The indent created was .3 inches...however, what I noticed was that while all three "first indents" lined up...the subsequent lines of #3 were indented even further to the right...destroying the "left alignment". Can anyone tell me why this might have happened or what may have done wrong? I can place the cursor at the beginning of these "off indents" and (using the paragraph indent adjustment) move them manually. But I know I shouldn't have to do that. AND when I do this...the top line then reads the new indent...even though it didn't move. I've sure it's something simple that I missed. Something affecting (or not affecting) subsequent lines.